Welcome to BookNex Solutions
BookNex is a comprehensive booking and appointment management system designed to help businesses streamline their scheduling process, accept payments, and automate workflows.
What can you do with BookNex?
- Manage appointments and bookings with an intuitive calendar system
- Accept online payments through multiple gateways (Stripe, PayPal, Square, Mollie, and more)
- Integrate with Google Calendar, Outlook, Zoom, and other essential tools
- Automate workflows and notifications via Email, SMS, WhatsApp, and Telegram
- Generate detailed reports and analytics to track your business performance
- Customize your booking panel to match your brand identity
- Manage multiple locations, staff members, and service categories
This documentation will guide you through every feature and help you get the most out of BookNex Solutions.
Quick Setup Guide
Get started with BookNex in just a few simple steps.
Step 1: Configure General Settings
Navigate to Settings > General and configure your business information including company name, logo, address, phone number, and website URL. This information will appear on your booking panel and in customer communications.
Step 2: Set Business Hours
Go to Settings > Business Hours and define when you're available for appointments. Set your weekly schedule with specific time ranges for each day, and mark any days off.
Step 3: Add Your Services
Navigate to Services module and create your service categories and individual services. Define pricing, duration, and assign staff members to each service.
Step 4: Add Staff Members
Go to Staff module and add your team members who will provide services. Configure their schedules, special days, and holidays.
Step 5: Configure Payment Settings
Set up Stripe, PayPal, or other payment methods in Settings > Payment Settings. Configure your currency, tax settings, and payment behavior options.
Step 6: Add Booking Panel to Your Site
Use the [booknex] shortcode to add the booking panel to any page on your website. Customize the appearance in Settings > Appearance.
Locations Module - Multi-location business management
The Locations Module in Booknex enables businesses with multiple physical locations to manage appointments, staff, and services across all sites from a single centralized platform. This feature is ideal for franchise operations, multi-branch clinics, salon chains, or any business operating in more than one location.
With the Locations Module, each branch can have its own dedicated staff, services, and schedules while maintaining unified reporting and customer management.
Key Features
- Centralized Management: Control all locations from one admin panel
- Location-Specific Staff: Assign staff members to specific locations
- Service Availability: Configure which services are offered at each location
- Independent Schedules: Each location can have unique working hours and availability
- Customer Choice: Allow customers to select their preferred location during booking
- Unified Reporting: Generate reports across all locations or filter by specific branches
Setting Up Locations
Step 1: Access the Locations Module
Navigate to the Locations section in your Booknex Admin Panel from the left sidebar menu.
Step 2: Add a New Location
- Click the "Add New Location" button
- Enter the location name (e.g., "Downtown Branch", "West Side Clinic")
- Add the physical address details
- Include contact information specific to this location (phone, email)
- Set the working hours for this location
- Save your changes
Step 3: Assign Staff to Locations
Once locations are created, you can assign staff members to work at specific locations:
- Go to the Staff module
- Edit a staff member's profile
- Select which location(s) they work at
- Staff can be assigned to multiple locations if needed
Step 4: Configure Services for Each Location
Not all services need to be available at every location. You can customize service availability:
- Navigate to the Services module
- Edit a service
- Select which locations offer this service
- Save your configuration
Customer Booking Experience
When the Locations Module is enabled, customers will see an additional step in the booking process:
- Select desired service
- Choose preferred location
- Select available staff member (filtered by location)
- Pick appointment date and time
- Complete booking
Location-Based Reporting
The Locations Module enhances your reporting capabilities:
- View performance metrics for each location separately
- Compare revenue across different branches
- Track appointment volume by location
- Identify top-performing locations
- Generate location-specific financial reports
Best Practices
- Consistent Naming: Use clear, recognizable names for your locations
- Accurate Addresses: Ensure addresses are complete and correct for customer navigation
- Staff Allocation: Balance staff assignments to meet demand at each location
- Service Parity: Consider offering core services at all locations for customer convenience
- Regular Updates: Keep location hours and contact information current
Troubleshooting
- Service Not Showing: Verify the service is enabled for the selected location
- Staff Unavailable: Check that staff members are assigned to the location
- Location Not Appearing: Ensure the location is set to active/enabled
General Settings in Booknex
The General Settings section in Booknex allows administrators to configure fundamental booking rules, display formats, and scheduling parameters that define how the system behaves for both staff and customers. Proper configuration of these settings is essential to match your business's operational flow and customer expectations.
This documentation provides an in-depth explanation of each general setting available in the Booknex admin panel.

Scheduling Settings
Time Slot Length
This setting determines the default time interval between available appointment slots in the booking calendar.
- For example, if you set this to 30 minutes, the available time slots for booking will be: 09:00, 09:30, 10:00, etc.
- This setting is applied globally across services unless a specific service overrides it with its own custom duration
- It's ideal for businesses that operate in structured blocks of time (e.g., beauty salons, clinics, personal trainers)
- A smaller interval (e.g., 5 or 10 minutes) gives customers more flexible options but can make calendar management more complex
Note: This setting does not define the duration of the services themselves.
Set Slot Length as Service Duration
When enabled, this setting ensures that the length of each booking slot exactly matches the duration of the selected service.
- For example, if your service lasts 45 minutes, the system will display available slots like 09:00, 09:45, 10:30, etc., based on service length
- This option overrides the default Time Slot Length setting, making slot generation dynamic and aligned to actual service durations
- Recommended for businesses that offer services with varied lengths and want to optimize calendar space without overlapping bookings
If you disable this option, the system will use the fixed "Time Slot Length" setting to determine available time slots, regardless of how long the service takes.
Minimum Time Requirement Prior to Booking
This setting defines the minimum notice required for customers to book an appointment.
- For example, if you set this to 24 hours, customers will not be able to book an appointment within the next 24 hours from the current time
- This is especially helpful for businesses that need preparation time before appointments or need to avoid same-day last-minute bookings
- You can define this setting in minutes, hours, or days, depending on your business needs
- It helps reduce rushed appointments and ensures adequate time for staff and resource preparation
If disabled, customers can book appointments at any time up until the moment the service starts.
Limited Booking Days
This setting limits how far into the future a customer is allowed to book an appointment.
- For example, if this is set to 60 days, customers will only see available slots within the next 60 calendar days from today
- This helps businesses prevent long-term calendar clutter and gives flexibility to update service offerings or staff schedules before distant dates are booked
- It also reduces the chance of no-shows due to forgotten long-term appointments
- A value of 0 means there is no limit, and customers can book as far into the future as they wish
Adjust this based on how predictable your business availability is. For high-demand services, limiting booking windows can also create a sense of urgency.
Display Format Settings
Week Starts On
Choose which day of the week your calendars start on across both the admin panel and the customer-facing booking calendar.
- This typically defaults to Monday or Sunday, depending on your country
- Selecting the right start day can make calendar reading more intuitive for both staff and clients
- Businesses in Europe often start the week on Monday, while North American businesses typically use Sunday
Date Format
This setting defines how dates appear in Booknex—for both you and your clients.
Common options include:
- dd/mm/yyyy (e.g., 25/04/2025)
- mm/dd/yyyy (e.g., 04/25/2025)
- yyyy-mm-dd (e.g., 2025-04-25)
It is important to match this format to local standards and client expectations to avoid confusion when selecting dates.
This format is reflected throughout the system, including appointment listings, invoices, and customer communication.
Time Format
Choose how times are displayed in the booking system:
- 12-hour (AM/PM): More common in the United States and some parts of Asia
- 24-hour: Standard in most European and international businesses
This affects how time is shown on booking pages, email notifications, and the admin calendar.
Appointment Settings
Default Appointment Status
This setting determines the initial status assigned to newly booked appointments.
Common default statuses include:
- Pending: Appointment awaits payment, confirmation or manual approval by staff/admin
- Approved: Appointment is instantly accepted and confirmed upon booking
Select the status that fits your workflow. If your team prefers to review and approve bookings before confirming them, set the default to Pending. You can also set up automated workflows to notify staff or clients based on appointment status changes.
Remember: Status changes can trigger other functions (e.g., payment processing, notifications), so configure this thoughtfully.
Company Details Settings
The Company Details Settings section in Booknex is where you define the foundational identity of your business within the booking system. These details personalize the front-end booking experience for your clients and appear across various system-generated communications, such as email notifications and invoices.
This guide explains how to configure your company information and the practical impact of each setting.
Accessing Company Details Settings
Go to Settings.
Click on the Company Details tab.

Available Fields

Company Logo
Upload your company's logo to visually brand the customer booking experience.
- Supported file types: JPG, PNG, SVG
- Appears on:
- The booking panel (if enabled)
- Email notifications (if configured via templates)
- Optionally visible in exported invoices
Enable the "Display a company logo on the booking panel" toggle to show your logo during booking.
Company Name
Enter the official or public-facing name of your business.
- Appears in email templates and other communications via the {company_name} shortcode
- Recommended to match your business license or branding
Company Address
Add your full business address.
- Helpful for businesses with physical locations or legal invoicing requirements
- Can be added to emails and other template-based content using {company_address}
Phone Number
Provide a business contact number where clients can reach you.
- This number appears in the footer of the customer booking panel under the "Have questions?" section
- Also available as {company_phone} for use in notifications or reminders
Website URL
Insert the official website or booking-specific landing page URL.
- Useful for linking back from email notifications
- Displayed in some notification templates or branding footers
Usage in Email Notifications
All the above fields can be dynamically inserted into your email notifications using predefined shortcodes:
- {company_name}
- {company_address}
- {company_phone}
- {company_website}
- {company_logo}
This allows you to create professional, branded email messages for customers and staff.
Displaying the Logo on the Booking Panel
To display your company logo on the customer-facing booking interface:
- Enable the toggle "Display a company logo on the booking panel"
- Upload your logo under the Company Logo field
- Save your settings
Once enabled, the logo appears prominently at the top of the booking widget, reinforcing your brand identity.
Tips
- Ensure the address and phone number are accurate if you include them in invoices or public pages
- Use high-resolution logo files (ideally SVG or PNG) for the best appearance on retina screens
- Keep your branding consistent across email, booking panel, and external communications
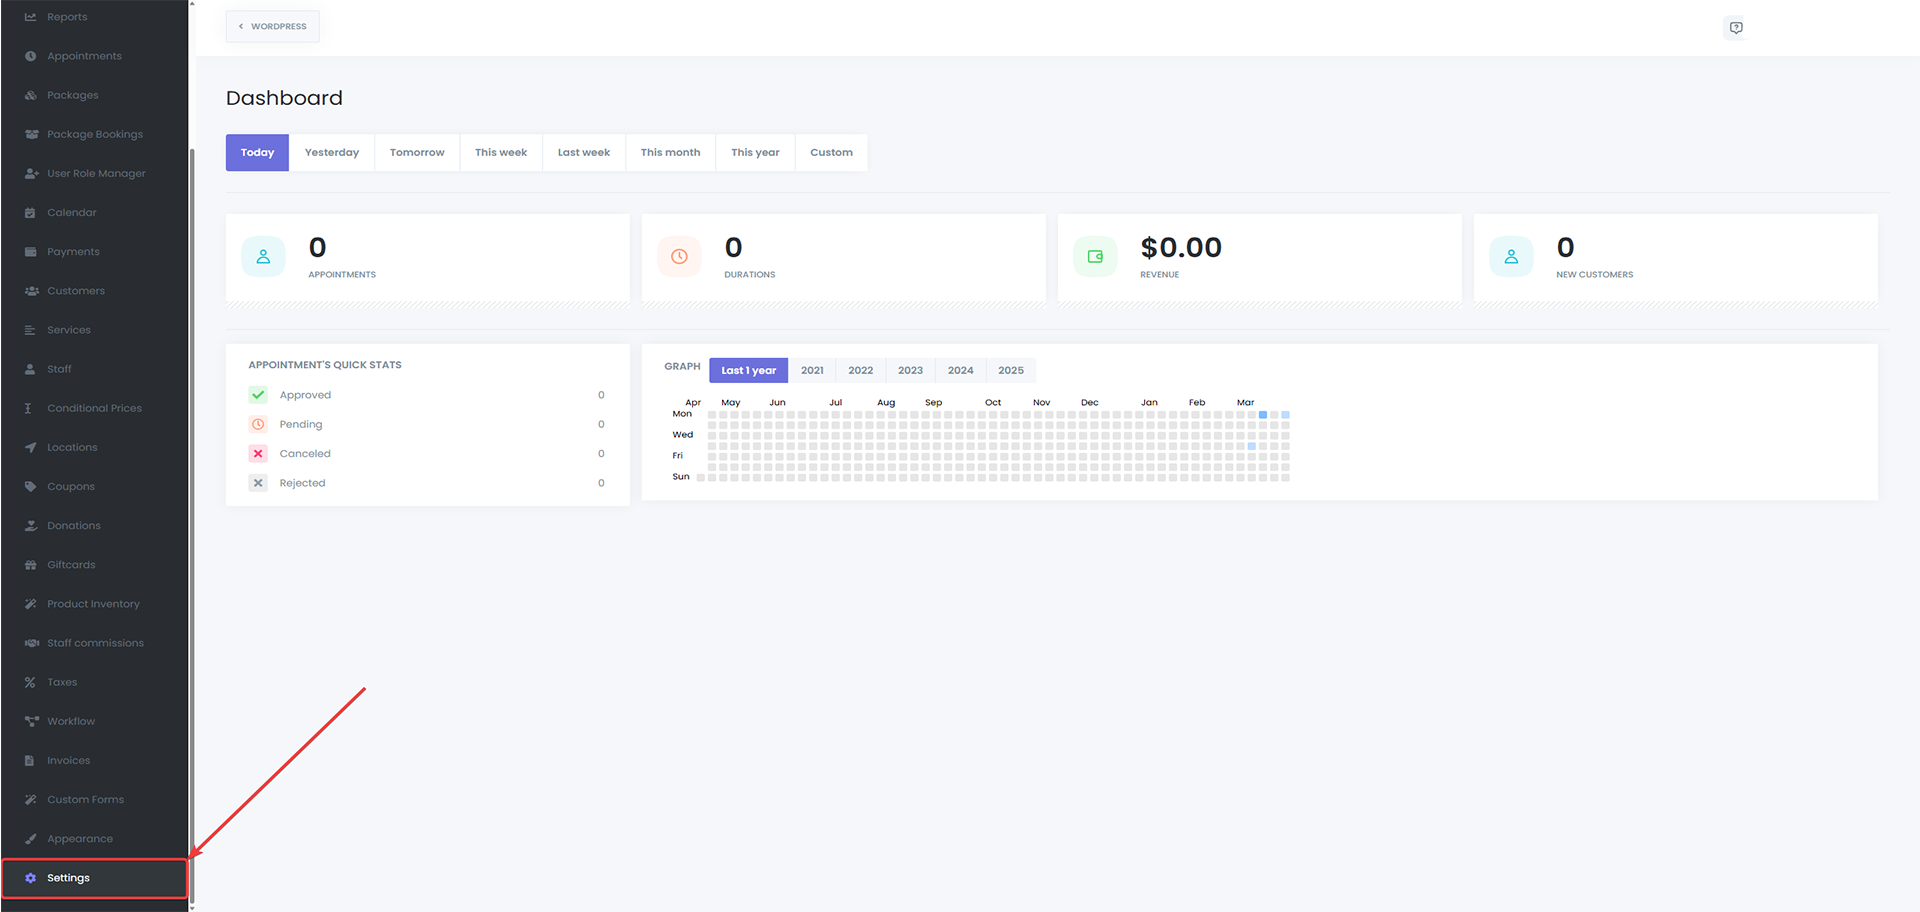
Payment Settings
The Payments Settings section in Booknex allows administrators to configure how pricing, currency, and payment behavior are handled during the booking process. These settings help tailor your platform to match your local accounting standards and provide flexibility for managing how customers complete their payments.
This documentation explains each available option in the Payments Settings tab and how it impacts your appointment booking flow.
Currency Settings
Currency
This setting determines the default currency used for displaying prices across your entire booking system.
- Example values: USD ($), EUR (€), GBP (£), etc.
- The selected currency applies to all services, invoices, and payment-related sections
- Choose the currency that matches your business's operating region
Default value: USD ($)
Currency Symbol
While the currency selection dictates the currency type, this field allows you to customize the symbol used next to price values.
- You can input any character or text, allowing localization or branding preferences
- For example, even if your currency is Euro, you may choose to show "EUR" instead of "€"
Currency Format
Choose how the currency symbol and price amount are displayed together.
Available formats:
- $100
- $ 100
- 100$
- 100 $
This helps localize how pricing appears on the frontend and in customer communications, matching regional expectations.
Default value: $100
Price Number Format
Controls the formatting style for large numbers and decimal places based on regional formatting standards.
Available options include:
- 45 000.00
- 45,000.00
- 45 000,00
- 45.000,00
This ensures the way prices are displayed matches customer expectations (e.g., using commas or periods appropriately for thousands and decimals).
Default value: 45 000.00
Number of Decimals
Specify how many decimal points are shown in price values.
- Most businesses use 2 decimal places (e.g., 49.99)
- You can set this to 0 if you deal in whole-number pricing, or increase it for high-precision billing scenarios
Default value: 2 decimals
Payment Behavior Settings
How Long to Wait for Payment
Sometimes customers fail to complete the payment process after selecting a timeslot. This setting allows you to define a waiting period (in minutes) during which the selected timeslot remains reserved for the customer.
- If the customer fails to pay within the defined timeframe, the appointment is canceled, and the time slot is released back into the system
- Helps reduce abandoned bookings and free up valuable appointment times
Example: Set to 10 minutes – If payment isn't received in that window, the slot becomes available again.
Customers Can Pay the Full Amount (Optional)
If you're using deposit payments, enabling this setting gives customers the option to pay the full amount upfront instead of just the deposit.
- Useful for customers who prefer to settle their full bill in advance
- Adds flexibility to the payment process without removing the deposit requirement
Booking Status for Successful and Failed Payments
These settings control what status an appointment should receive based on the payment outcome after the waiting time expires.
You can configure:
- Successful Payment → Appointment becomes Approved or a custom status of your choice
- Failed Payment → Appointment becomes Rejected, Canceled, or a custom-defined status
This helps keep your schedule organized and avoids pending appointments hanging indefinitely.
Hide "Price does not include taxes" Message
If enabled, this option removes the default disclaimer that appears next to prices, which states: "Price does not include taxes."
- Useful for businesses that do not apply tax or want a cleaner interface
- Can help reduce confusion for clients in tax-inclusive pricing models

Business Hours Settings
Understanding Business Hours Priority
There are three levels where working hours can be set in Booknex. When a customer selects a time during booking, Booknex follows this priority order:
- Staff Working Hours – Highest priority
- Service Working Hours
- Business Working Hours – Lowest priority (default fallback)
This means:
- If staff hours are set, they will override both service and business hours
- If staff hours are not set, but service hours are defined, the system will use service hours
- If neither staff nor service hours are defined, business hours will be used
This flexible hierarchy allows businesses to define general availability while still customizing availability for individual services or team members.
How to Configure Business Hours

- Navigate to Booknex > Settings > Business Hours
- You will see the weekly schedule displayed for each day (Monday–Sunday)
- For each day:
- Enable/disable booking for that day
- Set the available time range (e.g., 09:00–18:00)
- Optionally, you can mark certain days as "Day Off", which makes them unavailable for all bookings
24-Hour Availability
If your business operates around the clock, simply set the time range to:
00:00 – 24:00
This will allow appointments to be booked at any time of the day.
Service & Staff-Specific Hours
To fine-tune availability:
- Go to the Services or Staff module
- Click Edit next to a specific service or staff member
- Navigate to the "Working Hours" tab
- Set custom hours for that particular item
This is useful for:
- Part-time staff with different shifts
- Services that are only available on certain days
- Special availability for VIP offerings
Day-Offs
You can assign a day of the week as a "Day Off", meaning:
- No appointments can be booked on that day
- This applies unless overridden by staff/service-specific availability
For example:
If Sunday is marked as a day off in Business Hours, but a staff member has availability set for Sunday, that staff's hours will be used (due to priority).
Best Practices
- Set up your business hours as a baseline
- Use service hours to limit when specific services can be booked (e.g., only mornings)
- Use staff hours to reflect real employee shifts or absences
- Regularly review staff and service hours for seasonal adjustments or time-off requests
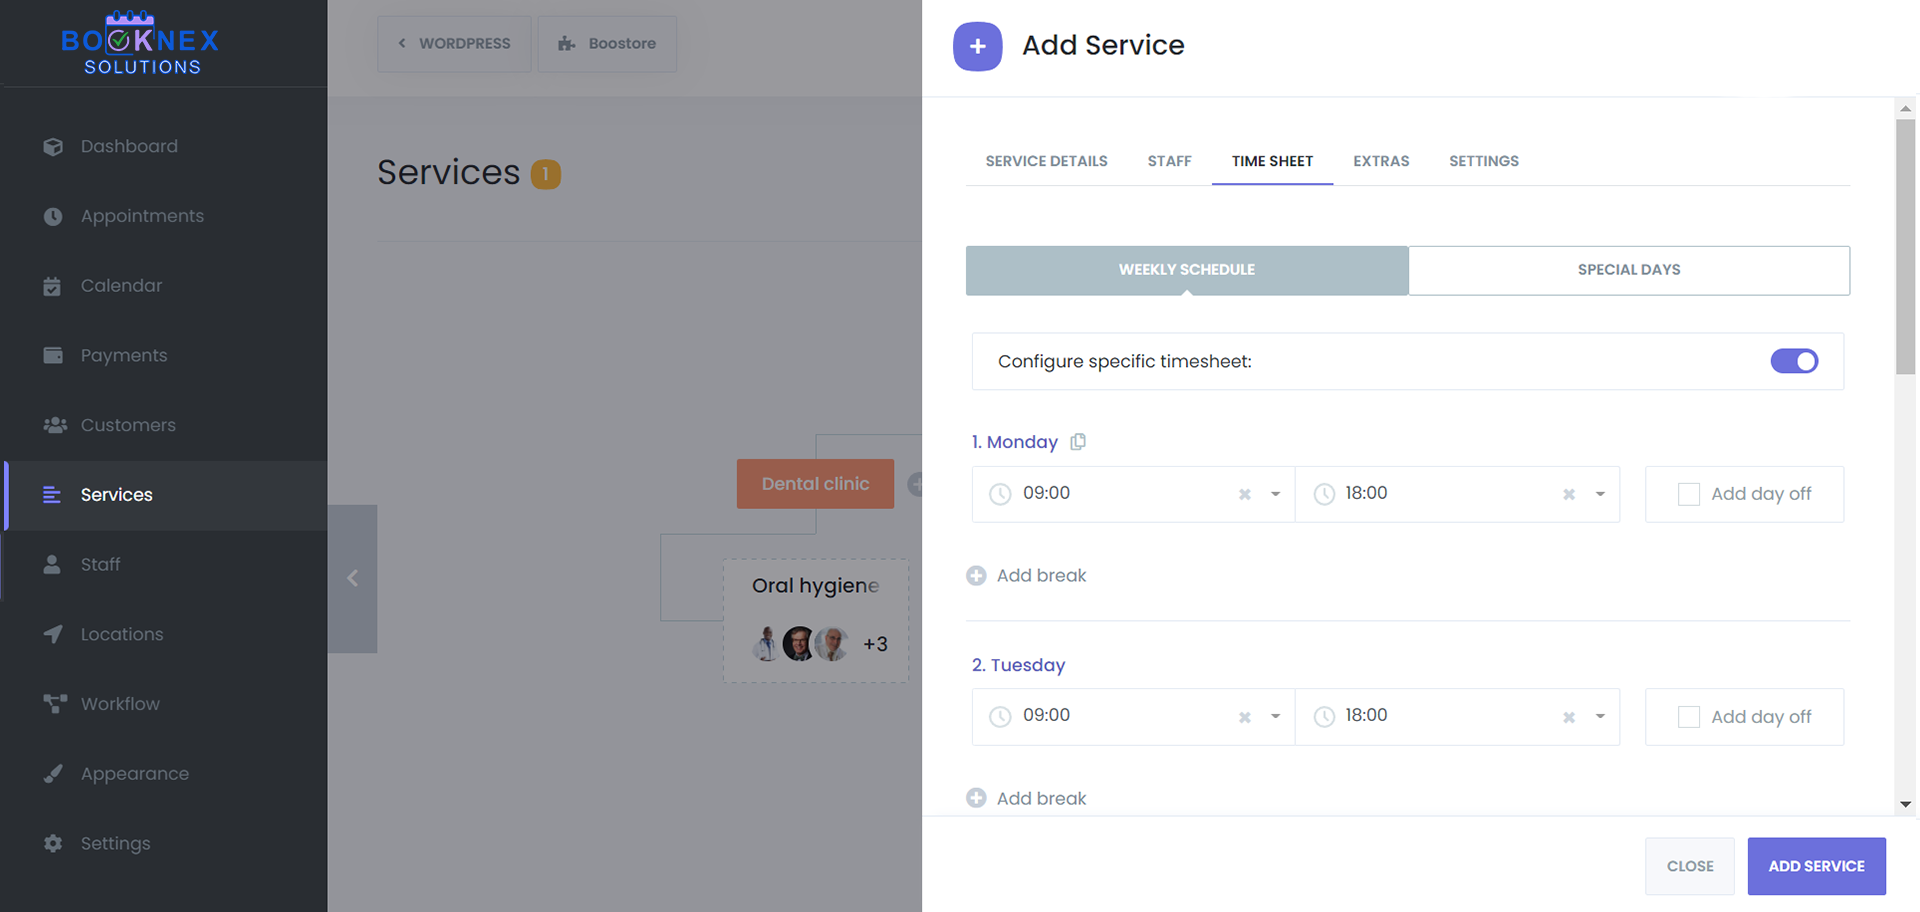
Holiday Settings
The Holidays Settings section in Booknex allows you to define specific dates when your business—or individual staff members—are unavailable for appointments. This is useful for national holidays, planned shutdowns, or personal leave, ensuring your booking calendar reflects true availability.
By properly configuring holidays, you prevent clients from booking on days when services cannot be delivered.
Business-Wide Holidays
Business-wide holidays apply across your entire booking system. When a date is marked as a holiday at the business level:
- All locations, services, and staff will be unavailable on that day
- The selected date will be blocked from the customer booking interface
- Customers will not be able to see or select this date when scheduling appointments
Examples of Business-Wide Holidays
- National holidays (e.g., New Year's Day, Christmas)
- Company-wide off days (e.g., inventory day, annual maintenance)
- Seasonal closures
How to Set a Business-Wide Holiday
- Go to Booknex > Settings > Holidays
- Select the desired date from the calendar
- Click Save Changes
These holidays are enforced automatically across the system and displayed in your admin calendar.
Staff-Specific Holidays

In addition to business-wide holidays, Booknex allows you to configure holiday dates for individual staff members. These are useful for handling personal time off, such as vacations, sick leave, or custom schedules.
Examples of Staff-Specific Holidays
- Vacation leave for one employee
- One-day unavailability for appointments
- Long-term absence or personal time off
How to Set a Staff-Specific Holiday
- Navigate to Booknex > Staff
- Click Edit next to the staff member whose holiday you want to configure
- Go to the Holidays tab inside the staff profile
- Click Add Holiday, choose the date
- Save your changes
Only the selected staff member will be unavailable on that date; all other staff will remain bookable unless also marked unavailable.
Important Notes
- Holidays apply to entire days only. You cannot set partial-day holidays at this time
- Once a holiday is added, that date becomes unbookable for affected staff or the entire business
- Booknex does not currently support recurring holidays. You must manually re-add them each year
Tips for Effective Holiday Management
- At the start of each year or season, add known public holidays and company events
- Encourage staff to log their unavailable dates early to avoid conflicts
- Inform your customers about upcoming closures through email or website banners if necessary
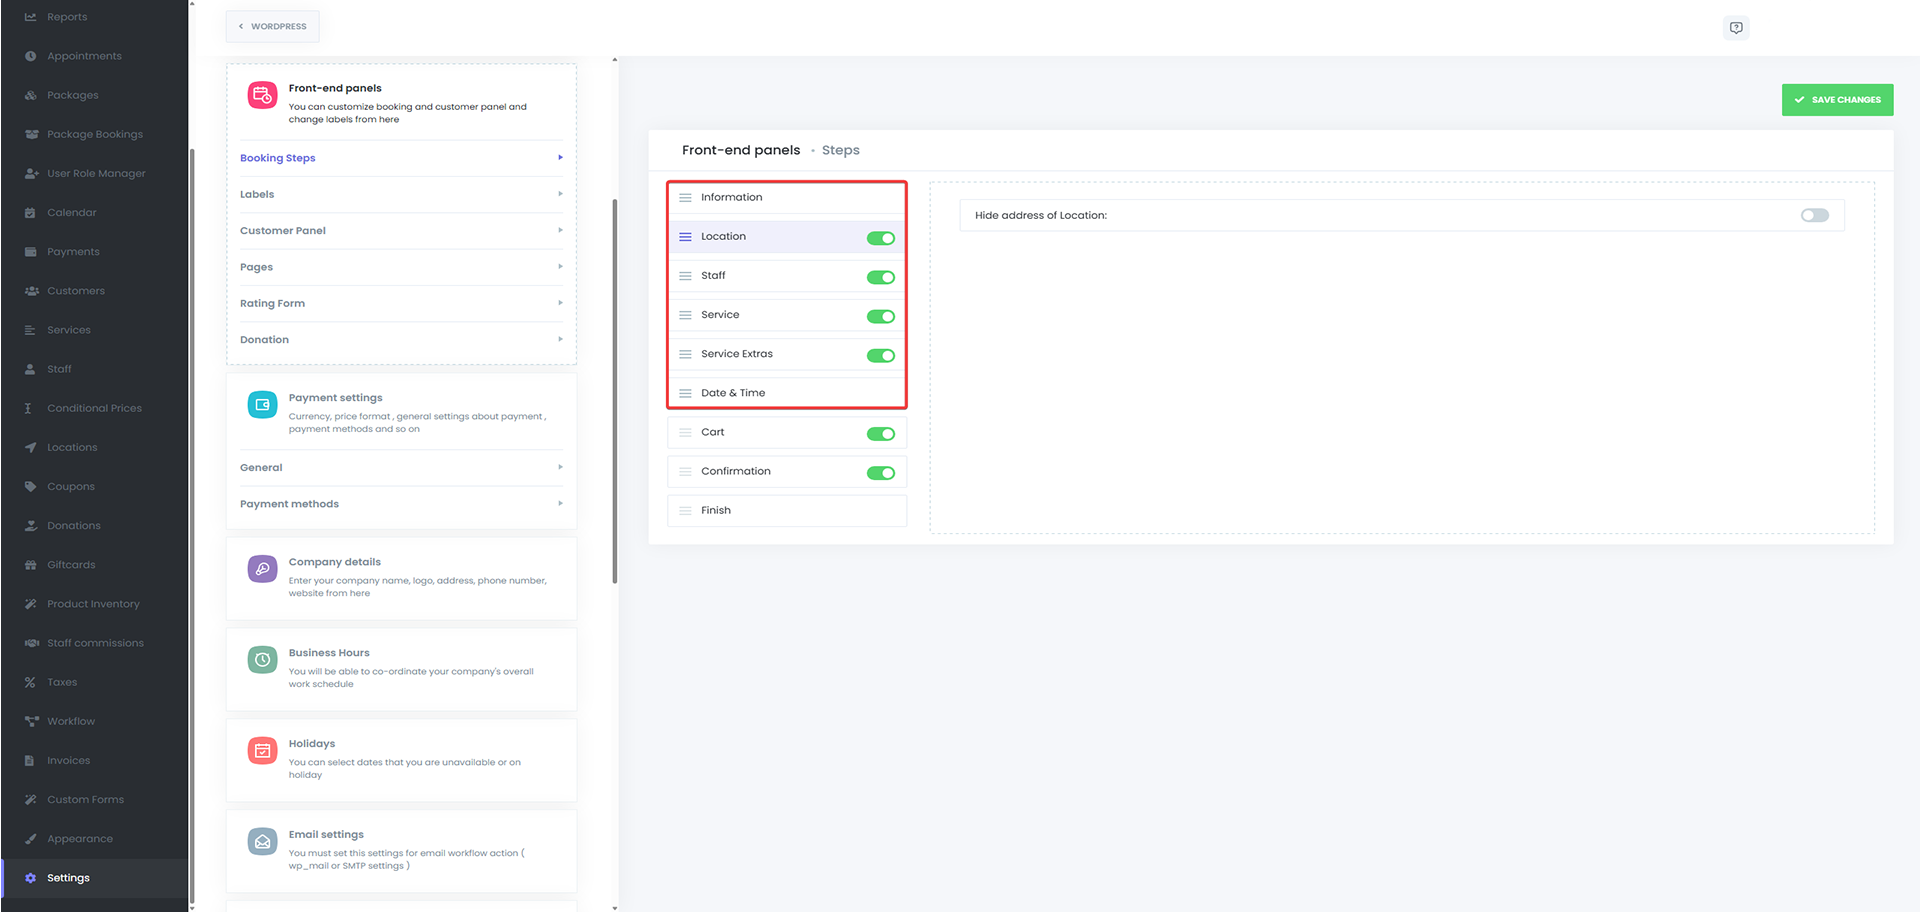
Reorder Booking Steps
The Booking Steps Reordering feature in Booknex allows you to fully customize the order and visibility of each step in your appointment booking form. This functionality ensures that the booking experience aligns perfectly with your business model, customer flow, and preferences.
Overview of Booking Steps
Booknex's default booking flow consists of 7 standard steps, typically displayed as:
- Location
- Staff
- Service
- Date & Time
- Information
- Payment
- Confirmation
Depending on your business needs, not all of these steps may be relevant. For example:
- If your business operates from a single location, you might not need to display the Location step
- If you always assign a default staff member, you may skip the Staff step entirely
How to Reorder the Steps
Go to Settings > Front-end Panels > Booking Steps.
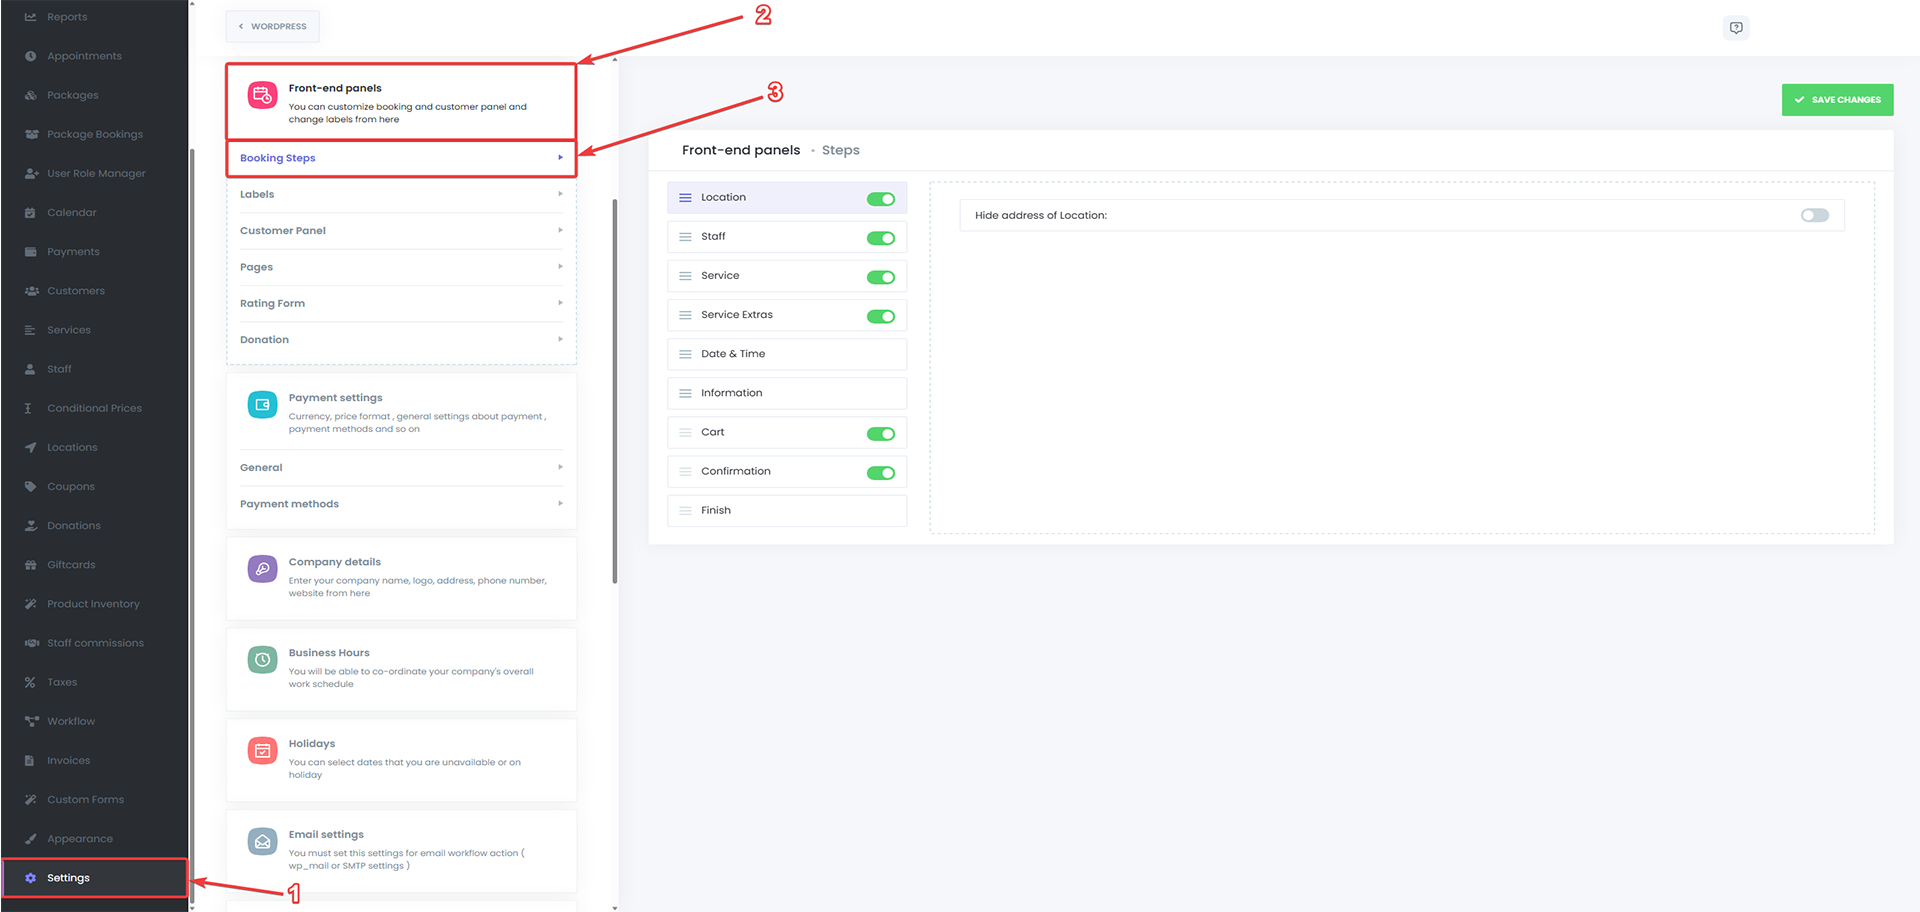
You will see a list of all booking steps.
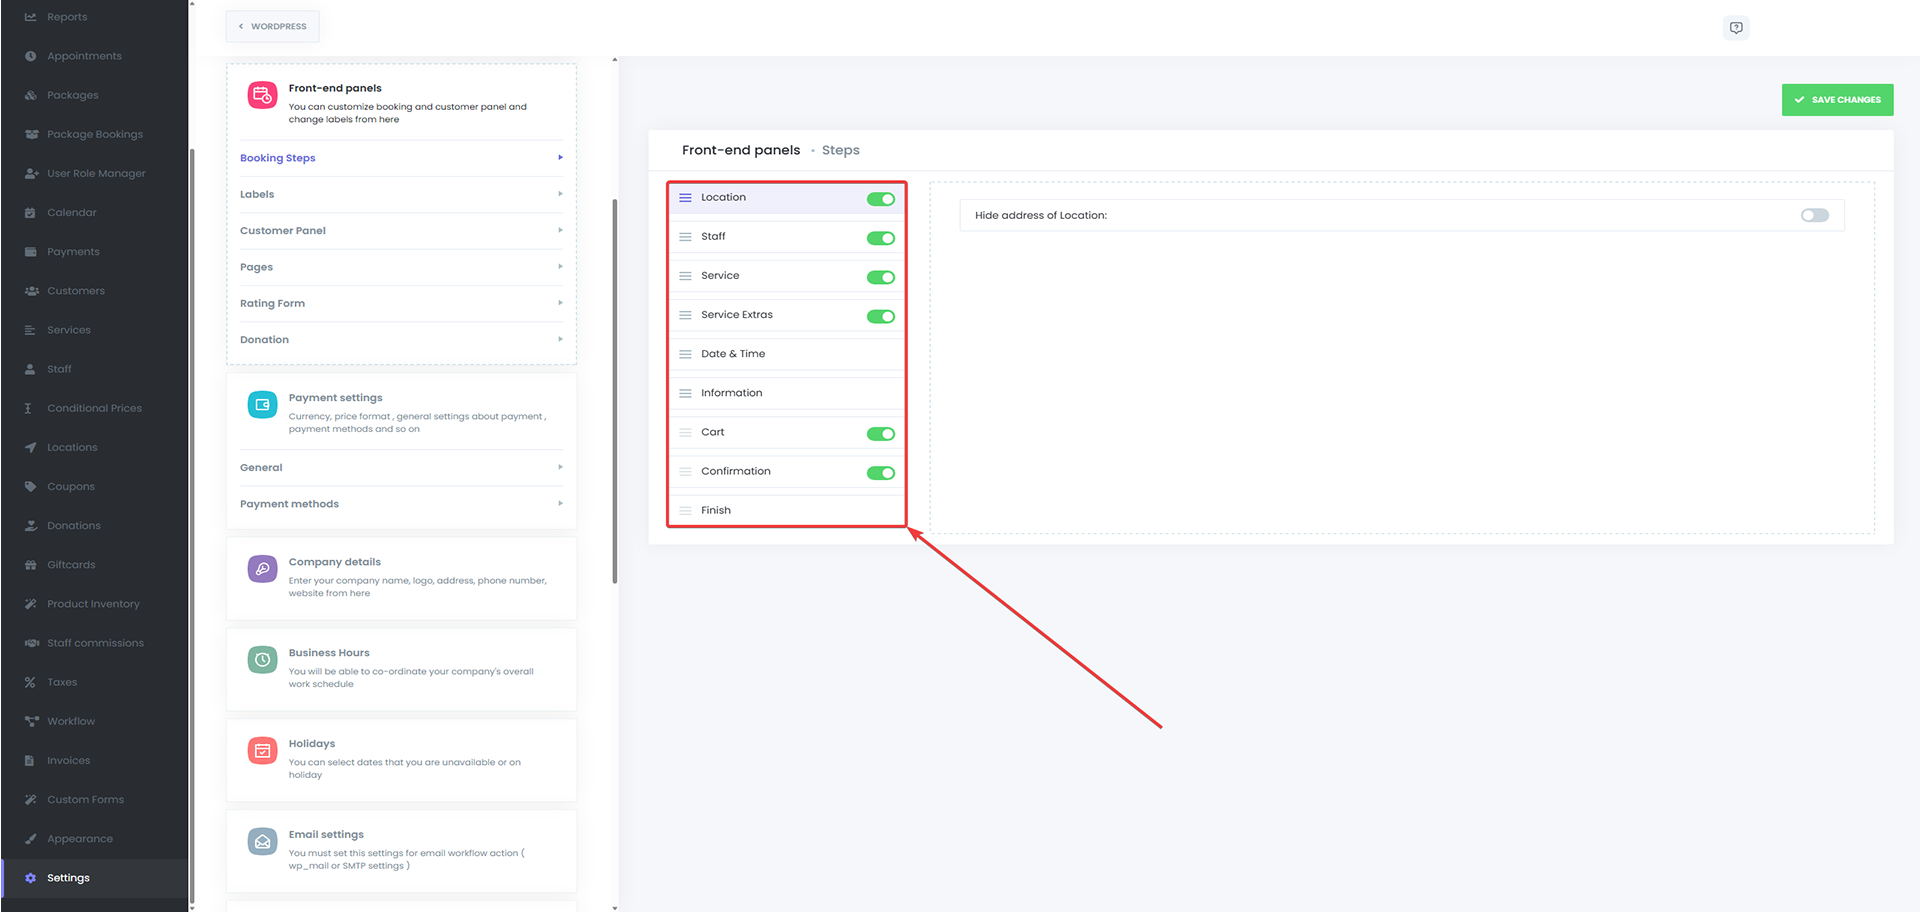
Click and hold the move icon (represented by three horizontal lines) next to a step.
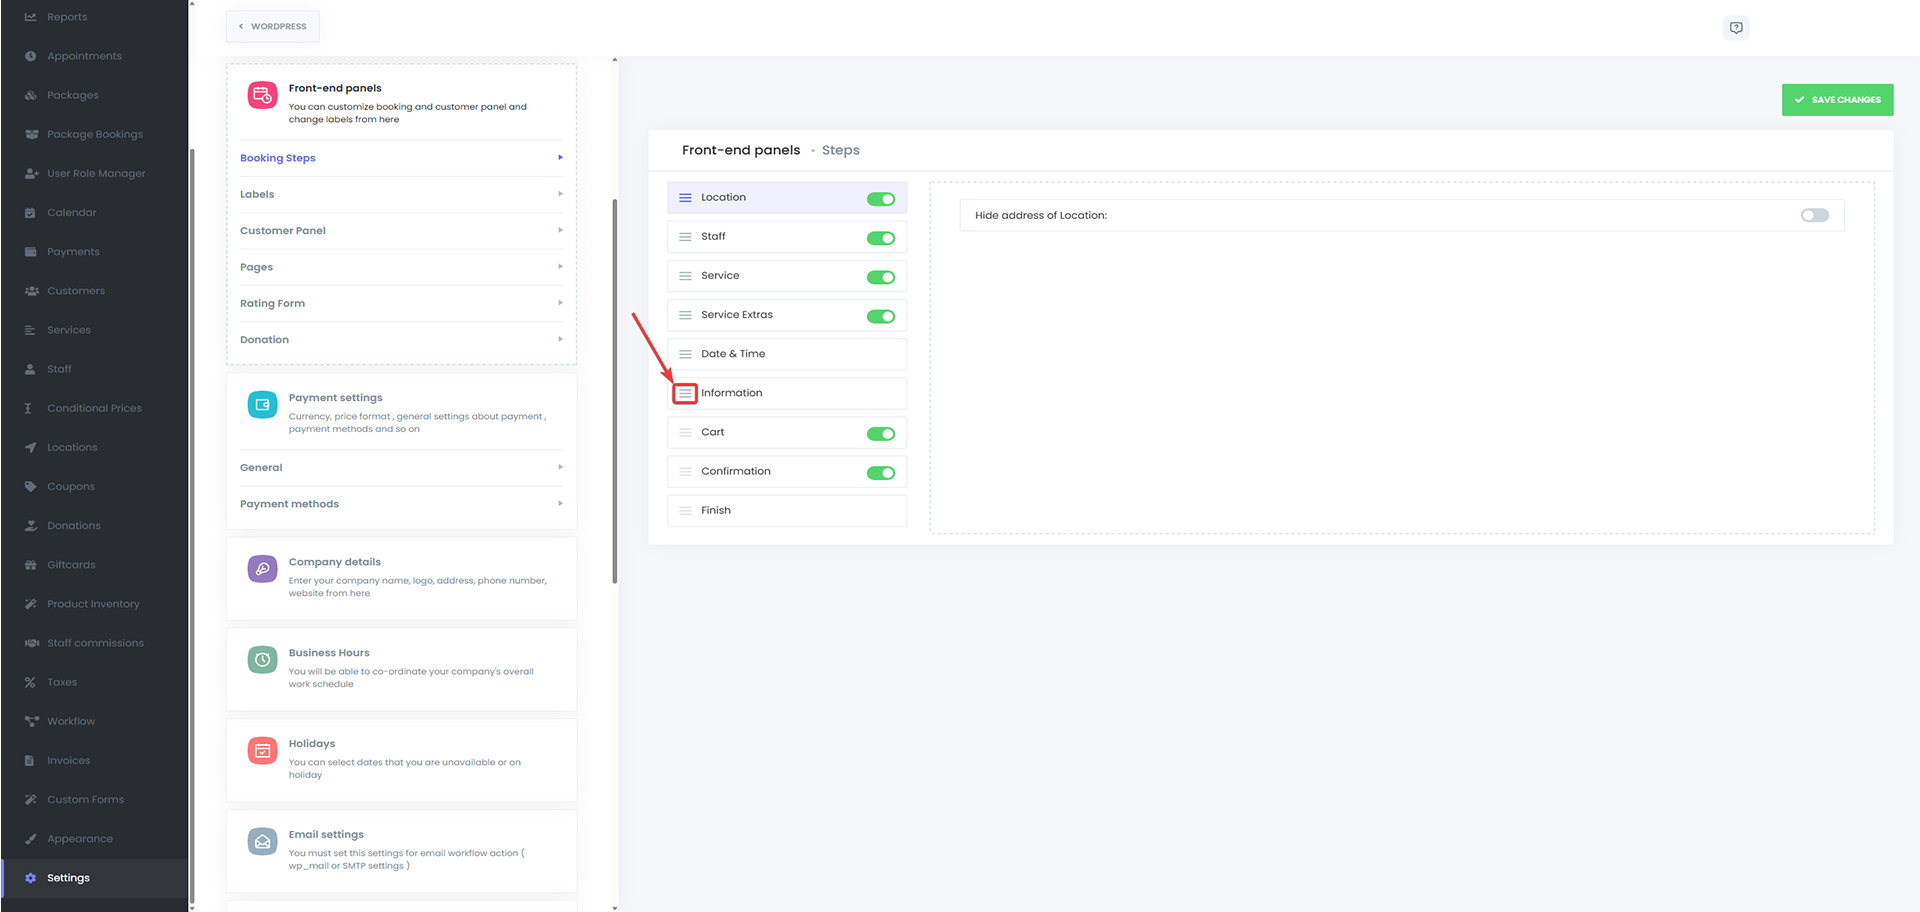
Drag the step up or down to reorder as needed, then release to drop it in the new position.
Example Use Case
If you move the Staff step before the Service step:
When a customer selects a staff member first, Booknex will automatically filter and display only the services offered by that staff member.
If you do the reverse (Service before Staff):
Once the customer chooses a service, only the staff members who offer that service will be shown in the next step.
Step Visibility Options
Along with reordering, you can disable or hide unnecessary steps entirely:
- Toggle off the steps you don't need (e.g., Location, Staff)
- This simplifies the user experience, especially for businesses with fixed resources
Changes to step order or visibility are fully supported and do not affect the functionality or logic behind appointments, pricing, or notifications. However, if you have multiple options for a step but disable it, booking panel will choose the option with the lowest ID number by default for that step.
Best Practices
- Always test your new step order from the customer side to ensure it flows intuitively
- Keep the process as short as possible—fewer visible steps often lead to higher booking conversions
- Customize your steps based on your business type (e.g., salons may prioritize Staff first, while clinics might start with Service or Location)
Staff Management
The Booknex Appointment Booking plugin supports multi-staff functionality. You can add your staff from different locations to the system.
Adding a New Staff Member
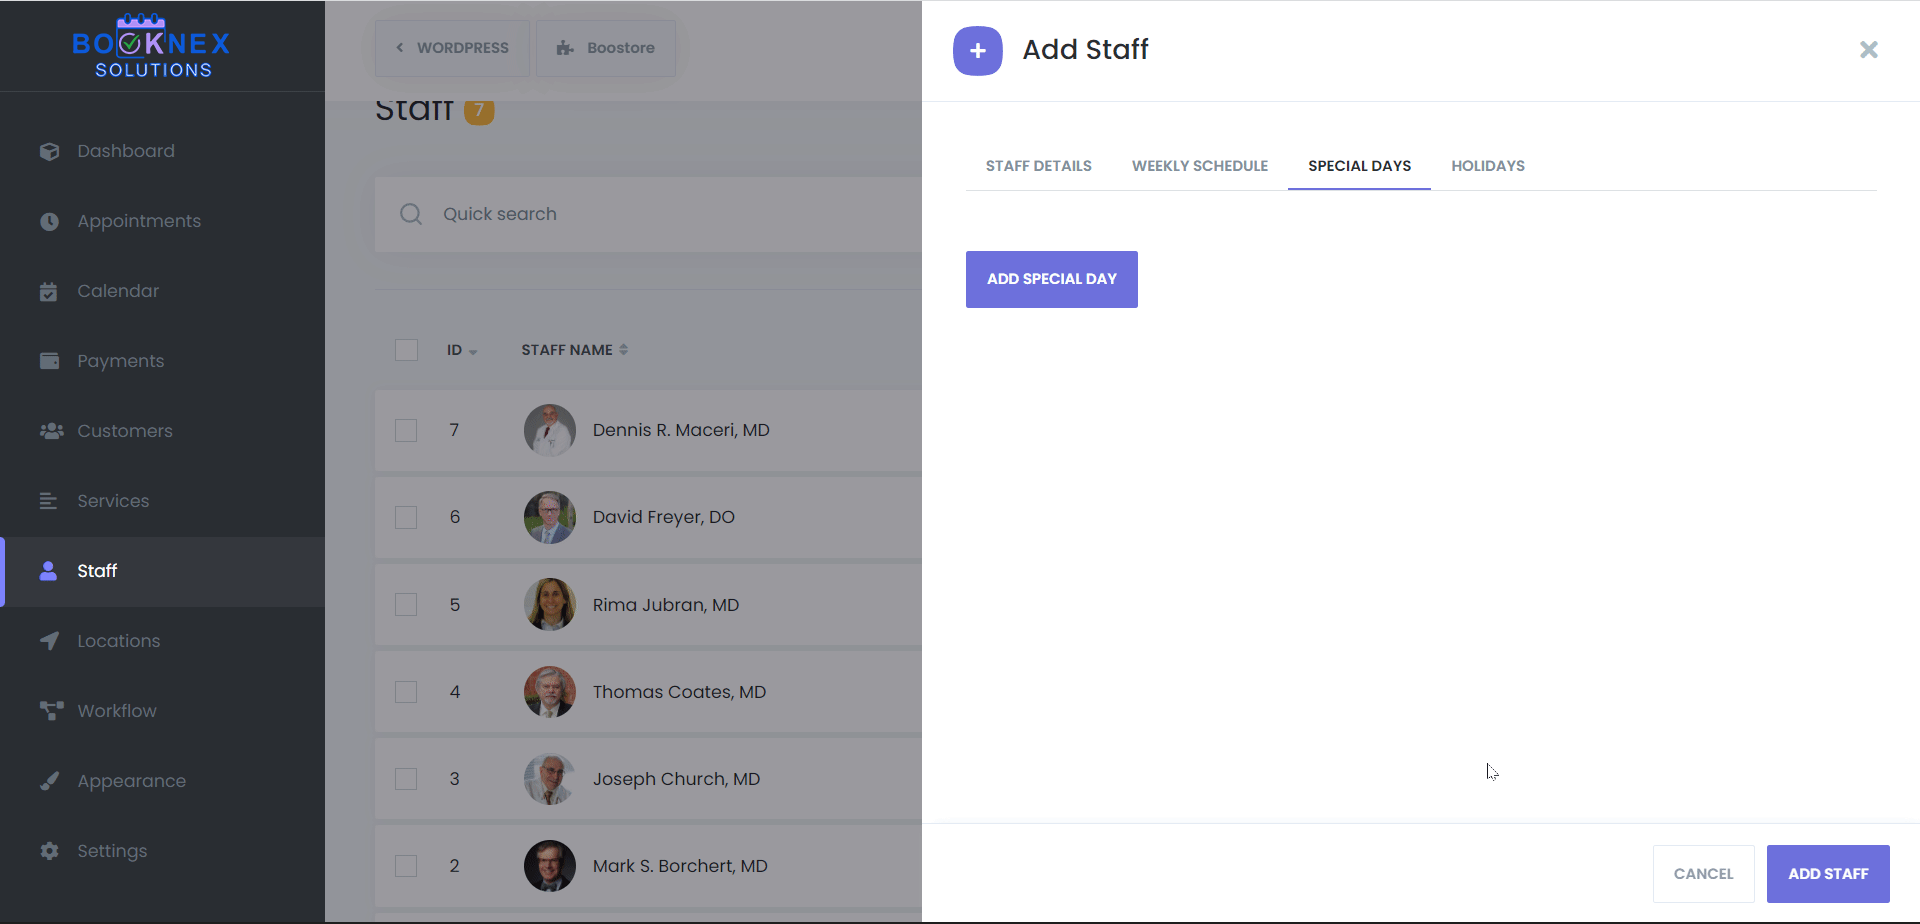
Click on ADD STAFF to add new staff. You'll see four tabs in the opening window:
- DETAILS
- WEEKLY SCHEDULE
- SPECIAL DAYS
- HOLIDAYS
DETAILS Tab
In the DETAILS tab, we will enter basic information about Staff. We will select the name, email, phone number, and profile picture of the Staff. The profile photo and name of the Staff will be visible in the booking process. Then we will select the location of Staff. If Staff works on several locations simultaneously, you can select all locations here with multi-select options. You can also include a short note about Staff. This note will not be visible to the customers.

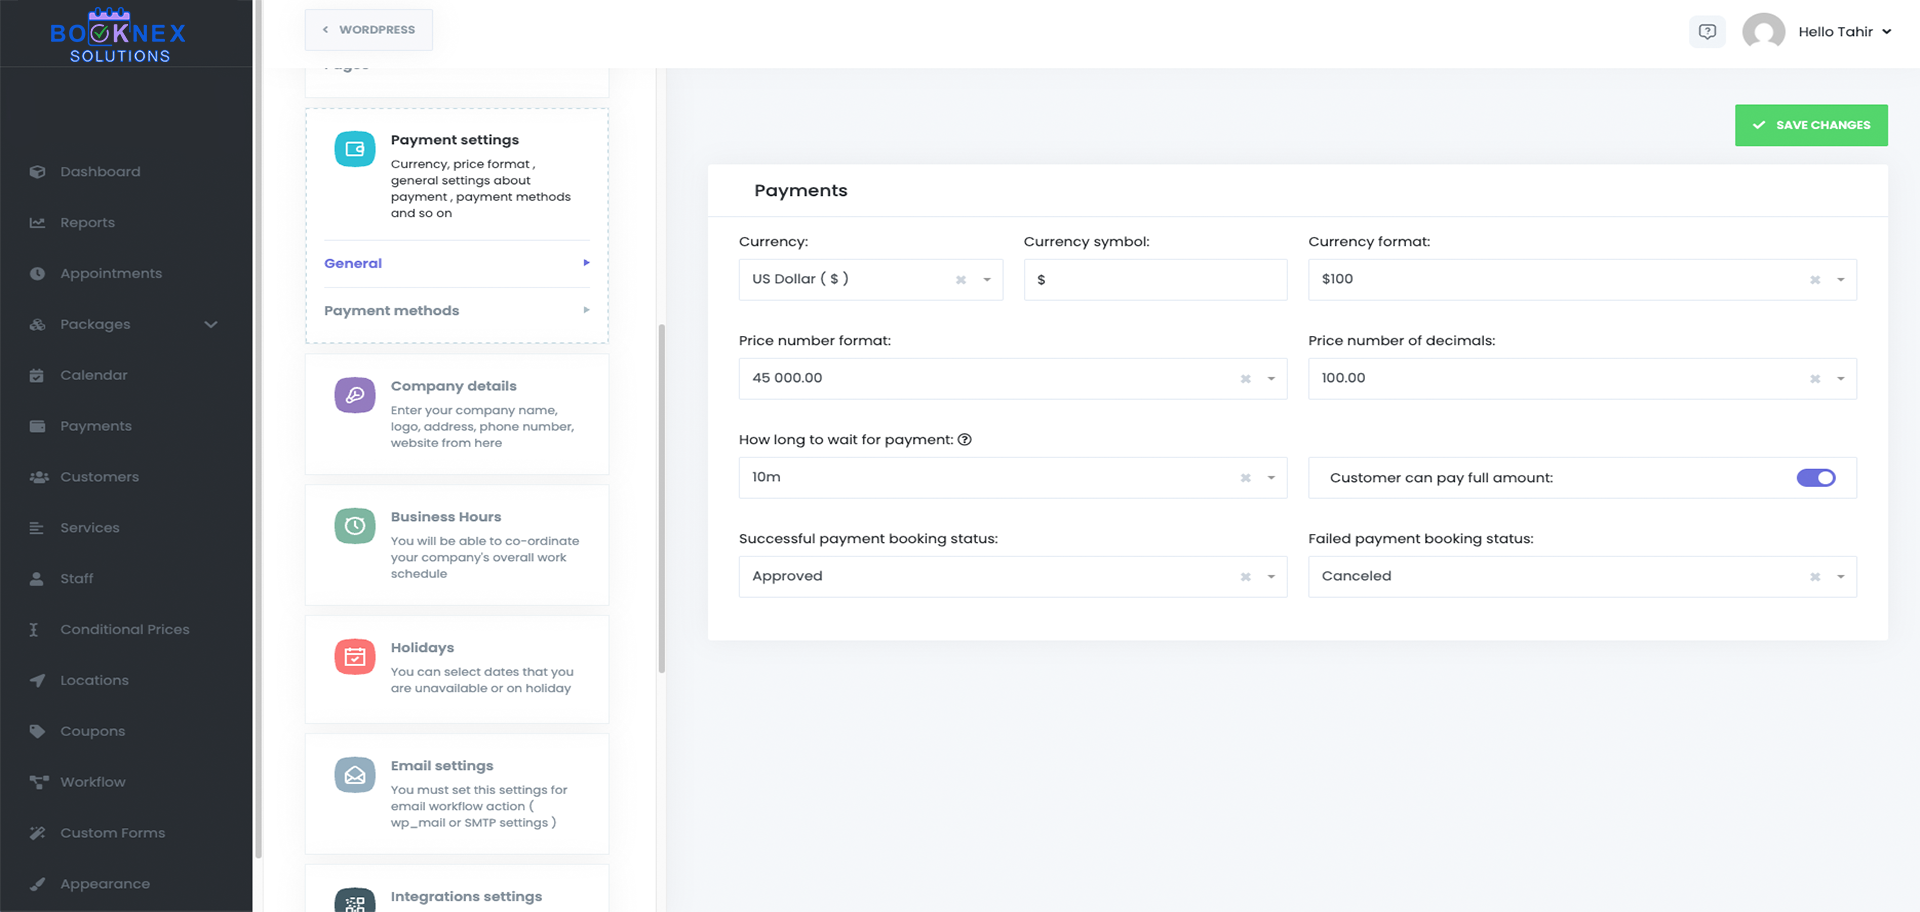
WEEKLY SCHEDULE Tab
By default, the Staff working hours are as configured in the settings. If you want to create a custom timetable for your Staff, you must first enable the "Configure specific timesheet" checkbox in the WEEKLY SCHEDULE tab.
You can build a special weekly work schedule for Staff. Here you can add Staff's non-working days, work hours, and breaks. You can also set up each day of the week. You mark the start and end times of each workday. If a certain day of the week is outside of your Staff's working days, you can set this day as Day-off.
If you want to add the break time, click on Add break button and save the start and end times of the break. You have the opportunity to add endless hours of breaks for each day of the week.

SPECIAL DAYS Tab
In the SPECIAL DAYS tab, you can set up a timesheet on special days for Staff. If a staff member is allowed to work any day that is a non-working day for the Business or can only work on the second half of the day, you can set it here.
Just click on the "Add special day" button and set the start and end hours in the opening panel. If needed, you can also click on the "Add break" button for special days to add break times. If it's needed to delete special days you added, click on the Remove special day button.
HOLIDAYS Tab
In the HOLIDAYS tab, you can set specific holidays for Staff. If Staff won't work any day, it's enough to click that day from the calendar in this tab.
Let's say that you are already setting the general holidays for your business in Settings > Holidays. If you want to appoint additional holidays for your current Staff, please note them in this tab. Otherwise, it'll be preferable to select the same holidays in both Staff and Settings.

Saving and Managing Staff
After completing all information about Staff, you can save the content by clicking on the ADD STAFF button.
You can search the name, email, phone numbers of Staff on the list. And you can also sort by name, email, and phone number with ASC or DESC. If you intend to change the staff information, click the Edit button.
Deleting Staff
You can delete Staff individually or as a group:
- Single Deletion: If only one Staff needs to be deleted, click the three-dot and then the Delete button
- Bulk Deletion: If you want to delete some Staff in bulk, check the checkboxes in front of the Staff names and click on the Delete icon which will open below
Services Module
The Services module in Booknex is where you define and structure the services your business offers. Whether you run a salon, a gym, a medical clinic, or any appointment-based business, this section allows you to create services, categorize them, set pricing, assign staff, and configure booking settings, all in one place.
To provide a seamless experience for both administrators and customers, Booknex offers a multi-level service categorization system. This helps businesses maintain a structured and intuitive service hierarchy, making it easy for customers to find and book the right services.
Creating and Managing Service Categories
Categories serve as the foundation for organizing your services. With a well-structured service menu, your customers will have an easier time navigating through available services and booking the ones that suit their needs.
How to Create a New Service Category
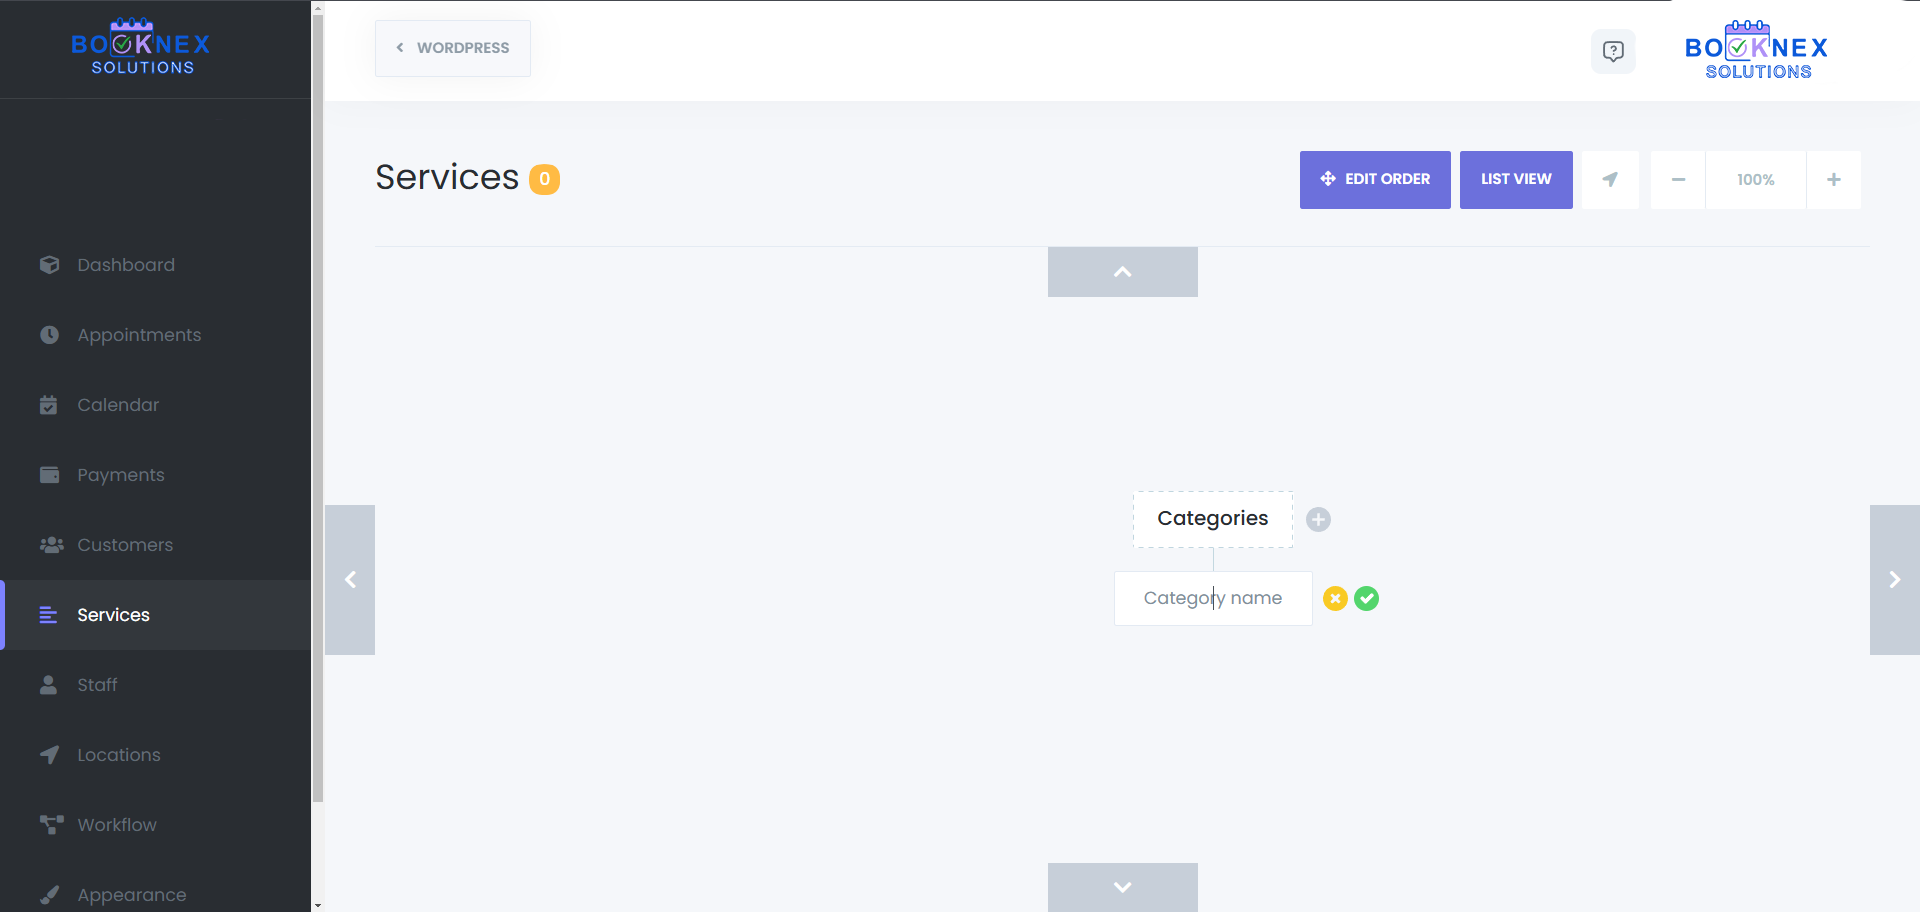
Access the Categories Panel
Navigate to the Services section in the Booknex dashboard.
Add a New Category
- Click the "+" (plus) icon next to Categories
- A new field will appear where you can enter the category name
- Once you've entered the name, click the Save icon to finalize the category creation
Organizing Categories and Subcategories
You can create multiple levels of categorization. For instance, a Beauty Services category can have subcategories like Hair Treatments and Skin Care, and each subcategory can contain individual services.
To create a subcategory under an existing category, click the "+" icon next to that category and choose Category when prompted.

Editing and Deleting Categories
- To rename a category, click on it, modify the name, and save the changes
- To delete a category, hover over it and click the trash icon. Keep in mind that deleting a category will also remove all associated subcategories and services, so use this option with caution
Adding and Configuring Services
After setting up your categories, you can start adding individual services. A service represents a specific offering your business provides, such as a 60-minute massage, a personal training session, or a dental check-up. Each service can be customized with its own pricing, duration, staff assignments, and additional settings.
How to Add a New Service
Assigning the Service to a Category
- Click the "+" icon next to the category where you want to place the new service
- Choose Service when prompted
Configuring Basic Service Details
After selecting "Service," a settings panel will open where you can define the core attributes of the service:
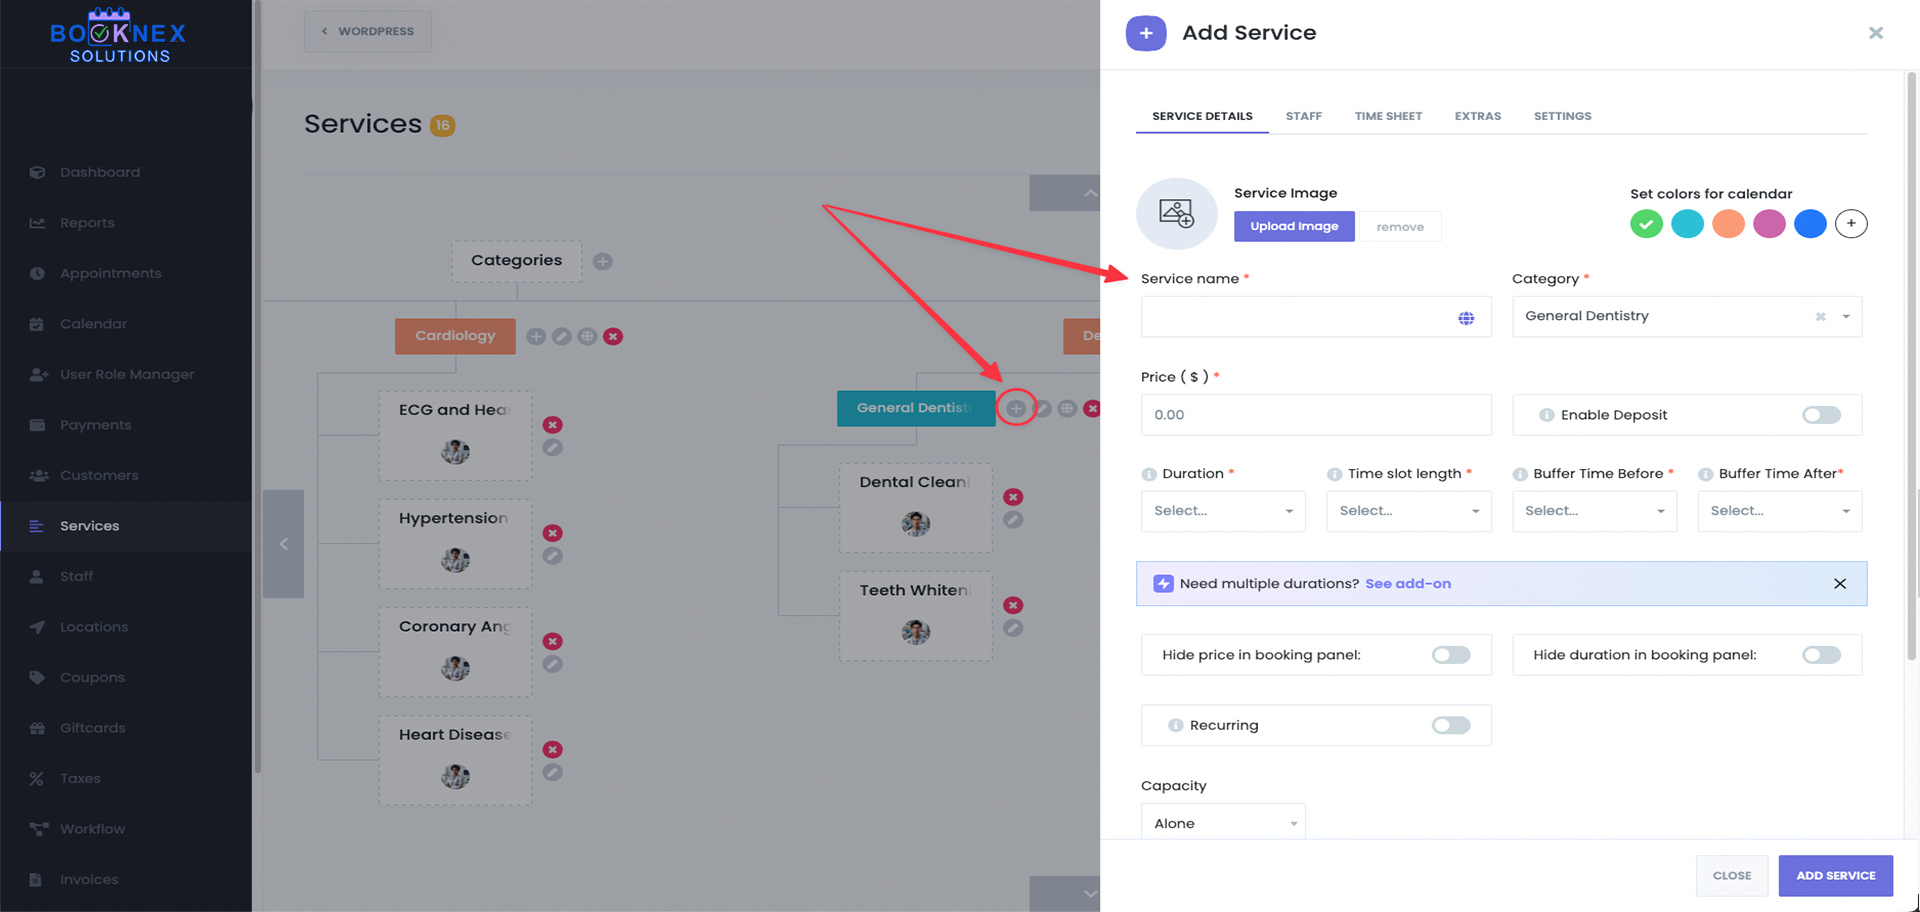
Service Image
Upload an image that visually represents the service. This image will be displayed to customers during the booking process to make selection easier.
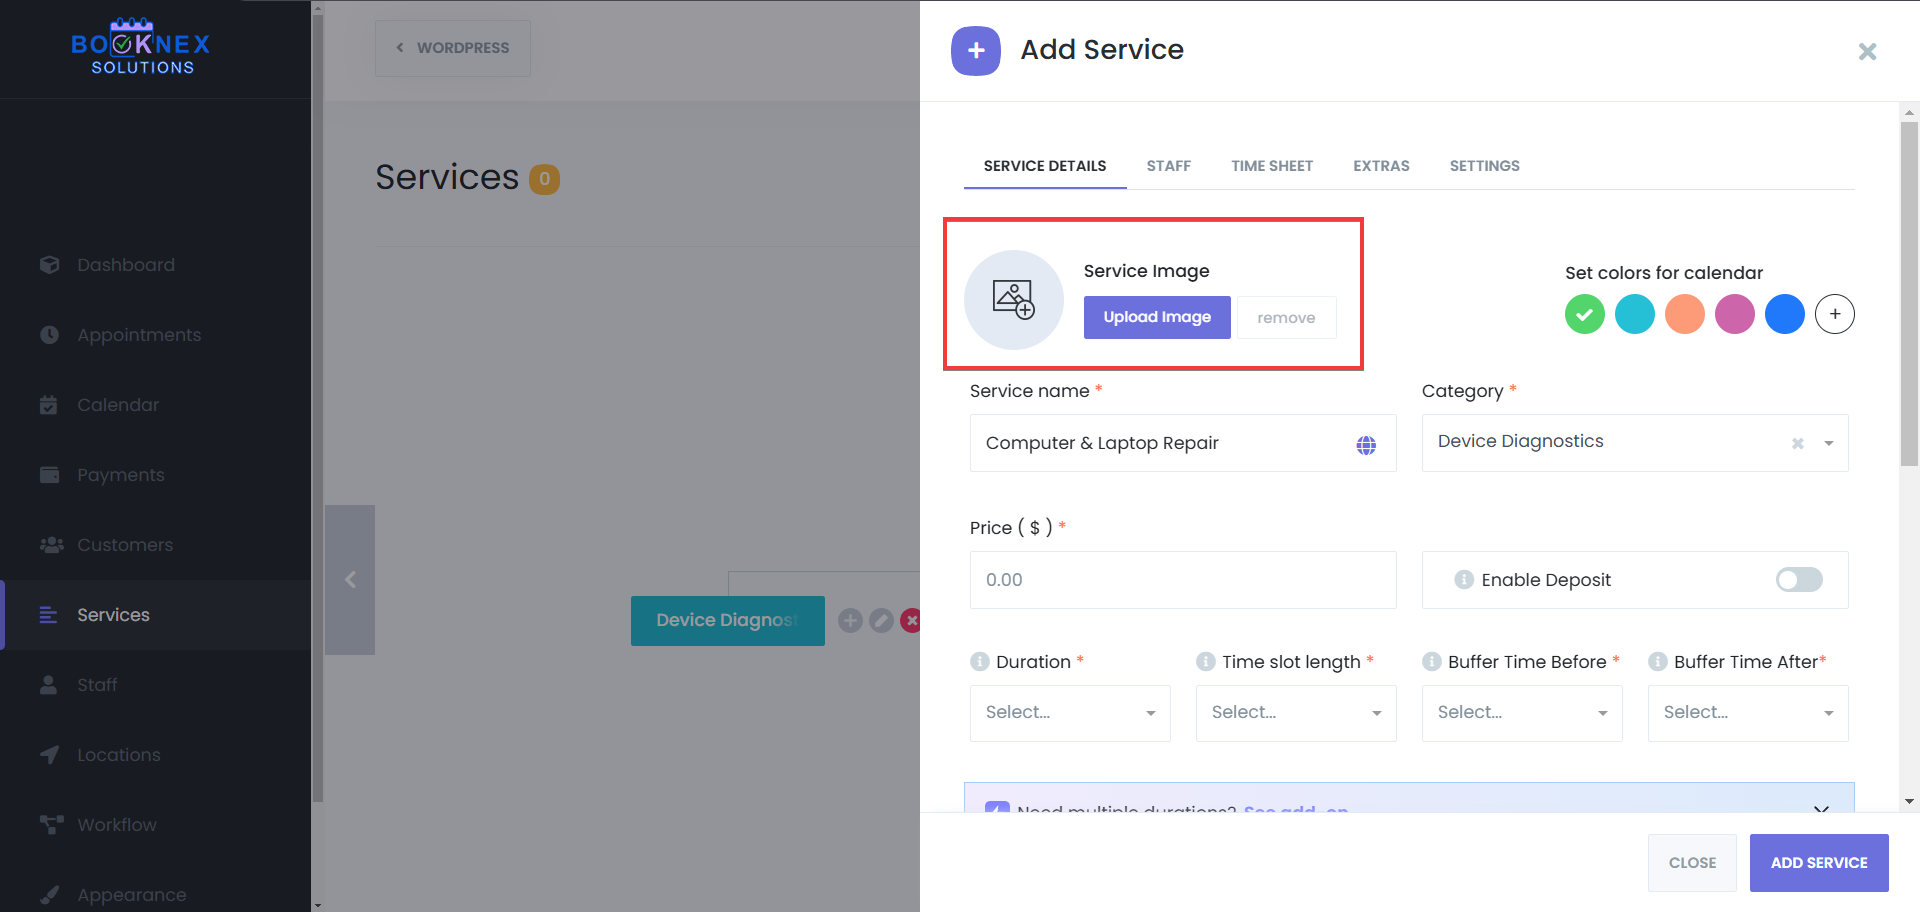
Service Name
Enter a clear and descriptive name for the service (e.g., "Full Body Massage" or "Men's Haircut").

Assigning a Category
The category you selected earlier will be pre-filled, but you can change it if needed.

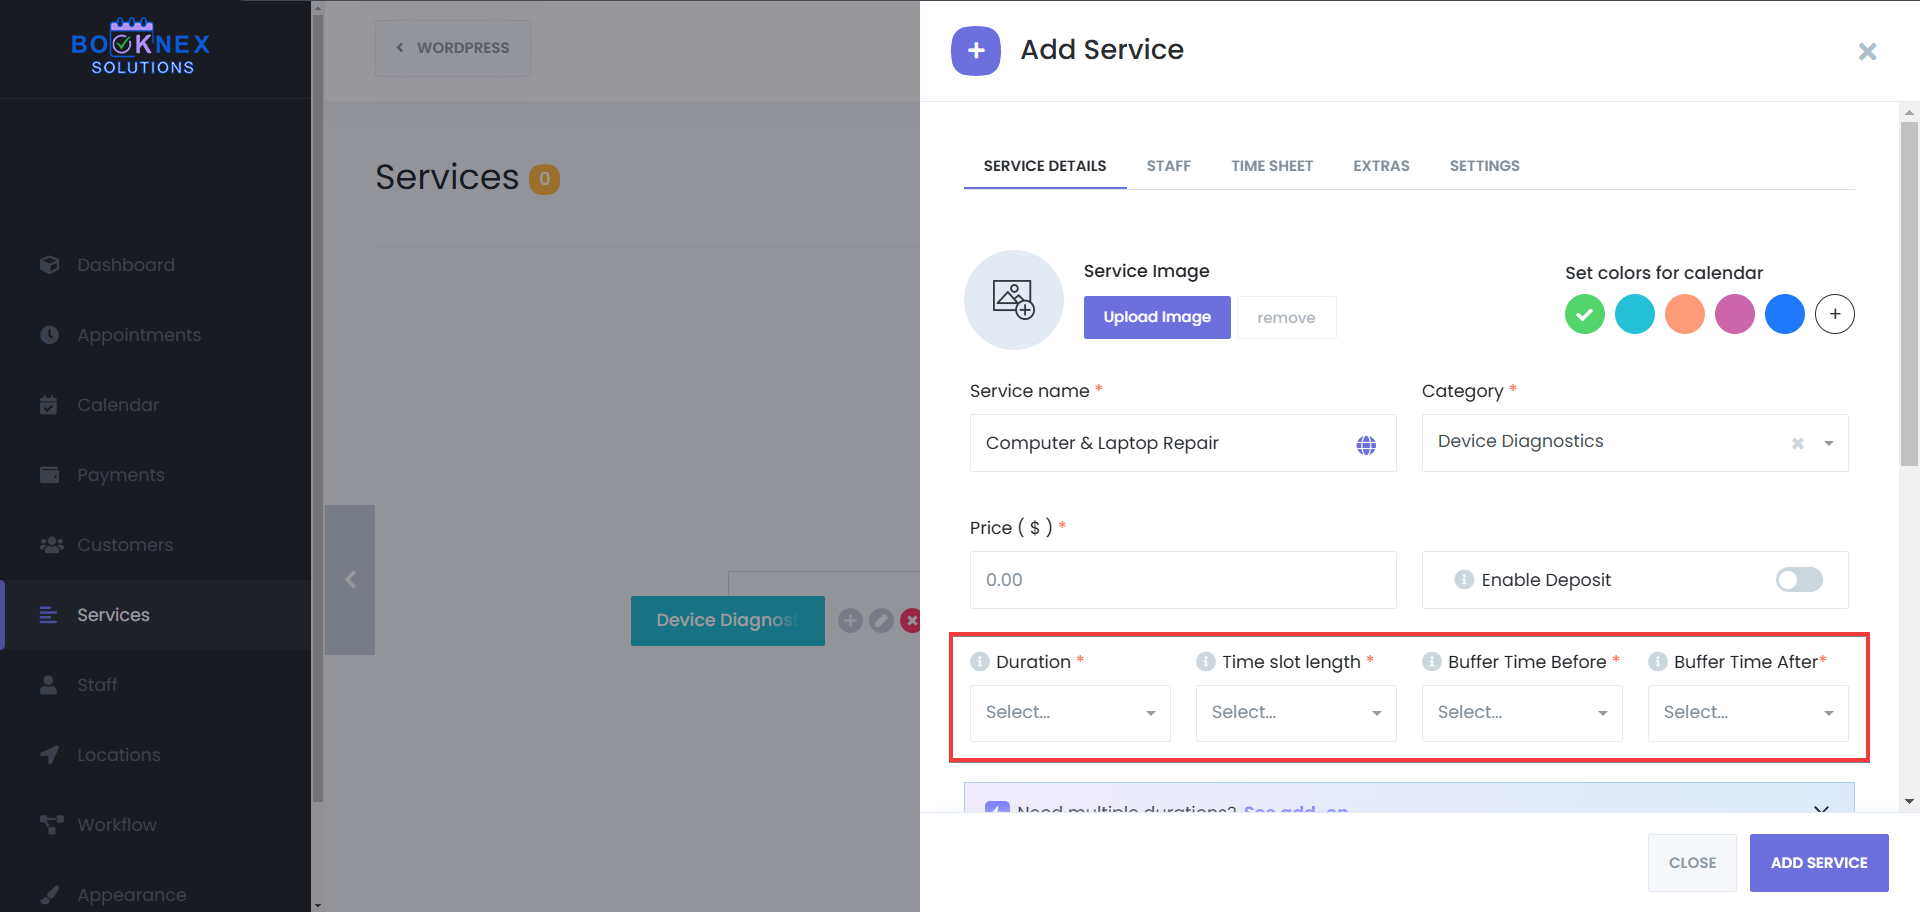
Service Duration & Buffer Time
Define how long the service lasts. This directly impacts scheduling availability, so make sure the duration accurately reflects the actual service time.
Adding Buffer Time Before & After Appointments:
- Buffer Before: Adds extra time before the appointment begins. Useful for preparation, setting up equipment, or allowing transition time between clients
- Buffer After: Adds extra time after the appointment ends. Useful for cleaning up, writing reports, or handling post-service tasks
Example: If a service is 60 minutes long with a 10-minute buffer before and after, the total blocked time in the calendar will be 80 minutes (10 min before + 60 min service + 10 min after).
Service Price
Enter the cost of the service. The currency format will follow your Booknex settings. If you offer variable pricing, you can create multiple pricing tiers based on different options, depending on your setup, using the Conditional Prices add-on.
You can also set multiple durations for one service, and this way, you will not need to create multiple services for each duration. If you'd like to learn more about the multiple services add-on, you can check the Custom Durations add-on feature page.
You can also hide price of the services, and the duration of those services in the booking panel, this way, your customers will be able to see the service name and description of that service, but not the duration and the price of the service, depending on your setup.

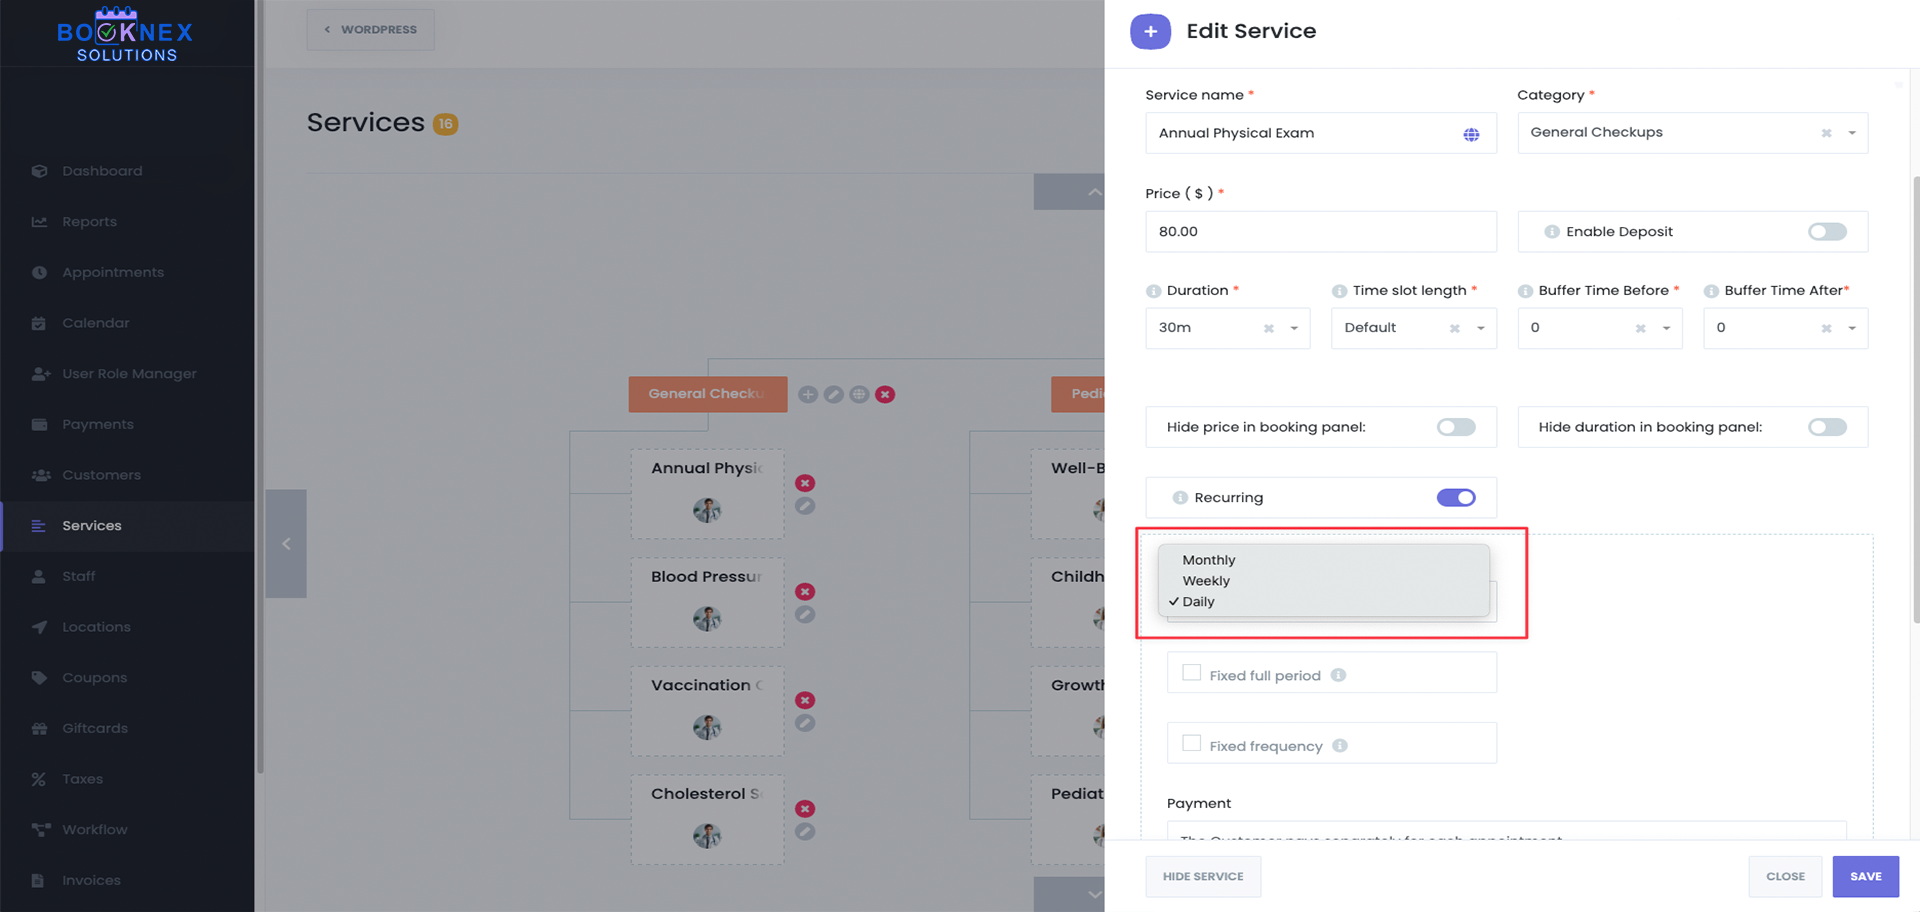
Recurring Appointments Feature
Booknex's Recurring Appointments feature allows clients to schedule services that repeat over a set period, eliminating the need to book each session individually. This is particularly beneficial for services like weekly classes or monthly consultations. For detailed information on setting up and managing recurring appointments, please visit our dedicated feature page.
Group Appointments Feature
Booknex's Group Appointments feature enables multiple clients to book the same time slot for a shared service. This is ideal for classes, workshops, or any service designed for group participation. For detailed information on setting up and managing group appointments, please visit our dedicated feature page.

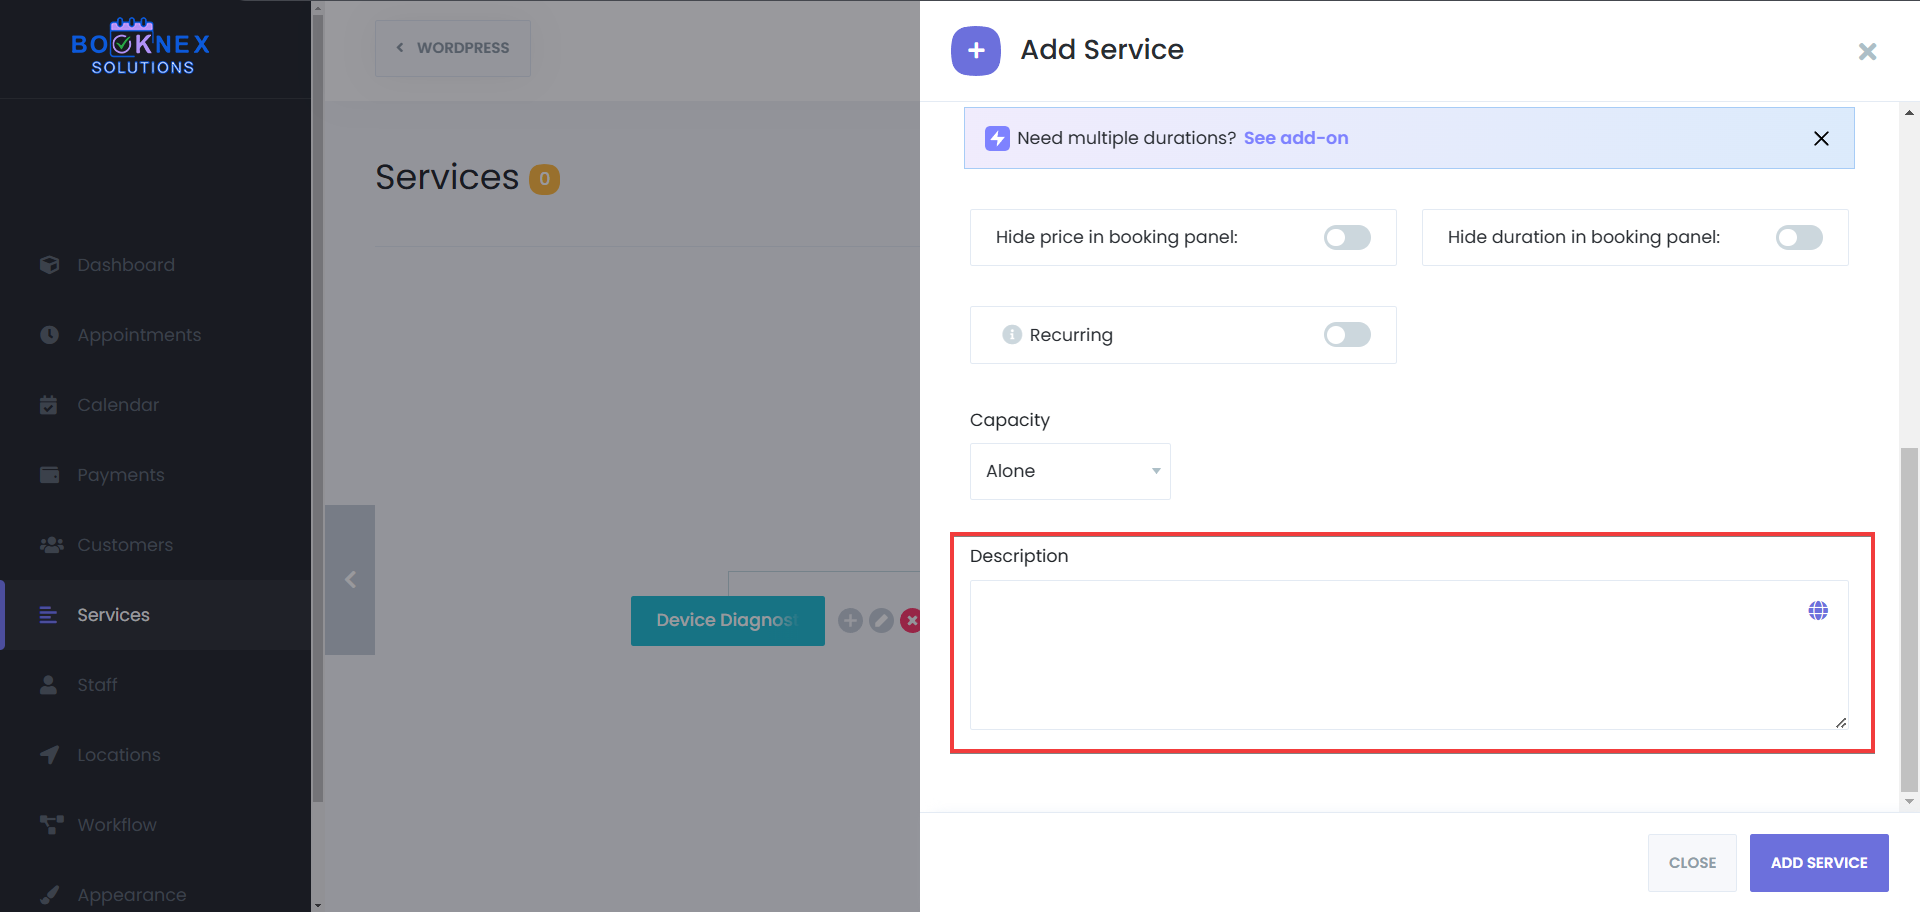
Service Description
The Service Description field allows you to provide a brief but informative overview of the service being offered. This helps customers understand what to expect before booking.
- Keep it clear and concise, highlighting key details about the service
- Mention any important requirements (e.g., "Clients must arrive 10 minutes early")
- Use this space to differentiate your service by mentioning unique features or benefits
A well-written service description improves the customer experience and helps them make informed booking decisions.
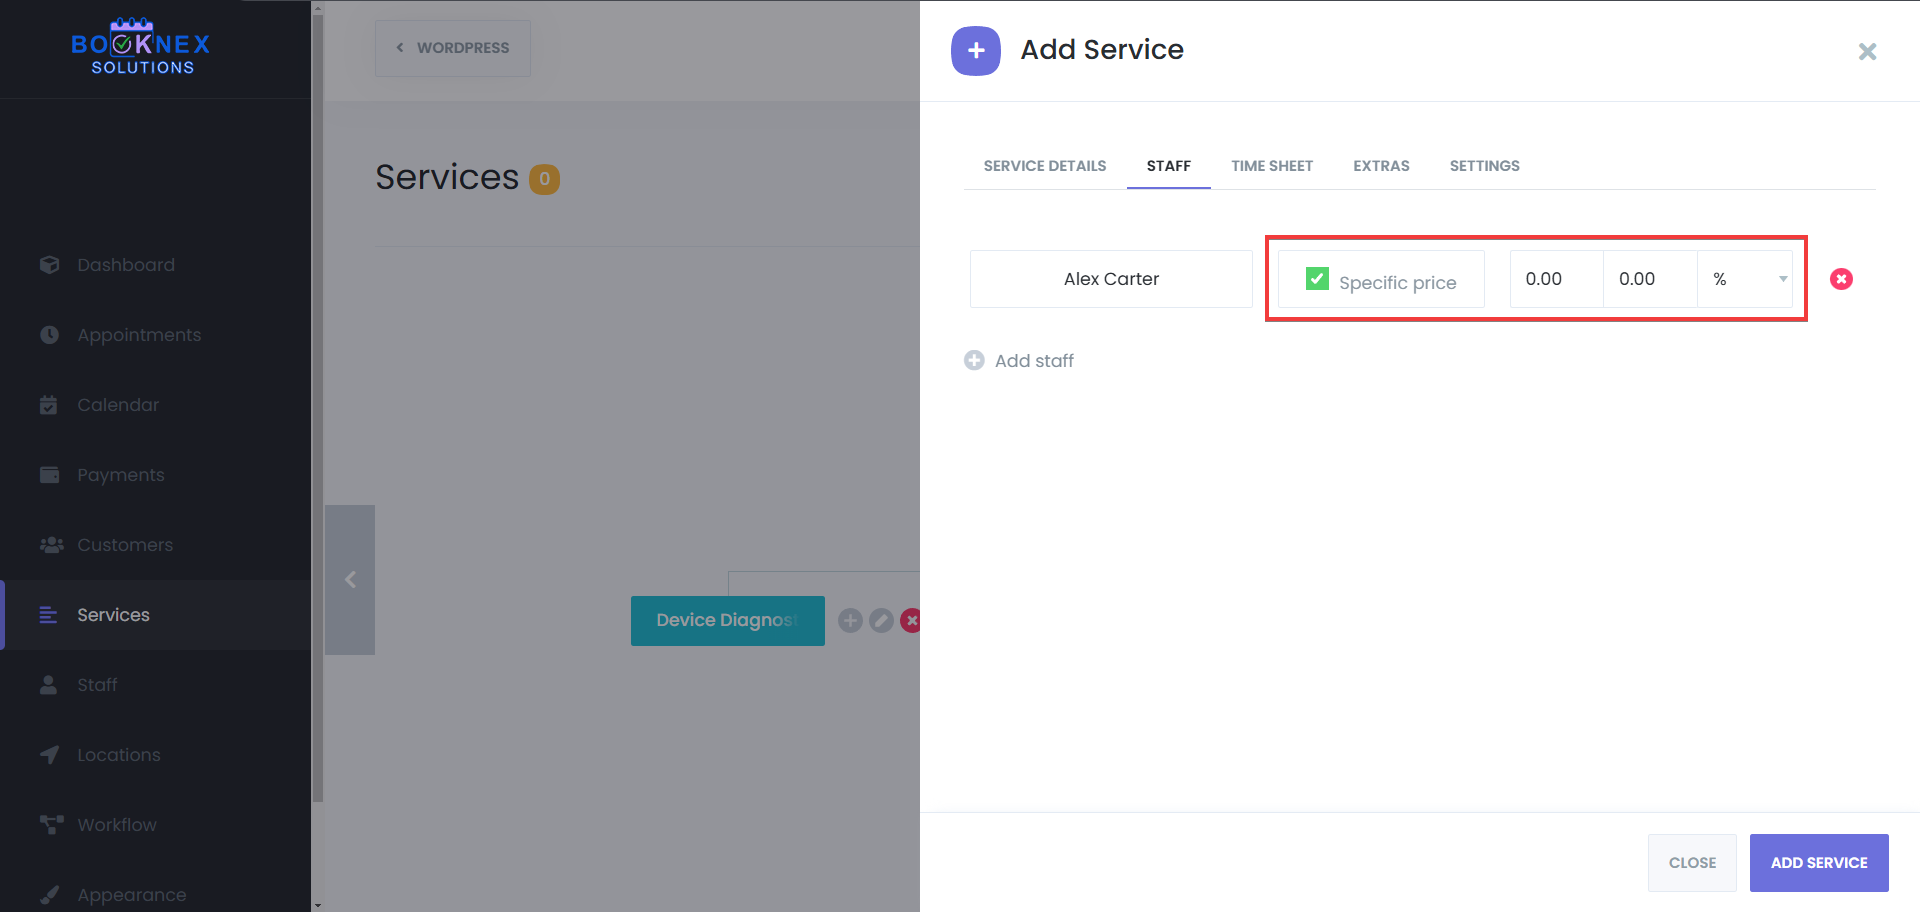
Assigning Staff to Services
Every service must be assigned to at least one staff member who will provide it. Without staff assignments, the service will not be available for booking.
Navigating to the Staff Tab
In the service settings panel, go to the Staff tab.
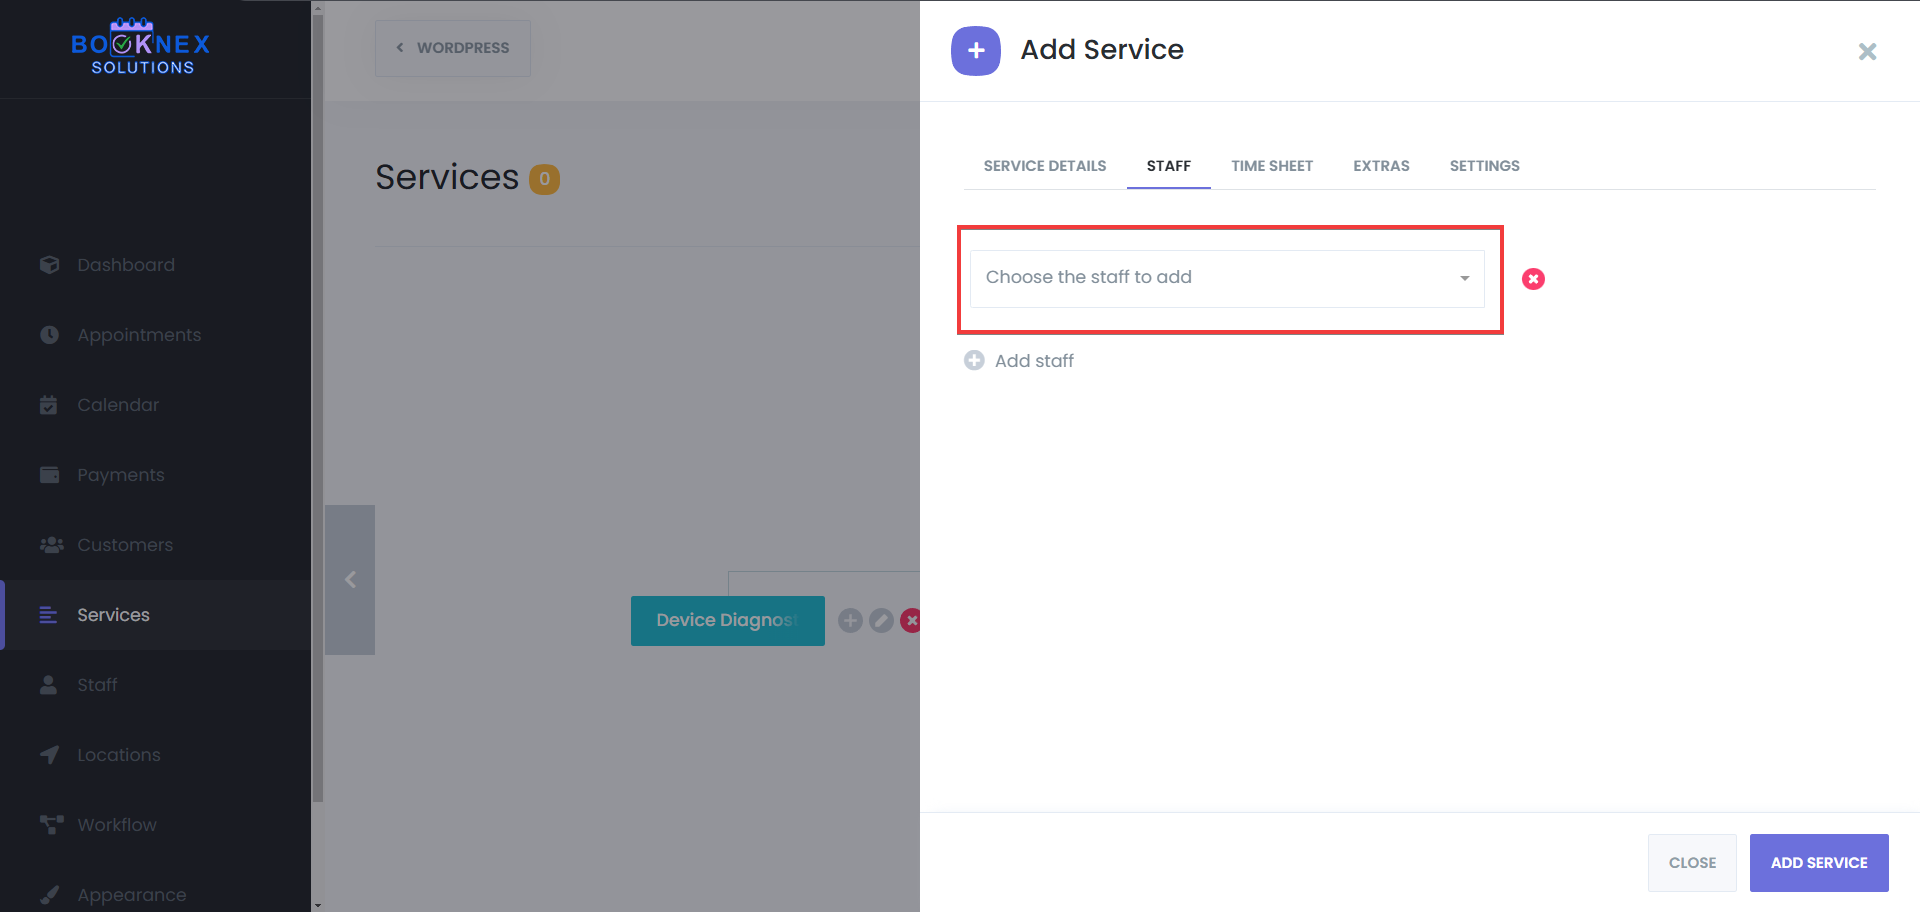
Selecting Staff Members
Choose which staff members are available to provide the service. If a staff member is assigned to multiple services, their schedule will automatically adjust to prevent double bookings.
Customizing Staff-Based Pricing (Optional)
If different staff members charge different rates for the same service, you can set staff-based pricing under the pricing section. This ensures customers are billed correctly based on the selected staff member.
Setting Service Availability
Each service can have its own availability settings that determine when it can be booked.
Navigating to the Timesheet Tab
Click the Timesheet tab in the service settings panel.
Defining Service Hours
By default, services follow the general working hours of assigned staff members. However, you can define custom availability by selecting specific days and time slots for the service.

Managing Holidays and Special Availability
- You can configure blackout dates for holidays or unavailable periods
- You can also add special availability for peak seasons or promotional events

Please also take into consideration that, if you configure weekly schedule for a service, it will override your business hours settings in the general settings. And if you set up a specific working hours for a staff, and assign this service to that staff, then the staff's working hours will override your service specific weekly schedule. Therefore, the priority is as such:
- Staff - Highest priority
- Service - 2nd highest priority
- Working hours (General settings) - Lowest priority
Adding Extra Options to Services
Booknex allows you to add Extras, which are optional add-ons that customers can select when booking a service. This is useful for businesses that offer additional features, upgrades, or customizations.
How to Add Extras to a Service
Go to the Extras Tab
Open the service settings panel and navigate to the Extras tab.
Create a New Extra
Click "Add Extra" and enter the details:
- Extra Name – A short, descriptive name (e.g., "Aromatherapy Upgrade" or "Premium Hair Treatment")
- Extra Price – Define the cost of the extra item or service
- Extra Image – Upload an image that represents the extra
- Extra Duration – If the extra adds time to the service, specify the additional minutes. Leave blank if it doesn't extend the booking duration
- Maximum Quantity – Set the limit for how many times a customer can select the extra in a single booking

Activating Extras for Booking
Once saved, customers will be able to select extras when booking the associated service.
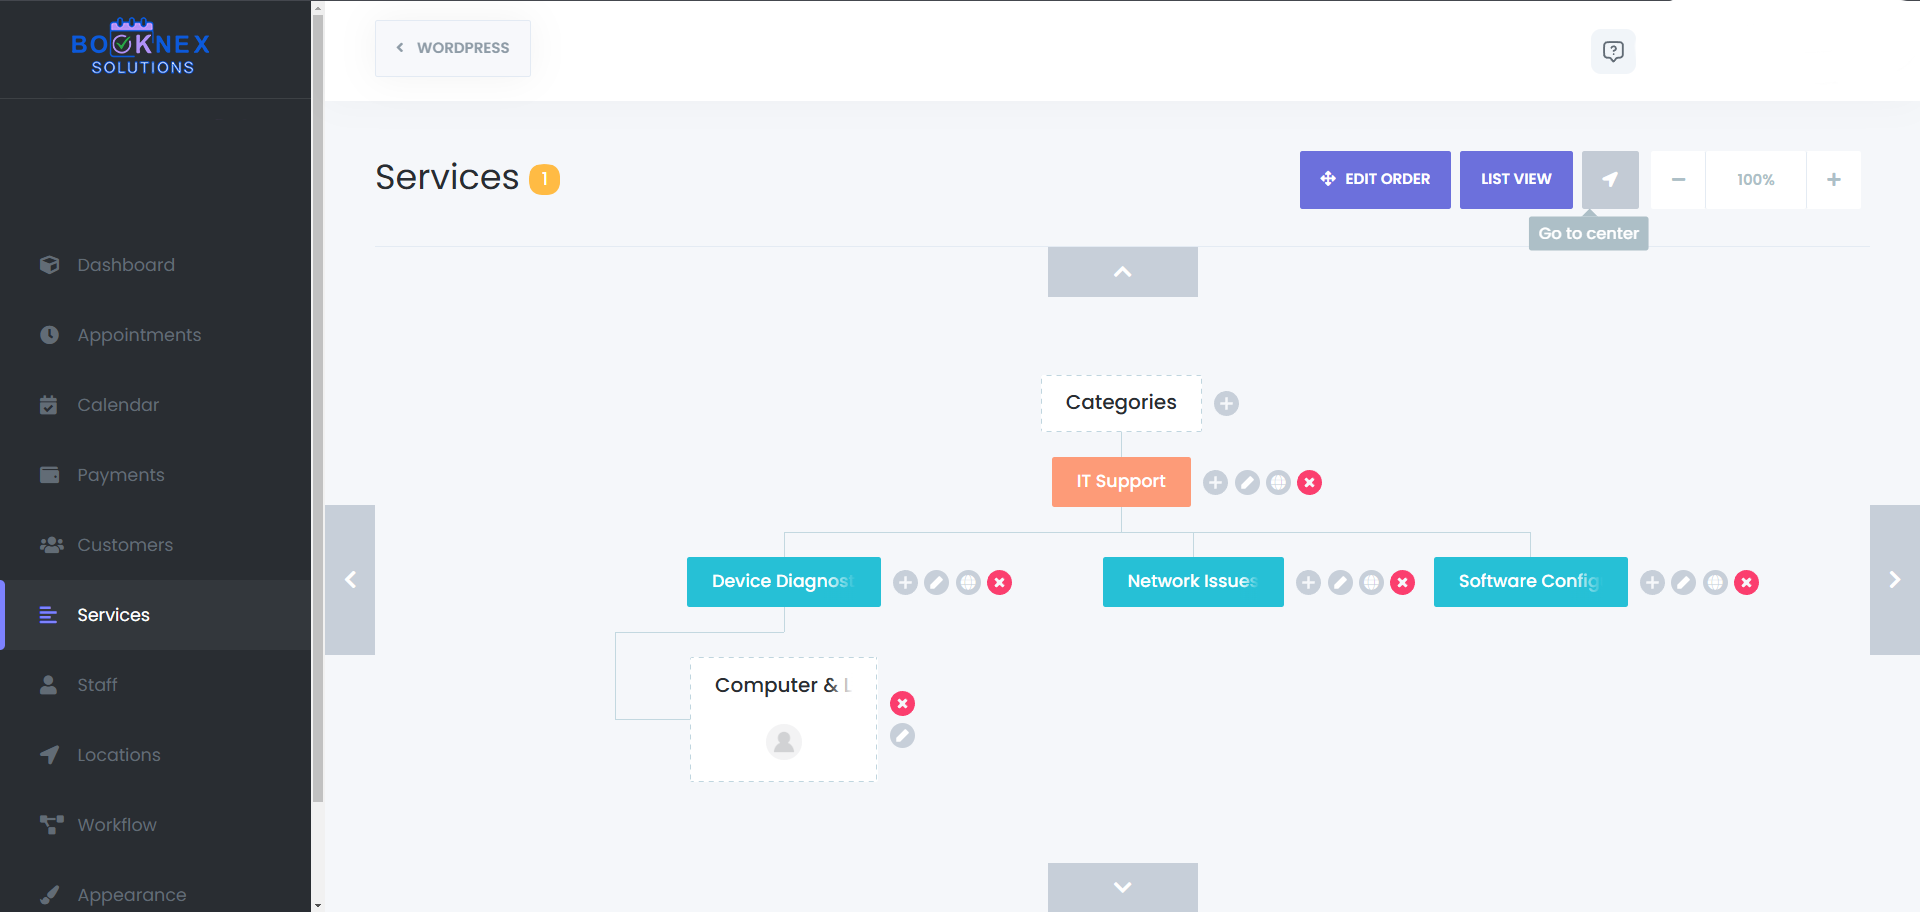
Navigating the Service Structure Map
Booknex offers an interactive Service Structure Map, allowing you to visualize your service hierarchy.
Moving and Zooming
Use your mouse or trackpad to pan around the map and explore different categories and services. Zoom in and out to get a better view of the structure.
Re-centering the Map
If you lose track of your position on the map, click the re-center button next to the zoom controls to reset the view.
Summary
The Services module in Booknex is designed to give you full control over your service offerings, ensuring a smooth and organized booking experience. With categories, subcategories, staff assignments, pricing structures, availability settings, and extras, you can create a service setup that aligns perfectly with your business model.
By taking the time to properly configure your services, you ensure that customers can easily find, book, and enjoy the services you provide.
Customers Module
The Customers module in Booknex acts as a centralized hub for managing all client-related information, ensuring a seamless and efficient booking experience. It allows businesses to store, track, and update customer data, making it easier to manage appointments, streamline communication, and build long-term client relationships. By keeping all customer details organized in one place, businesses can enhance service quality and improve customer satisfaction.
Accessing the Customers Module
Navigate to the Dashboard: Log in to your WordPress admin panel. Locate and click on the Booknex plugin in the sidebar.
Open the Customers Section: Within the Booknex menu, select Customers to access the module.

Adding Customers
Booknex offers multiple ways to add and manage customers, giving businesses the flexibility to build and maintain their client database with ease. Customers can be added manually, allowing for precise data entry when handling individual clients, or imported in bulk using a CSV file, making it simple to transfer existing customer lists into the system. Additionally, Booknex provides an export function, enabling businesses to back up or migrate their customer data whenever needed. These options ensure that all businesses can efficiently manage customer records without hassle.
Manual Addition
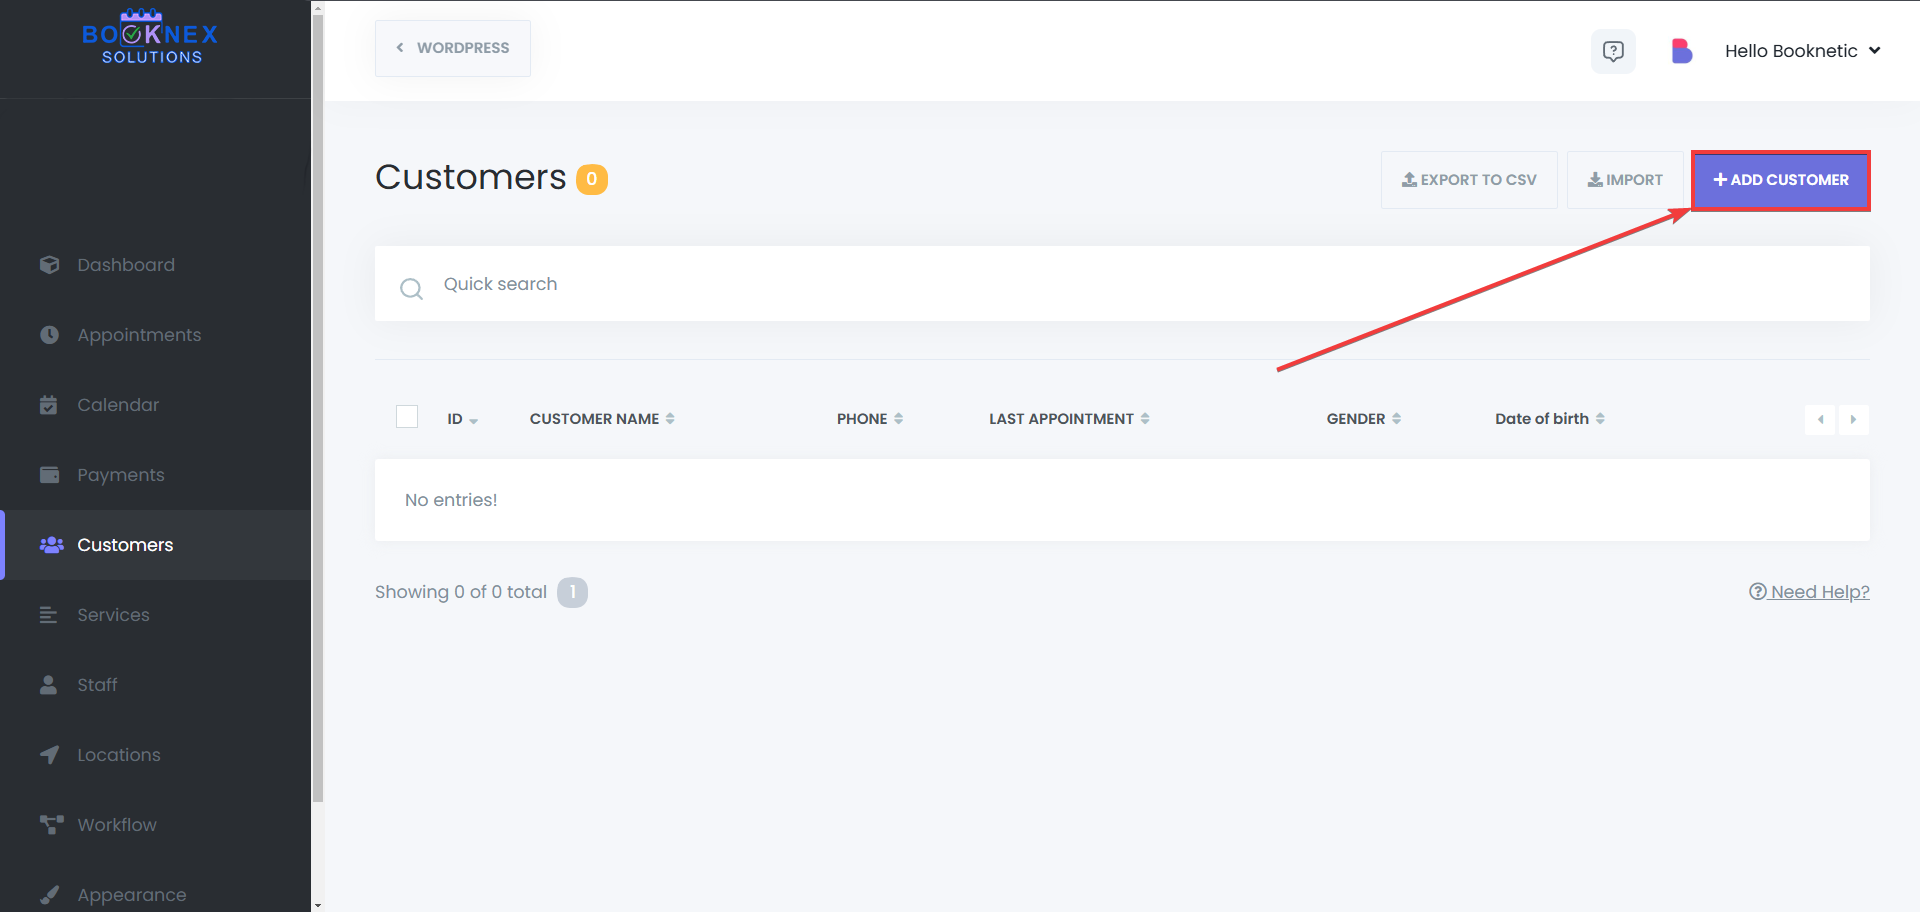
Initiate the Process: Click the "ADD NEW" button at the top of the Customers page.
Enter Customer Details:
- Name and Surname: Input the customer's full name
- Email: Provide a valid email address
- Phone Number: Enter the contact number
- Profile Picture: Upload an image if available
- Gender: Select the appropriate option
- Date of Birth: Specify the birth date
- Note: Add custom notes about the customer
Allow the customer to log in: When the "Allow to log in" option is enabled, you can connect the customer profile to an existing WordPress profile, or create a new WordPress profile for that customer from Booknex directly. This will allow your customers to save their information on booking panel if they log in to their account, and if you have the customer panel add-on, they will be able to manage their bookings by logging in to their account and using the customer panel.
Run workflows on save: If you have any workflows related to customer creation, like sending email to the customer email, or the phone number, or any other type of workflow that runs when a new customer is created, it will work if this toggle is kept on. Otherwise, if the toggle is turned off, the workflow action will also not start. If you'd like to learn more about workflows, you can check the workflow module of Booknex.
Save the Information: After filling in the details, click the "SAVE" button to add the customer to your database.

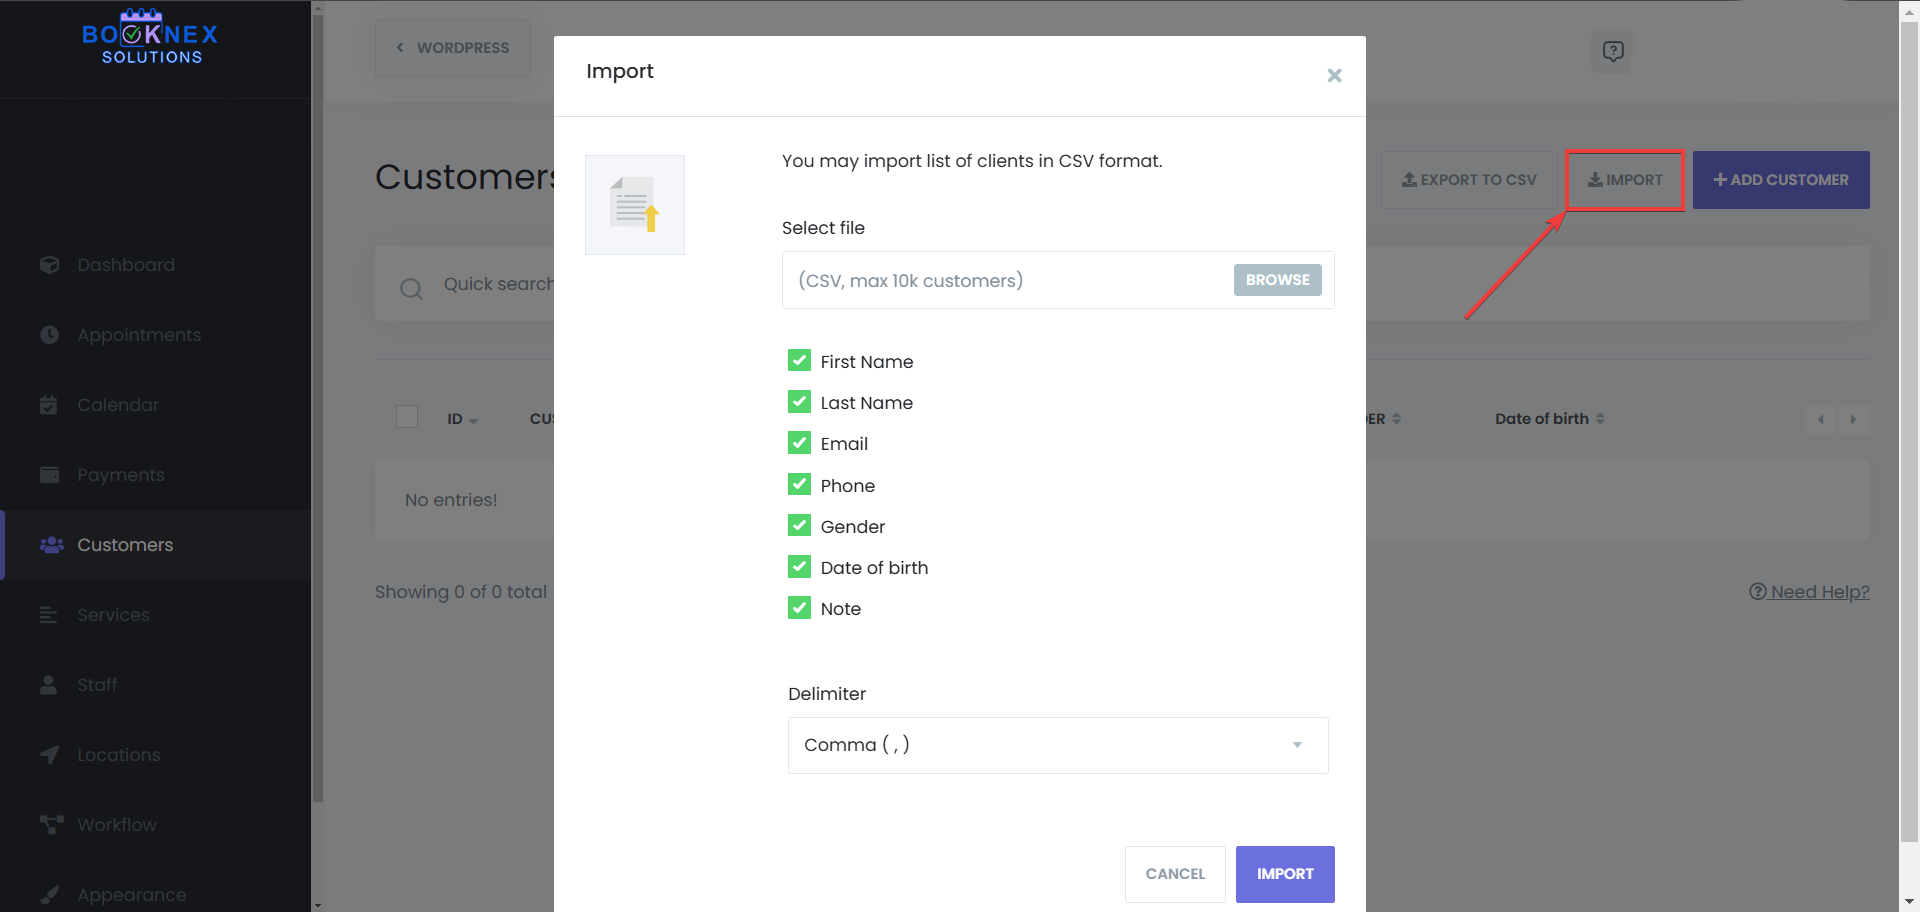
Importing Customers via CSV
Prepare the CSV File: Ensure your CSV file is formatted correctly with appropriate headers matching the required customer fields.
Import Process: In the Customers module, look for the "Import" option. Upload your CSV file and follow the on-screen instructions to map fields and complete the import.
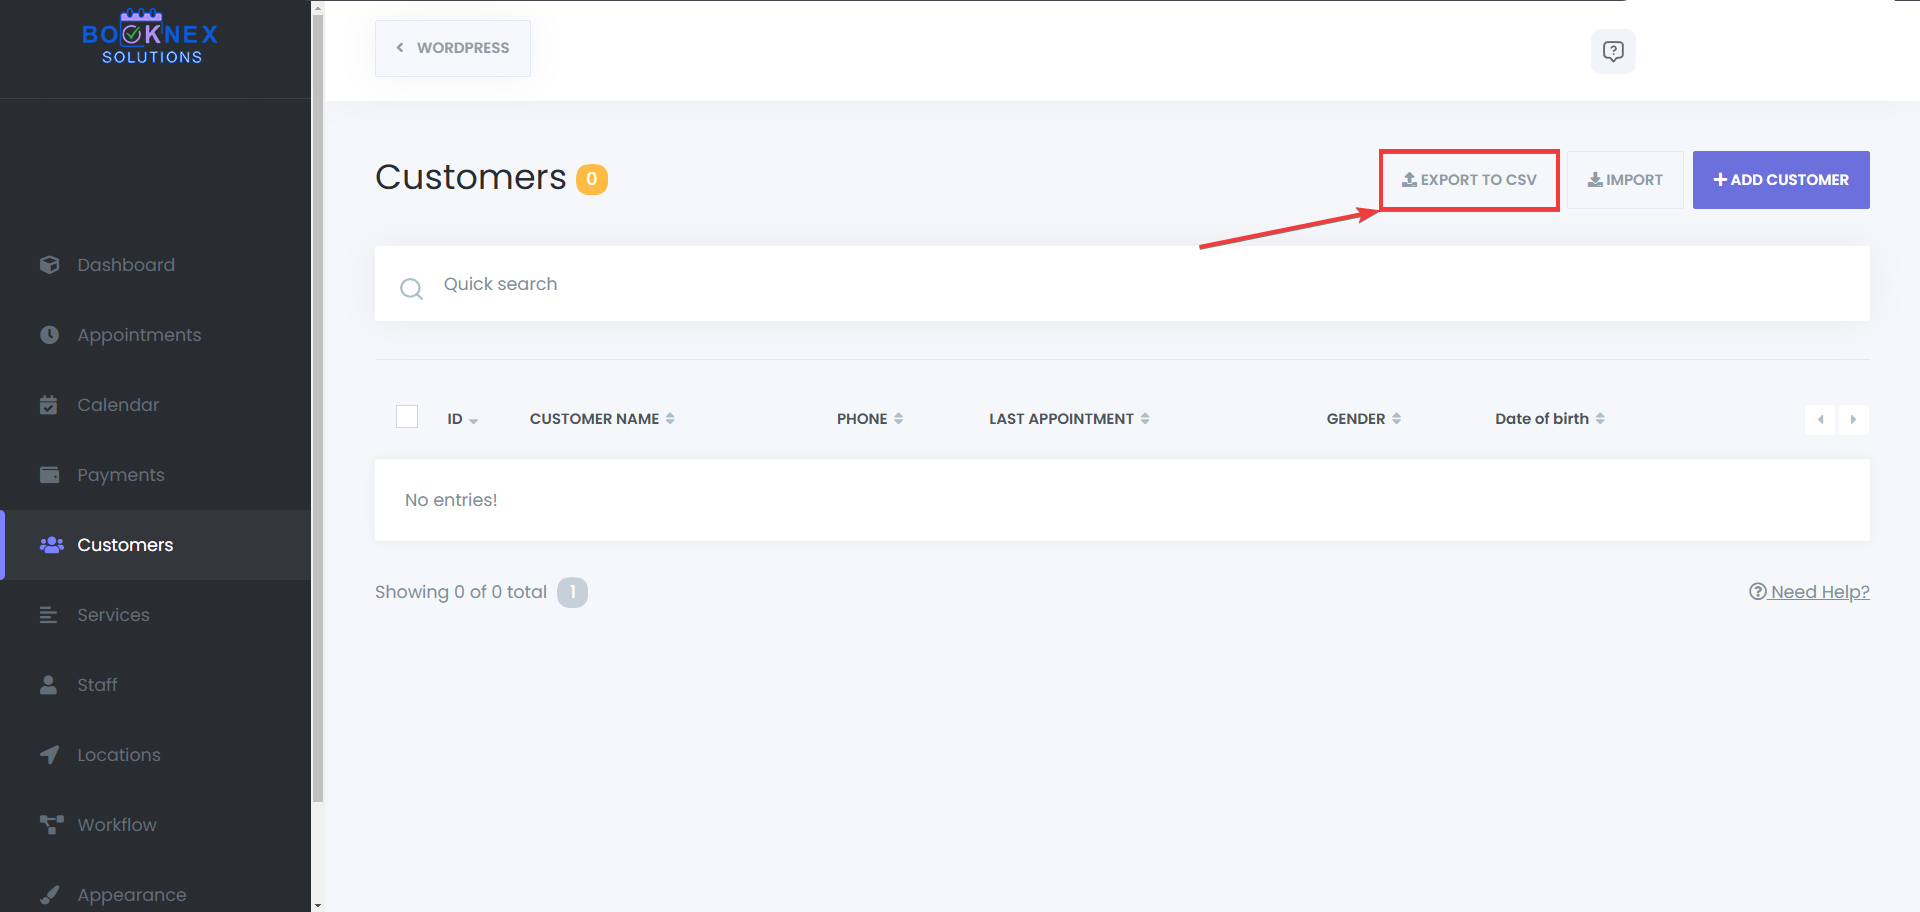
Exporting Customer Data
Initiate Export: Click on the "Export" button within the Customers module. Download the File: The system will generate an Excel file containing your customer data, which you can save for backup or analysis purposes.
Managing Customer Information
Efficient management of customer data is essential for improving customer relationships and ensuring a smooth booking experience. By maintaining up-to-date customer profiles, businesses can personalize services and communicate effectively with clients. Well-organized customer data also helps reduce scheduling errors and improve overall customer satisfaction. Keeping records current ensures that every interaction with a client is informed, professional, and seamless.
Editing Customer Details
Locate the Customer: Use the search bar to find the customer by name, email, or phone number.

Edit Process: Click the "Edit" button next to the customer's name.

Update the necessary information in the provided fields. Save the changes to update the customer's profile.

Deleting Customers
Single Deletion: Click the "Delete" button corresponding to the specific customer.
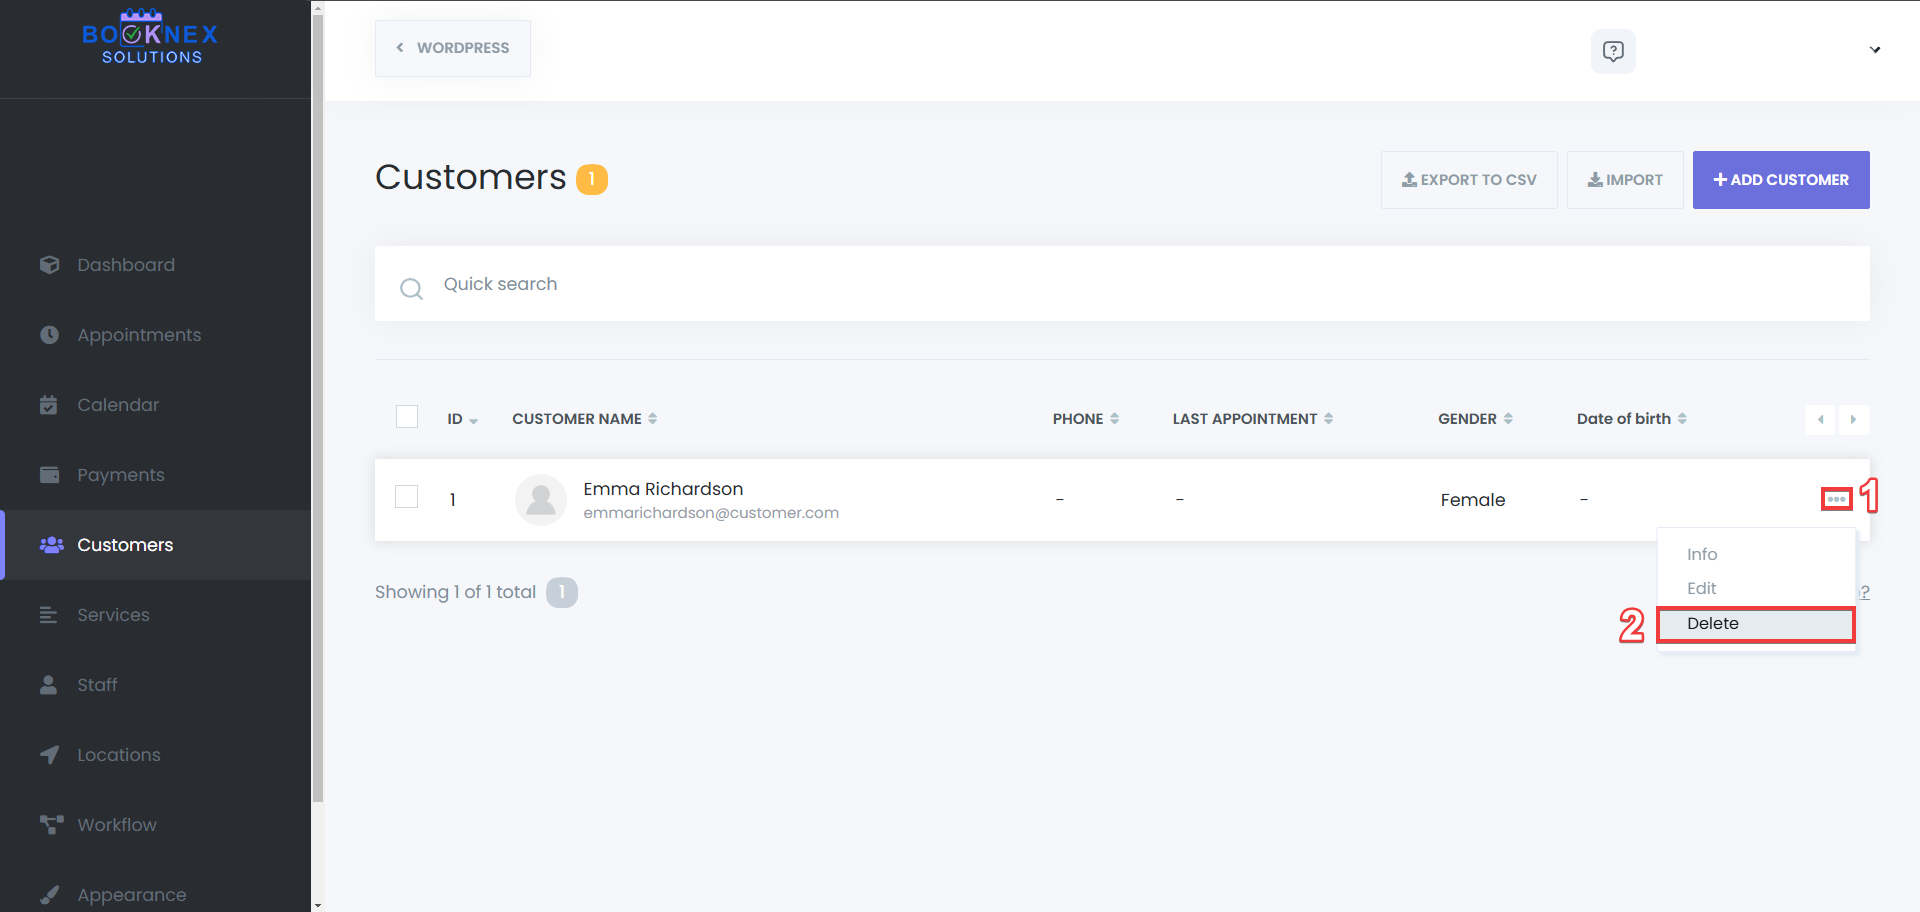
Bulk Deletion: Select multiple customers using the checkboxes. Click the "Delete" button at the bottom to remove the selected entries.

Customer Registration Methods
Your customers have two ways for signing up and having their own customer profile. One of them is, having an account created for your customer automatically, when they book their first appointment, and the other one is using the sign-up panel of Booknex. Here's how you can set them up:
Booking for the First Time
When a customer books an appointment for the first time, Booknex automatically creates a profile for them.
Profile Creation: Upon the initial booking, a customer profile is generated in the system. Credentials Notification: A password is automatically generated and sent to the customer via email notification. Important Consideration: This registration process occurs only once. The password is encrypted after creation and cannot be resent. Ensure customers are aware to save their credentials for future reference. Here's how to set it up:
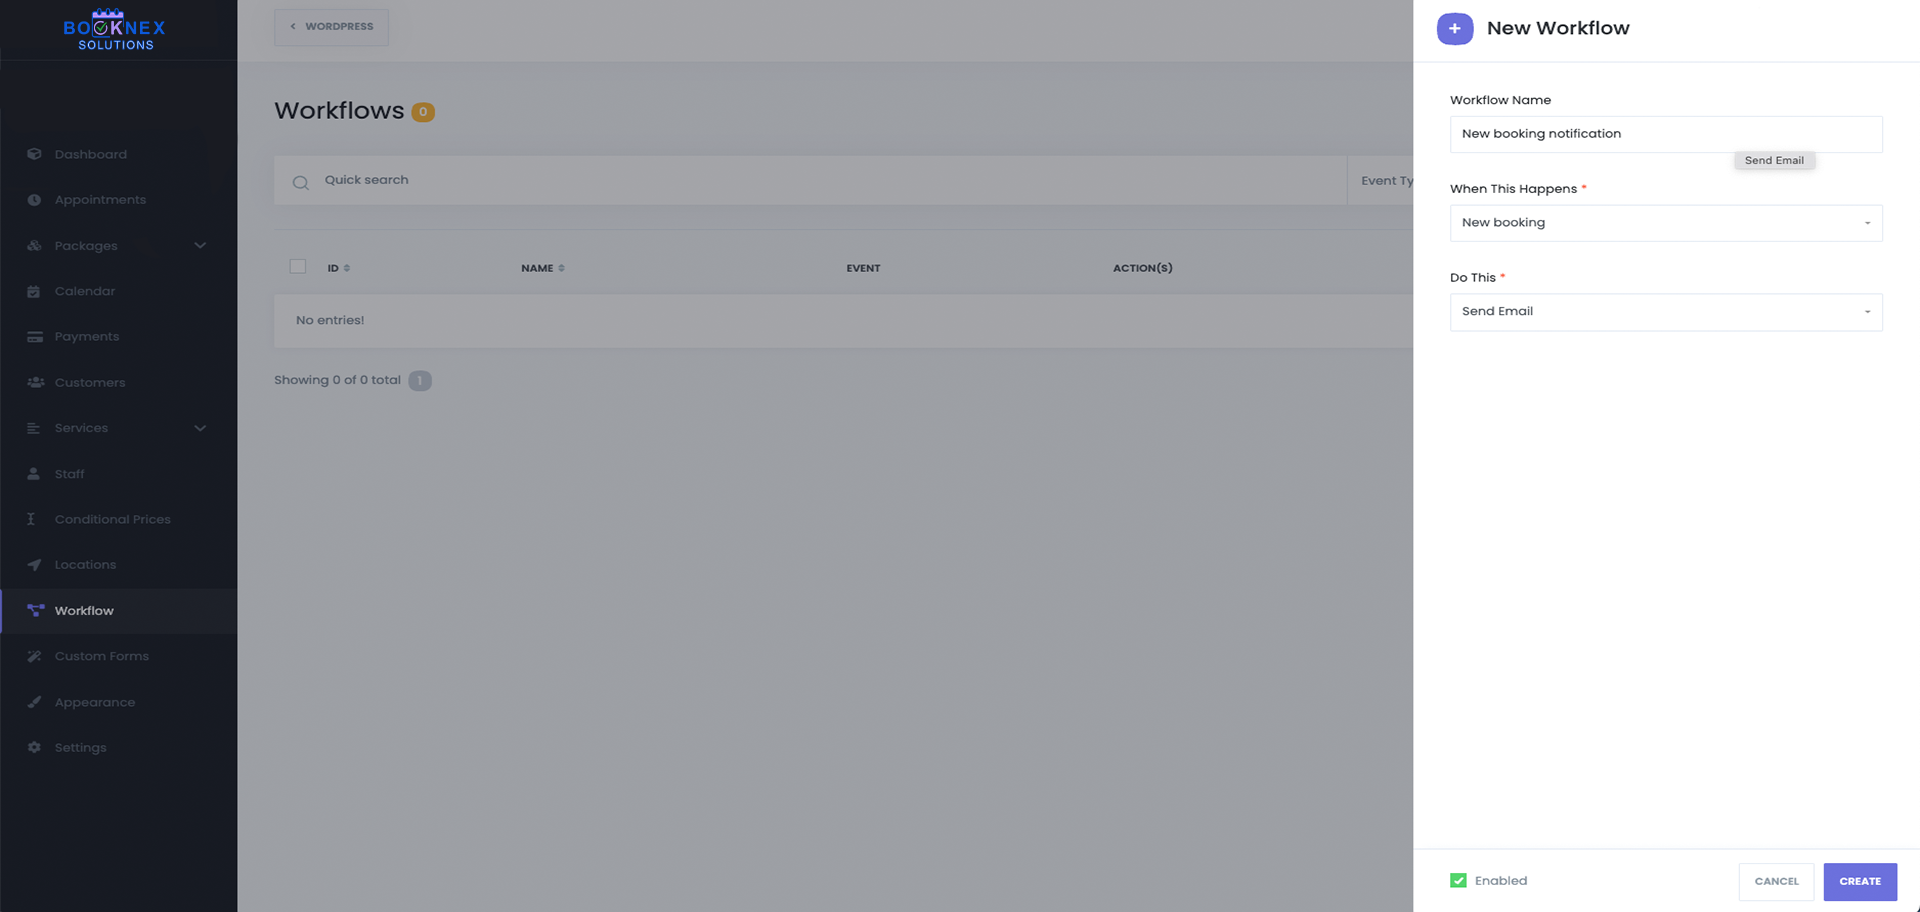
Go to Workflows tab. Create a new workflow. Set the trigger as "New customer created"

After that, edit the contents of the sent notification, and add the {customer_password} keyword to the notification, to make sure that the customer does get their password generated and sent to them automatically. You can set up the notification content as you'd like, but the {customer_password} keyword is needed to be included in that notification for your customers to receive their passwords.

Using the Sign-Up Panel of Booknex
Booknex provides a dedicated sign-up panel that allows customers to register their accounts before making an appointment. This feature ensures a smoother booking experience by letting clients manage their appointments, update personal details, and access their booking history from their customer panel.
Access the Sign-Up Panel: Customers can visit the dedicated Sign-Up Page, where they will be prompted to create an account. This page is typically linked to the Customer Panel and can be placed on any page using the [booknex-cp] shortcode.
Filling Out the Registration Form: Customers are required to enter key information, including: Full Name – Used to personalize the booking experience. Email Address – Required for confirmations and notifications. Password Creation – Customers set a secure password for their accounts.
After finishing the sign-up process, customers can also sign in to their Booknex accounts, using the Sign-in panel.
Calendar Module
The Calendar Module in Booknex provides a centralized view of all appointments, allowing businesses to manage schedules efficiently. With multiple viewing modes, filtering options, and both Google Calendar and Outlook Calendar integrations, the calendar ensures smooth appointment tracking for both administrators and staff.
Accessing the Calendar Module
Navigate to the Booknex Plugin. Go to Booknex > Calendar to access the scheduling interface.
Overview of the Calendar Interface
- Displays all scheduled appointments in an organized format
- Provides quick actions to create, edit, or filter appointments
- Synchronizes with Google Calendar and Outlook Calendar for seamless scheduling updates
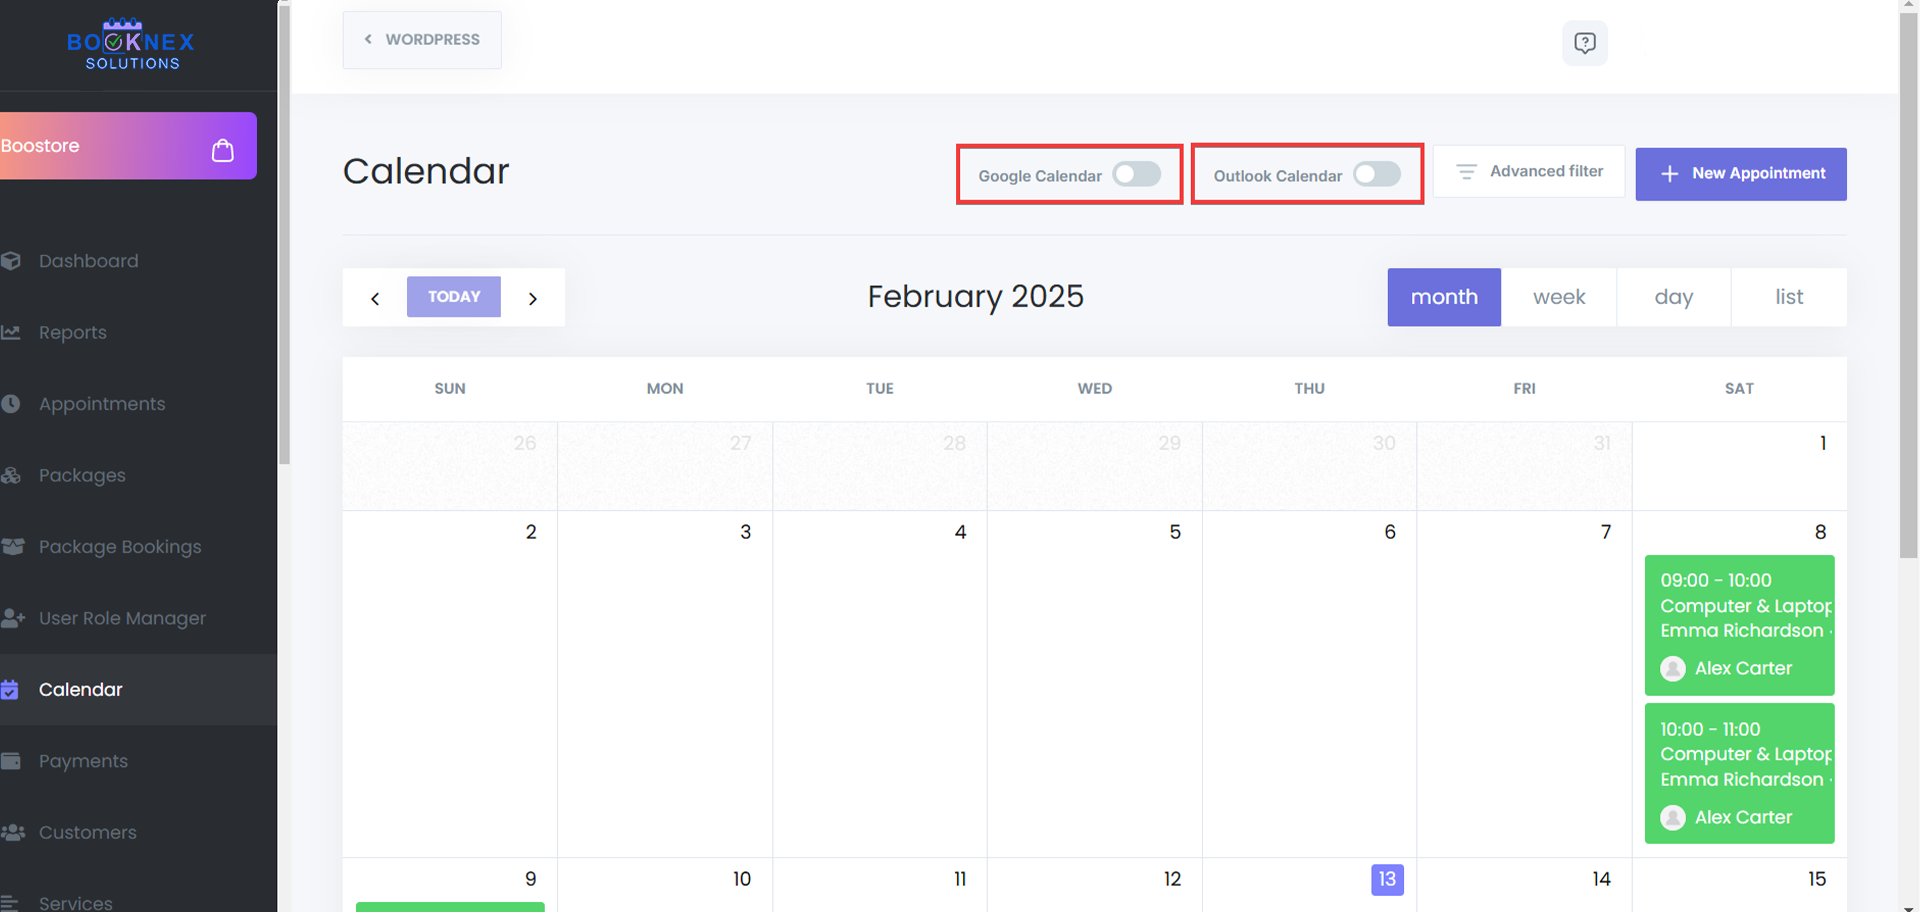
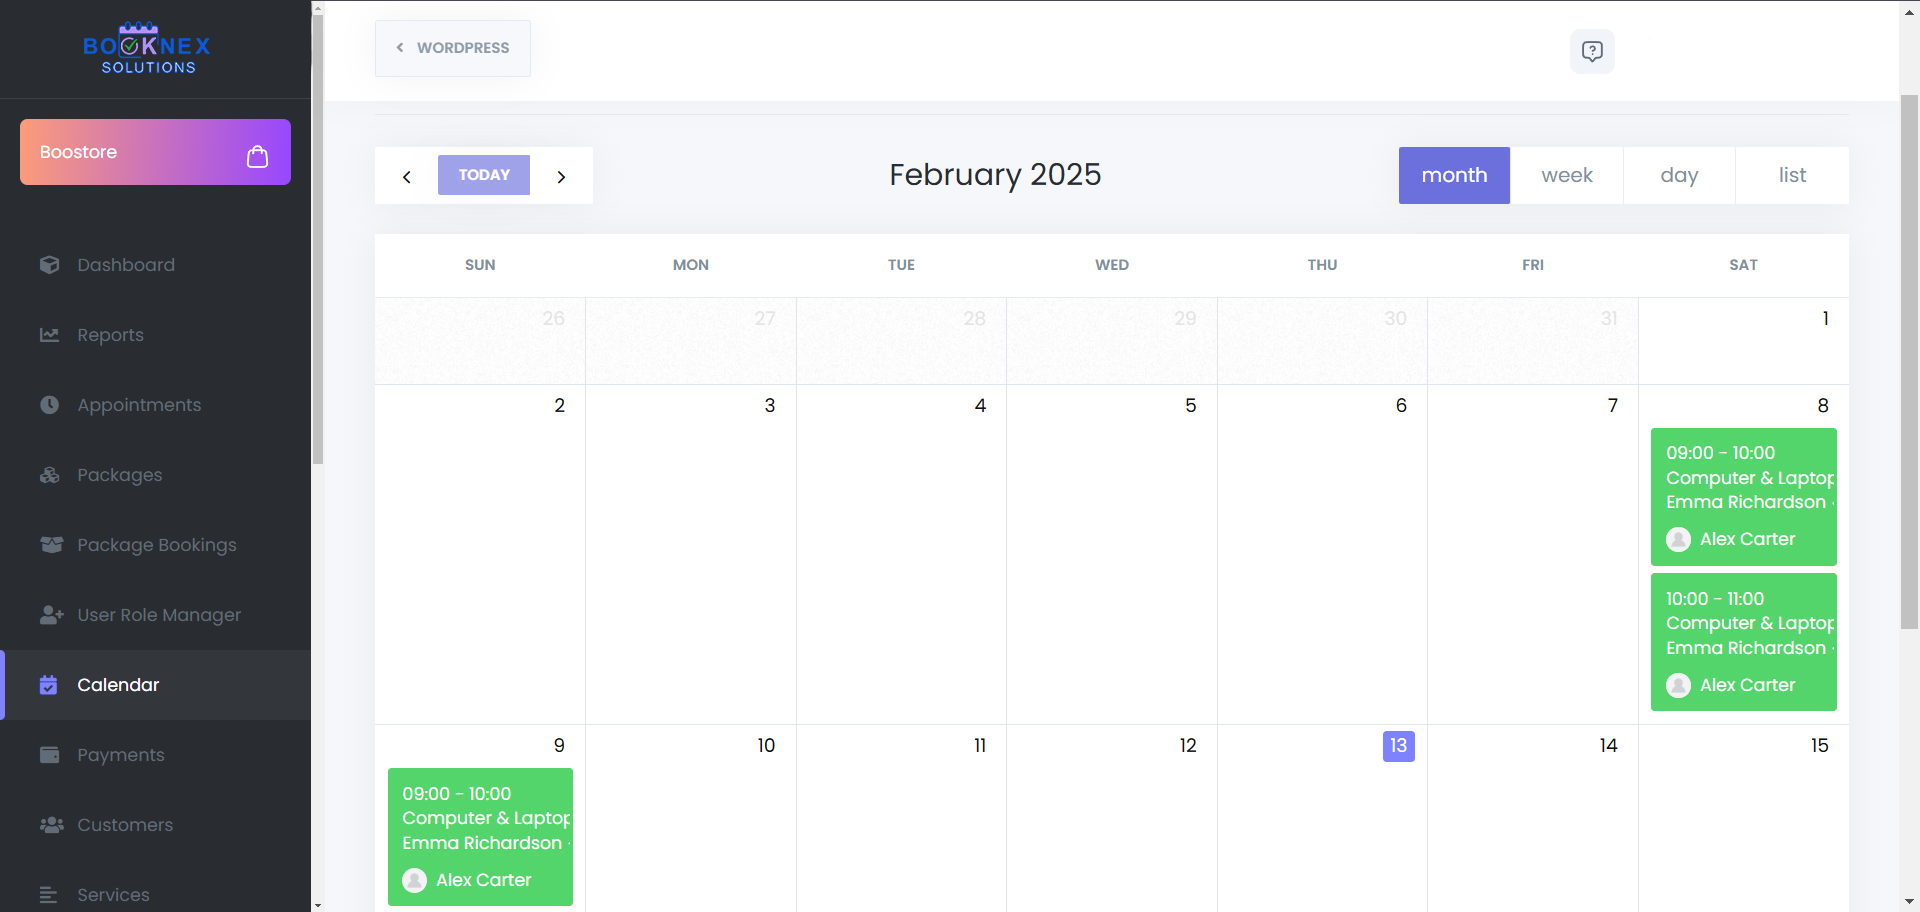
Calendar Viewing Modes
Booknex offers multiple viewing options to accommodate different scheduling preferences:
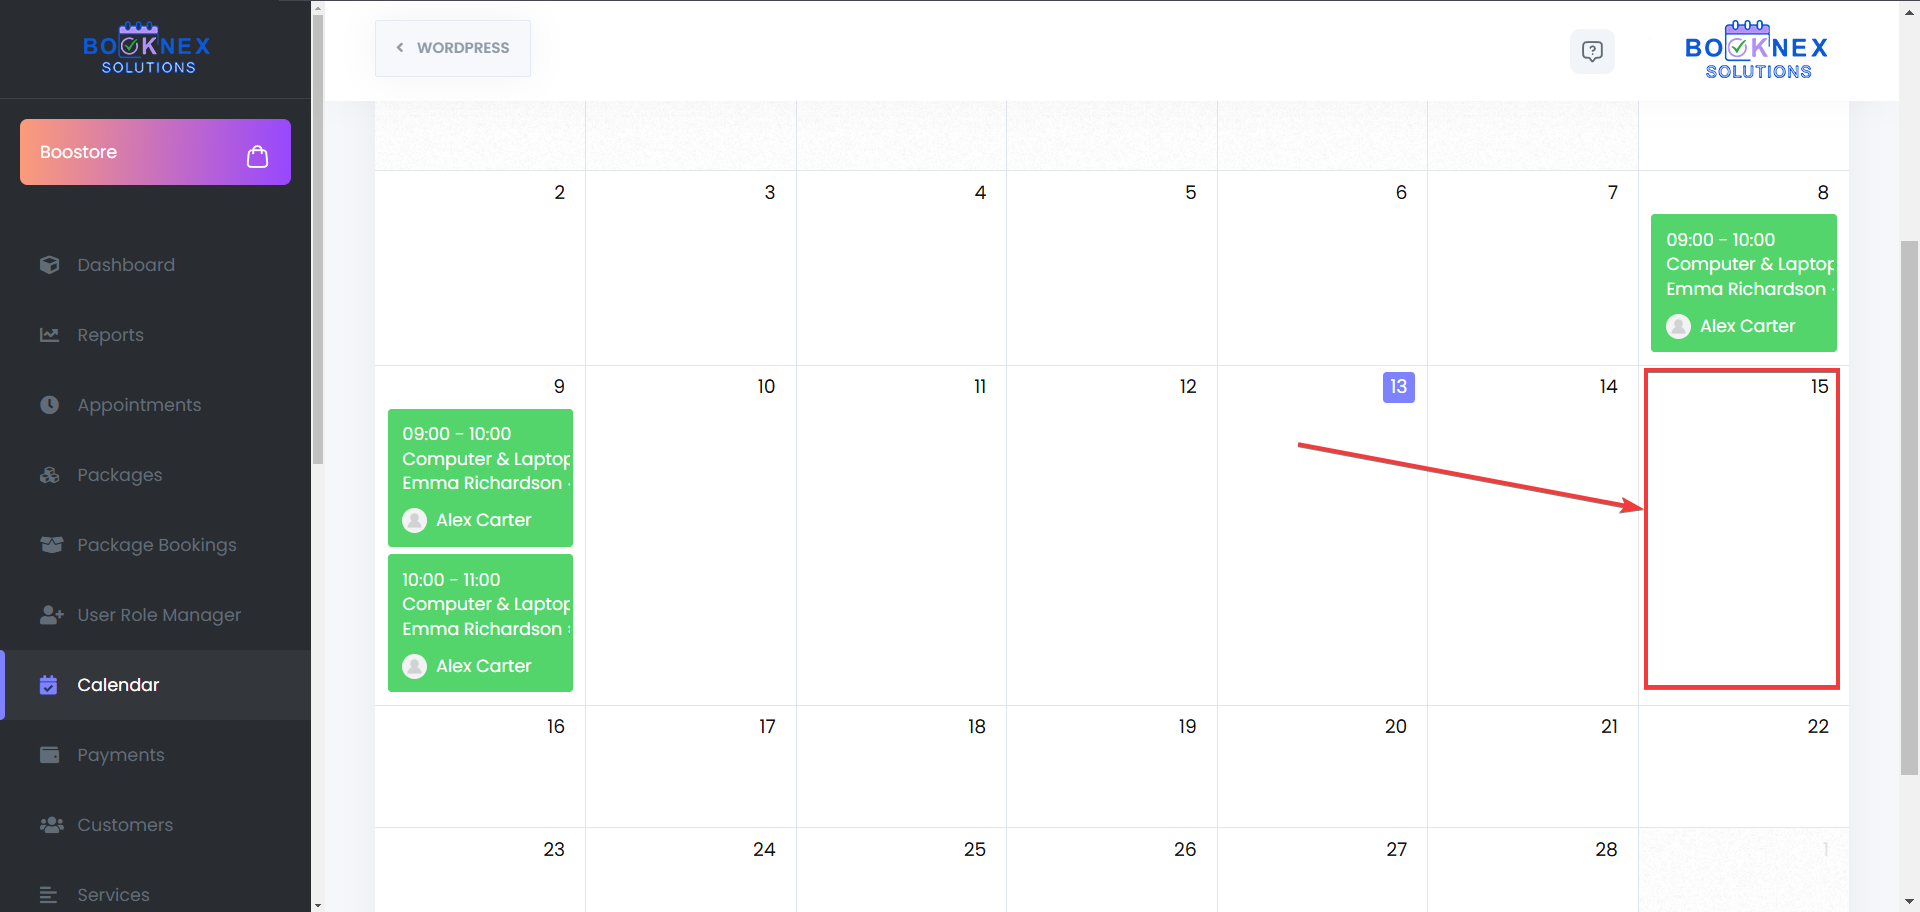
Monthly View
Displays all booked appointments for the selected month.

Weekly View
Provides a week-long breakdown of scheduled appointments.
Daily View
Shows a detailed schedule for a single day, including staff columns for better organization.

List View
Displays appointments in a structured list format for quick browsing.

Managing Appointments from the Calendar
Adding a New Appointment
Click on the desired date within the calendar.
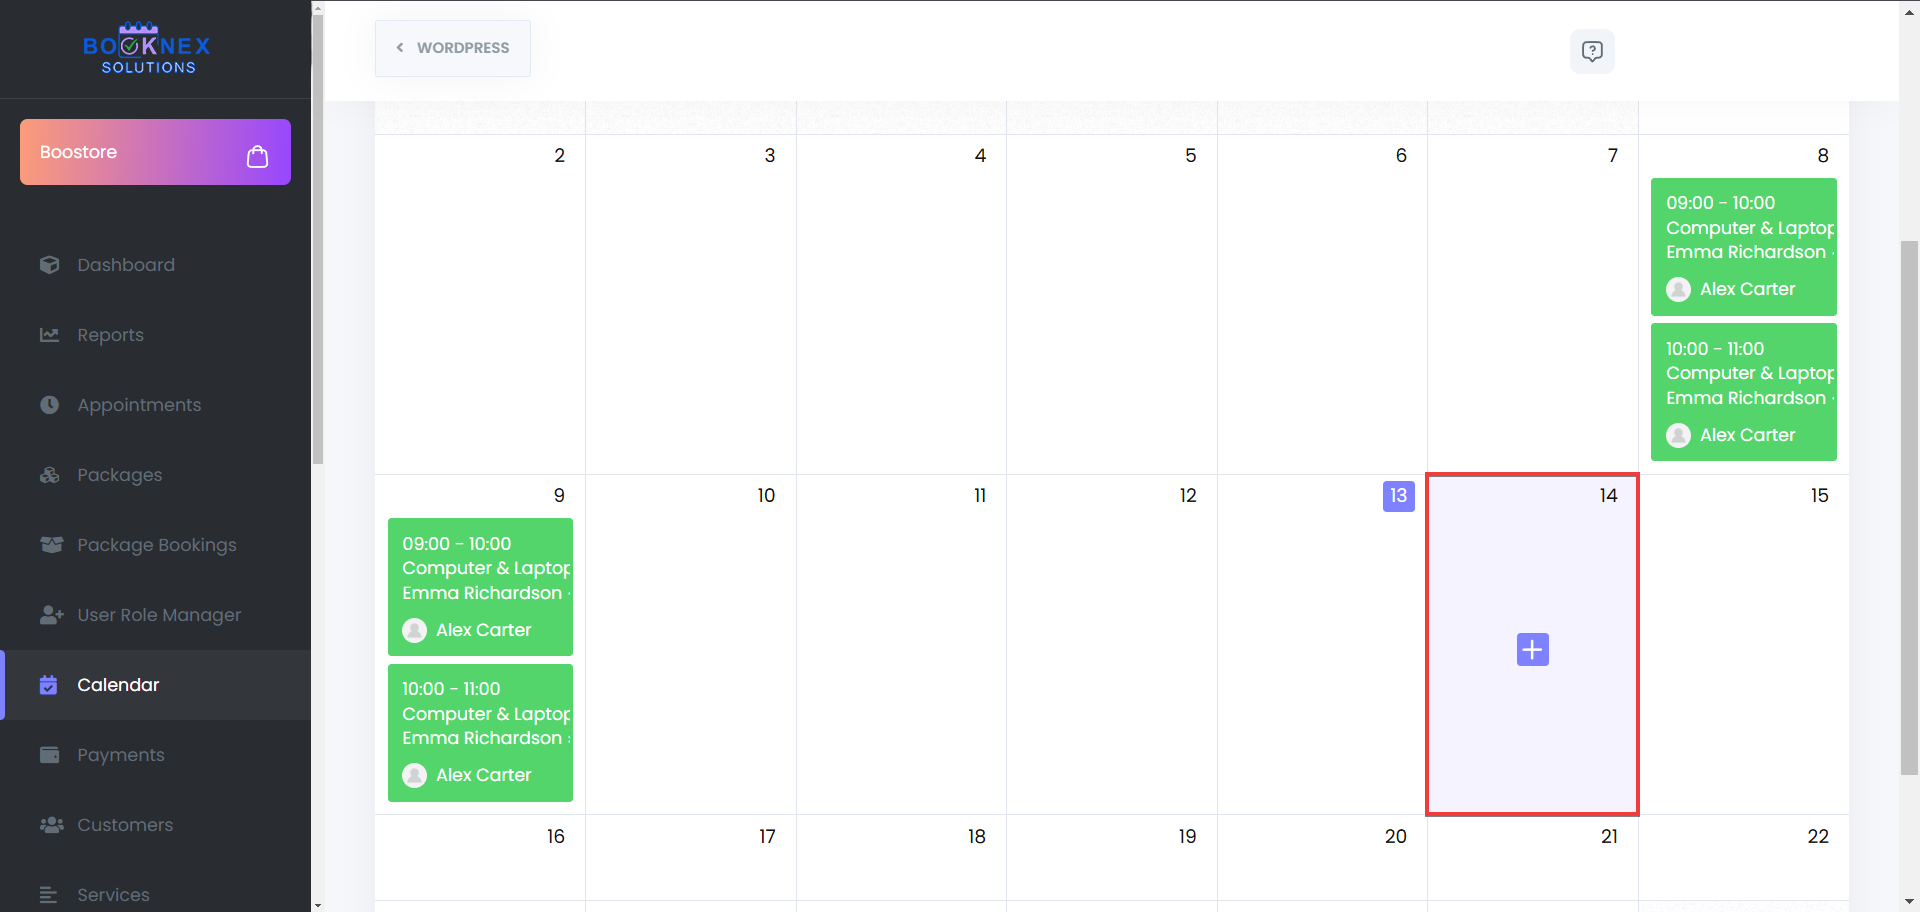
Fill in the mandatory appointment details, including:
- Location
- Category
- Service
- Staff
- Date & Time
- Customer
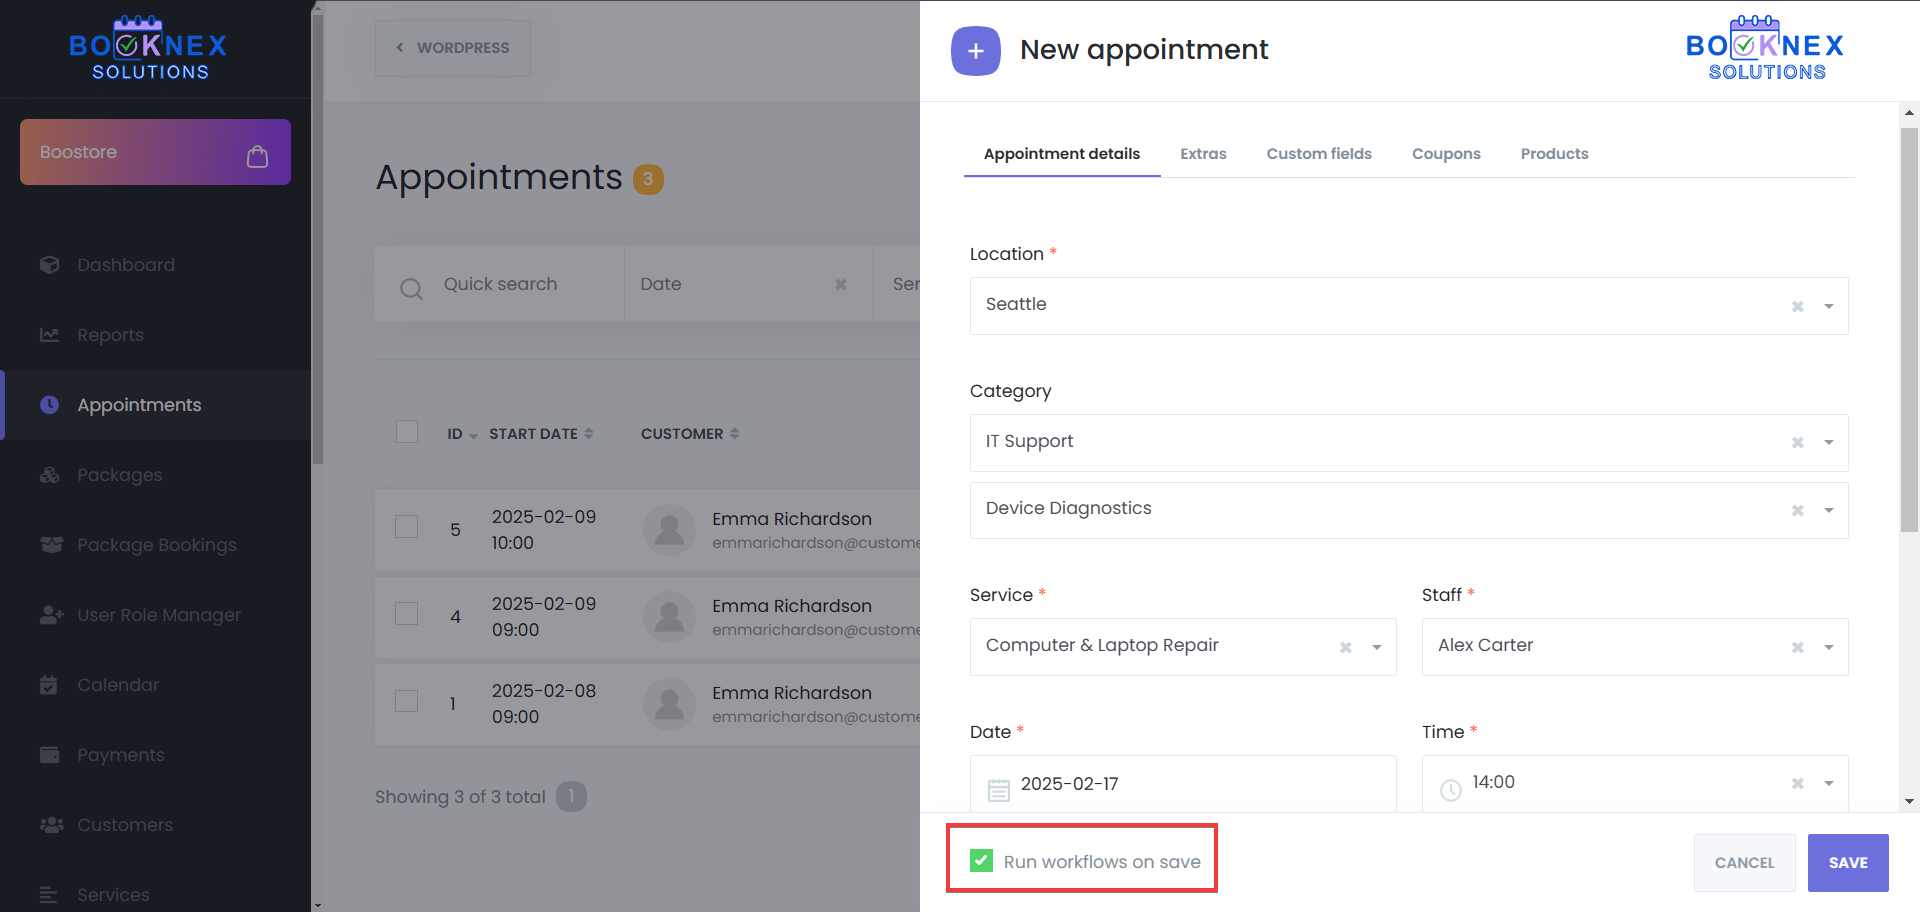
Click Save to confirm the booking, however, beware of the fact that if the "Run workflows on save" button is enabled, it will activate your workflows upon creation of a new appointment, meaning, it may send your customer and staff notifications about the appointment, based on your workflows.

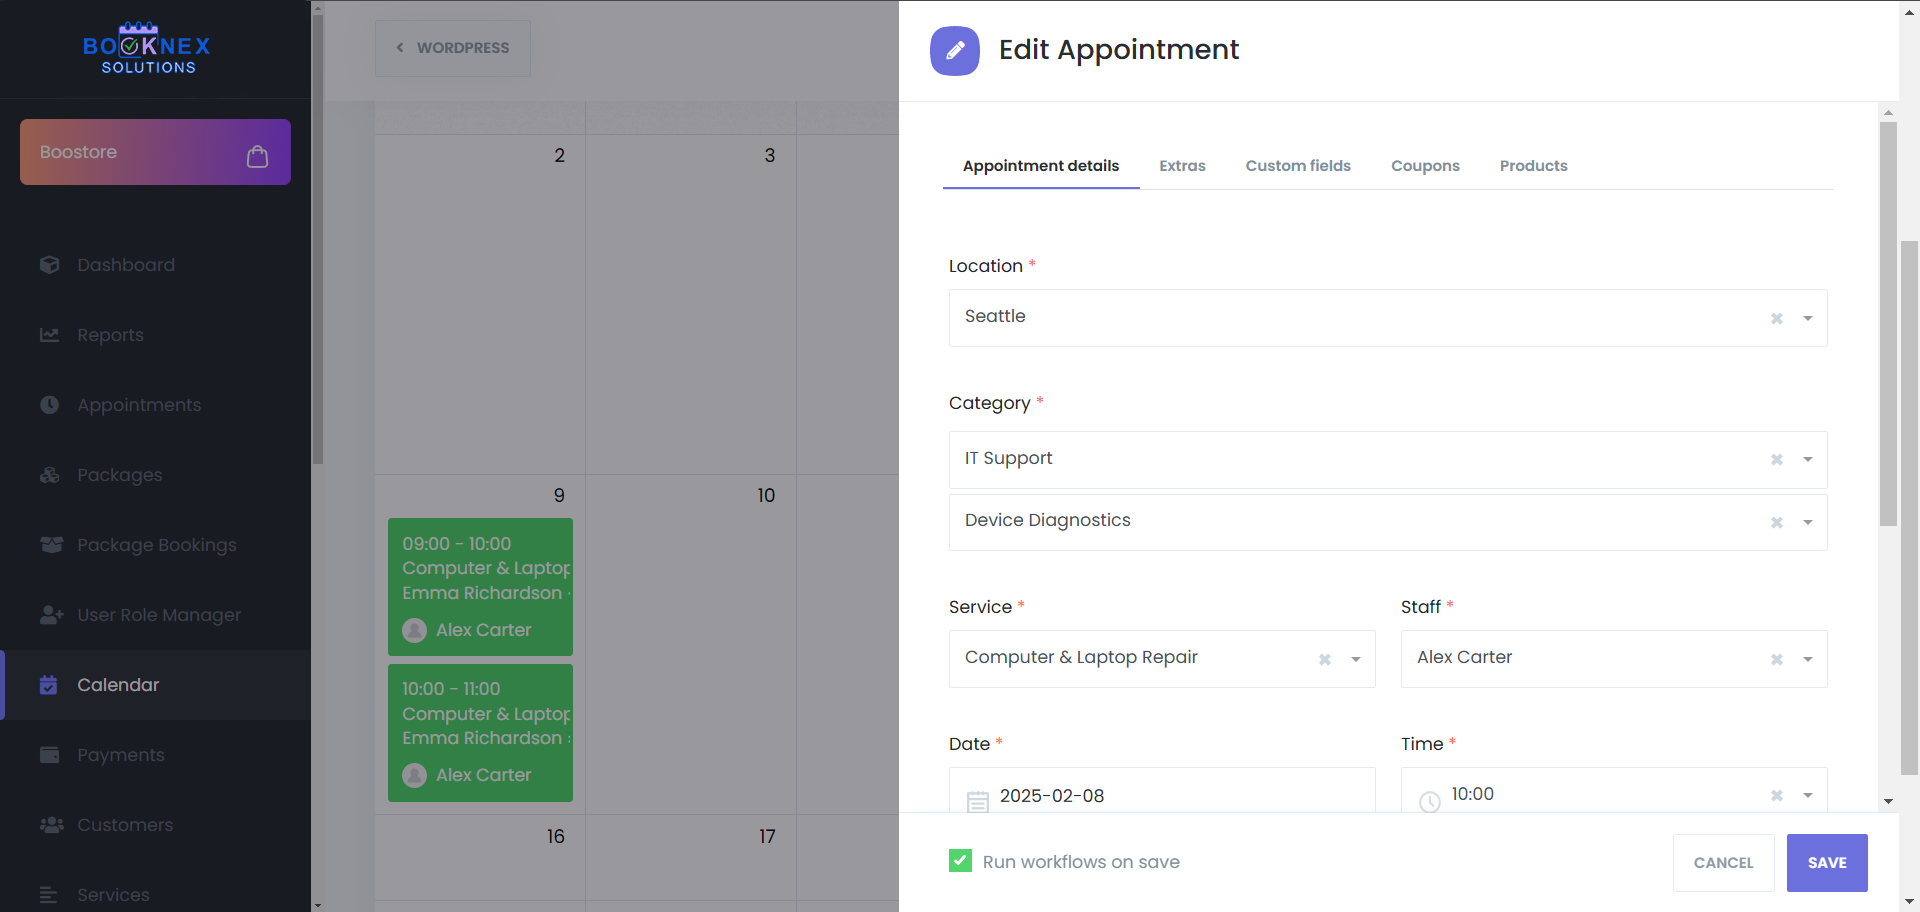
Editing an Appointment
Click on an existing appointment in the calendar.
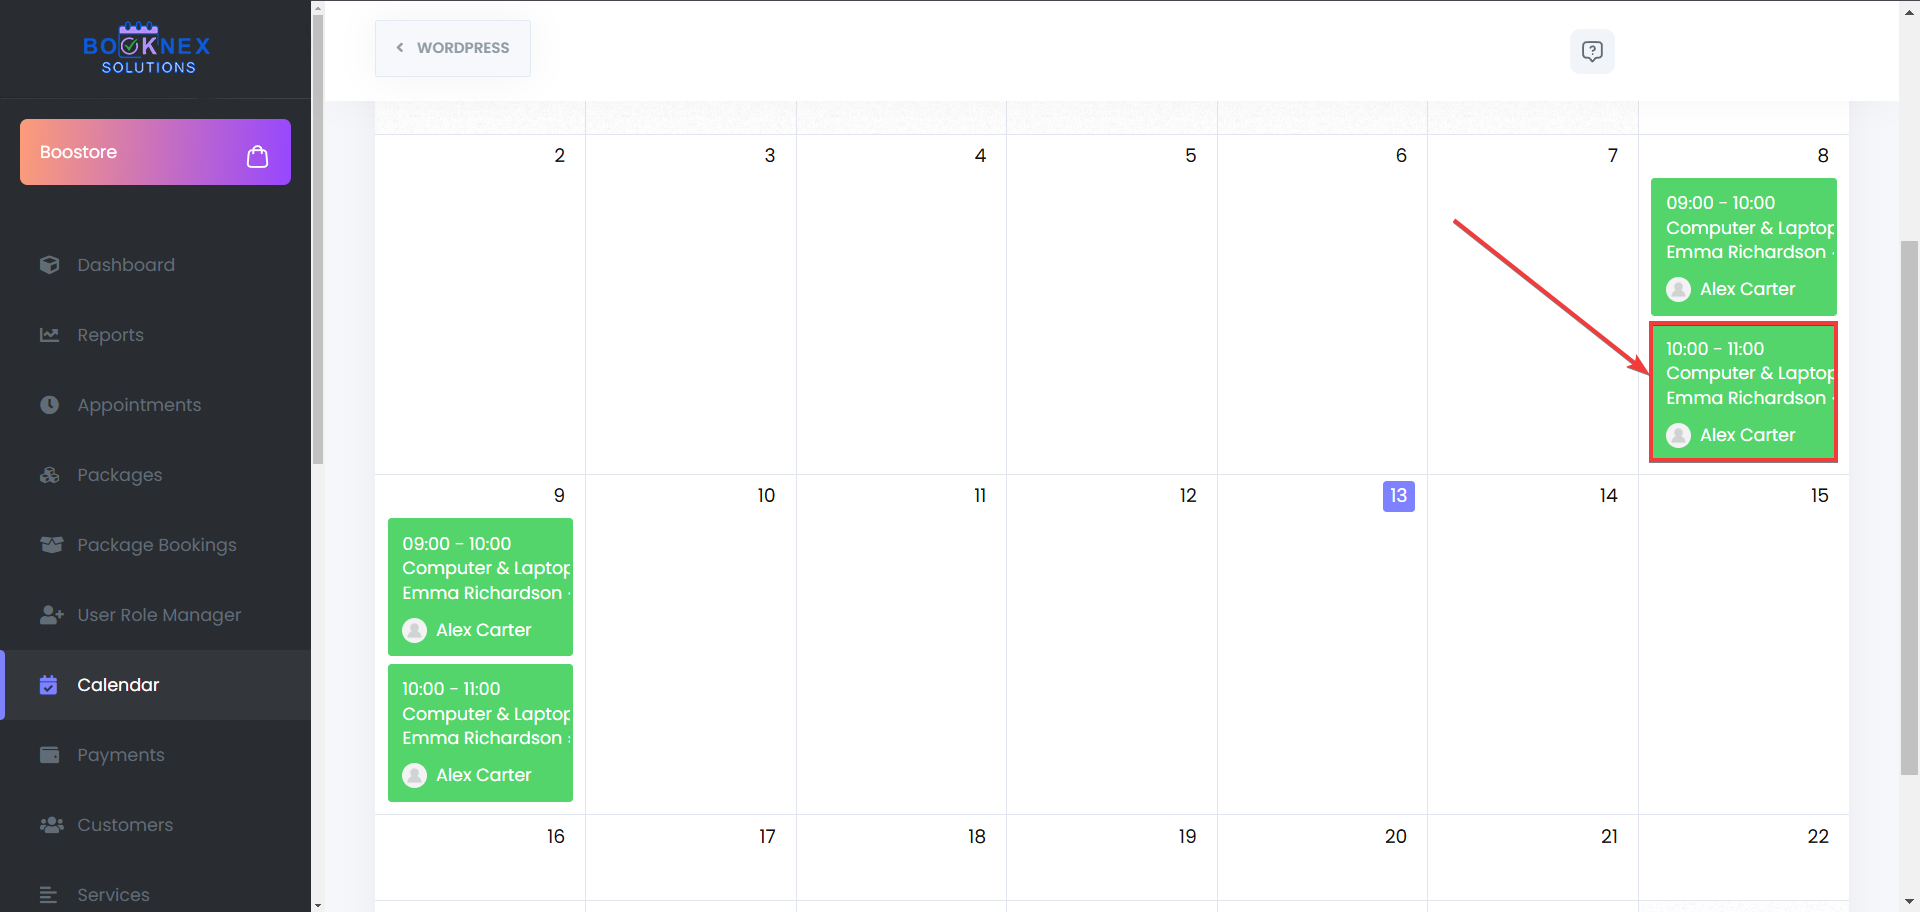
Click edit, and then modify the necessary details (e.g., time, staff, or service).
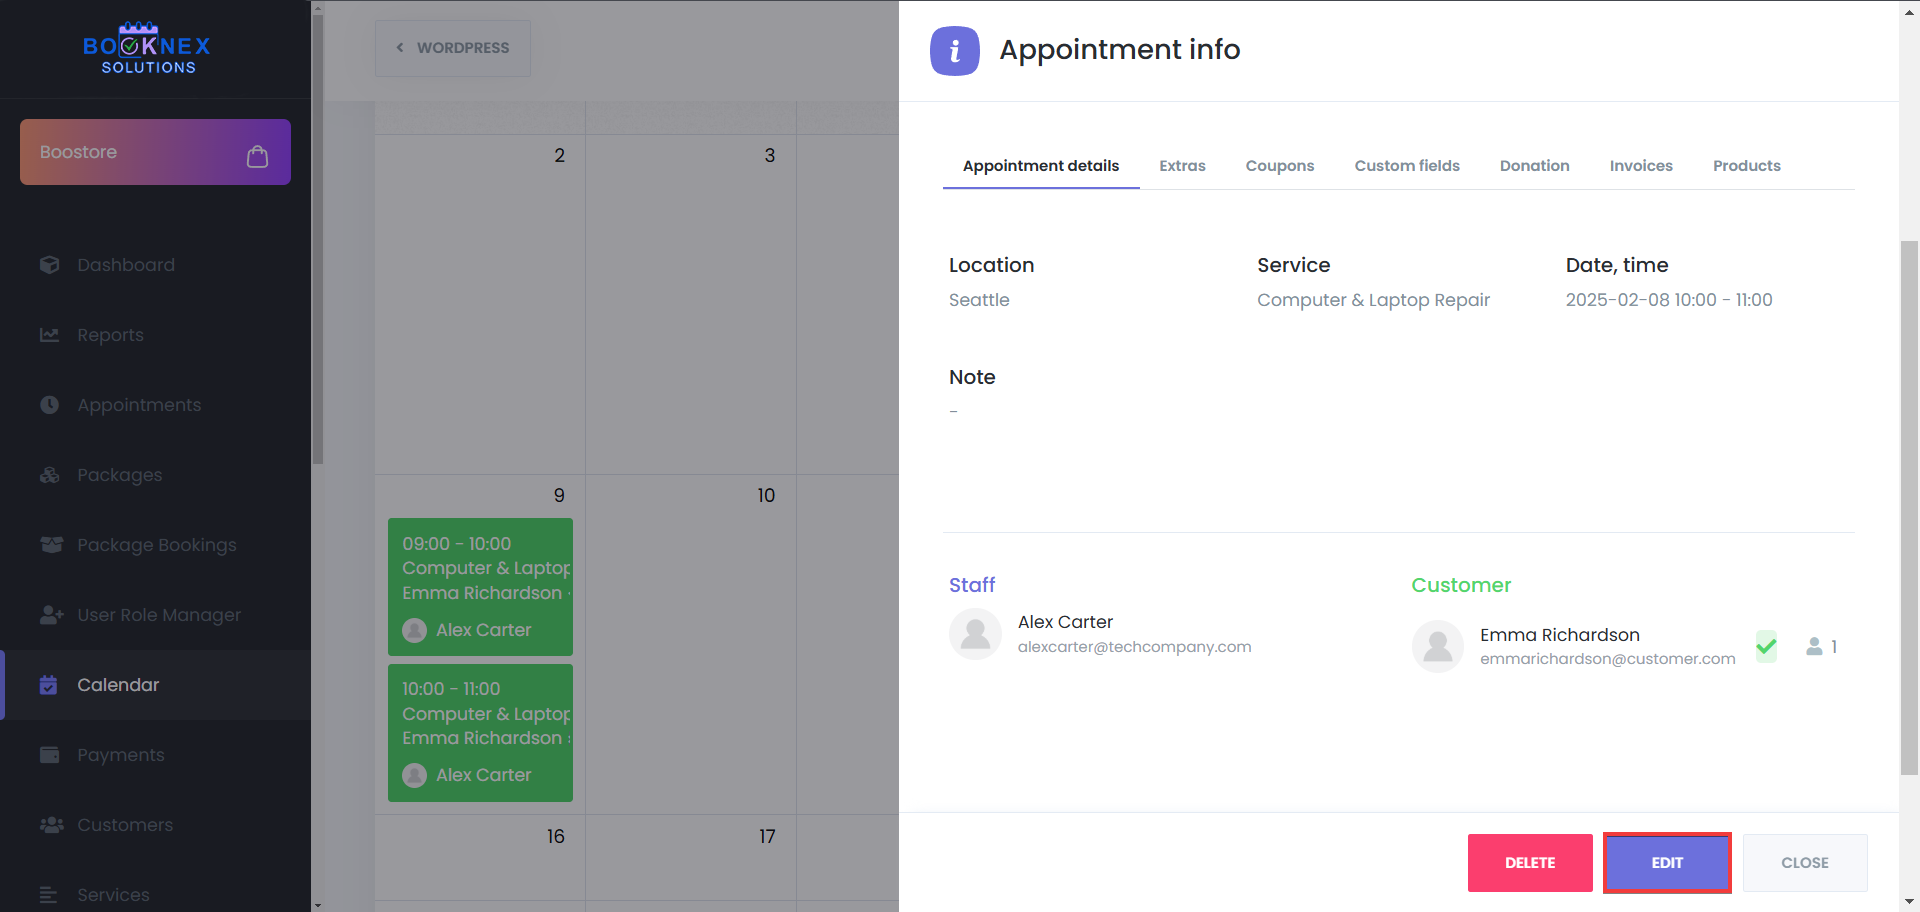
Click Update to save the changes. As before, when you edit an appointment, and the "Run workflows on save" button is enabled, it will activate your workflows upon creation of a new appointment, meaning, it may send your customer and staff notifications about the appointment, based on your workflows.
Deleting an Appointment
Select an appointment from the calendar.

Click Delete and confirm the action.
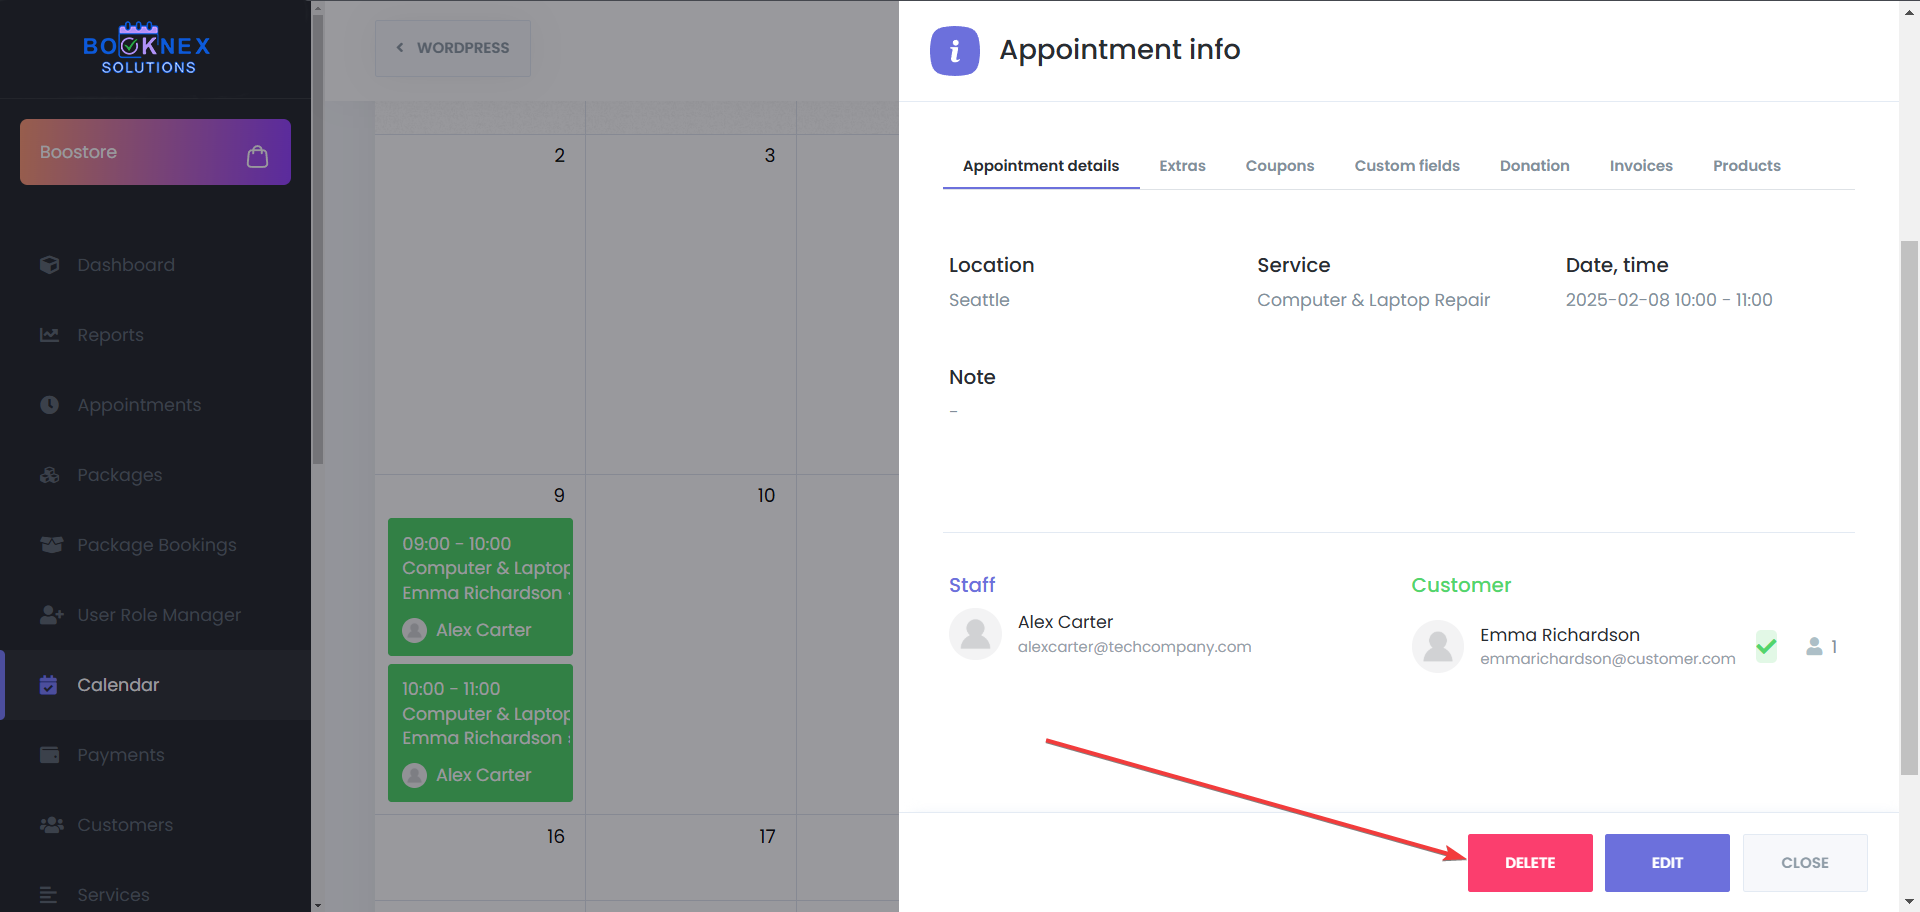
The appointment will be removed from the system.
Filtering and Searching Appointments
To quickly find specific appointments, use the built-in filters and search options:
- Filter by Location – View appointments at a specific branch or service area
- Filter by Service – Display only bookings related to a particular service
- Filter by Staff – Show appointments assigned to a specific staff member
- Search Bar – Enter customer names or appointment details to find a booking instantly

Google Calendar and Outlook Calendar Integration
Booknex supports two-way synchronization with Google Calendar, ensuring that appointments are updated across both platforms.
Benefits of Google Calendar Sync
- Automatically syncs appointments between Booknex and Google Calendar, or Outlook Calendar
- Updates in Google Calendar or Outlook Calendar reflect instantly in Booknex
- Helps prevent double bookings and scheduling conflicts
How to Enable Google Calendar Integration
- Navigate to Booknex > Settings > Integrations
- Select Google Calendar or the Outlook Calendar
- Configure synchronization settings to match business requirements
- Save changes and verify the connection

Appointments Module
Accessing the Appointments Menu
Select the Appointments tab to open the appointments interface.
Managing Appointments
Editing an Appointment
Locate the Appointment – Use the search or filter functions.
Click on the Options Icon – Open the menu next to the appointment.
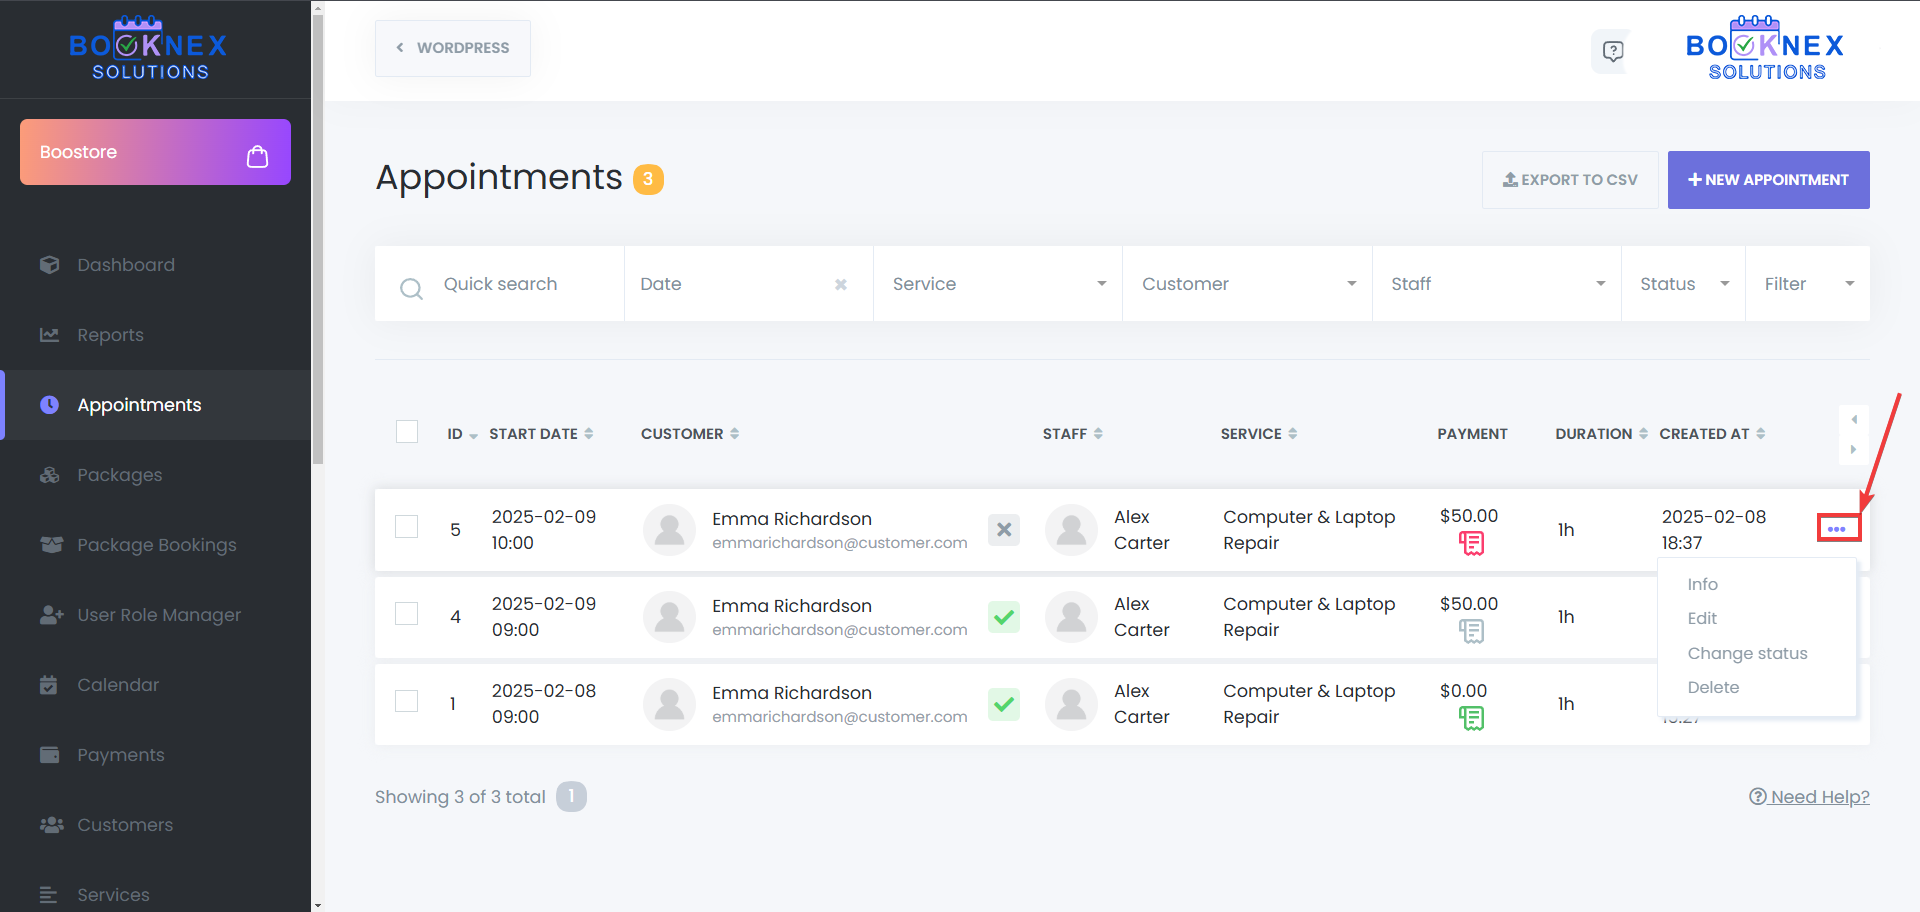
Select "Edit" – Modify details such as service, staff, or time.
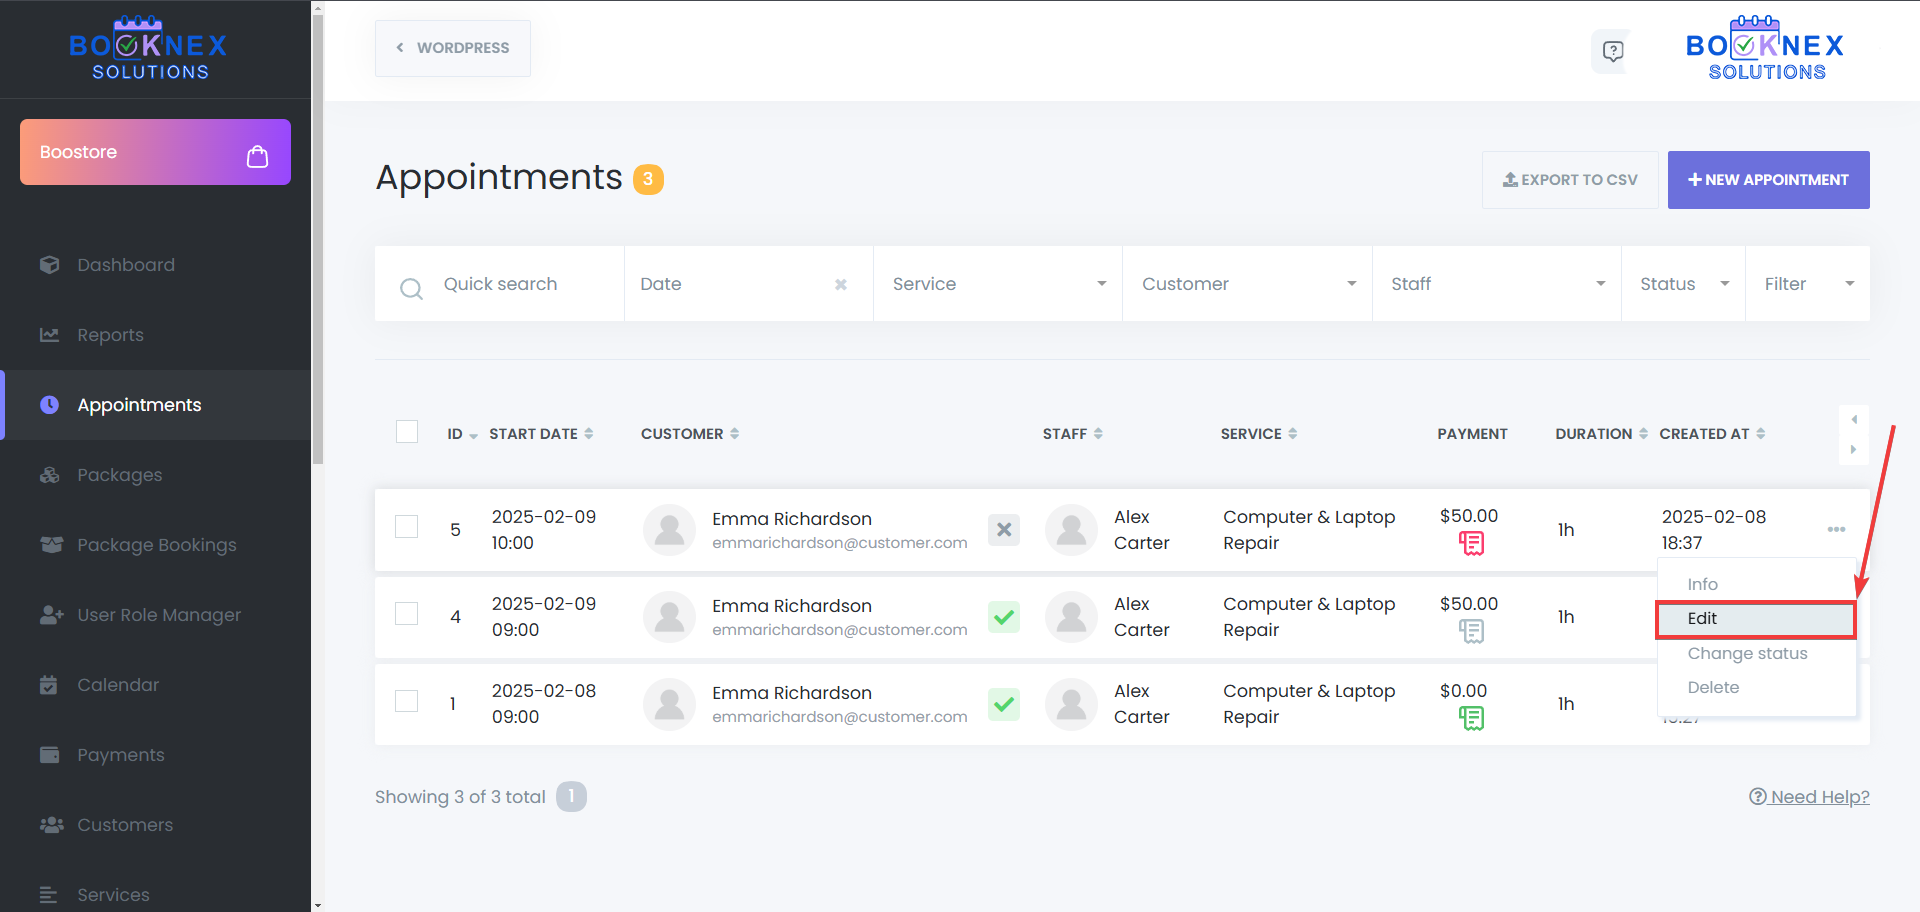
Save Changes – After you've made your changed, click Save to update the booking.

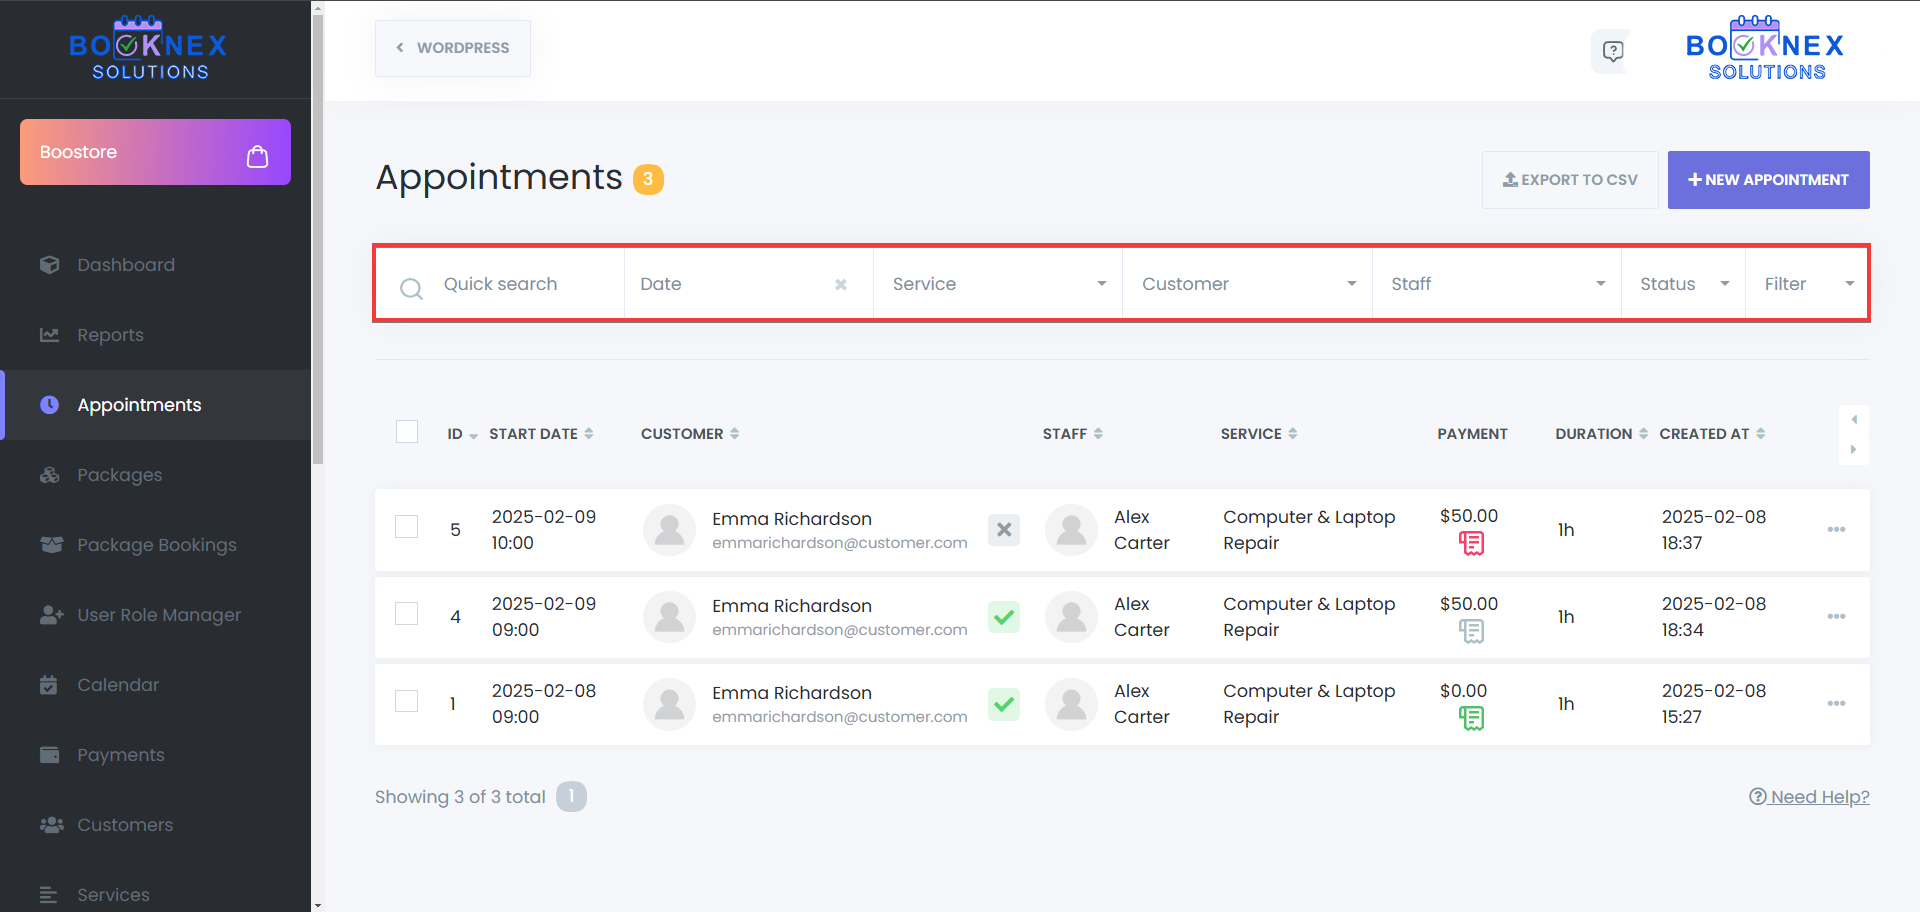
Export Appointments as CSV
Export to CSV – Export your current appointments to a CSV file easily.

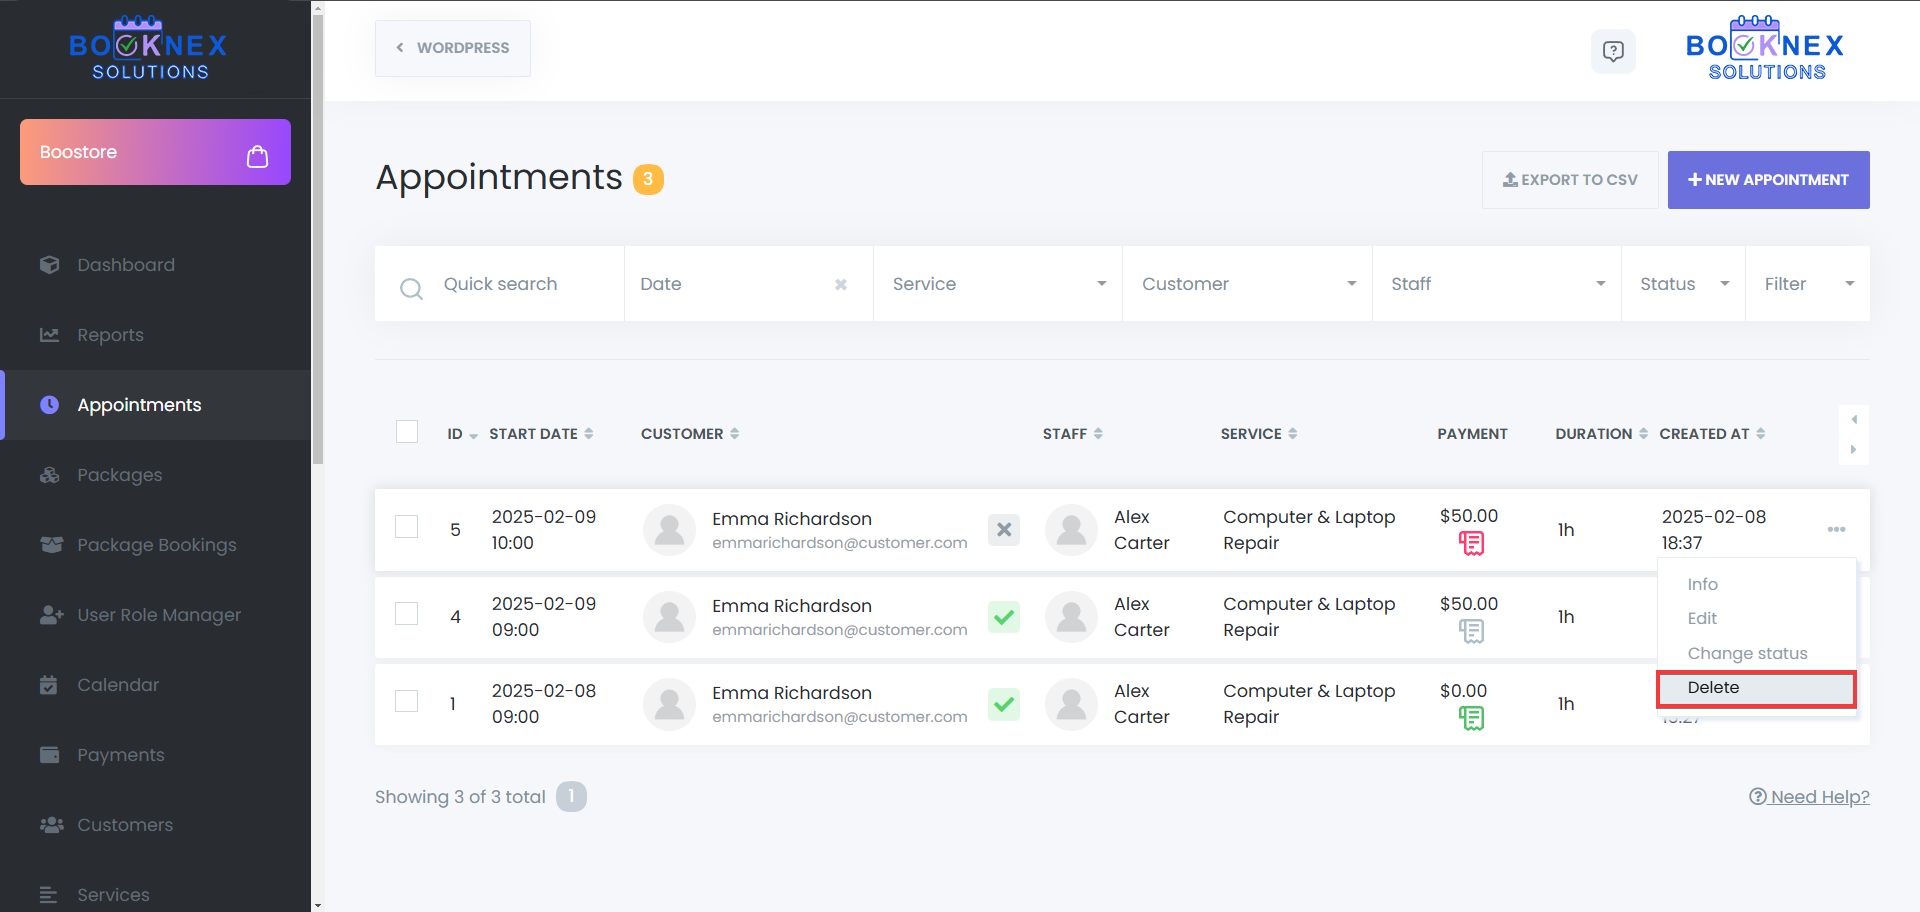
Deleting Appointments
Single Deletion – Open the menu for an appointment and select Delete.
Bulk Deletion – Select multiple appointments and click the Delete button.

Viewing Payment Information
Locate the Payment column in the Appointments Menu.
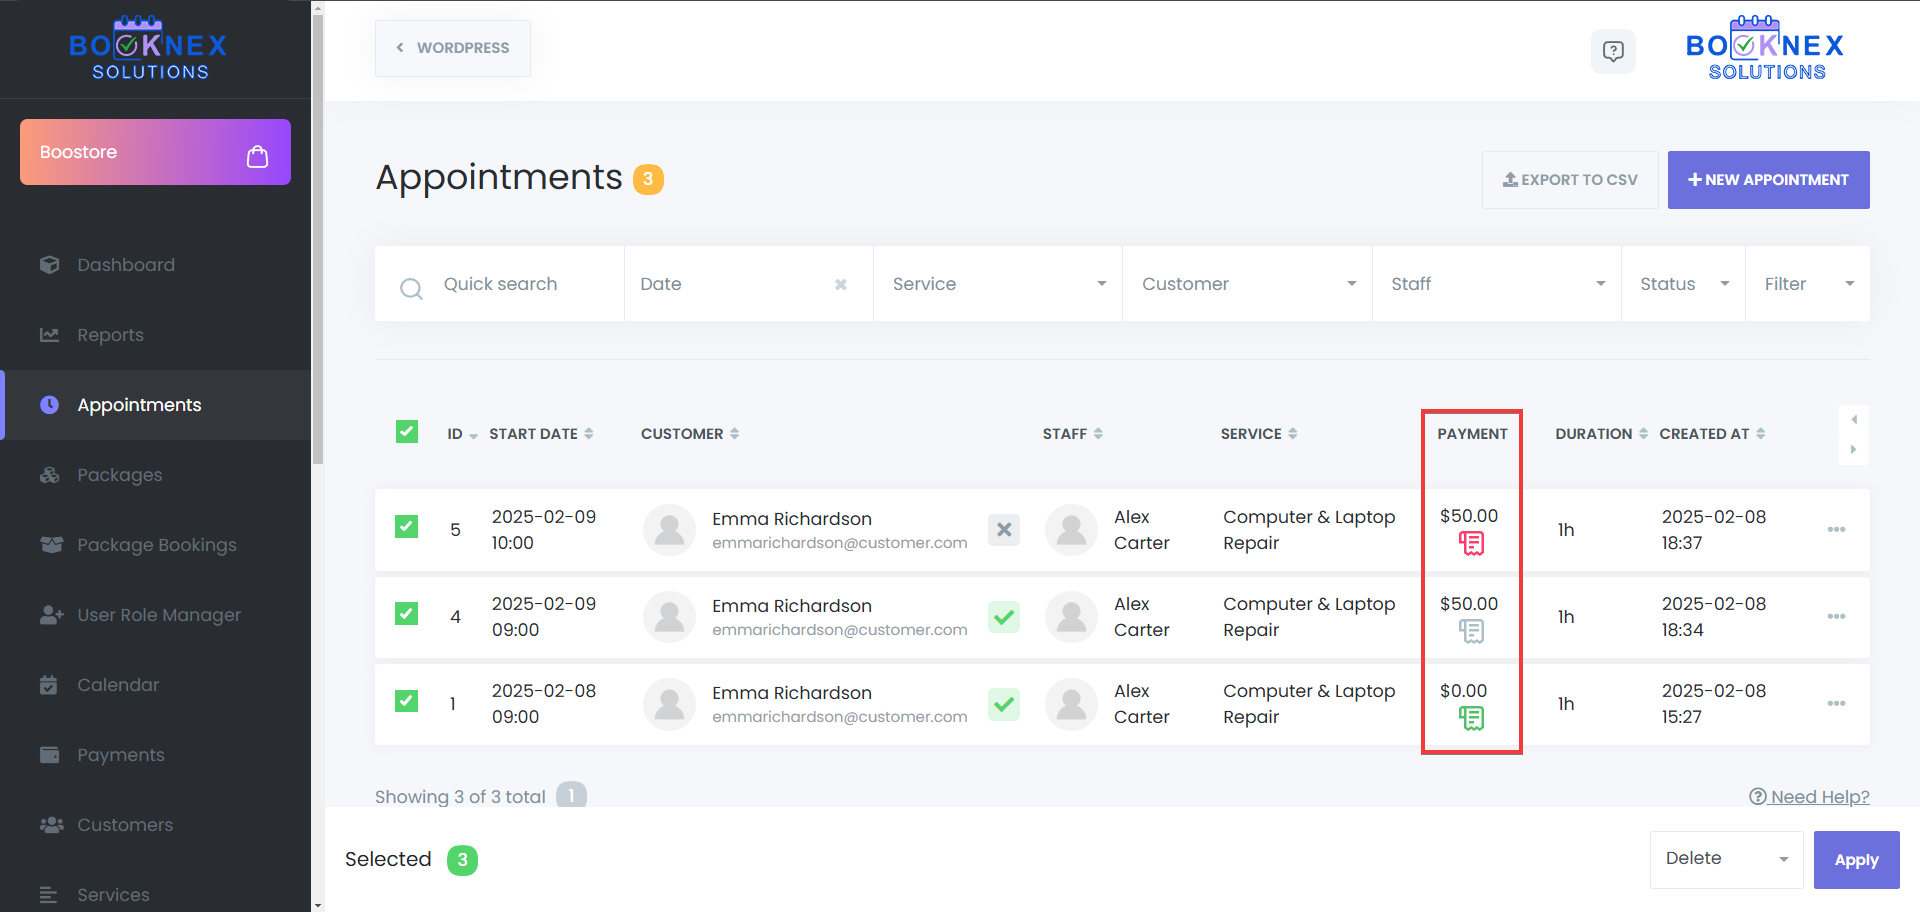
Click the Payment Details icon to view or update transaction information.

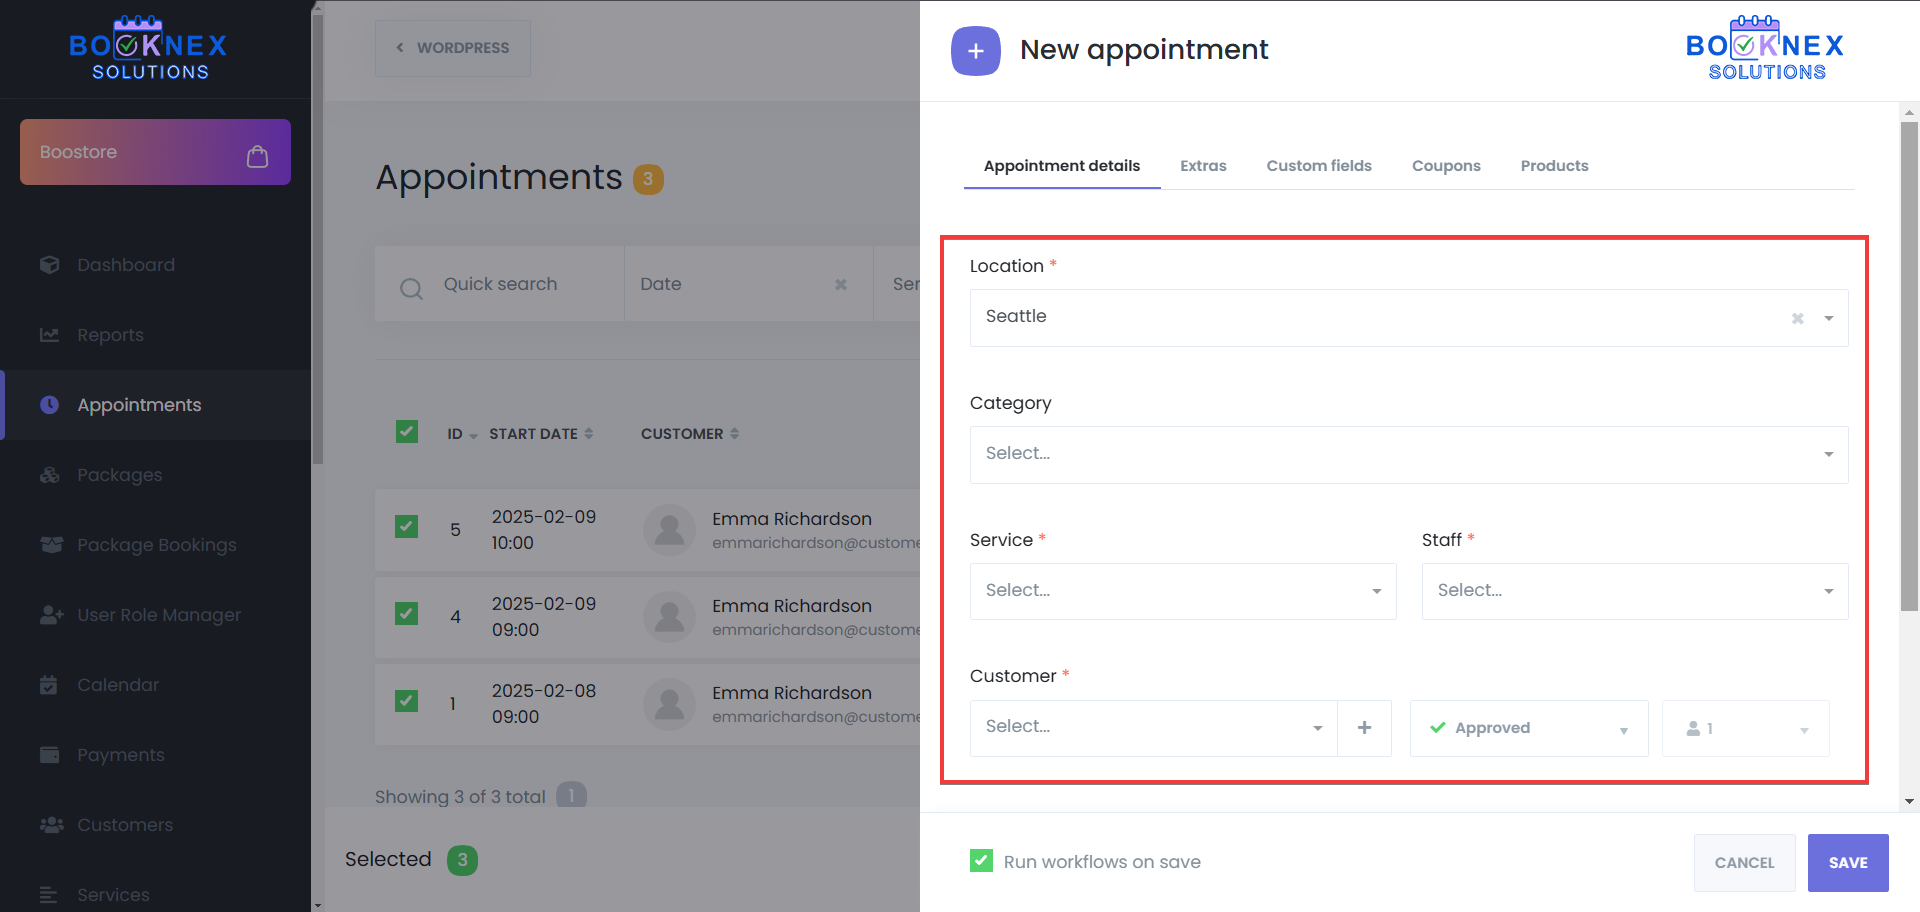
Creating a New Appointment
Click "New Appointment" in the Appointments Menu.
Enter Booking Details in The Appointment Details Tab:
- Category – Select the category which contains the needed service
- Service – Select the service being booked. It can be a recurring service, or a regular service, both of the service types are bookable through the appointments menu
- Staff Member – Assign a staff member. The options for this section will be available based on the service that you've selected
- Date and Time – Pick an available slot. If you've chosen the recurring service, set up the recurring times to save the appointment
- Customer Information – Choose an existing customer or add a new one
- Appointment Status – Choose a status for the appointment, including custom statuses (you can add an appointment as approved directly from the booking panel, even if it is a paid service and the customer hasn't paid for that through the booking panel)
- Appointment Notes – Leave notes for that specific appointment
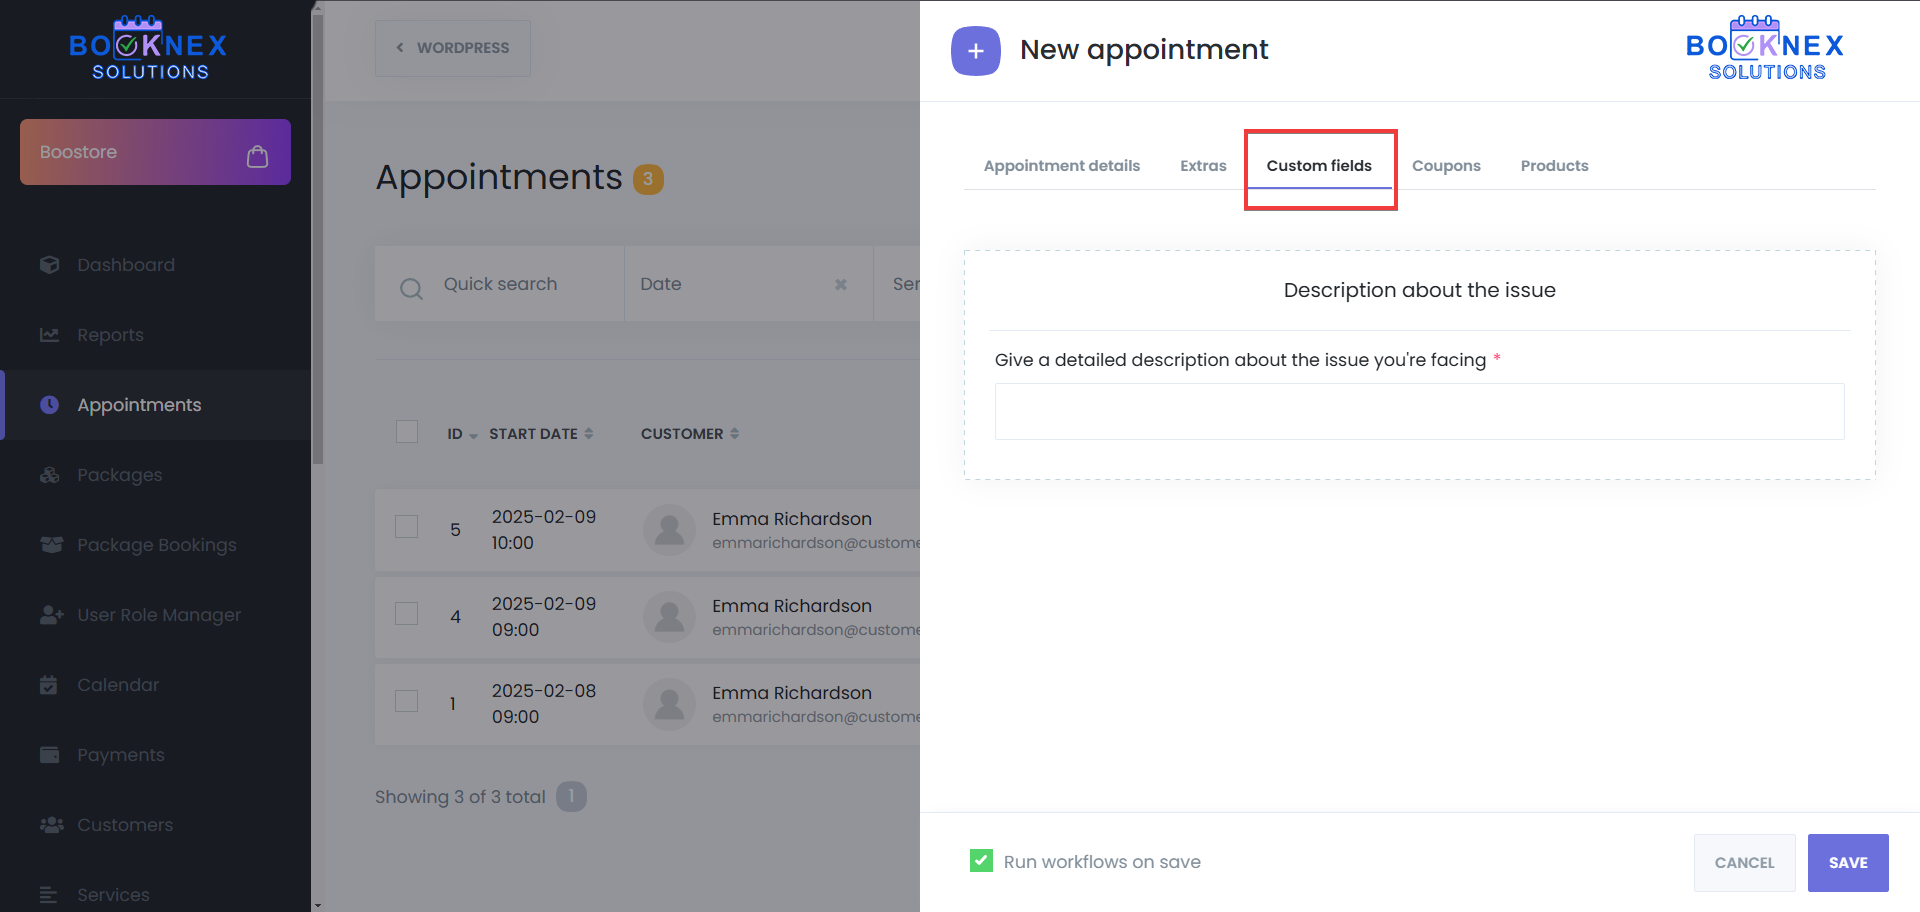
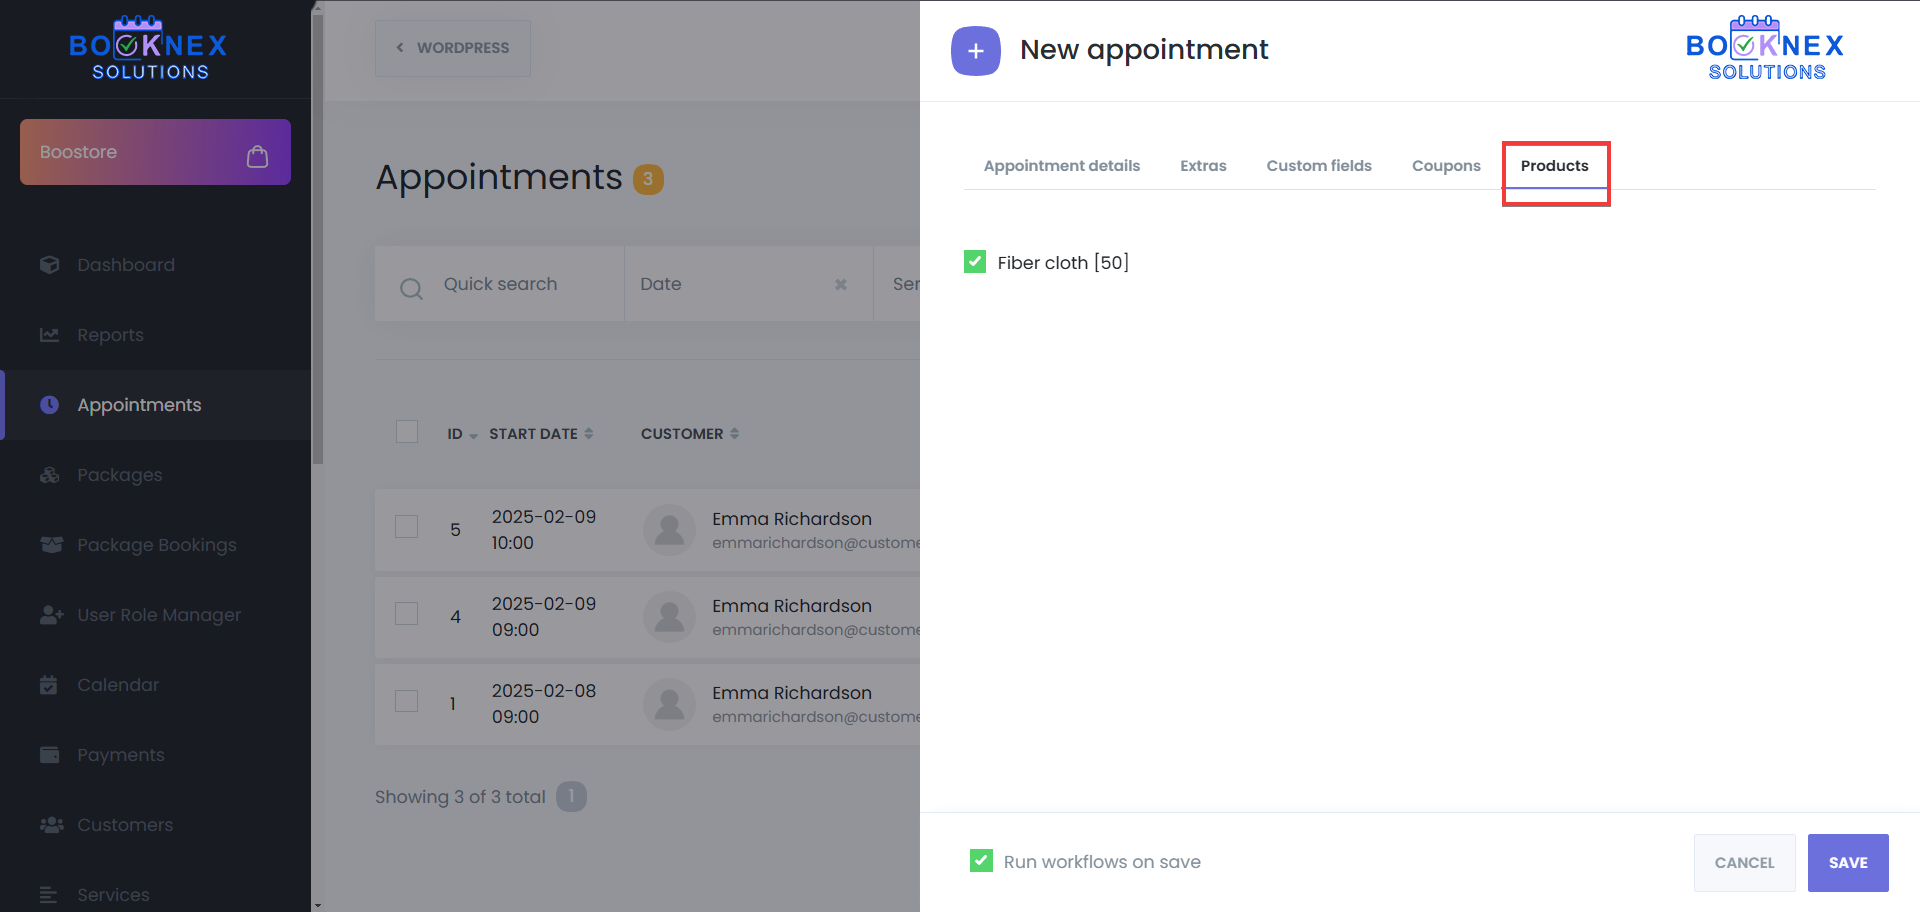
Additional Options:
Extras – Include additional services if applicable.

Custom Forms – Fill out required fields.
Coupons – Apply discount codes.

Products – Add your used/planned products to this appointment.
Enable Notifications
Activate Run workflows on save to send booking confirmations, or start any other workflow, based on your configuration.
Save Appointment
Click Save to finalize the booking.

Add-On Features
- Custom Forms: Enables you to create and manage custom booking forms, allowing for tailored data collection during the booking process
- Coupons: Allows you to create and manage discount codes for your customers, promoting engagement and incentivizing bookings
- Products: Adds the ability to manage and sell products alongside services, allowing you to offer physical or digital products during the booking process
- Custom Appointment Statuses: Provides the ability to create and manage personalized appointment statuses, allowing for better tracking and organization of bookings
Multi-Level Categories
Multi-Level Categories in Booknex help you organize services into a clear and structured hierarchy. Instead of listing all services in one place, you can group them into categories and subcategories, making it easier for customers to find the right service and staff.
This feature is especially useful for businesses that offer a wide variety of services across different staff members. For example, clinics, salons, gyms, or training centers. By structuring services into levels, you reduce complexity and create a smooth booking experience for customers.
What does Multi-Level Categories do?
- Simplify navigation: Customers can easily browse categories and subcategories instead of searching through a long list of services.
- Organize services by type: Example: A clinic can have categories like "Dentistry," "Cardiology," and "Pediatrics." Each category may have its own subcategories and services.
- Assign staff per service: Different staff can be linked to services in different categories, even if they offer similar services at different prices.
- Improve customer experience: Customers can quickly find the correct service and staff without confusion.
How to Set Up Multi-Level Categories
Go to the Services Module
Open Booknex → Services from the dashboard.

Create a Category
Click the "+" icon next to Categories. Enter a name for the category (e.g., Medical Services). Save it.

Add Subcategories
To create a subcategory, click the "+" icon next to an existing category. Choose Category when prompted. Example: Under Medical Services, you can create Dentistry or Cardiology.

Add Services to Categories
Click the "+" icon next to the category or subcategory where the service belongs. Choose Service when prompted. Configure service details such as duration, price, staff assignments, and availability.
Assign Staff to Services
For each service, assign one or more staff members who provide that service. This ensures that customers know exactly which staff are available for the chosen category.

Accordion View Option
Booknex also offers the option to display categories in an accordion layout on the booking form. In this view, categories and subcategories can be expanded or collapsed, making navigation even easier when you have a large number of services.
This improves usability for businesses with many service groups and ensures customers can quickly browse and select the right option.
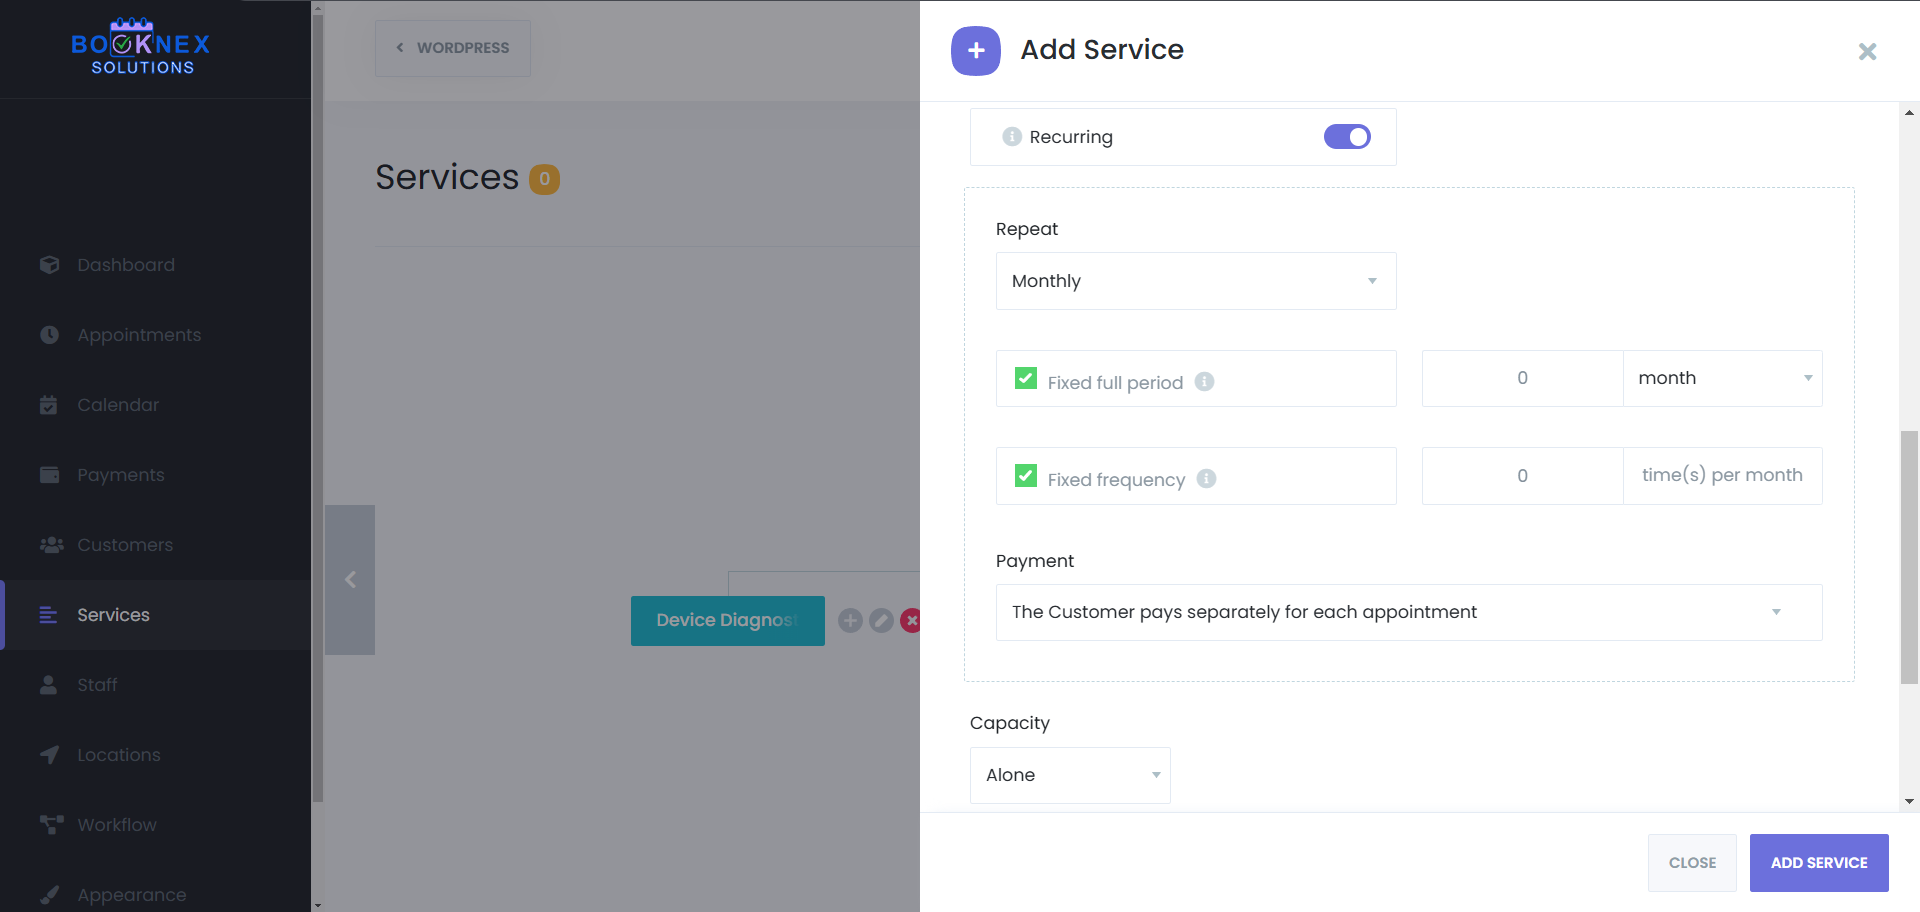
Recurring Appointments
The Recurring Appointments feature in Booknetic allows your customers to schedule ongoing bookings across multiple days, weeks, or months without creating separate appointments each time. This feature is especially useful for services that rely on regular sessions, such as yoga classes, therapy sessions, or monthly consultations.
By enabling recurring appointments, you improve convenience for customers, reduce repetitive booking tasks, and ensure your calendar stays organized.
Why Use Recurring Appointments?
- Appointments can repeat daily, weekly, or monthly.
- Flexible controls for full period (start and end dates) or fixed frequency (number of repeats).
- Conflict-free scheduling: overlapping bookings are automatically prevented.
- Customizable payment options (all at once or per appointment).
How to Enable Recurring Appointments?
Step 1: Navigate to the Services Module
Open the Booknetic dashboard. Go to Services. Either create a new service or edit an existing one where you want to allow recurring bookings.

Step 2: Enable Recurring Appointments
Open the service settings panel. Locate the Recurring Appointments option. Toggle it on to activate recurring booking for that service. Once enabled, customers will be able to choose between a one-time appointment or a recurring appointment when booking.

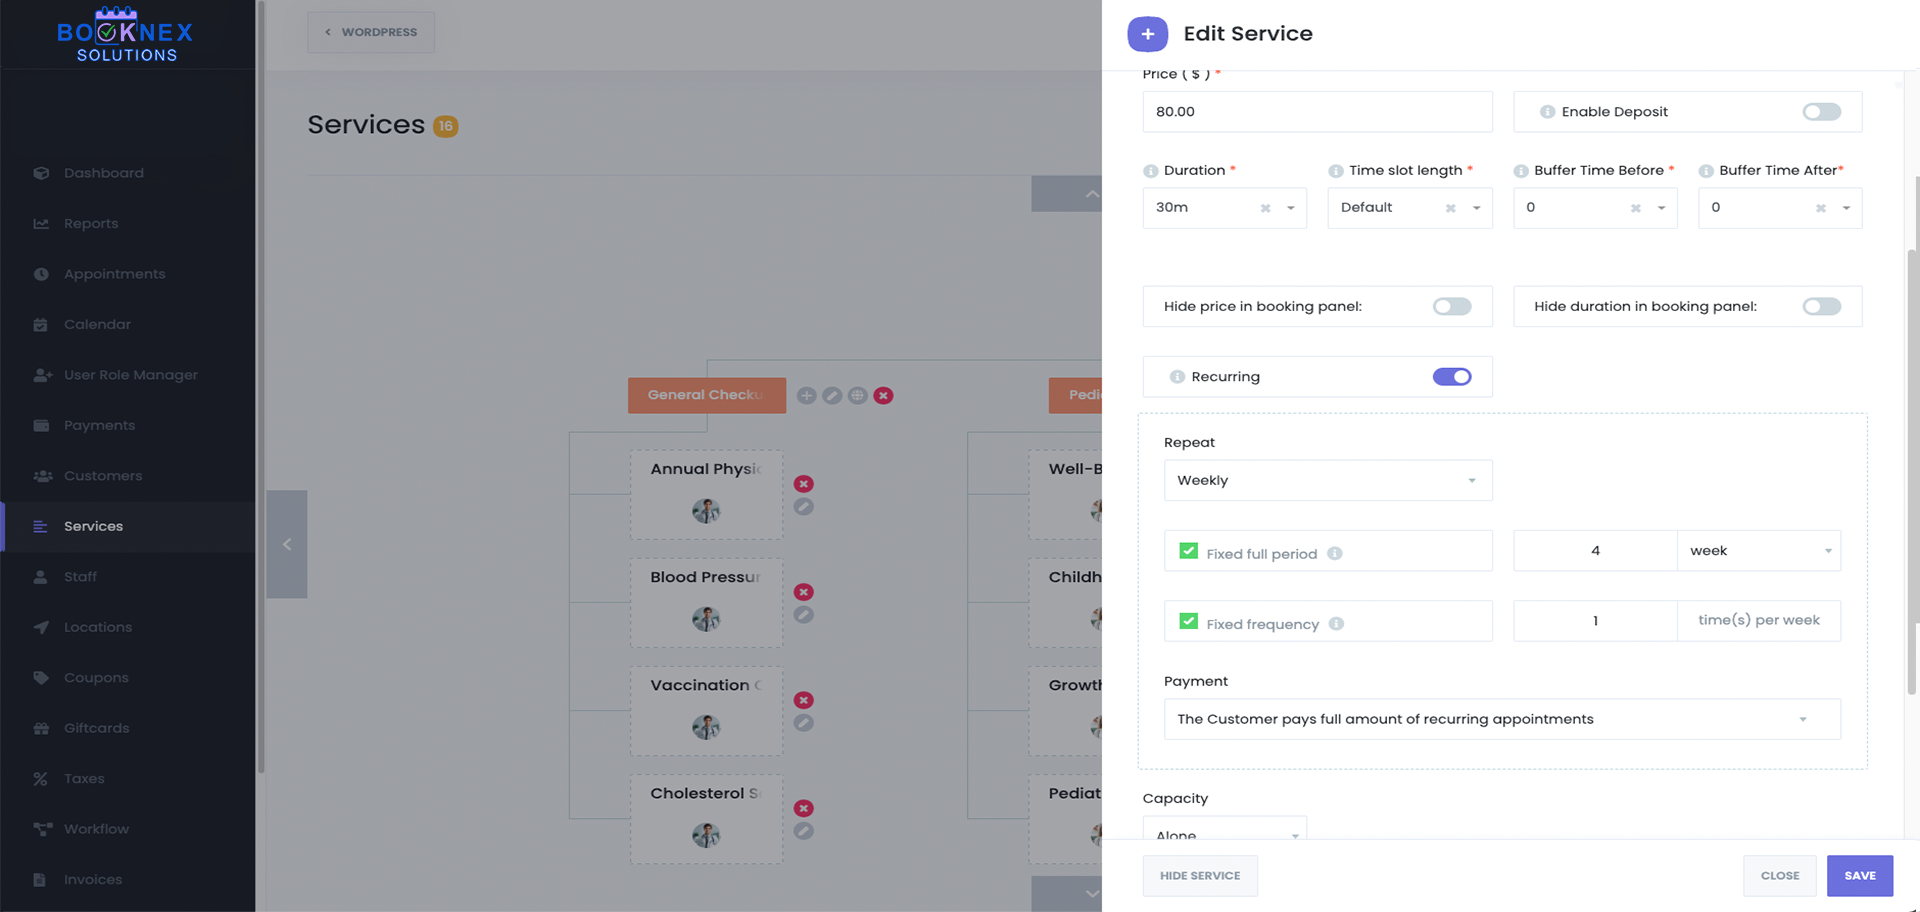
Step 3: Configure Recurrence Types
Booknetic supports three recurrence patterns, each adapting the booking panel to make scheduling simple:
1. Daily Recurrence
Customers can repeat the appointment every day within the defined period. Example: A 5-day training program from June 1–5 creates one appointment per day. Best for short daily programs like workshops or bootcamps.
2. Weekly Recurrence
Customers can select one or more days of the week to repeat. Example: A yoga class every Monday, Wednesday, and Friday for the next 4 weeks. Ideal for weekly courses, classes, or therapies.
3. Monthly Recurrence
Customers can select specific days of the month. Example: Appointments scheduled on the 5th and 20th of each month for 3 months. Suitable for monthly checkups, meetings, or long-term programs.
Step 4: Set Recurrence Rules
After choosing a recurrence type (Daily, Weekly, or Monthly), you must decide how the repetition is calculated. Booknetic provides two options:
Fixed Full Period
Defines how long the recurrence lasts. Customers specify a duration: X days, X weeks, or X months. Example: If a customer selects 4 weeks with a weekly recurrence, the system generates all weekly bookings across that 4-week period.
Fixed Frequency
Defines how many times per period the appointment repeats. Customers enter how many times per week/month/day the appointment should occur. Example: If a customer selects 2 times per week for 4 weeks, the system creates 8 appointments in total.
Both options can work together: the Fixed full period sets the timeframe, while Fixed frequency defines how often within that timeframe the bookings repeat.
Payment Options
Recurring appointments support flexible payment methods:
- Pay for all appointments at once – Customers pay upfront for the entire recurring series.
- Pay per appointment – Customers pay separately for each occurrence in the series. This is useful for ongoing services where customers prefer a pay-as-you-go approach.
Handling Remaining Payments with Payment Links
In many businesses, it is not always practical to request the full amount at the time of booking. Customers may prefer to pay a deposit upfront and settle the remaining balance later. Booknetic solves this with Payment Links.
- Manual payment links: From the admin dashboard, you can generate a payment link for the due balance of any appointment. Simply open the appointment details, choose the desired payment method (e.g., Stripe, PayPal, Mollie, Square, Razorpay), and Booknetic will create a secure payment link. You can then share this link with the customer.
- Automated payment links via Workflows: Payment links can also be sent automatically through the Workflow Module. For example, you can create a workflow to send a payment link reminder 1 day before the appointment or 1 hour before the appointment.
Shortcodes for payment links:
Booknetic provides shortcodes for each supported gateway, which can be used in email/SMS/WhatsApp notifications or invoices:
- {appointment_payment_link_stripe} – Stripe
- {appointment_payment_link_paypal} – PayPal
- {appointment_payment_link_mollie} – Mollie
- {appointment_payment_link_square} – Square
- {appointment_payment_link_razorpay} – Razorpay
Example Use Cases
- Yoga Teacher – Weekly classes every Wednesday for 2 months.
- Therapist – Bi-weekly sessions for 6 months.
- Language Tutor – Daily practice sessions for 10 days.
- Doctor's Office – Monthly check-ups on the 1st of every month.
Group Appointments
The Group Appointments feature in Booknex allows multiple customers to book the same service at the same time slot. This is ideal for classes, workshops, or any service where several people can participate at once.
By enabling Group Appointments, you can define how many participants are allowed per session, and the system will automatically manage the available capacity as bookings are made.
How to Enable Group Appointments
Open the Services Module
Go to Booknex → Services in the dashboard. Either create a new service or edit an existing one.

Enable Group Appointments
In the service settings panel, turn on the Group Appointments option. This allows multiple customers to reserve the same time slot.
Set Maximum Capacity
Define the maximum number of participants that can attend a single session. Example: If you set the maximum capacity to 15, the system will accept up to 15 bookings in that time slot.
Save the Service
Once saved, the group booking option will be active for that service.

Customer Experience
- When booking, customers can select how many people they want to reserve spots for (e.g., booking for themselves or booking for multiple attendees).
- The booking panel will show the remaining availability for each time slot.
- Once a slot starts filling up, a capacity badge appears (e.g., 5/15), showing how many participants are already booked out of the maximum limit.
- If the maximum capacity is reached, the slot will automatically be closed and cannot be booked further.

Bring People With You
The Bring People With You feature allows customers to bring additional attendees without each person needing to make a separate booking.
- Customers simply select the number of people they are bringing with them at the time of booking.
- All participants are reserved under a single appointment, and the total will count toward the service's group capacity.
- Example: If the service capacity is set to 10 and a customer books for themselves + 3 guests, the remaining capacity will reduce to 6.
Customer Birthday Greeting
The Customer Birthday Workflow Event in Booknex allows you to automatically trigger actions on or around a customer's birthday. Instead of manually tracking birthdays, you can let Booknex send greetings, promotions, or reminders at the right time, strengthening customer loyalty with zero extra effort.
Why Use Customer Birthday Workflows?
- Automated greetings – Send personalized birthday messages via Email, SMS, WhatsApp, or Telegram.
- Customizable timing – Choose whether to send messages on the birthday itself or before/after using flexible offsets.
- Segmented campaigns – Use filters like gender, birth year, or birth month to tailor birthday promotions to specific groups.
- Marketing opportunities – Offer discounts, coupon codes, or free gifts to increase customer engagement.
- Integration power – Combine with Webhooks to update CRMs, loyalty systems, or marketing platforms automatically.
How the System Works
Customer birthday workflows are managed in the Workflow Module and function like other automated events.
- Event: Customer birthday
- Offset: Choose to run the workflow Before or After the birthday.
- Execution Time: Define the exact time of day (e.g., 08:00) when the action should be executed.
For example:
- Send a coupon 2 days before the birthday.
- Send a greeting email at 09:00 on the birthday.
- Send a thank-you SMS 1 day after the birthday.
Setting Up a Customer Birthday Workflow
Step 1: Create a Workflow
Go to Booknex → Workflows. Click Create new workflow. Name your workflow (e.g., Birthday Email Campaign).
Step 2: Choose the Event
In the When this happens dropdown, select Customer birthday.
Step 3: Configure Event Settings
In the event settings panel, you can define:
- Offset: Before → Send messages before the birthday. After → Send messages after the birthday. 0 (zero) days → Runs on the exact birthday.
- Time: Select the exact time of day when the action should run (e.g., 08:00).
- Filters:
- Gender – Target male, female, or all customers.
- Year filter – Target based on the customer's birth year (e.g., send only to those born after 1990).
- Month filter – Target customers with birthdays in specific months (e.g., run a summer campaign in June–August).
Step 4: Define the Action
Choose what should happen when the workflow runs. Actions can include:
- Send Email
- Send SMS
- Send WhatsApp message
- Send Telegram message
- Send Webhook request (integrate with Zapier, IFTTT, or external CRMs)
Step 5: Write the Message or Build Webhook Data
Use shortcodes like {customer_full_name}, {customer_email}, or coupon codes to personalize your greeting. For webhooks, include birthday data in the request payload to sync with external platforms.
Step 6: Save & Enable
Click Save. Ensure the workflow is marked as Enabled.
Practical Examples
- Before Birthday – Send an email 2 days before with a discount code: "Celebrate early! Here's 15% off any service this week."
- On Birthday – Send a WhatsApp message at 9 AM with a simple greeting and booking link.
- After Birthday – Send an SMS 1 day later thanking the customer and reminding them to redeem their gift.
- Segmented Campaigns – Create a special promotion only for customers with July birthdays, filtered by month.
Best Practices
- Combine filters – For example, send different promotions based on gender or age groups.
- Use workflows creatively – Pair email with a webhook to update your CRM with a "birthday greeted" tag.
- Add value – Discounts, free extras, or loyalty points will make customers more likely to rebook.
- Test timing – Experiment with sending offers a few days before vs. on the exact day.
Reminders in Booknex
The Reminder & Follow-Up Notifications feature in Booknex ensures smooth communication before, during, and after appointments. Using the Workflow Module, you can automatically send messages via Email, SMS, WhatsApp, Telegram, or even trigger Webhooks to connect with external apps.
This flexibility helps reduce no-shows, keeps staff prepared, and engages customers after their visits.
How do Reminder & Follow-Up Notifications help you?
- Reduce no-shows by reminding customers before their bookings.
- Prepare staff with alerts before their sessions.
- Engage customers afterward with thank-you messages, invoices, or review requests.
- Automate timing with precise before/after triggers for both booking start and booking end events.
- Integrate with external apps by sending data through Webhooks (Zapier, IFTTT, CRMs, Google Sheets, Slack, etc.).
- Personalize communication using dynamic shortcodes for appointment details.
How the System Works
Notifications and webhooks are managed in the Workflow Module, which operates on two key events:
- Booking starts → When the appointment begins.
- Booking ends → When the appointment finishes.
For both events, workflows can run Before or After the event with a custom offset: Minutes, Hours, or Days.
This allows you to:
- Send reminders before booking starts.
- Trigger in-session updates after booking starts or before booking ends.
- Send follow-ups after booking ends.
- Trigger Webhooks at any of these times to connect with third-party tools.
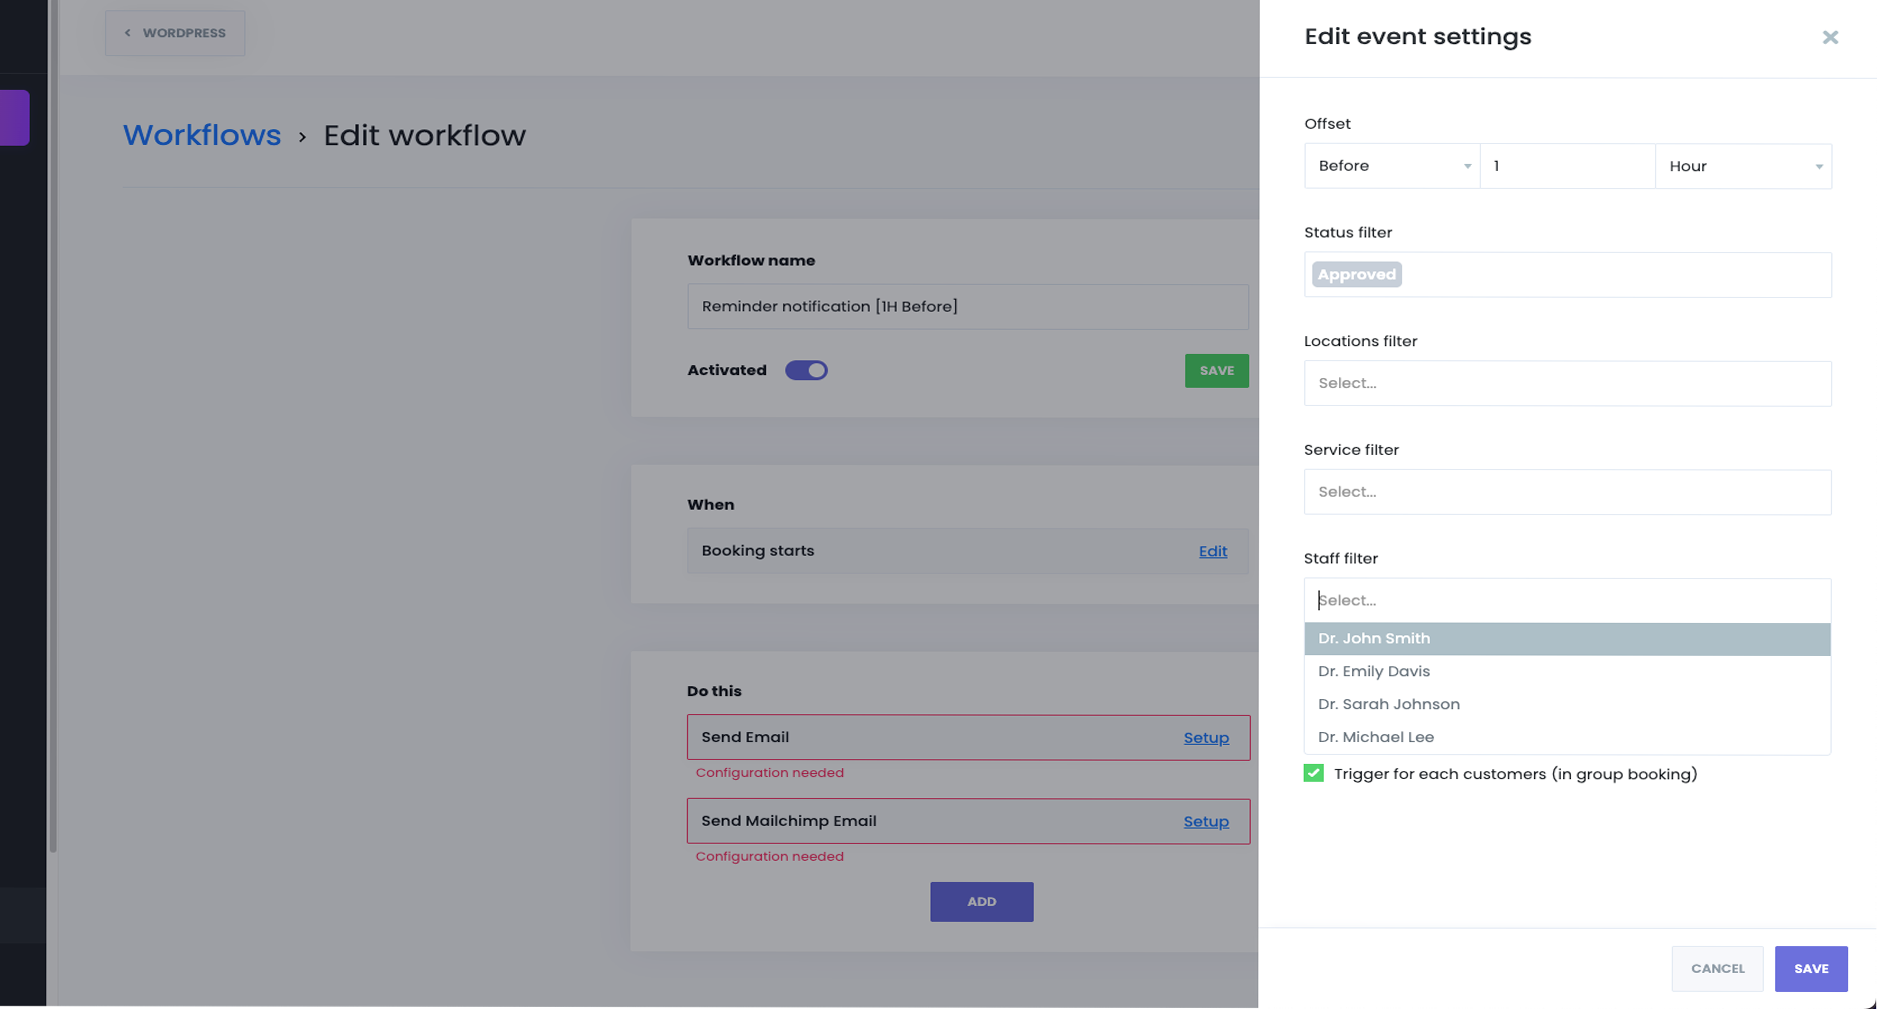
Setting Up Reminder & Follow-Up Notifications
Step 1: Create a Workflow
Go to Booknex → Workflows → Create new workflow. Name your workflow (e.g., Customer Reminder – 1 Hour Before or Feedback Request – 1 Day After).

Step 2: Choose a Trigger
Select Booking starts or Booking ends.
Step 3: Configure Offset
Choose Before or After. Enter a number (e.g., 1). Select the unit (Minute / Hour / Day).

Examples:
- Booking starts → Before → 1 Day → Reminder email 24h before.
- Booking ends → After → 1 Hour → Feedback request email 1 hour after.
- Booking ends → Before → 10 Minutes → Alert staff to wrap up session.
Step 4: Add Filters (Optional)
- Status filter – Send only for Approved appointments.
- Location filter – Target a specific branch.
- Service filter – Apply only to selected services.
- Staff filter – Trigger for chosen staff members.
- Locale filter – Send messages in the customer's booking language.
- Group bookings – Enable Trigger for each customer so all participants receive notifications.
Step 5: Define the Action

You can choose one or multiple actions:
- Send Email
- Send SMS
- Send WhatsApp message
- Send Telegram message
- Send Webhook request (HTTP/HTTPS request to an external system)

When using Webhooks, you can:
- Select a request method (GET, POST, PUT, DELETE).
- Enter a target URL (shortcodes supported).
- Add form data, headers, or parameters.
- Example: Send a POST request to Zapier an hour before an appointment starts.
Step 6: Write the Message or Build Webhook Data
For notifications: Customize the message using shortcodes like {appointment_date}, {staff_name}, {zoom_url}, etc.
For webhooks: Add body fields or headers with shortcodes so appointment details are sent to your external system.
Step 7: Save & Enable
Click Save and make sure the workflow is set to Enabled.
Practical Examples
Reminder (Booking starts → Before)
- Send SMS 24 hours before appointment.
- Email staff 2 hours before with customer details.
- Trigger a webhook to Slack to notify the team 15 minutes before the meeting.
In-session (Booking starts → After OR Booking ends → Before)
- Email admin 5 minutes after a session starts.
- Trigger a webhook to Google Sheets to log attendance 10 minutes before session ends.
Follow-Up (Booking ends → After)
- Send thank-you email 30 minutes after.
- Request feedback 1 day later.
- Trigger a webhook to CRM to update customer record after the session ends.
Best Practices
- Use multiple reminders – Example: 24h before + 1h before.
- Combine channels – Send an email to the customer, SMS to staff, and a webhook to your CRM in one workflow.
- Apply filters – Ensure reminders only go to relevant services or statuses.
- Test carefully – Use "Save & Test" (shortcodes won't populate without real booking data).
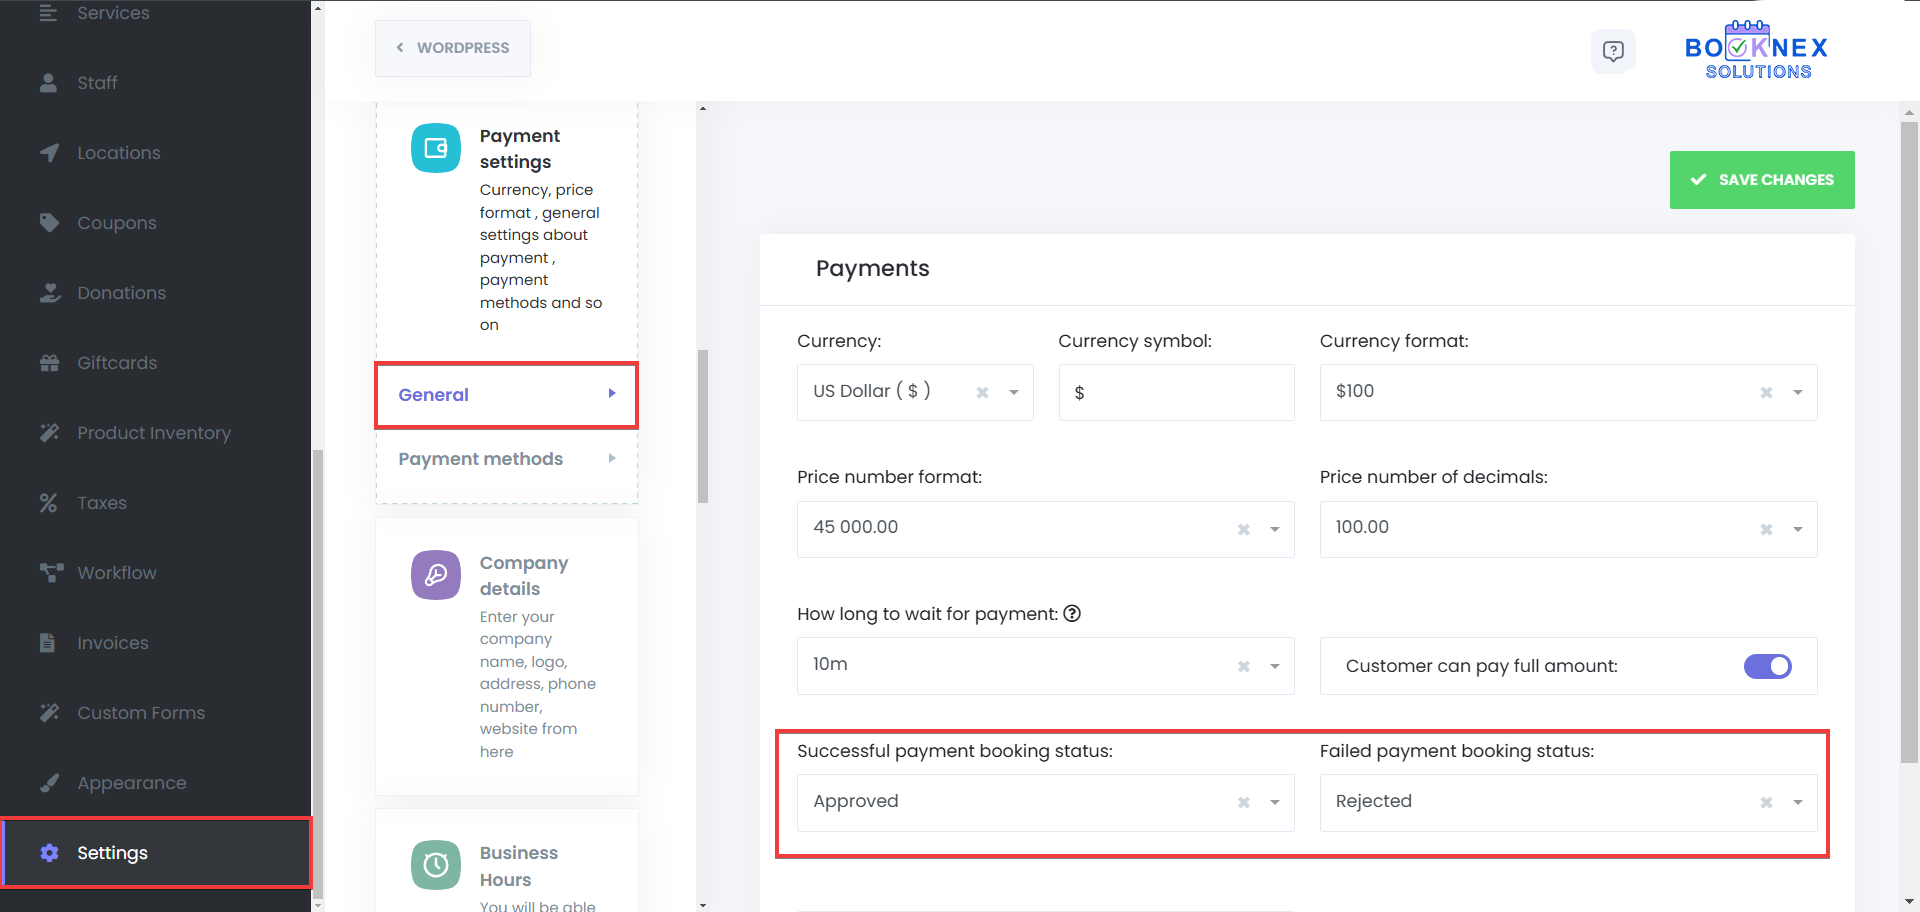
Payment Module
The Payments module in Booknex serves as a comprehensive hub for managing all financial transactions related to your appointments. This module provides a detailed overview of each payment, allowing for efficient tracking, updating, and reporting.
Open the Payments Section

Within the Booknex menu, select Payments to access the module.
Understanding Payment Statuses
Each payment is assigned a status to indicate its current state:
- Paid: Displayed in green, this status signifies that the customer has completed the payment during the booking process. You can also use workflows to send or receive notification when your customer pays for their appointment's due amount, meaning, it will send the notification when the full price for that appointment is paid.
- Pending: This status appears when a customer has chosen one of the online payment methods, and has been redirected to the payment page, but their payment haven't been received yet.
- Unpaid: Indicates that the appointment was booked, but no payment has been made. This is useful for tracking customers who have yet to complete their transactions.
- Cancelled: This status appears when a customer has chosen one of the online payment methods, and has been redirected to the payment page, but has exceeded the time system waits for the payment, set in Settings > Payment Settings > How long to wait for payment.
Understanding Successful And Failed Payment Booking Statuses
You can set up the payment booking statuses by going to Settings > Payment Settings > General:
- Successful payment booking status: A payment is marked as Successful when the transaction is completed and confirmed by the payment gateway.
- Failed payment booking status: A payment is marked as Failed if the transaction is declined or incomplete due to insufficient funds or a declined card, interrupted transaction or payment gateway issues.
Managing Pending Payments
For payments marked as Pending, it's essential to update their status once the payment is received:
Locate the Payment
Use the search or filter options to find the specific payment.

Edit the Payment Status
Click on the three-dot menu at the end of the payment row. Select the Info button.

In the payment details window, click on the Edit button, or if the full payment has been received, click on "Complete Payment" button.
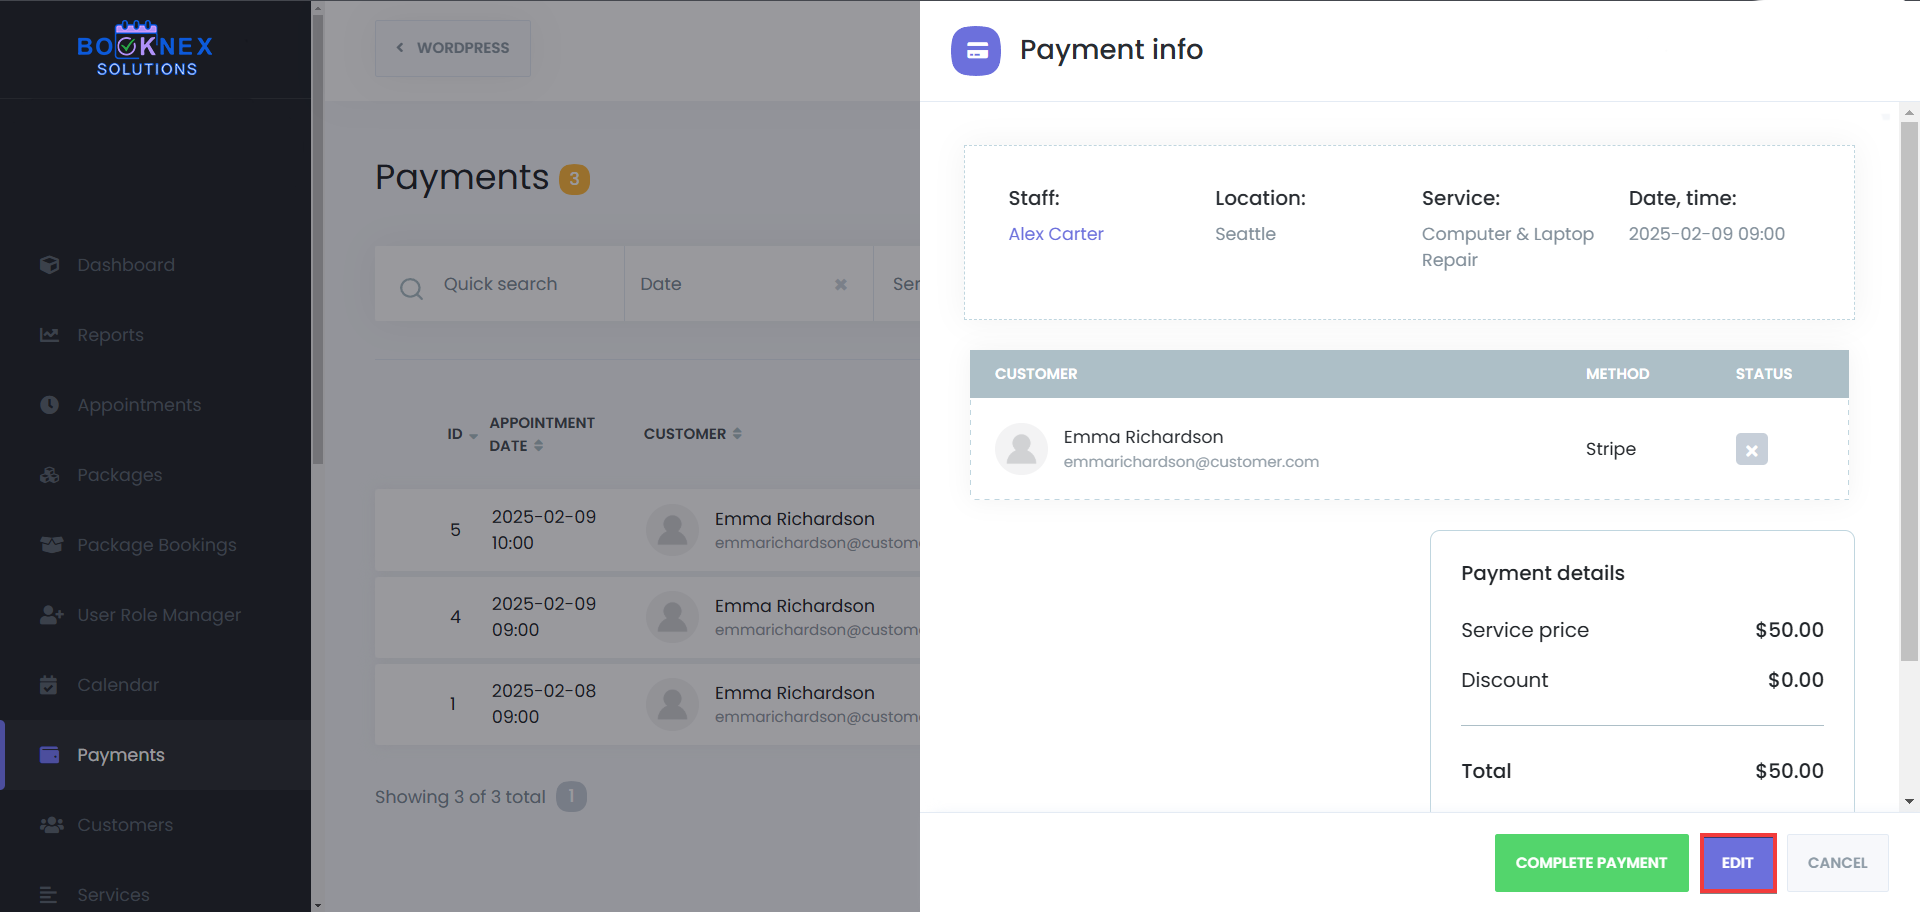
Update the status, paid amount, discount, service price, and the service price, then click on the save button. If only a partial payment was made, note the amount and leave the status as Pending until the remaining balance is settled.
Exporting Payment Data
Booknex allows you to export payment data for record-keeping or analysis:
Export Data
Click on the Export button.

The file will be saved as CSV in your system.
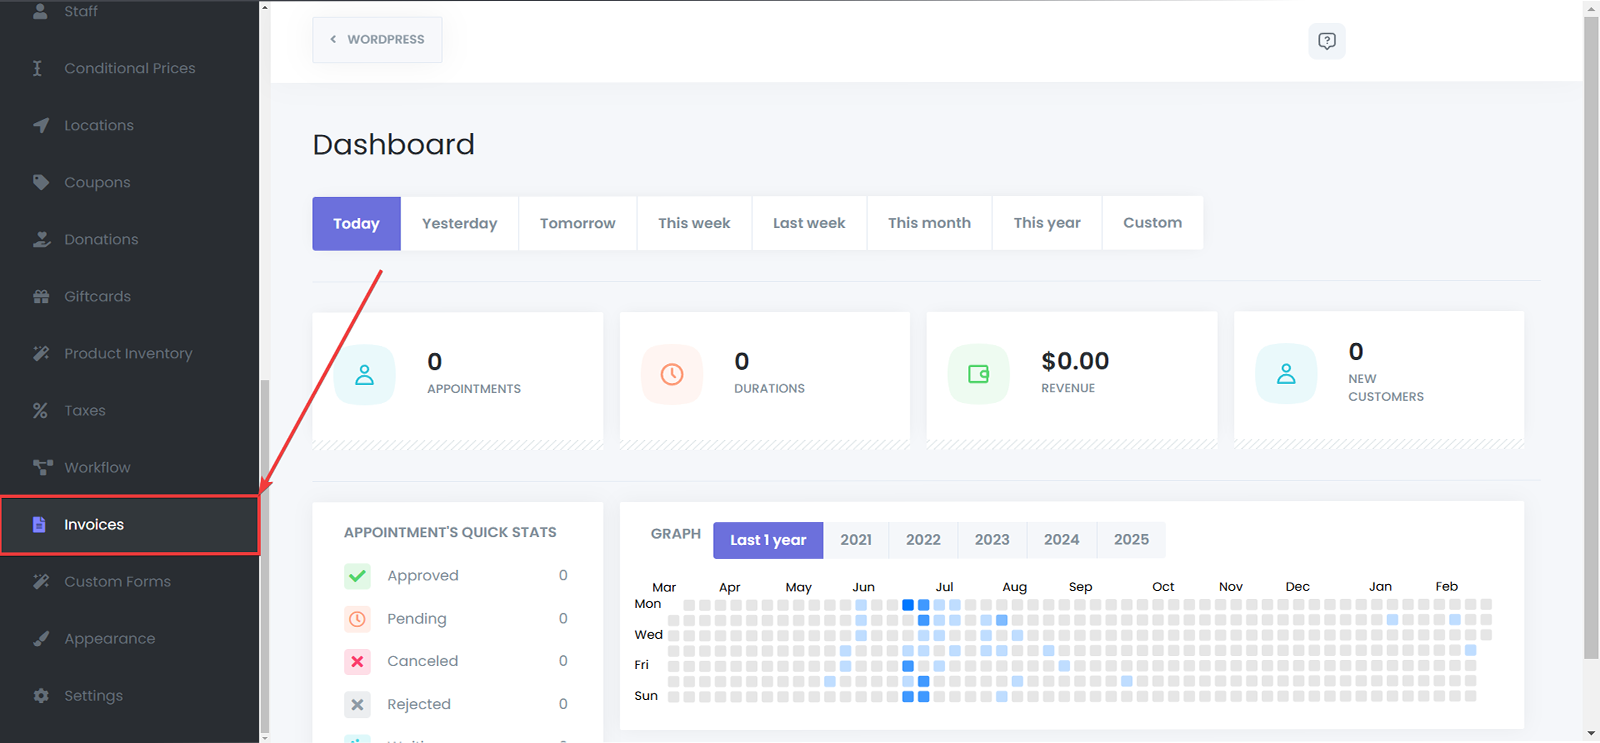
Invoices
Navigate to the Invoices Module: Go to Booknex > Invoices.
Creating an Invoice
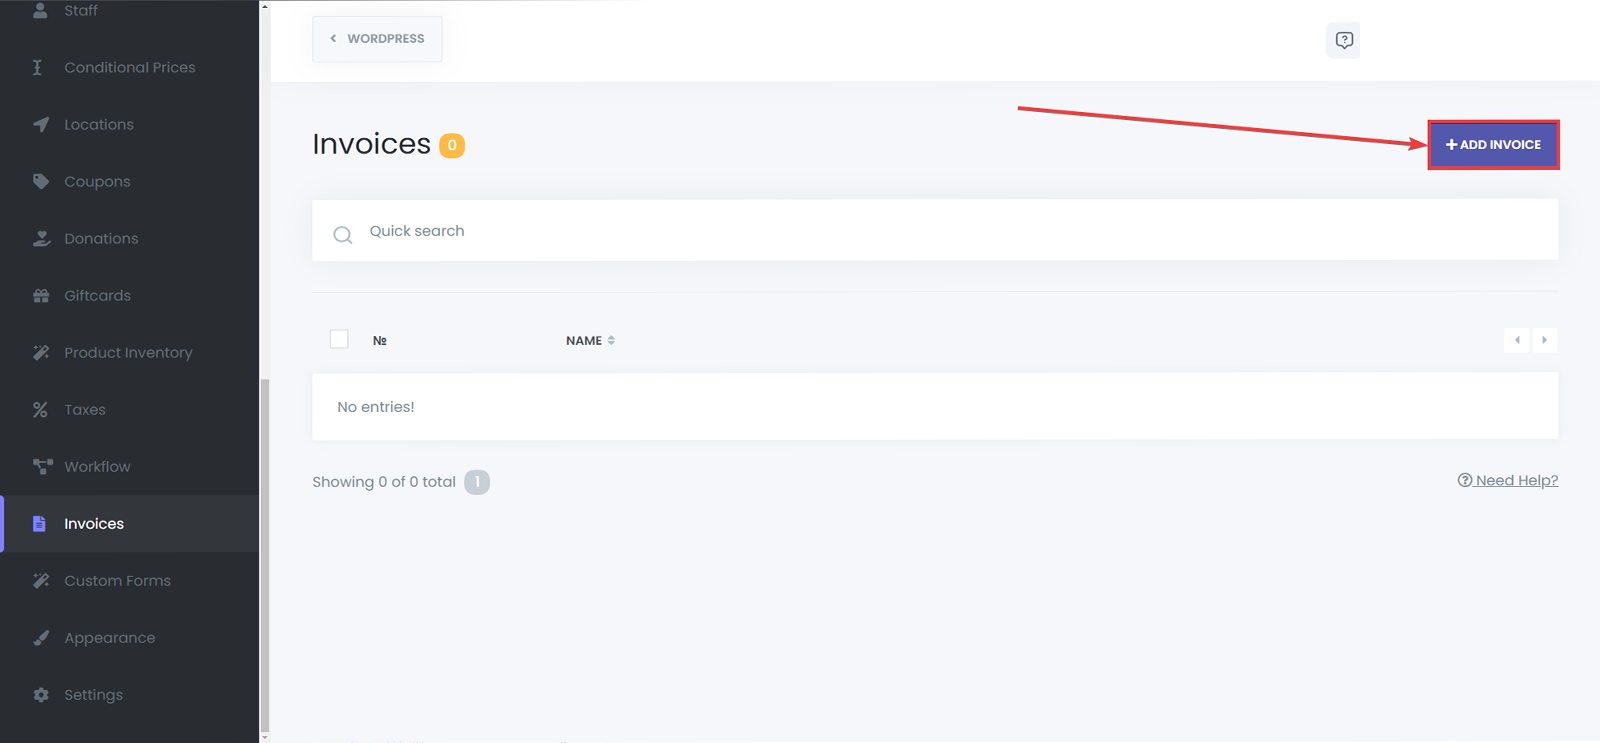
Create a New Invoice
Click the Add Invoice button to create a new invoice.
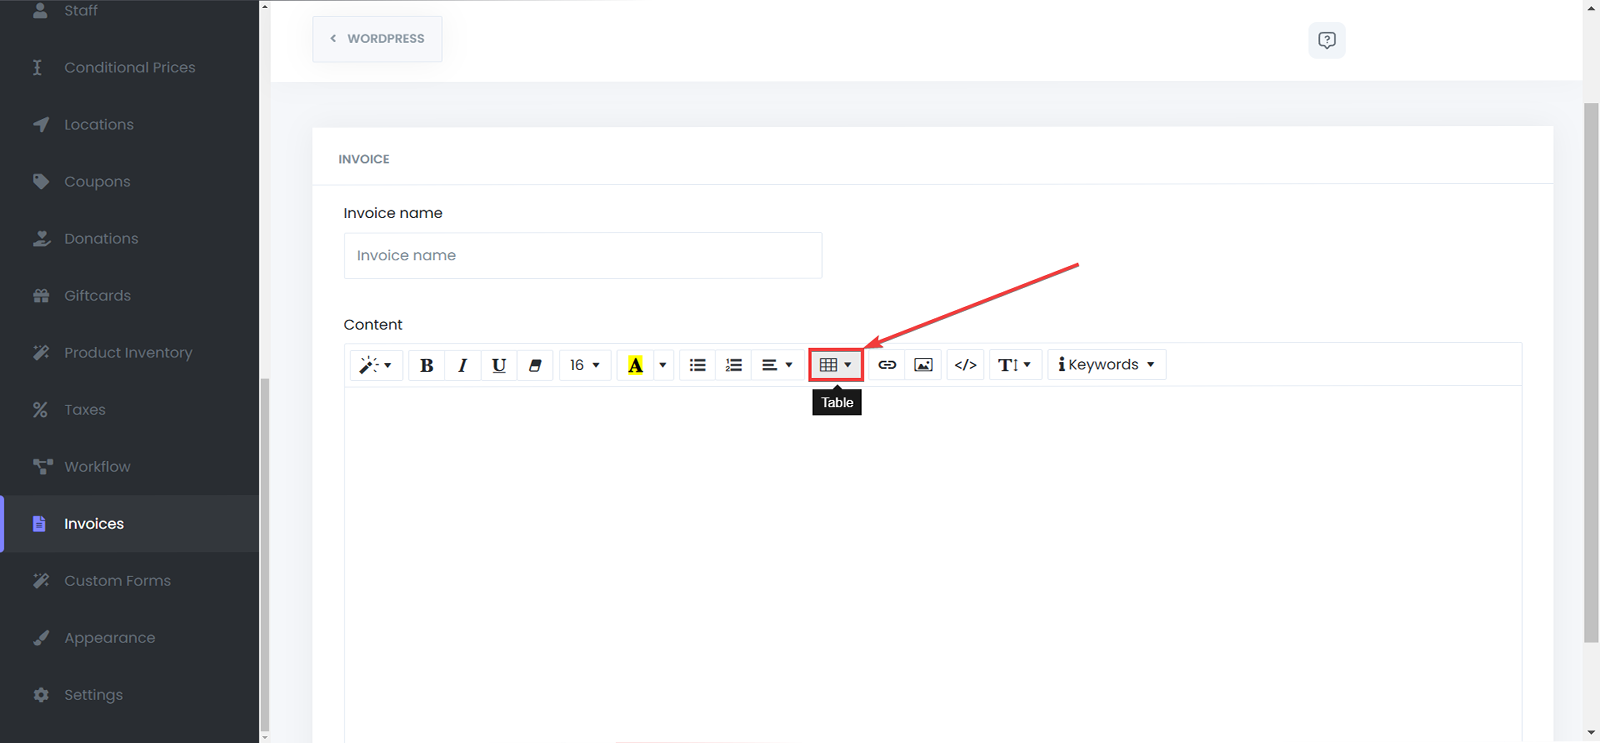
Set a name for your invoice
Enter a unique name to identify the invoice internally.

Choose a style for the text
Use formatting options to customize your text, to make sure that the important lines stand out.

Choose the font style and size
Set the font type and adjust the size to match your invoice design preferences.

Set the background and text color
Customize the background and text colors to match your brand identity.

Add unordered or ordered list to your Invoice
Add bullet points or numbered lists to organize invoice details clearly.

Add Table to your Invoice
Insert a table to neatly display item details, pricing, or other information.
Add Links or Images to your Invoice
Enhance your invoice by adding clickable links or images for extra clarity and branding.

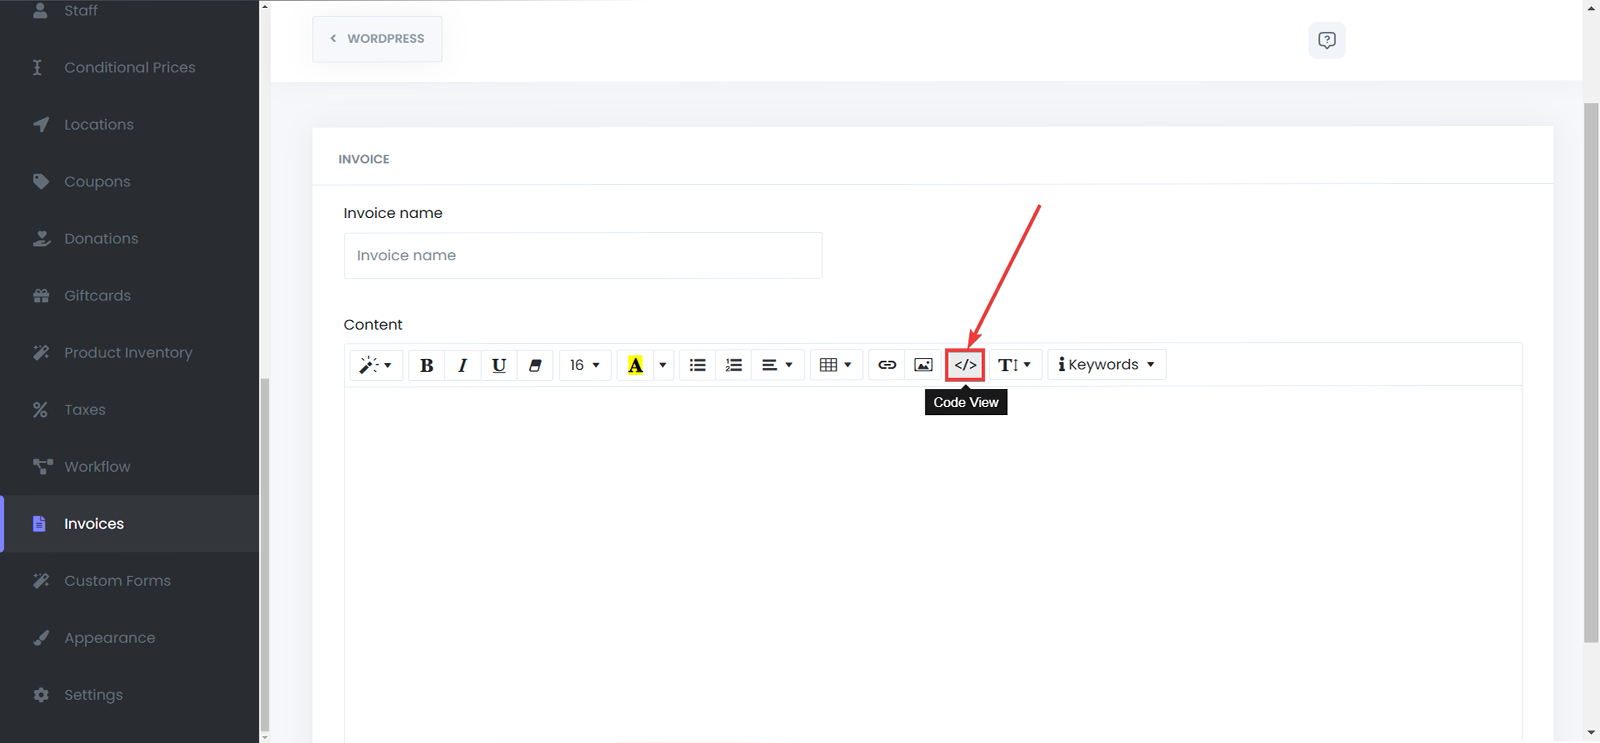
Switch to Code View
View and edit the raw HTML of your invoice for full control. You can also use a template and make your changes to it to customize and add your branding to it.
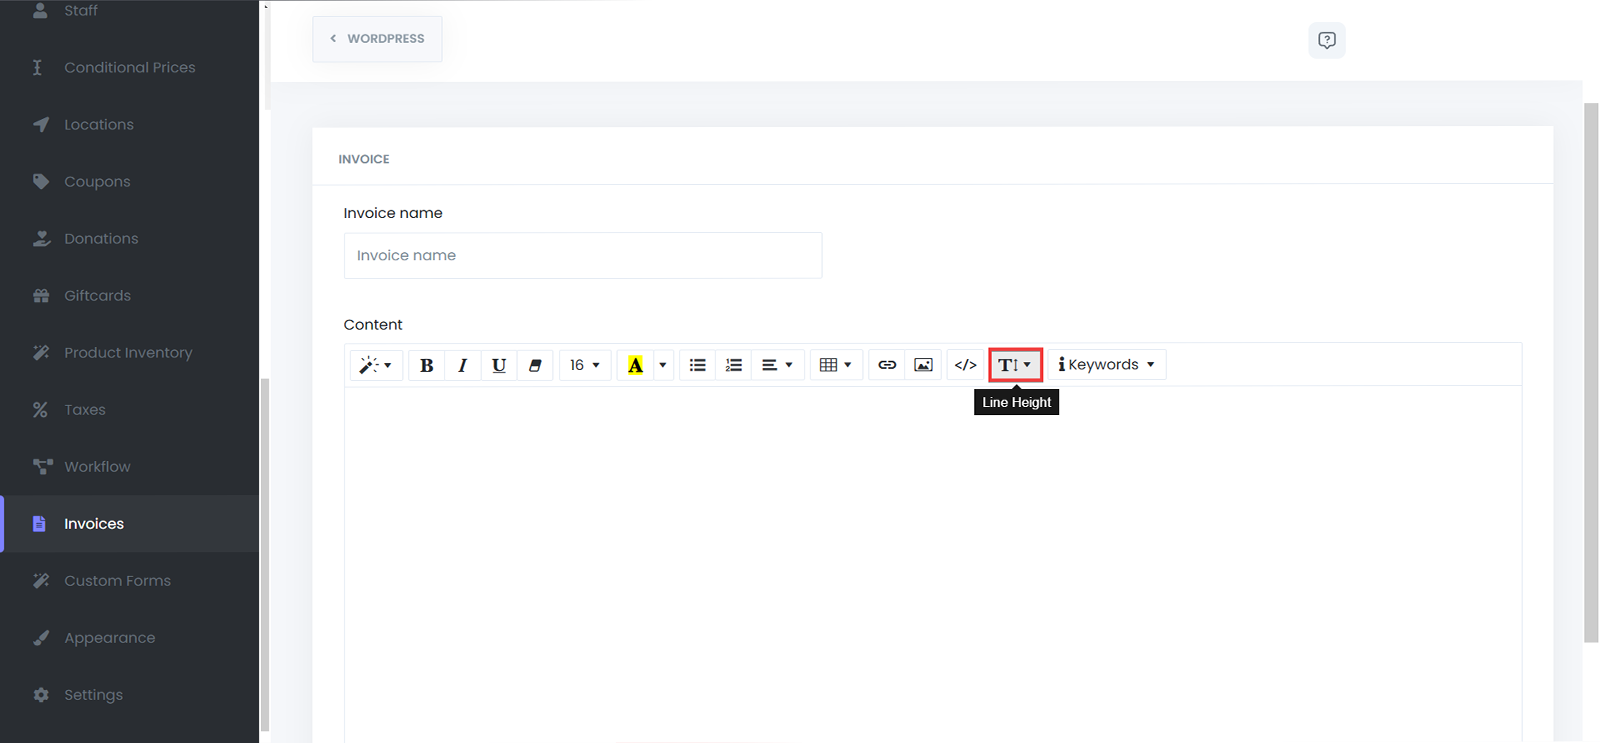
Adjust Line Height
Customize the spacing between lines for better readability.
Use Keywords to Automate Data Entry
Click the Keywords button to view available dynamic placeholders.

These placeholders automatically pull customer and appointment data into your invoices, ensuring accuracy and saving time.
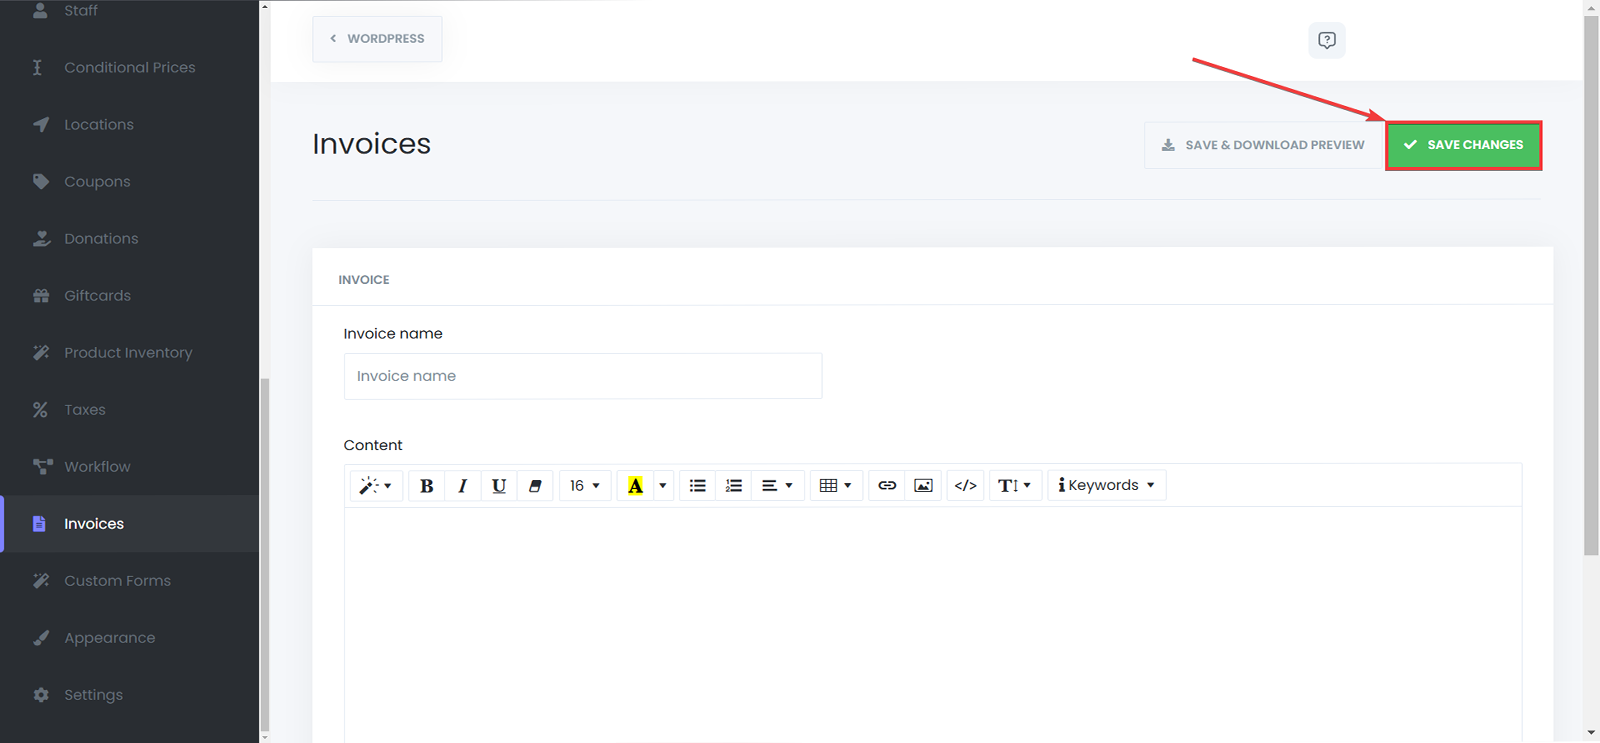
Preview and Download
Use the Preview button to check how the invoice will appear as a PDF.

Once satisfied, you can save it and proceed to attach it to notifications.
Attaching Invoices to Notifications
Once your invoice template is created, you can automatically attach it to customer notifications:
Navigate to Workflows
Go to Booknex > Workflows and open the workflow where you want to attach invoices (e.g., Appointment Confirmation or Payment Received).

Edit the Notification Action
Scroll down to the Attachments section at the bottom of the notification editor. Select the invoice you want to attach from the dropdown list. (Using PATH option will add the invoice itself as a file, while the URL option will include the link of the file)
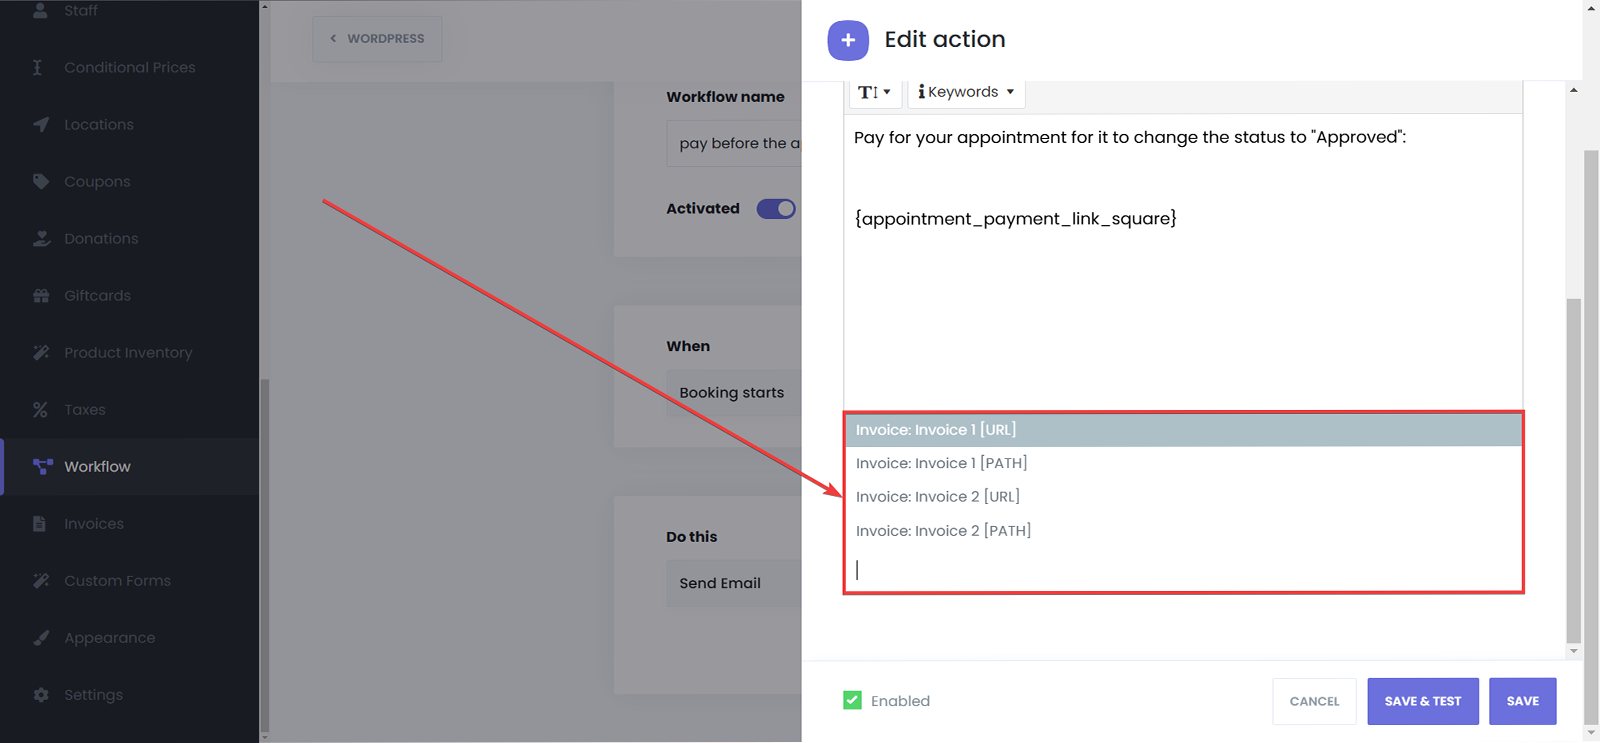
Save the workflow.

Multiple Invoices Support
You can attach more than one invoice to a single notification if needed, allowing you to send combined documentation in one message.

Benefits of Using Invoices in Booknex
- Automated Invoice Generation: Save time by automatically generating and sending invoices with each appointment.
- Customizable Design: Use pre-defined templates or fully customize your invoices with HTML.
- Legal and Financial Documentation: Maintain accurate records for both your business and your customers, ensuring clear communication and legal compliance.
- Seamless Workflow Integration: Combine invoices with your existing appointment notifications for a professional and consistent customer experience.
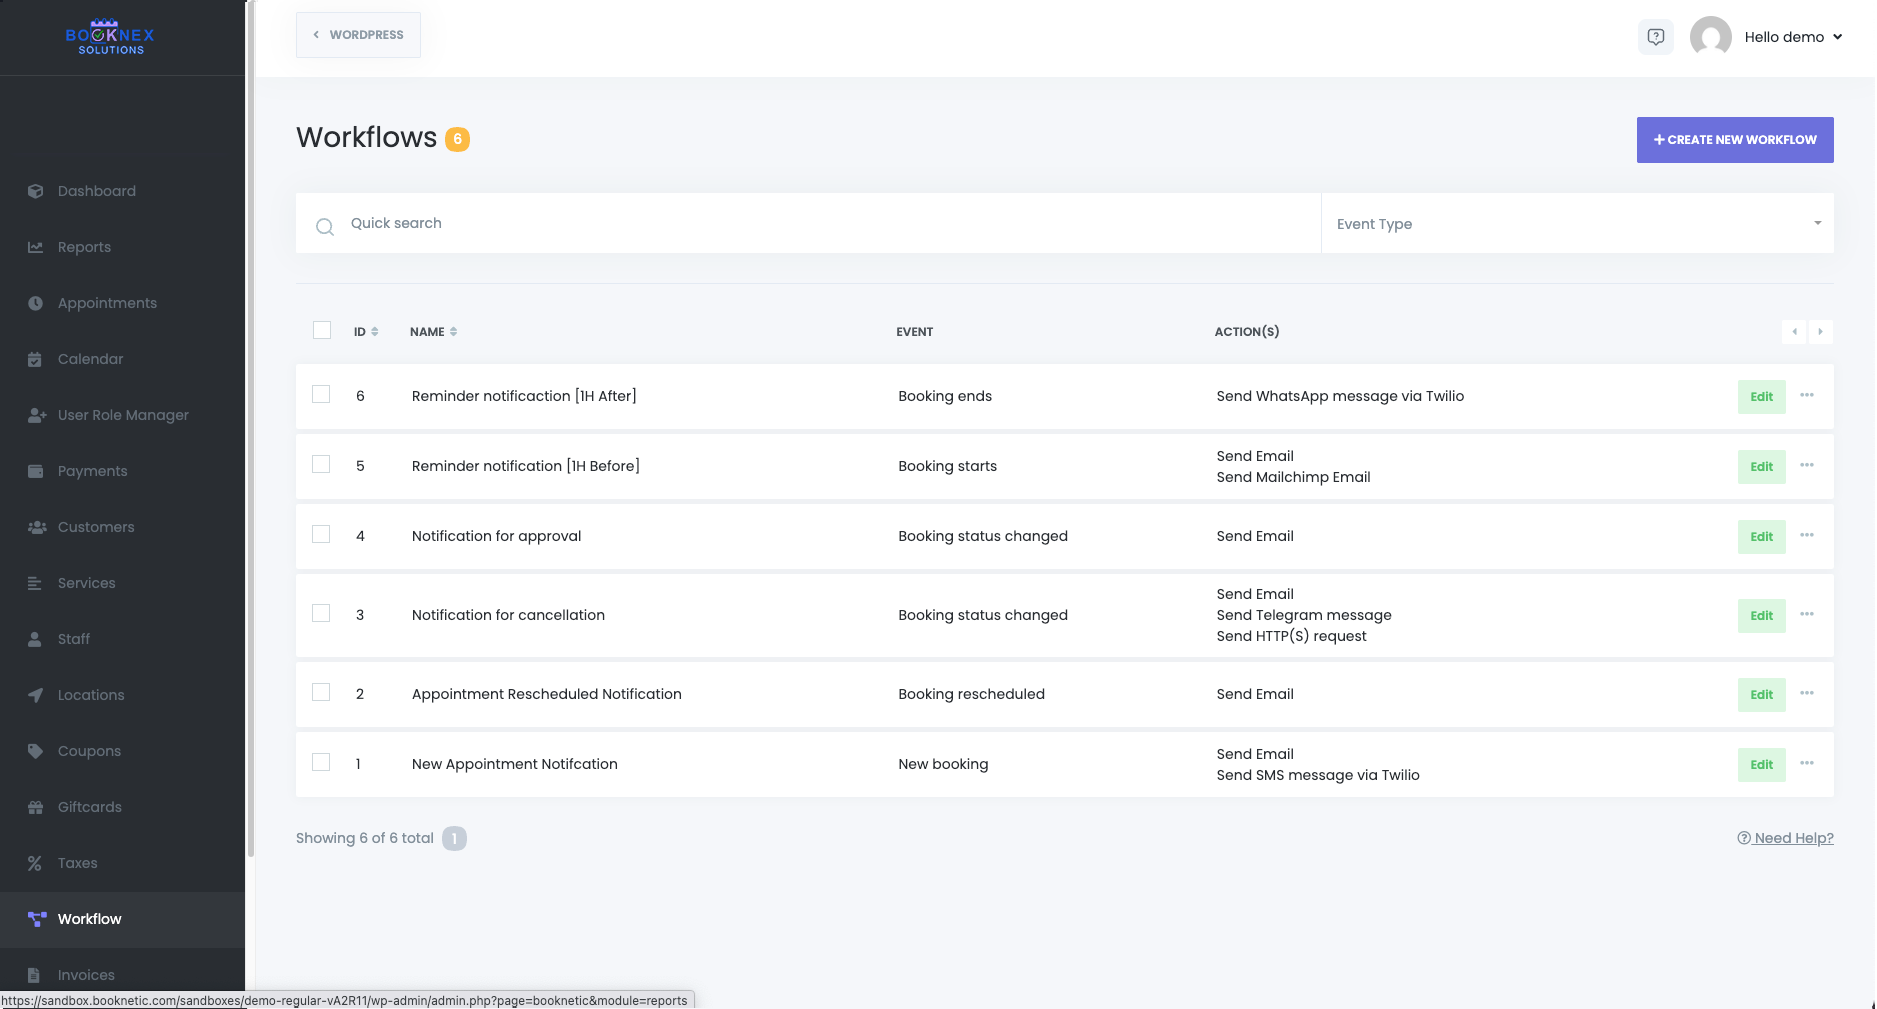
Workflow Email Notification
Creating Email Notifications with Workflows
Email notifications are managed inside the Workflows Module. Workflows allow you to automate messages by defining triggers (events) and actions (notifications).
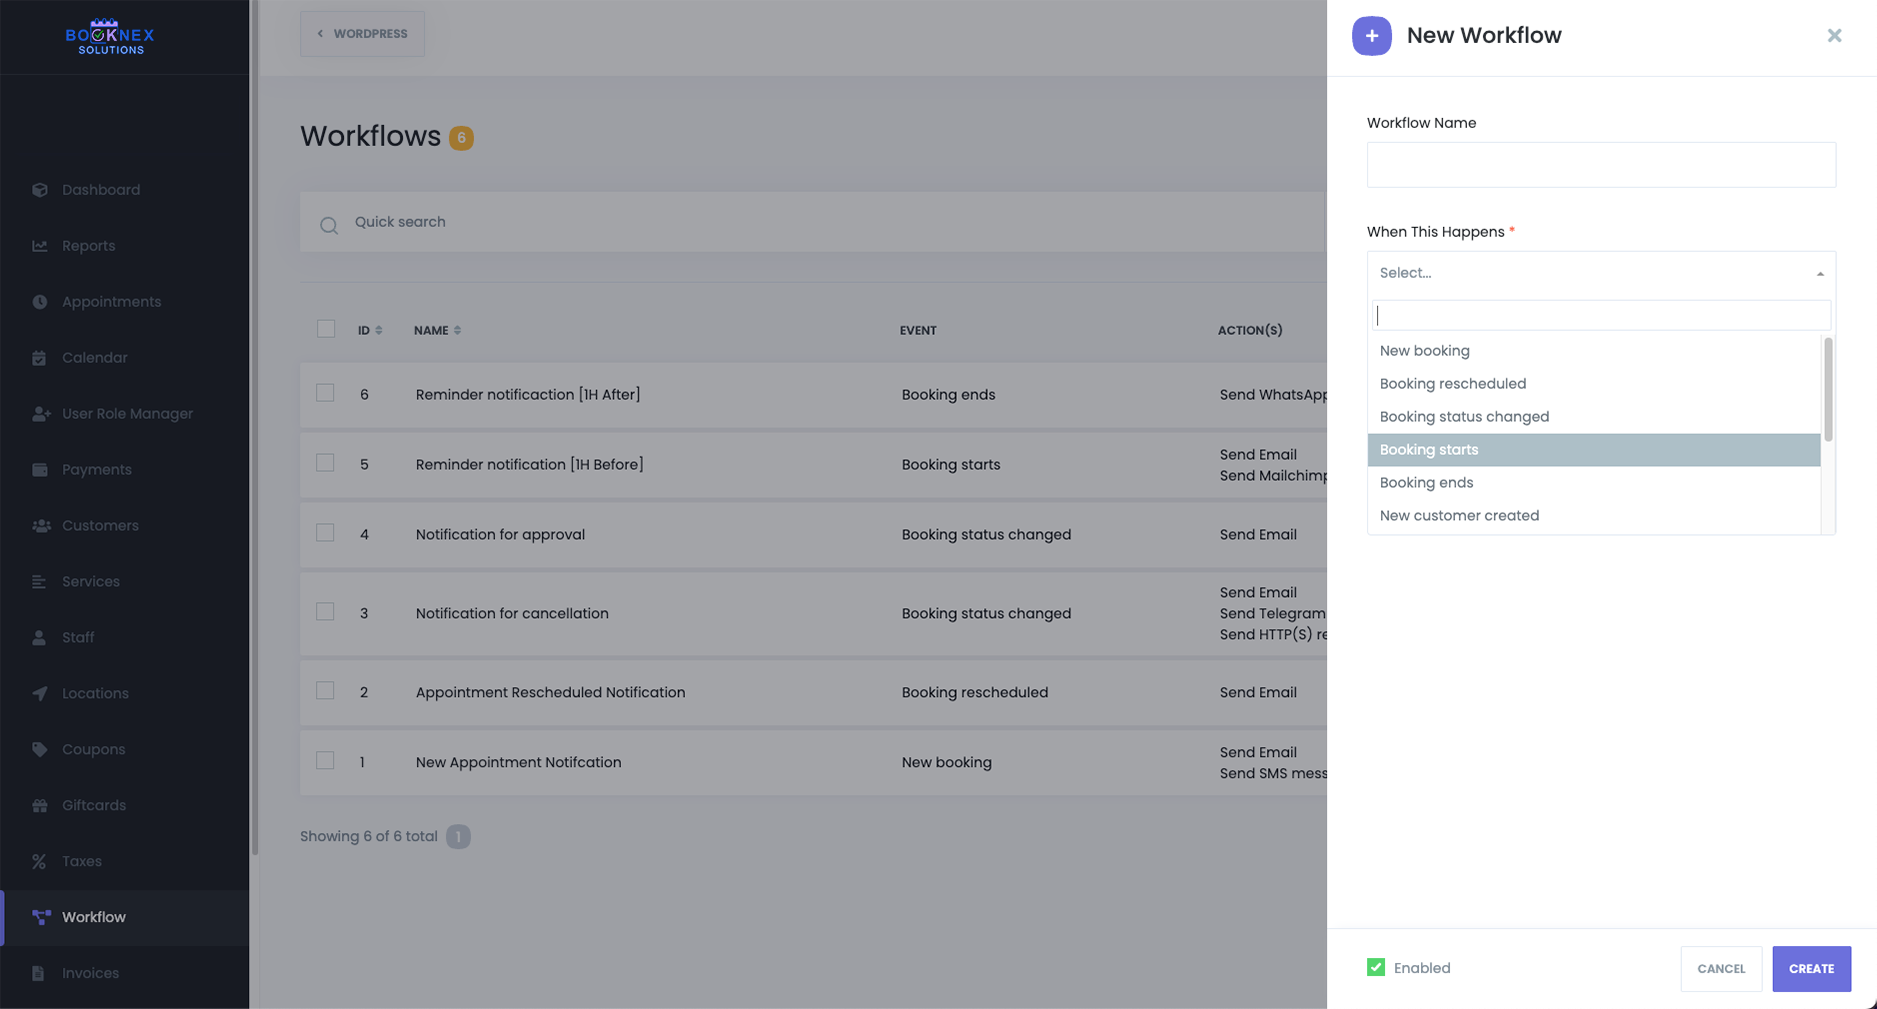
Step 1: Open Workflows
Go to Booknex → Workflows from the left-side menu.
Step 2: Create a Workflow
Click Create new workflow. Name it so you can identify it easily.

Step 3: Choose an Event
Select when the workflow should activate. Triggers include:
- New booking
- Booking status changed (canceled/approved/etc.)
- Booking rescheduled
- Appointment starts / ends
- Appointment paid
- New customer created
- Customer signed up
- Customer forgot password
- Customer birthday

Each trigger can be fine-tuned with filters:
- Service, staff, or location filters.
- Frontend / Backend booking source.
- Language (Locale) for multilingual sites.
- Before/after timing (for reminders) (e.g., 1 hour before appointment).
Step 4: Define the Action
Choose how the notification will be sent. Booknex supports multiple email actions inside workflows:
- Send Email – Uses your configured mail settings (WordPress Mail, SMTP, or Gmail SMTP).
- Send via Mailchimp – Sends the email notification through your configured Mailchimp Transactional integration.
You can:
- Send notifications to customers, staff, admins, or custom addresses.
- Add multiple recipients per notification.
- Combine multiple actions in one workflow (e.g., Send Email + Send SMS + Send via Mailchimp).
Writing Email Content
When setting up the email body, you can:
- Use rich text formatting (bold, italics, colors, lists, tables).
- Insert links, images, or HTML code for advanced layouts.
- Add shortcodes (keywords) that dynamically insert booking data.

Common Shortcodes
- {appointment_date} → Appointment date and time
- {customer_full_name} → Customer's name
- {service_name} → Service booked
- {staff_name} → Staff member assigned
- {zoom_url} → Zoom link (if enabled)
- {appointment_extras_list} → Selected extras
NOTE: If a shortcode has no value (e.g., no extras selected), it will be removed from the final email.
Adding Attachments
You can attach files to your notifications, such as:
- Customer-uploaded files (via Custom Forms).
- Invoices (requires the Invoices add-on).
Automated Notification Examples
Here are the most common automated notifications you can create:
- Booking Confirmation – Sent instantly when a customer books.
- Reschedule Update – Notifies customers and staff of changes.
- Cancellation Notice – Alerts when an appointment is canceled.
- Reminders – Sent N minutes/hours before the appointment to reduce no-shows.
- Follow-ups – Sent after the appointment to collect reviews or encourage re-booking.
- New Customer Registration – Sends login credentials for the Customer Panel.
- Customer Birthday – Automatically send personalized greetings or special offers to customers on their birthdays.
Tips for Managing Workflows
- Use filters to send notifications only for specific services, staff, or locations.
- Use Frontend/Backend filter to control if notifications are sent based on booking source.
- Use the Search and Filter function in the Workflows list to find workflows quickly.
- Test your notification with Save & Test, but note: shortcodes will not be replaced in test mode (they require real booking data).
Stripe Payment Gateway
Stripe is one of the most trusted and widely-used online payment platforms globally. Integrating Stripe with Booknex allows you to accept credit card and debit card payments directly within your booking system, providing customers with a secure, seamless payment experience.
This comprehensive guide walks you through the entire process of setting up Stripe in Booknex, from account creation to processing your first live payment.
Why Use Stripe?
- Security: PCI-compliant payment processing with built-in fraud detection
- Global Reach: Accepts major credit and debit cards worldwide
- Fast Payouts: Receive funds directly to your bank account within days
- No Monthly Fees: Pay-as-you-go pricing with no setup or monthly charges
- Transparent Pricing: Clear per-transaction fees with no hidden costs
- Automatic Updates: Payment statuses sync automatically with Booknex appointments
Prerequisites
- Active Booknex installation
- Valid business email address
- Business information and tax documentation
- Bank account details for receiving payouts
Step 1: Create a Stripe Account
Sign Up for Stripe
- Visit stripe.com
- Click the "Sign Up" or "Start now" button
- Enter your email address and create a secure password
- Provide your country of operation
Verify Your Email
Stripe will send a verification email to the address you provided. Click the verification link in the email to confirm your account.
Step 2: Activate Your Stripe Account
Before you can accept live payments, you must complete Stripe's activation process.
Complete Your Profile
- Visit your Stripe Dashboard
- Click the "Complete profile" button

Verify Your Email Address
If you haven't verified your email yet:
- Check your inbox for the verification email
- If you can't find it, click "Resend email" in your Stripe dashboard
- Click the verification link in the email

Fill Out Business Information
Stripe requires detailed business information for compliance and payout purposes:
- Business Type: Select your business structure (sole proprietor, LLC, corporation, etc.)
- Business Details: Legal business name, address, industry
- Personal Information: Owner/representative details for verification
- Bank Account: Account details where you'll receive payouts
Review and Submit
- Carefully review all provided information on the summary page
- Ensure all details are accurate and complete
- Click "Agree and submit" to activate your Stripe account

Step 3: Obtaining Stripe API Keys
To connect Stripe with Booknex, you need to retrieve your API keys from the Stripe Dashboard.
For Testing Purposes (Optional)
If you want to test payments before going live:
- Visit the Stripe Test API Keys page
- Copy both the Publishable key and Secret key
- Keep these keys for the testing phase

For Live Payments
When you're ready to accept real payments:
- Go to your Stripe API Keys page
- Copy the Publishable key (starts with pk_live_)
- Copy the Secret key (starts with sk_live_ - keep this confidential!)
Security Note: Never share your Secret key publicly or in client-side code. Keep it secure in your Booknex admin panel only.
Step 4: Configuring Stripe in Booknex
Navigate to Payment Settings
- Log into your Booknex Admin Panel
- Go to Settings > Payment Methods
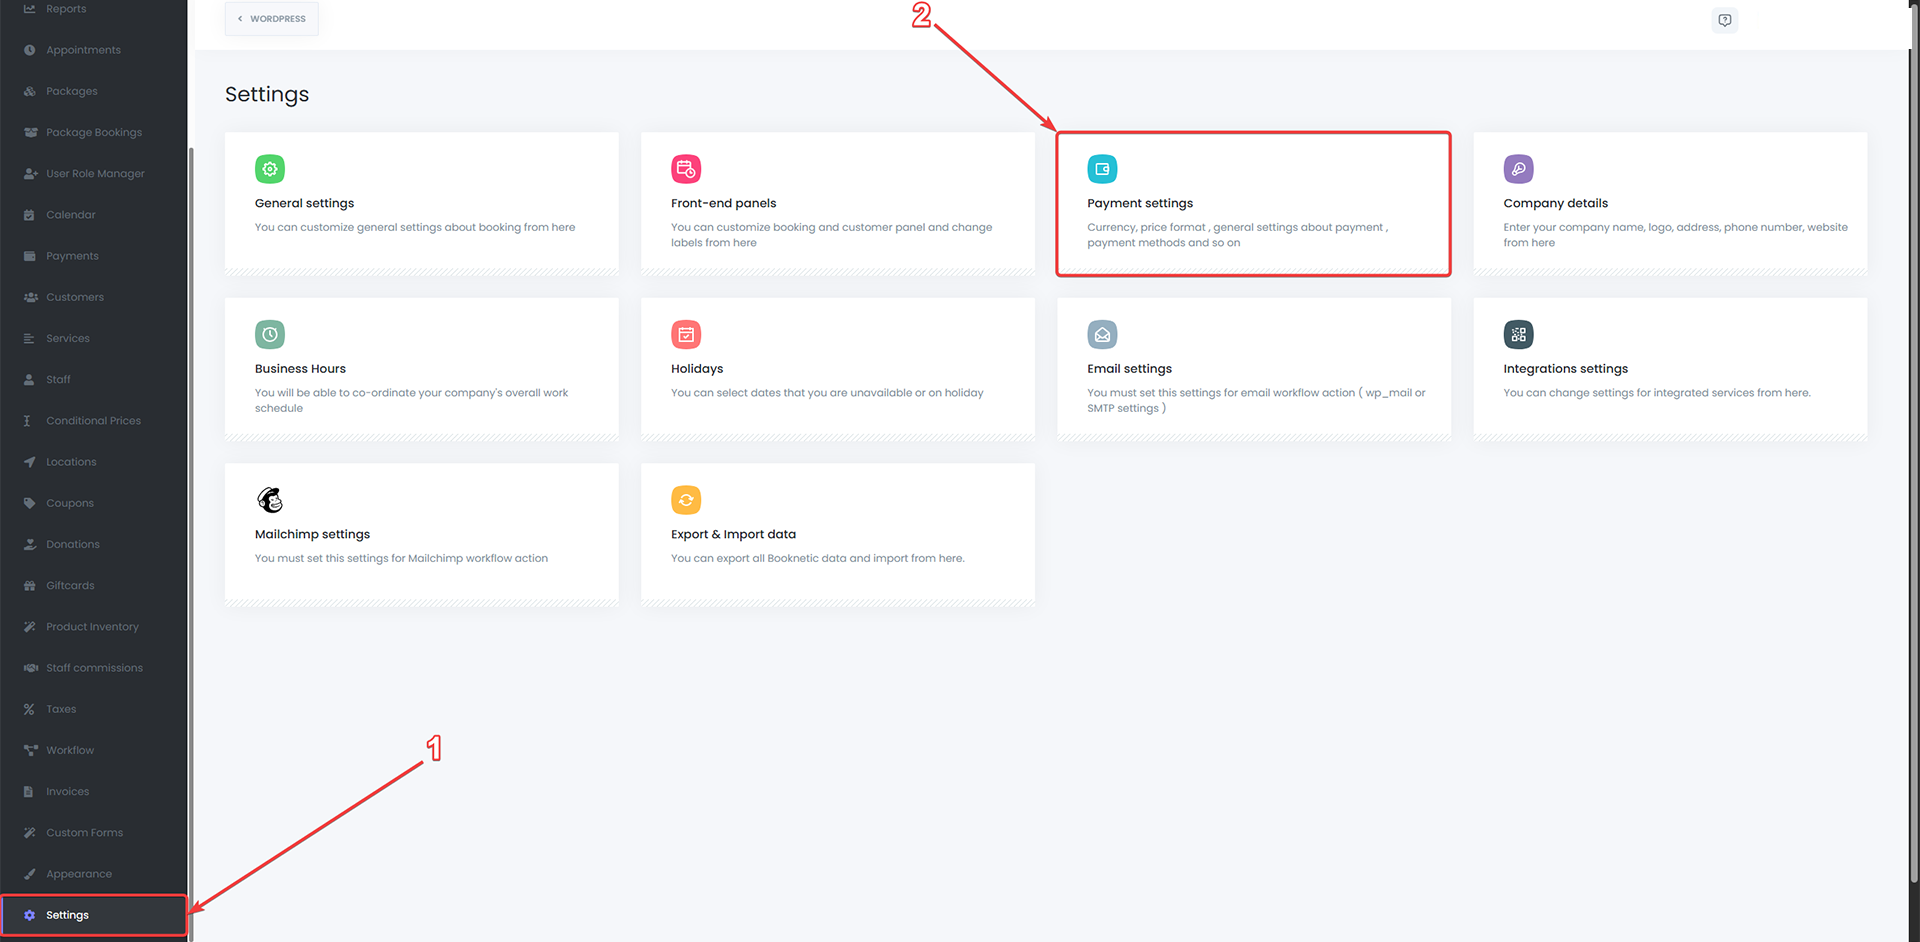
Enable Stripe
- Locate the Stripe payment option
- Toggle the switch to ON to enable Stripe payments

Paste Your API Keys
- Paste your Publishable Key into the corresponding field
- Paste your Secret Key into the Secret Key field
- Select the appropriate mode (Test or Live)

Save Your Settings
Click the "Save" button to apply your Stripe configuration. Stripe is now active in your Booknex system!
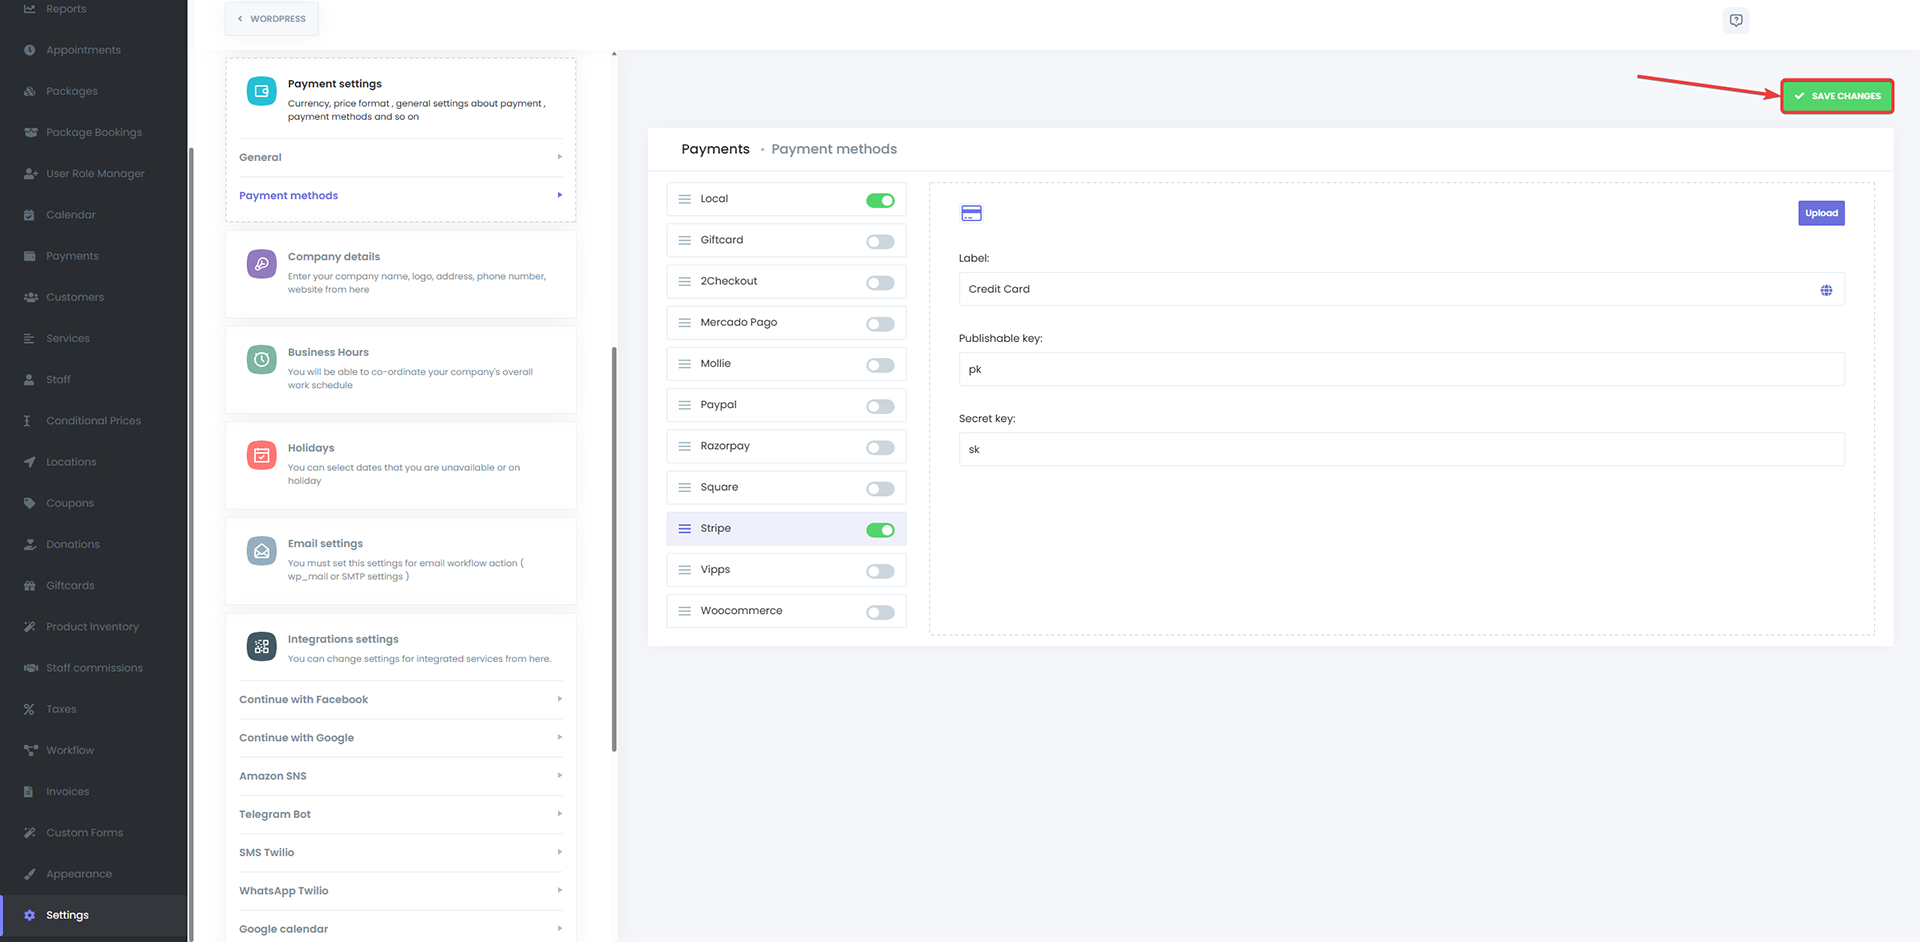
Testing Stripe Payments
Before accepting live payments, it's highly recommended to test the integration:
- Use Stripe's test mode credentials in your Booknex settings
- Create a test appointment booking on your site
- When prompted for payment, use Stripe's test card numbers
- Common test cards include:
- Success: 4242 4242 4242 4242
- Declined: 4000 0000 0000 0002
- Requires Authentication: 4000 0025 0000 3155
- Use any future expiration date and any 3-digit CVC
- Verify the payment appears in your Stripe test dashboard
Important: No real money is charged during test mode.
Managing Stripe Payments
Once your integration is live, managing payments is straightforward.
View Transactions in Stripe
- Log into your Stripe Dashboard
- Navigate to Payments to see all transactions
- Review completed, pending, and failed payments
- Download transaction reports for accounting
Process Refunds
To refund a payment:
- Go to your Stripe Dashboard > Payments
- Find the transaction you want to refund
- Click on the payment
- Click "Refund payment"
- Enter the refund amount (full or partial)
- Confirm the refund
Handle Disputes
If a customer disputes a charge (chargeback):
- Stripe will notify you via email
- Log into your Stripe Dashboard
- Navigate to Payments > Disputes
- Review the dispute details
- Submit evidence if you wish to contest it
Booknex Appointment Status Synchronization
Stripe payment statuses automatically update appointment statuses in Booknex:
- Successful Payment: Appointment status changes to Approved
- Failed Payment: Appointment remains Pending or changes to Rejected
- Refunded Payment: Appointment status can be updated manually or via workflow automation
Common Issues and Troubleshooting
Incorrect API Keys
Problem: Payments fail or Stripe connection doesn't work
Solution:
- Verify you're using the correct keys (test vs. live)
- Ensure there are no extra spaces when pasting keys
- Make sure you copied both Publishable and Secret keys
- Regenerate keys in Stripe if you suspect they're compromised
Payments Not Processing
Problem: Customers can't complete payments
Solution:
- Check that Stripe is toggled ON in Booknex settings
- Verify your Stripe account is fully activated (not in test mode for live keys)
- Review your Stripe Dashboard for any holds or restrictions
- Ensure your website uses HTTPS (required for secure payments)
Test Mode vs Live Mode Confusion
Problem: Real customers can't pay, or test payments appear in live mode
Solution:
- Confirm you're using the correct API keys for your intended mode
- In Booknex, ensure the mode setting matches your keys (Test or Live)
- When switching from test to live, replace test keys with live keys
Security Best Practices
- Protect Secret Keys: Never expose your Secret key in client-side code or public repositories
- Use HTTPS: Always serve your booking pages over secure HTTPS connections
- Monitor Activity: Regularly check your Stripe Dashboard for unusual transactions
- Enable Two-Factor Authentication: Secure your Stripe account with 2FA
- Limit Dashboard Access: Only grant Stripe Dashboard access to trusted team members
Stripe Fees
Stripe charges per-transaction fees. Standard pricing is:
- 2.9% + $0.30 per successful card charge (US)
- International cards may incur additional fees
- No setup fees, monthly fees, or hidden charges
- Check Stripe's pricing page for region-specific rates
Support and Resources
- Stripe Documentation
- Stripe Support Center
- Stripe Dashboard
- Booknex Support for integration-specific questions
PayPal Payment Gateway
PayPal is one of the world's most recognized and trusted online payment platforms, with millions of users globally. Integrating PayPal with Booknex enables you to accept payments through PayPal accounts, credit cards, and debit cards, providing customers with a familiar and secure checkout experience.
This guide will walk you through the complete process of creating a PayPal Business account, obtaining API credentials, and connecting PayPal to your Booknex booking system.
Why Use PayPal?
- Brand Recognition: PayPal is trusted by customers worldwide
- No Account Required for Customers: Customers can pay with credit/debit cards without a PayPal account
- Buyer Protection: Built-in protection for both buyers and sellers
- Multiple Payment Methods: Accepts PayPal balance, bank accounts, and cards
- Fast Integration: Simple API setup with Booknex
- Global Reach: Supports multiple currencies and countries
Prerequisites
- Active Booknex installation
- Valid business email address
- Business information and documentation
- Bank account or credit card for verification
Step 1: Create a PayPal Business Account
Sign Up for PayPal Business
Visit the PayPal Business account registration page:
https://www.paypal.com/unifiedonboarding/entry?country.x=US&locale.x=en_US&products=EXPRESS_CHECKOUT
Fill out the registration form with your business information:
- Business email address
- Business name
- Password for your account
- Phone number
Step 2: Verify Your Email Address
After completing the registration form, PayPal will prompt you to confirm your email address:
- Click the "Email you a code" button
- Check your email inbox for the verification code from PayPal
- Enter the received code in the verification field
- Click "Confirm" to proceed


Step 3: Activate Your PayPal Account
To start accepting payments, you must activate your PayPal Business account by completing the verification process.
Begin Activation
After email verification, PayPal will prompt you to activate your account. Click the "Let's Go!" button to begin.

Select Your Business Type
PayPal will ask you to select your business type. Choose the option that best describes your business:
- Individual: Sole proprietor or single-owner LLC
- Company: Corporation, partnership, or multi-owner business
- Nonprofit: Registered nonprofit organization
For example, selecting "Individual" will set your business type as "Individual or LLC (Single owner)".
Step 4: Verify Your Personal Information
PayPal requires personal information about the account holder for identity verification and compliance purposes.
You'll need to provide:
- Full legal name
- Date of birth
- Home address
- Social Security Number or Tax ID (depending on your country)
Important: Ensure all information is accurate. Incorrect details may delay or prevent account activation.
Step 5: Provide Business Information
PayPal will request detailed information about your business. This step is critical for account approval, so fill it out carefully.
Required business information includes:
- Legal Business Name: Official name as registered
- Business Address: Physical location of your business
- Business Type/Industry: Category that describes your business
- Business Website: Your company website URL
- Estimated Monthly Sales Volume: Expected transaction volume
- Product/Service Description: What you sell or provide

Tip: Provide accurate and complete information to avoid activation delays or account limitations.
Step 6: Submit Proof of Identity
To verify your identity and business legitimacy, PayPal requires documentation.
Commonly accepted documents include:
- Government-issued photo ID (driver's license, passport)
- Business registration documents
- Tax identification documents
- Bank statements
- Utility bills (for address verification)
Upload clear, legible copies of the requested documents. PayPal will review your submission, which typically takes a few business days.
Step 7: Wait for Account Verification
After submitting all required information and documentation, PayPal will review your account. You'll receive an email notification once your account is verified and activated.
Verification Time: Usually 1-3 business days, but can take longer depending on the complexity of your business and documentation provided.
Step 8: Access the PayPal Developer Dashboard
Once your PayPal Business account is verified, you can obtain the API credentials needed to connect PayPal with Booknex.
- Go to https://developer.paypal.com/dashboard/
- Log in with your PayPal Business account credentials

Retrieve API Credentials
In the Developer Dashboard:
- Navigate to My Apps & Credentials
- Select the Live tab (for production/live payments)
- If you don't have an app, click Create App and give it a name
- Once created, you'll see your Client ID and Secret
- Click Show under the Secret to reveal it
- Copy both the Client ID and Secret
Sandbox Credentials (Optional for Testing): If you want to test PayPal integration before going live, select the Sandbox tab instead and retrieve your sandbox credentials.
Step 9: Configure PayPal in Booknex
Navigate to Payment Settings
- Log into your Booknex Admin Panel
- Go to Settings > Payment Settings > Payment Methods
Enable PayPal
- Locate PayPal in the payment methods list
- Toggle the switch to ON to enable PayPal payments
Enter API Credentials
- Paste your PayPal Client ID into the corresponding field
- Paste your PayPal Secret into the Secret field
- Select the correct Mode:
- Sandbox: For testing with sandbox credentials
- Live: For real payments with live credentials

Save Configuration
Click Save to apply your PayPal settings. PayPal is now active in your Booknex system!
Important: Mode Configuration
Critical Warning: The mode setting in Booknex must match the credentials you're using:
- If you select Live mode in Booknex, you must use Live API credentials from PayPal
- If you select Sandbox mode in Booknex, you must use Sandbox API credentials
- Mismatched mode and credentials will result in payment failures
Example Error: Using Sandbox credentials with Live mode selected will cause PayPal payments to fail in Booknex.
Testing PayPal Payments
Before accepting live payments, test your integration:
- Set Booknex to Sandbox mode
- Use PayPal Sandbox API credentials
- Create a test appointment booking
- When redirected to PayPal, log in with your Sandbox test account
- Complete the payment
- Verify the payment appears in your PayPal Sandbox account
- Confirm the appointment status updates in Booknex
Note: You can create Sandbox test accounts in the PayPal Developer Dashboard under Sandbox > Accounts.
Managing PayPal Payments
View Transactions
To see all PayPal payments:
- Log into your PayPal Business account
- Go to Activity or Transactions
- Filter by date, amount, or status
- Download transaction reports for accounting
Process Refunds
To refund a payment:
- Navigate to your transaction list in PayPal
- Find the transaction you want to refund
- Click on the transaction
- Select Refund this payment
- Choose full or partial refund
- Click Refund to process
Appointment Status Synchronization
PayPal payment statuses automatically sync with Booknex appointments:
- Completed Payment: Appointment status changes to Approved
- Pending Payment: Appointment remains Pending
- Failed/Cancelled Payment: Appointment can be set to Rejected or remain Pending
Common Issues and Troubleshooting
Mode Mismatch Error
Problem: PayPal payments fail with authentication errors
Solution:
- Verify you're using the correct credentials (Sandbox vs. Live)
- Ensure the Booknex mode matches your credentials
- Check that you copied the full Client ID and Secret without extra spaces
Account Not Verified
Problem: Cannot obtain API credentials or payments are limited
Solution:
- Complete all verification steps in your PayPal account
- Submit required identity documentation
- Wait for PayPal to review and approve your account
- Contact PayPal support if verification is taking unusually long
Payments Not Processing
Problem: Customers encounter errors during checkout
Solution:
- Ensure PayPal is enabled in Booknex settings
- Verify your PayPal account is active and not limited
- Check that your PayPal account can receive payments
- Review PayPal's transaction limits and ensure you haven't exceeded them
API Credentials Not Working
Problem: Cannot connect Booknex to PayPal
Solution:
- Regenerate API credentials in the PayPal Developer Dashboard
- Ensure there are no extra spaces when copying/pasting credentials
- Verify you're copying from the correct app in the Developer Dashboard
- Try creating a new app if issues persist
PayPal Fees
PayPal charges transaction fees for receiving payments:
- Standard Rate (US): 2.9% + $0.30 per transaction
- International Transactions: Additional fees may apply
- Currency Conversion: Fees apply when receiving payments in different currencies
- No setup fees or monthly charges for basic accounts
Check PayPal's fee structure for your region and account type.
Security Best Practices
- Protect Your Credentials: Never share your Client ID and Secret publicly
- Enable Two-Factor Authentication: Secure your PayPal account with 2FA
- Monitor Transactions: Regularly review your PayPal activity for unauthorized transactions
- Use Strong Passwords: Create a unique, complex password for your PayPal account
- Limit Access: Only grant PayPal account access to trusted team members
Support and Resources
- PayPal Help Center
- PayPal Developer Documentation
- PayPal Developer Dashboard
- PayPal Business Login
- Booknex Support for integration-specific questions
Google Meet Integration - Automated video meeting creation
The Google Meet integration in Booknex automatically generates Google Meet video links for appointments, eliminating the need for manual link creation. This integration provides a seamless virtual meeting experience for both staff and customers, ensuring every online appointment has a professional video conferencing solution ready.
Once configured, Google Meet links are automatically created when appointments are booked and included in all notifications, making remote consultations effortless.
Key Features
- Automatic Link Generation: Meet links created instantly upon appointment booking
- Email & SMS Integration: Links automatically included in notifications
- Calendar Sync: Meetings appear in staff Google Calendars with Meet links attached
- Staff-Level Control: Each staff member connects their own Google account
- No Manual Work: Completely automated - no need to create or share links manually
Setting Up the Google Meet Integration
Step 1: Enable Google Meet Integration in Booknex
Before using the integration, you need to enable it in the Booknex Admin Panel.
Access Booknex Settings
- In the Booknex Admin Panel, navigate to Settings in the left sidebar
- Select the Integrations tab
Enable Google Meet
- Locate the Google Meet section
- Toggle the integration to Enabled
Step 2: Access Google Developer Console
To set up the integration, you'll need to create a project in the Google Developer Console and obtain OAuth 2.0 credentials. This process is similar to the Google Calendar setup.
Sign In
- Go to the Google Developer Console
- Sign in with your Google account
- If this is your first time, agree to the terms of service
Create a New Project
- Click on the Select a project dropdown at the top of the page
- Click NEW PROJECT
- Name the project (e.g., "Booknex Google Meet")
- Select No organization (unless you have a Google Workspace organization)
- Click Create to finalize
Step 3: Enable Google Meet API
- In the Google Developer Console, go to APIs & Services > Library
- Search for Google Meet API
- Click on the API in the search results
- Click Enable
Step 4: Set Up OAuth Consent Screen
The OAuth consent screen is what users see when they authorize Booknex to access their Google account.
Configure OAuth Consent
- Go to APIs & Services > OAuth consent screen
- Click Get Started
- Select External for the user type
- Click Create
Fill in App Information
Complete the required fields:
- App name: Your business name (e.g., "Booknex")
- User support email: Your business email
- Developer contact information: Your email address
- Fill out the contact information
- Agree to the Google API Services User Data Policy
- Click Continue
- Click Create when done
Step 5: Create OAuth 2.0 Client Credentials
Create OAuth Credentials
- Go to APIs & Services > Credentials
- Click Create Credentials
- Select OAuth 2.0 Client ID
Configure Application Type
- Choose Web Application as the application type
- Give it a name (e.g., "Booknex Google Meet Integration")
Add Authorized Redirect URI
- Under Authorized redirect URIs, click Add URI
- Paste the redirect URI provided by Booknex (found in Booknex > Settings > Integrations > Google Meet)
- Click Create
Save and Copy Client Credentials
- Once the credentials are generated, a popup will display your Client ID and Client Secret
- Copy both values (you can also download them as a JSON file)
Paste Credentials into Booknex
- Go back to Booknex > Settings > Integrations > Google Meet
- Paste the Client ID into the corresponding field
- Paste the Client Secret into the corresponding field
- Click Save changes
Connecting Staff Accounts with Google Meet
Each staff member must connect their individual Google account to Booknex to generate unique Google Meet links for their appointments.
Steps for Staff to Sync Their Google Account:
- Staff member logs into their Staff Profile in the Booknex Admin Panel
- In their profile settings, there will be an option to Connect to Google Meet
- Click the connection button
- A Google authorization page will appear with a warning that "This app isn't verified" (this is normal for custom integrations)
- Click Advanced, then Go to [Your App Name] (unsafe)
- Review the permissions requested
- Click Allow to authorize access
- Once connected, Booknex can generate Meet links for that staff member's appointments
Note: The "app isn't verified" warning is standard for custom Google integrations. It does not indicate a security issue.
How Google Meet Works in Booknex
Automatic Meet Link Creation
When a customer books an appointment with a staff member who has connected their Google account:
- Booknex automatically creates a unique Google Meet link
- The Meet link is associated with the appointment
- No manual intervention required
Email & SMS Notifications
The Google Meet link is automatically included in:
- Customer confirmation emails
- Staff notification emails
- Reminder emails and SMS messages (if configured)
Calendar Integration
If Google Calendar integration is also enabled:
- The appointment appears in the staff member's Google Calendar
- The Google Meet link is attached to the calendar event
- Customers can join directly from the calendar invitation
Customer Experience
Here's what happens from the customer's perspective:
- Customer books an appointment through your Booknex booking page
- Customer receives a confirmation email with the Google Meet link
- At the scheduled time, customer clicks the link to join the meeting
- Customer enters the meeting (no Google account required for guests)
Staff Experience
Here's what happens from the staff member's perspective:
- Staff member receives a notification about the new appointment
- The notification includes the Google Meet link
- At the scheduled time, staff member clicks the link to start the meeting
- Staff member can also access the meeting from their Google Calendar
Troubleshooting
Google Meet Links Not Generating
Problem: Appointments don't have Meet links attached
Solution:
- Ensure Google Meet integration is enabled in Booknex settings
- Verify that the staff member has connected their Google account
- Check that the Google Meet API is enabled in your Google Developer Console
- Confirm the OAuth credentials are correctly entered in Booknex
OAuth Credentials Invalid
Problem: Error messages when trying to connect staff accounts
Solution:
- Double-check that you copied the Client ID and Client Secret correctly (no extra spaces)
- Verify the redirect URI in Google Developer Console matches exactly what Booknex provides
- Ensure your OAuth consent screen is properly configured
App Not Verified Warning
Problem: Staff see "This app isn't verified" when authorizing
Solution:
- This is normal for custom integrations
- Staff can safely click Advanced and proceed
- To remove this warning permanently, you would need to submit your app for Google verification (optional and not necessary for functionality)
Application Status Not Published
Problem: Integration not working properly
Solution:
- In Google Developer Console, go to OAuth consent screen
- Ensure your application status is set to Published (or at least in Testing mode with authorized users)
- If in Testing mode, add staff email addresses to the list of test users
Staff Cannot Authorize Account
Problem: Authorization fails or loops back
Solution:
- Clear browser cache and cookies
- Try authorizing in an incognito/private browsing window
- Verify the redirect URI is correct in both Booknex and Google Console
- Check that the staff member is using the correct Google account
Security and Privacy
- Limited Access: Booknex only requests permission to create Meet links, not access other Google data
- Staff Control: Each staff member controls their own Google account connection
- Revocable: Staff can disconnect their Google account at any time from their profile
- Secure OAuth: Uses industry-standard OAuth 2.0 for secure authorization
Best Practices
- Test First: Have one staff member test the connection before rolling out to the entire team
- Provide Instructions: Create a simple guide for staff on how to authorize their Google account
- Include in Notifications: Ensure your email/SMS templates include the Meet link shortcode
- Set Reminders: Configure appointment reminders that include the Meet link
- Staff Training: Train staff on starting and managing Google Meet sessions
Frequently Asked Questions
Do customers need a Google account to join?
No, customers can join Google Meet sessions as guests without a Google account. They simply click the link and enter their name.
Can we use the same Google account for all staff?
While technically possible, it's not recommended. Each staff member should connect their own account so Meet links are associated with their calendar and they can manage their own meetings.
What happens if a staff member disconnects their Google account?
Existing appointments will retain their Meet links, but new appointments will not generate Meet links until the staff member reconnects their account.
Is there a limit to how many Meet links can be created?
Google Meet does not impose specific limits on link creation. However, standard Google Meet usage policies and limits apply (meeting duration, participant limits, etc.).
Support and Resources
- Google Developer Console
- Google Meet API Documentation
- Google Meet Help Center
- Booknex Support for integration-specific questions
Microsoft Teams Integration - Virtual meetings through Teams (VivoMeetings)
The VivoMeetings Integration add-on for Booknex enables businesses to schedule and manage virtual meetings directly from the Booknex platform using VivoMeetings' video conferencing solution. By integrating VivoMeetings with Booknex, appointments booked through your system are automatically linked to unique meeting rooms, simplifying the process for virtual consultations and meetings.
VivoMeetings provides a reliable, professional video conferencing platform that seamlessly connects with Booknex to deliver automated meeting creation for your business.
Key Features
- Automatic Room Creation: Unique VivoMeetings room URLs generated for each appointment
- Staff-Level Control: Each staff member links their own VivoMeetings account
- Service-Based Settings: Enable VivoMeetings for specific services only
- Customizable Meeting Details: Configure meeting subject and agenda with dynamic shortcodes
- Email Notifications: Meeting links automatically included in appointment confirmations
- No Manual Link Creation: Fully automated meeting URL generation
Prerequisites
- Active Booknex installation
- VivoMeetings account (free or paid)
- Staff members with individual VivoMeetings accounts
Step 1: Create a VivoMeetings Account
- Visit VivoMeetings.com
- Click Sign Up or Create Account
- If you already have an account, simply log in

Complete the registration process by providing your email, creating a password, and verifying your account.
Step 2: Enable VivoMeetings Integration in Booknex
Access Integration Settings
- In your Booknex Admin Panel, navigate to Settings > Integrations

Enable VivoMeetings
- Find VivoMeetings in the list of available integrations
- Toggle the switch to Enable the integration
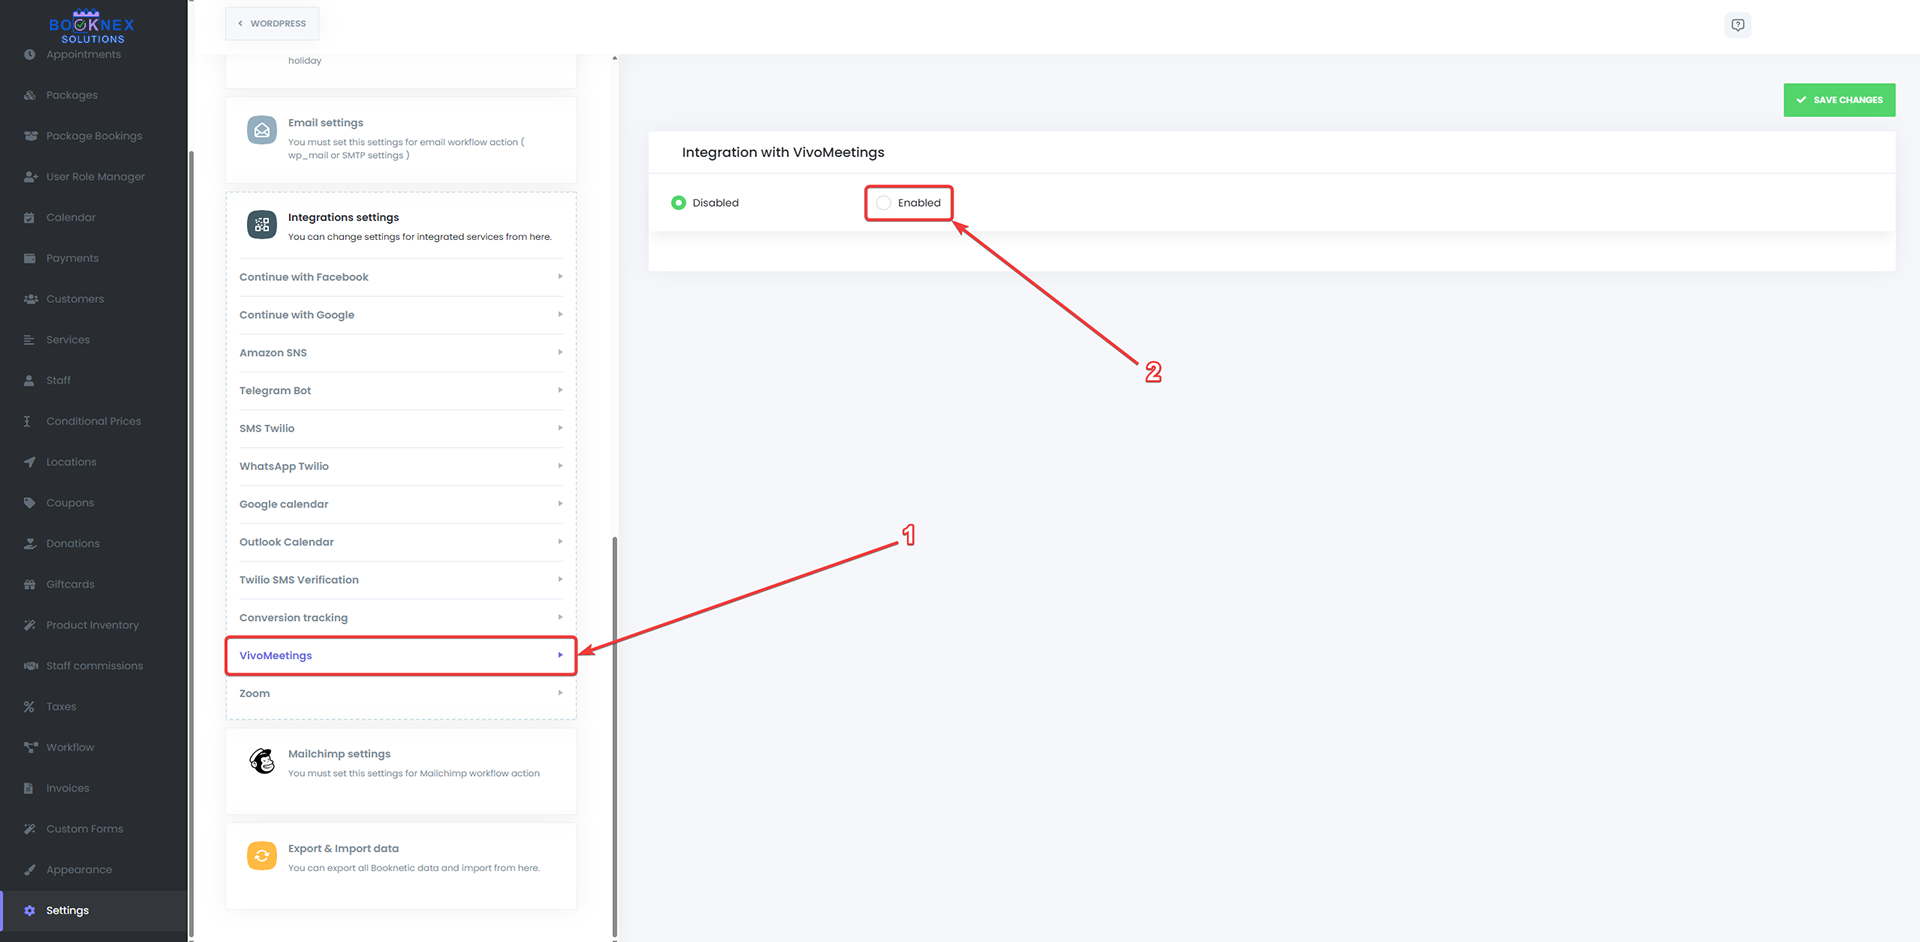
Configure Meeting Settings
After enabling VivoMeetings, you can customize the meeting details:
- Conference Subject: The title that appears for the meeting
- Agenda: Description or agenda for the meeting
- Service Selection: Choose which appointment types should include VivoMeetings
You can use shortcodes to make these fields dynamic:
{customer_name}- Customer's full name{service_name}- Name of the booked service{staff_name}- Staff member's name{appointment_date}- Date of the appointment{appointment_time}- Time of the appointment
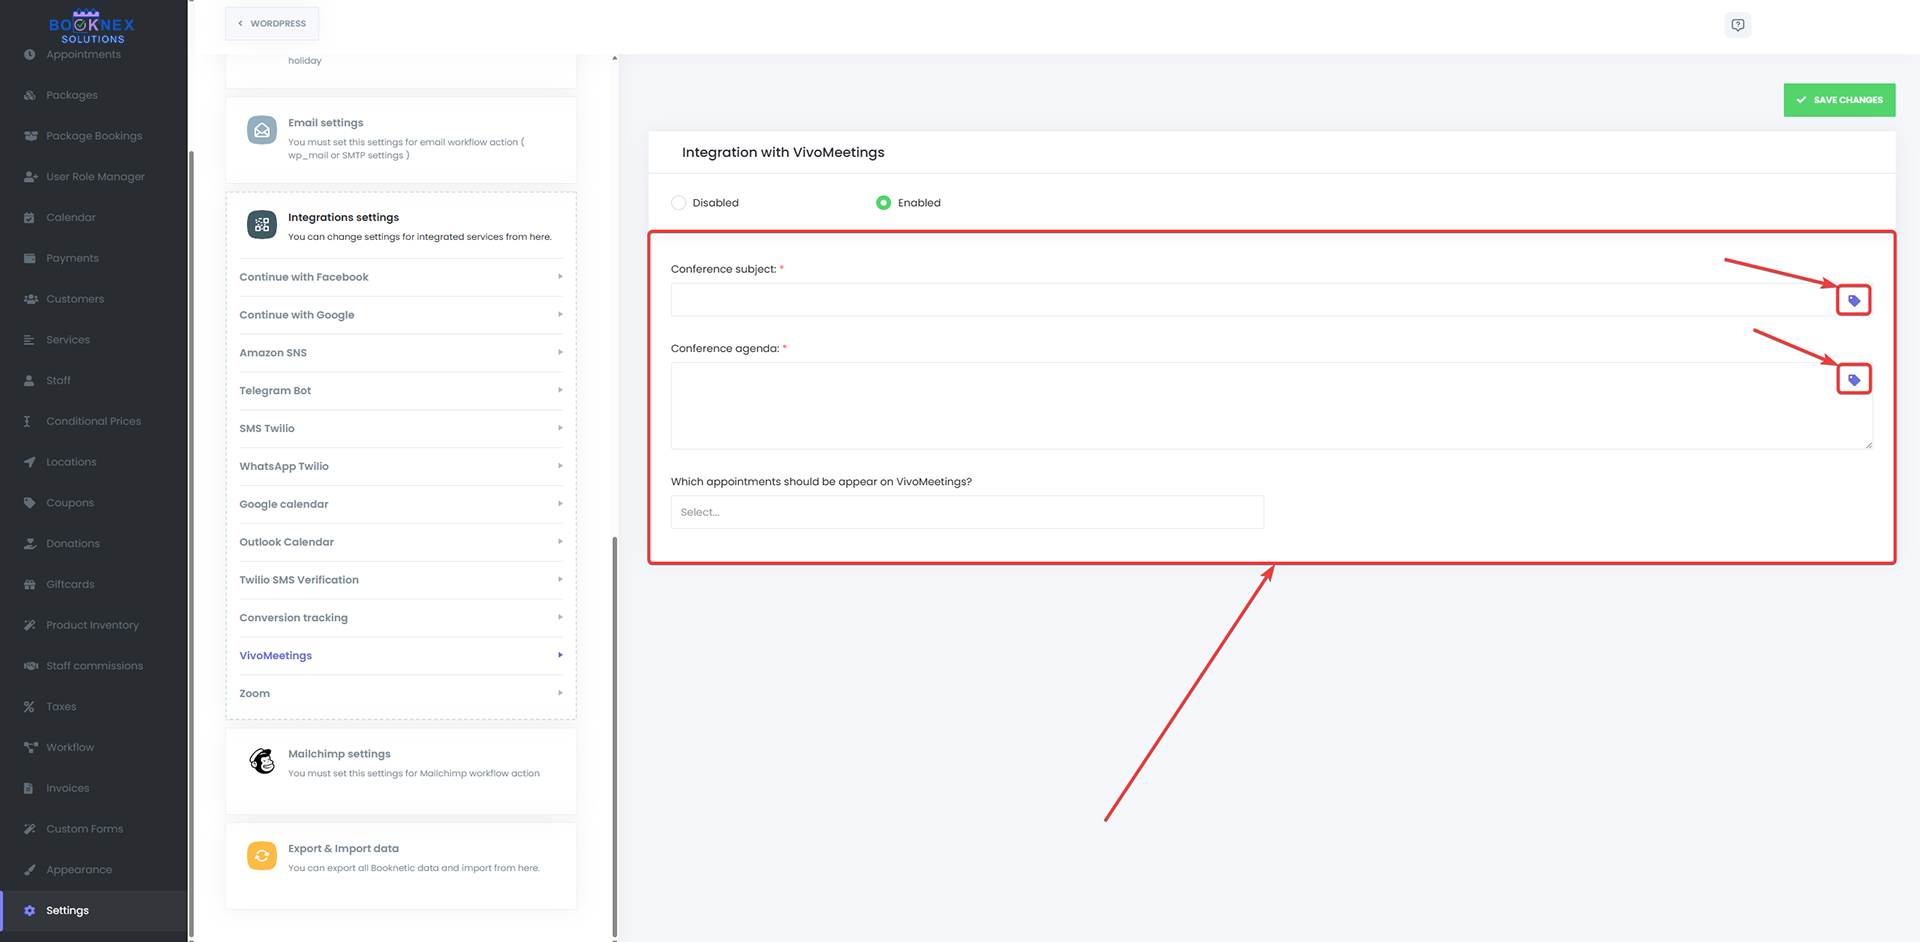
Example Configuration:
- Subject: "Consultation with {staff_name}"
- Agenda: "{service_name} appointment scheduled for {appointment_date} at {appointment_time}"
Step 3: Link Staff Profile to VivoMeetings
Each staff member must authorize their individual VivoMeetings account to generate unique meeting rooms.
Access Staff Module
- Go to the Staff module in the Booknex Admin Panel
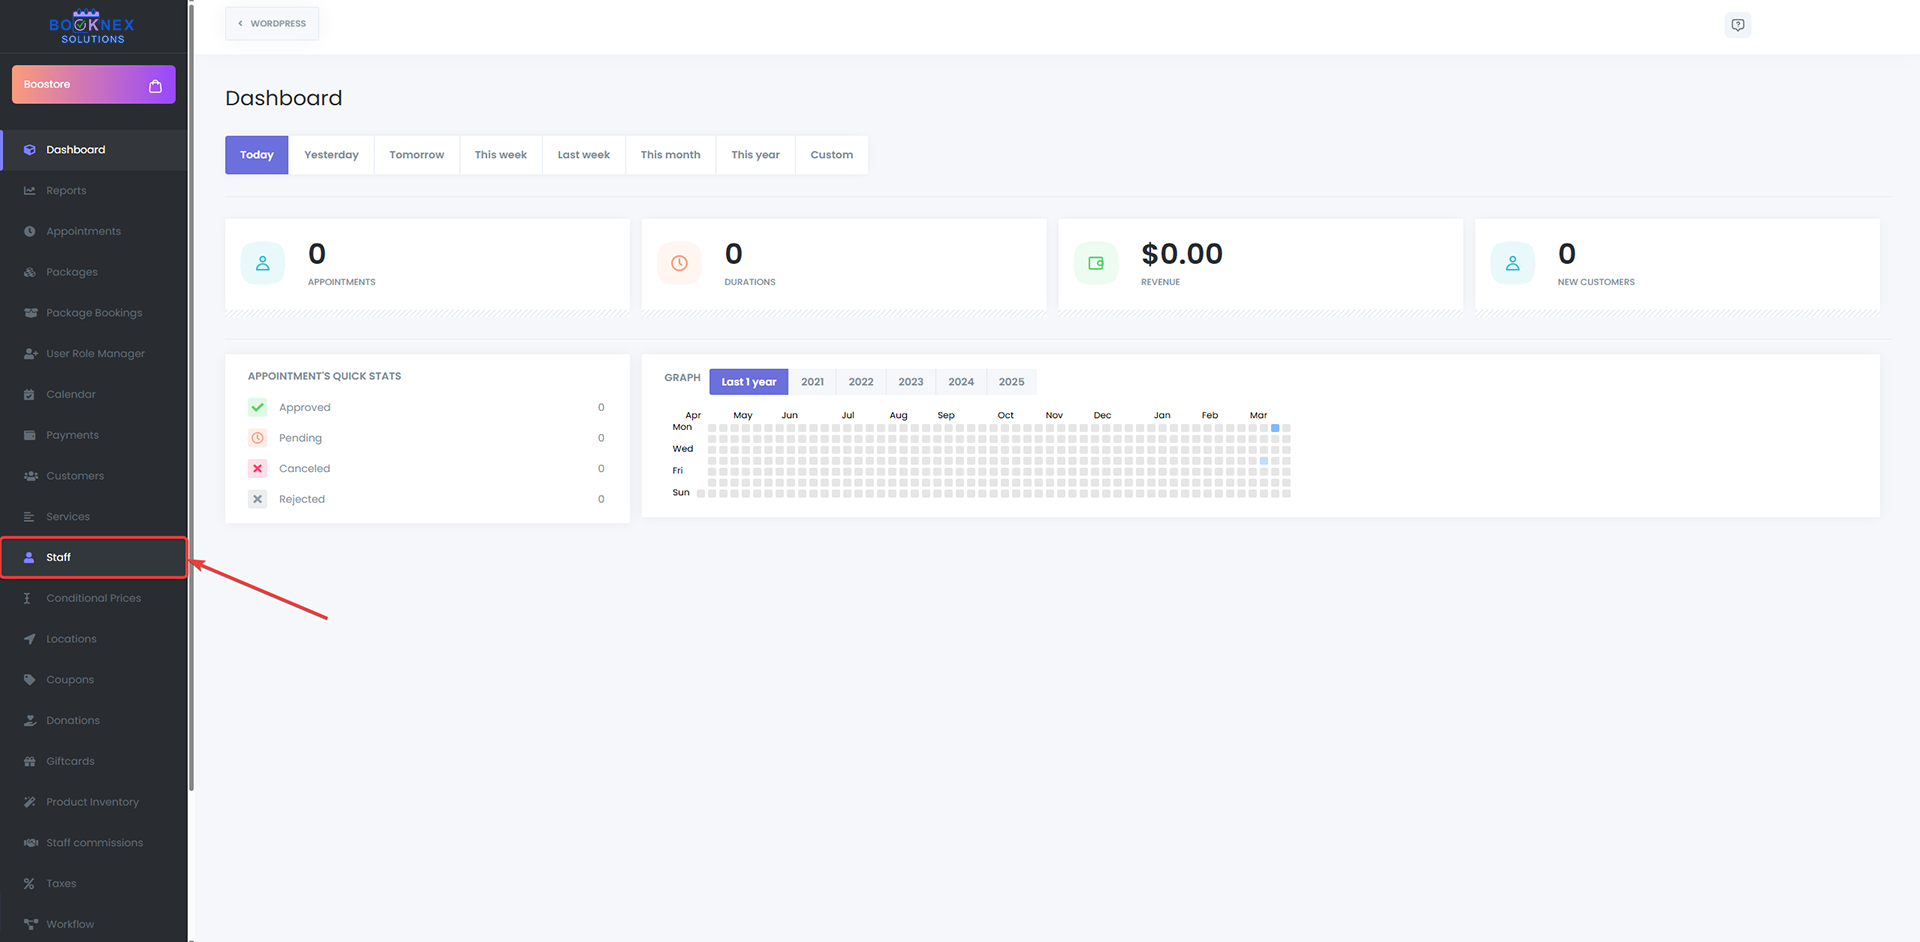
Edit Staff Profile
- Click on a staff member's profile to edit it

Connect to VivoMeetings
- In the staff profile, locate the VivoMeetings section
- Click Log In to VivoMeetings
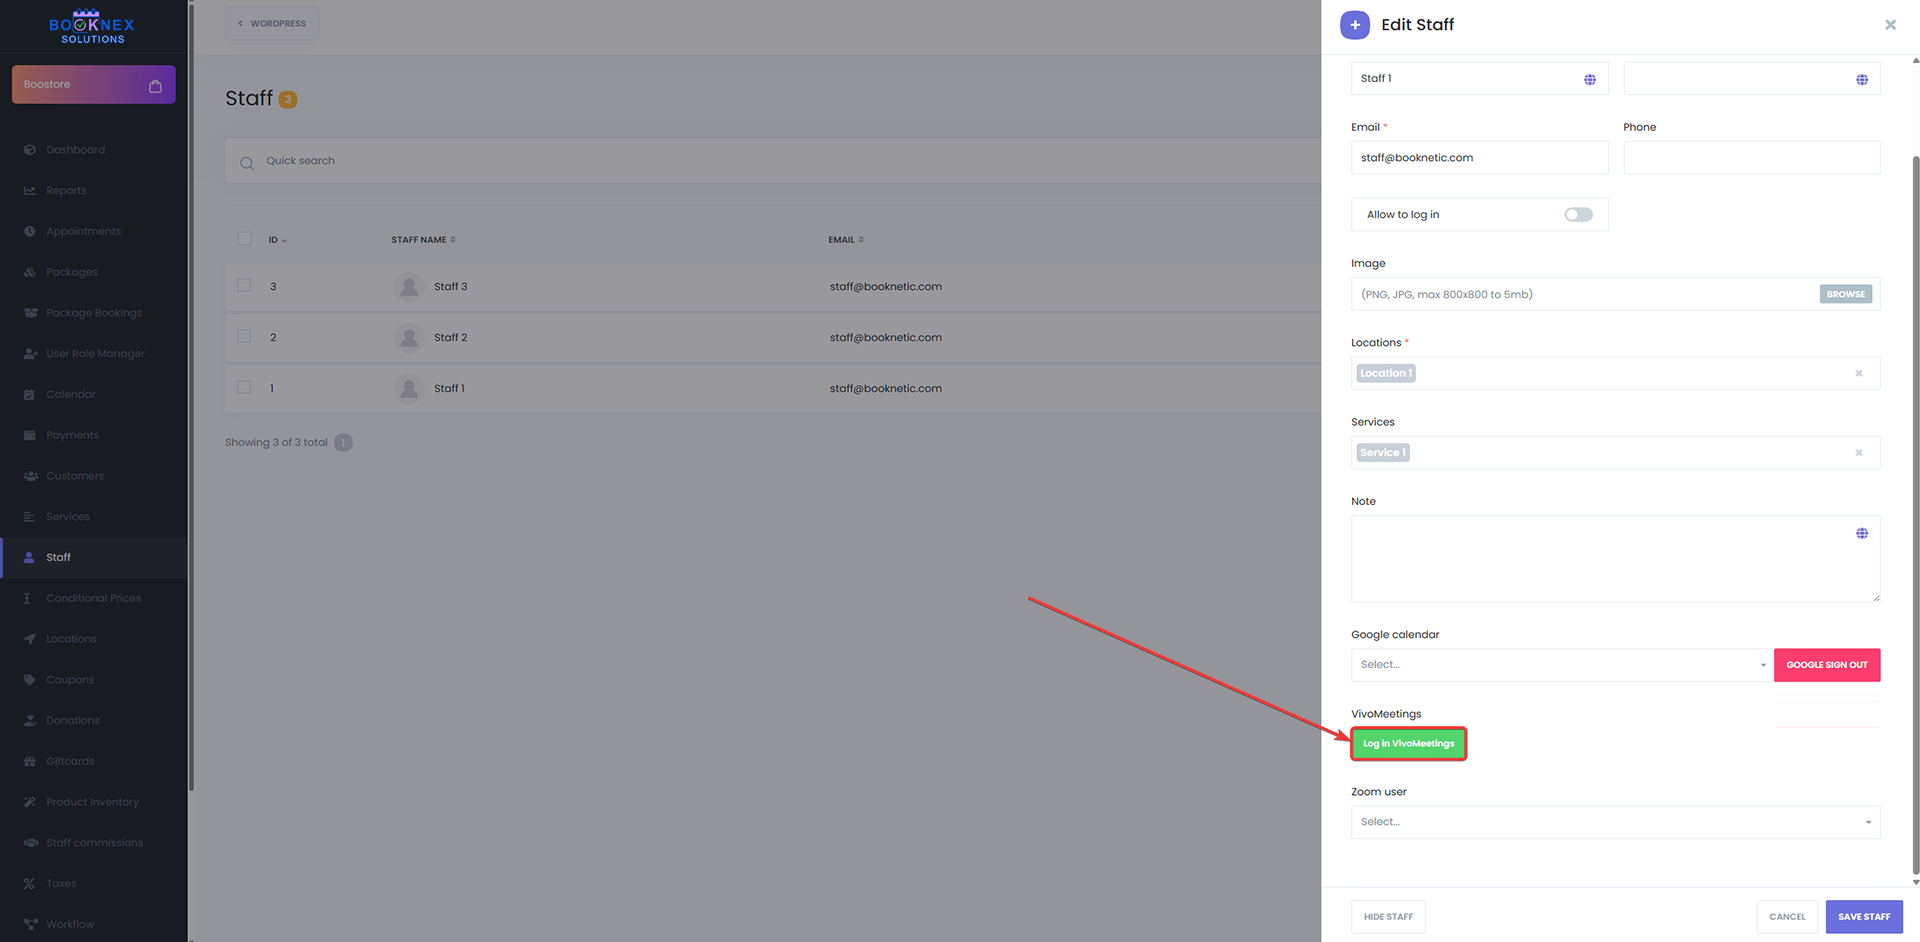
Authorize the Connection
- A VivoMeetings authorization page will appear
- Log in with the staff member's VivoMeetings credentials
- Review the permissions requested
- Click Authorize to connect the account
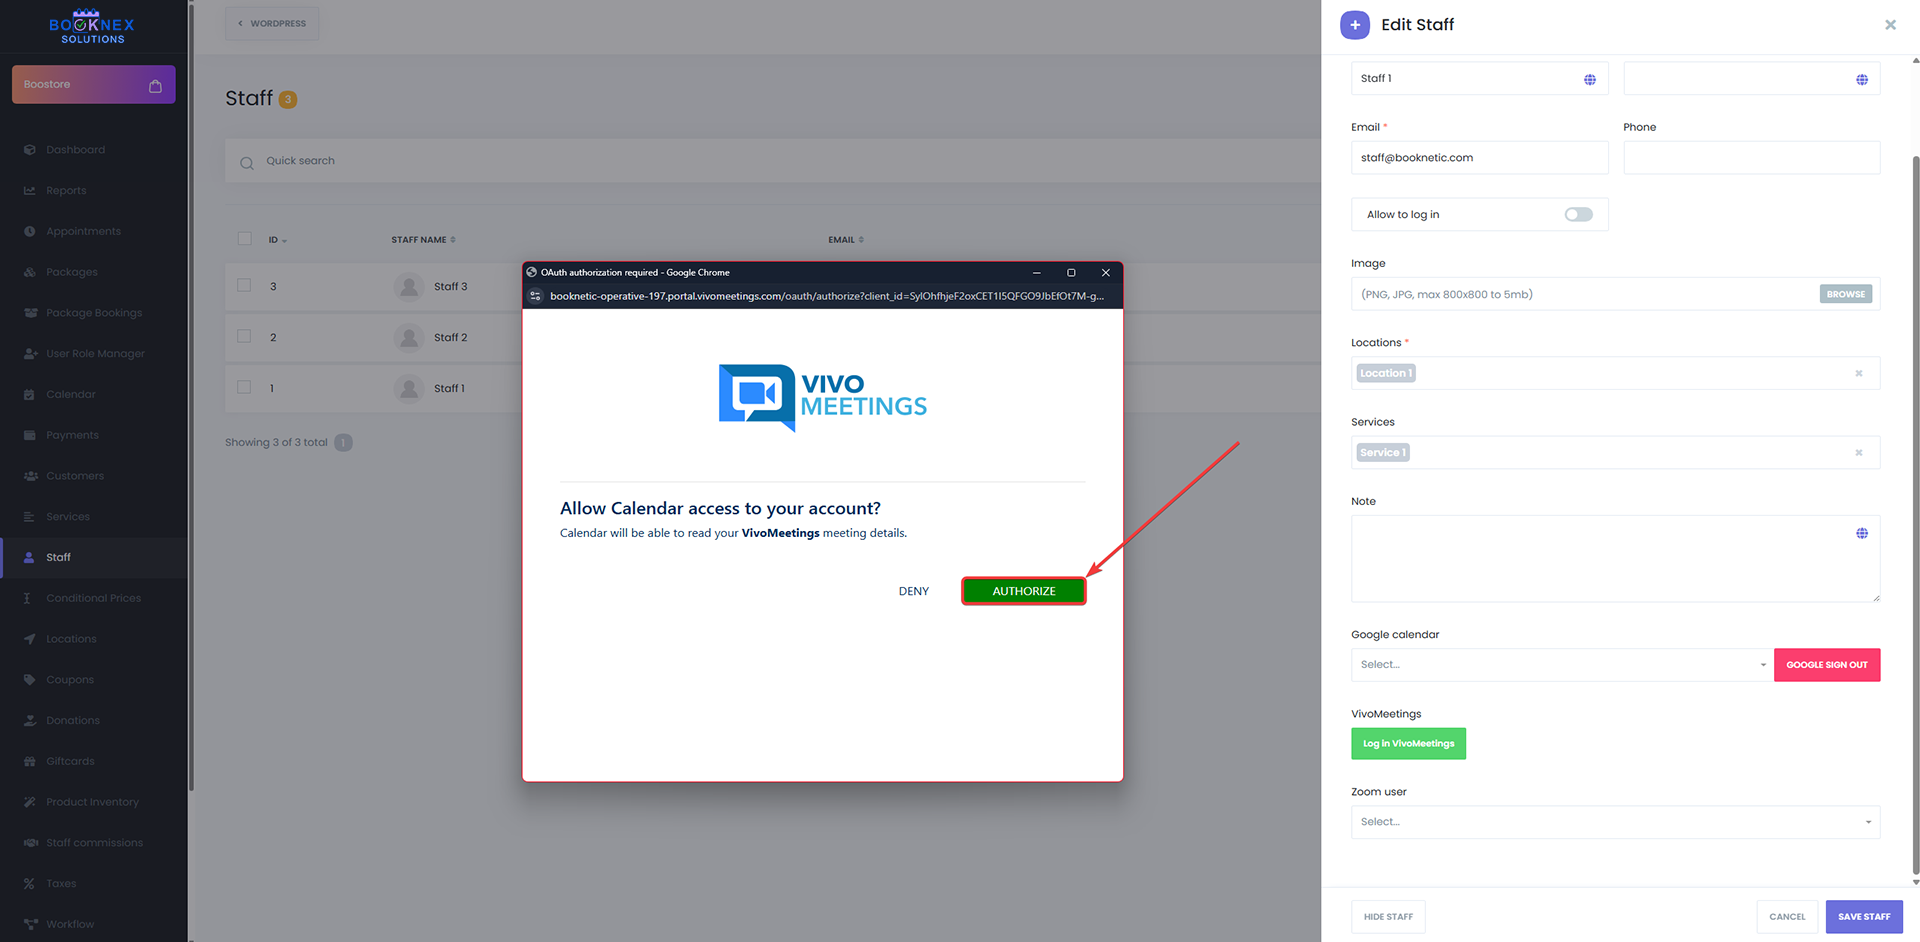
Once authorized, the staff member's profile will show as connected to VivoMeetings.
Step 4: Enable VivoMeetings for Services
You can choose which services should include VivoMeetings links. Not all services may require virtual meetings.
Access Services Module
- Navigate to the Services module in your Booknex Admin Panel
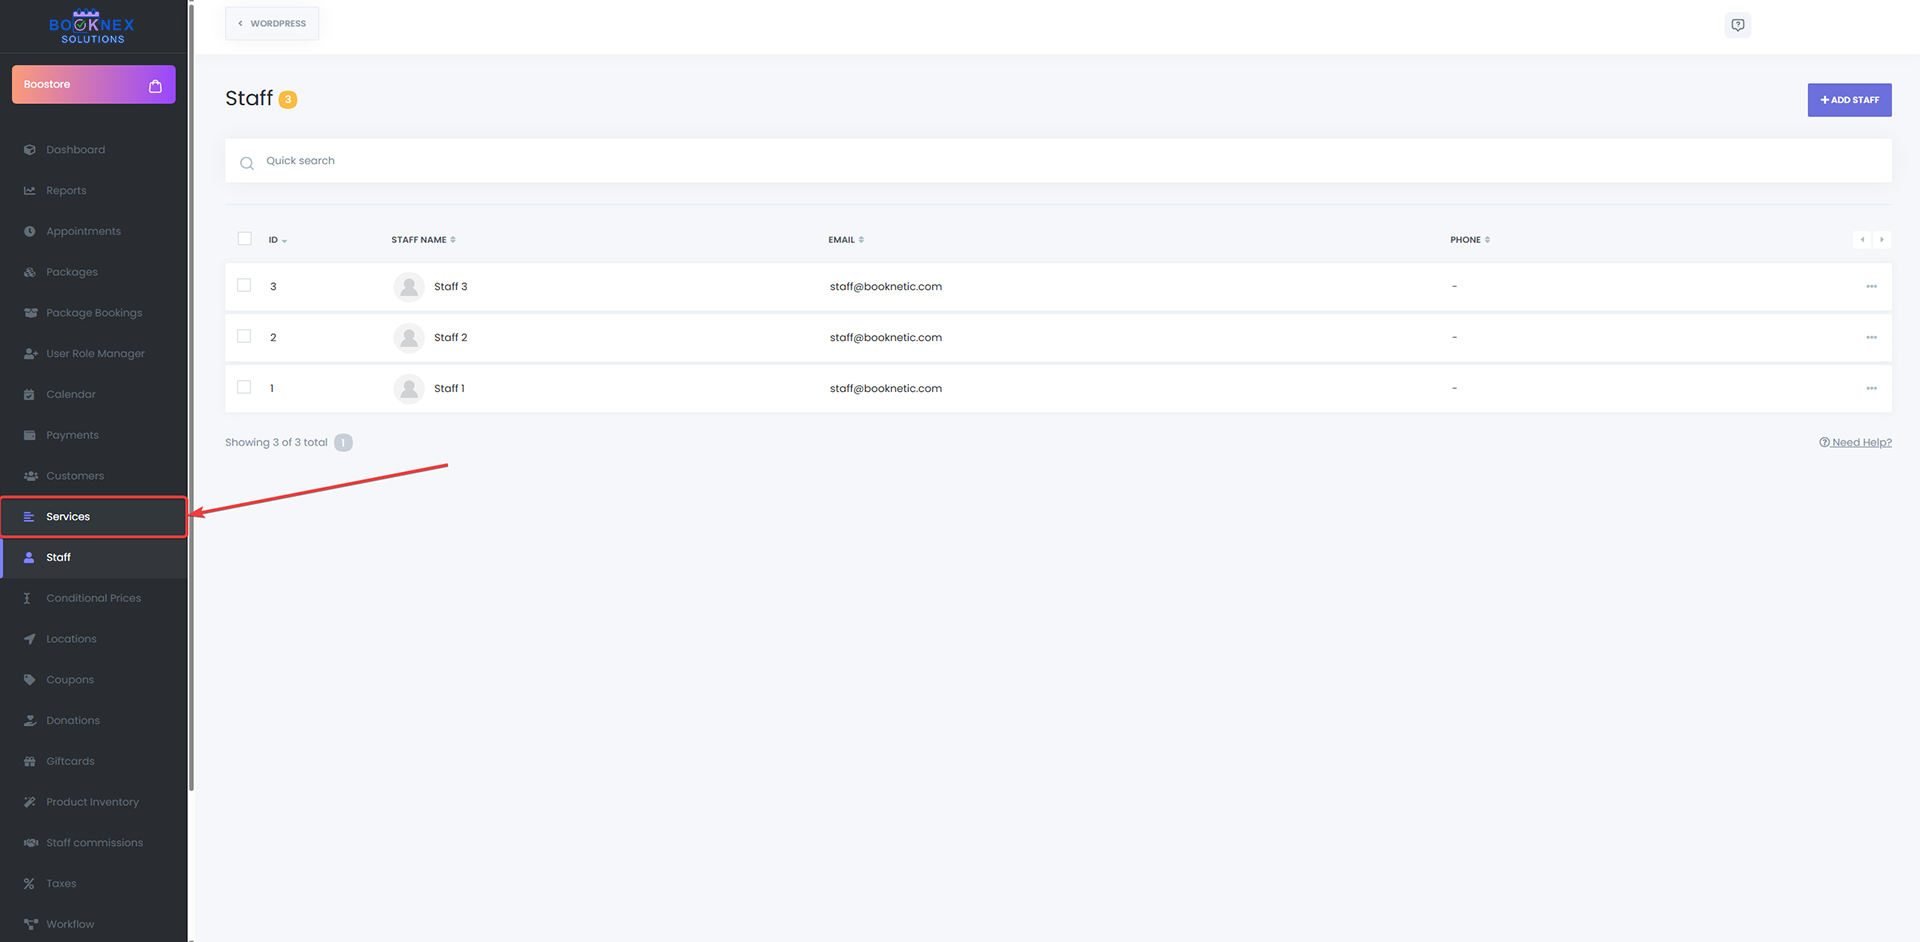
Edit Service Settings
- Click on a service you want to edit
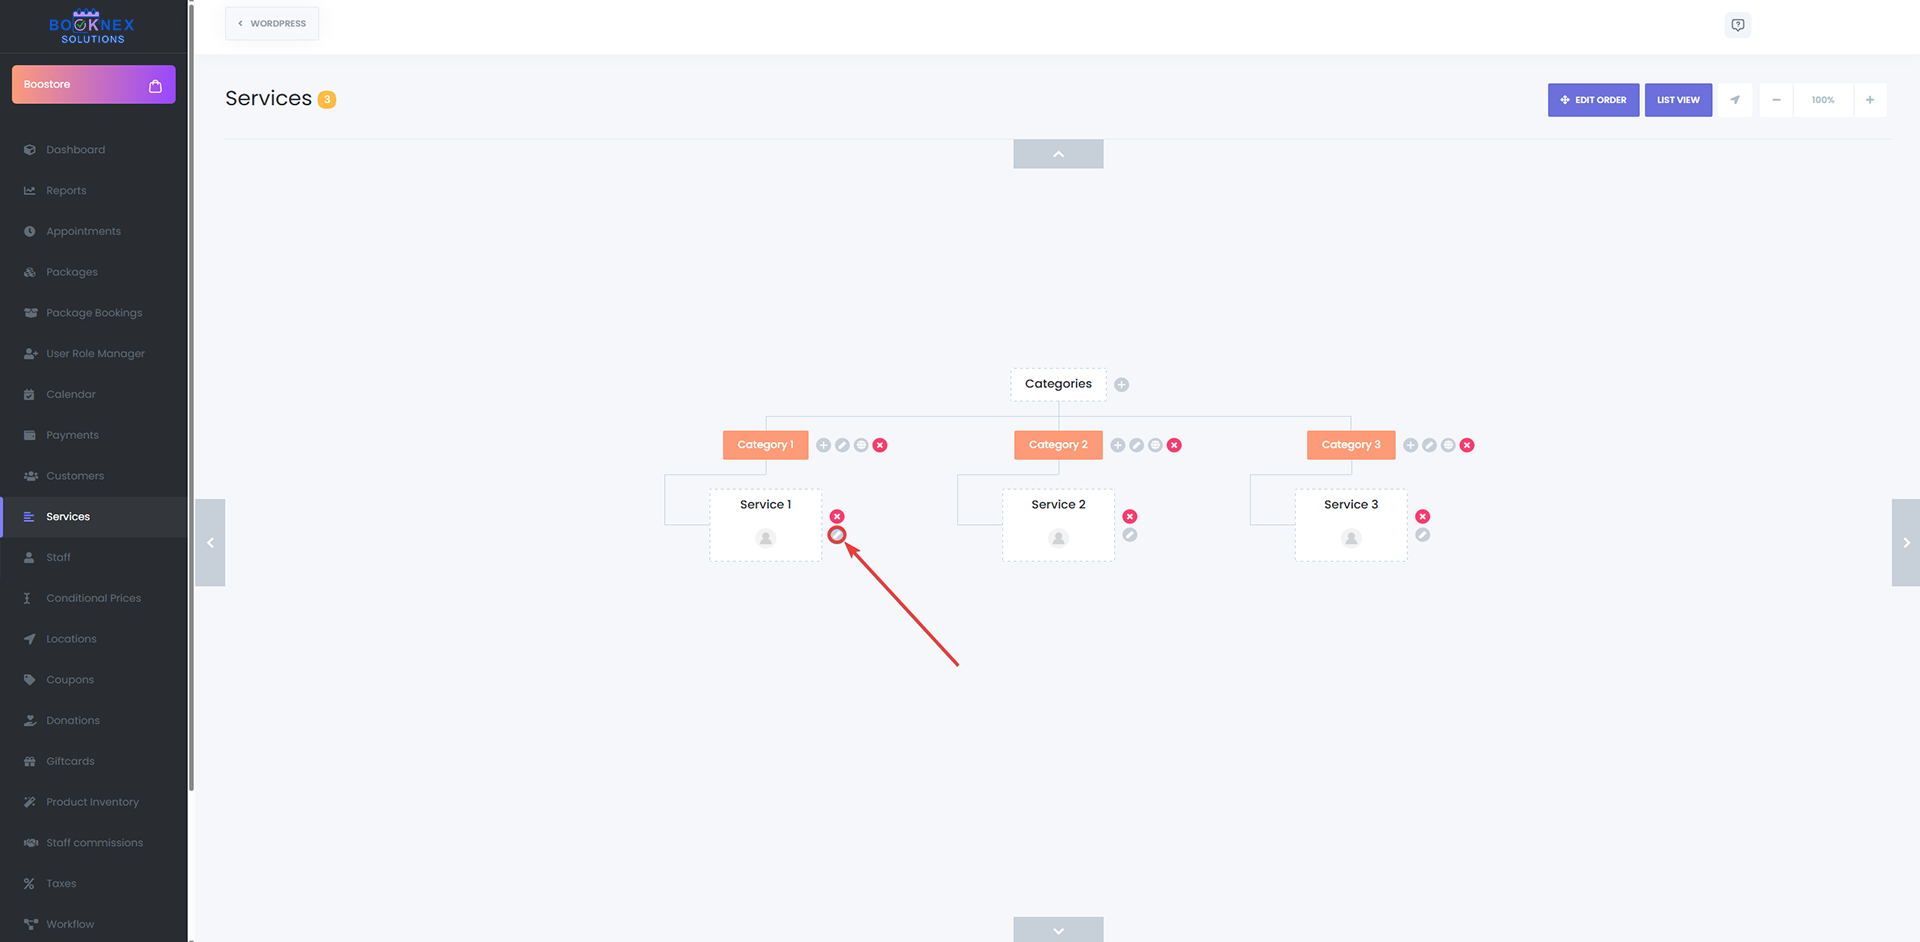
Enable VivoMeetings
- Find the VivoMeetings option in the service settings
- Toggle it ON to enable VivoMeetings for this service
- Click Save

Repeat this process for all services that should include virtual meeting links.
Step 5: Add VivoMeetings Link to Notifications
To ensure customers and staff receive the meeting link, you must add the VivoMeetings shortcode to your email notifications.
Access Workflows Module
- Go to the Workflows module in your Booknex Admin Panel

Create or Edit a Workflow
- Create a new workflow or edit an existing one (such as "Appointment Confirmation")
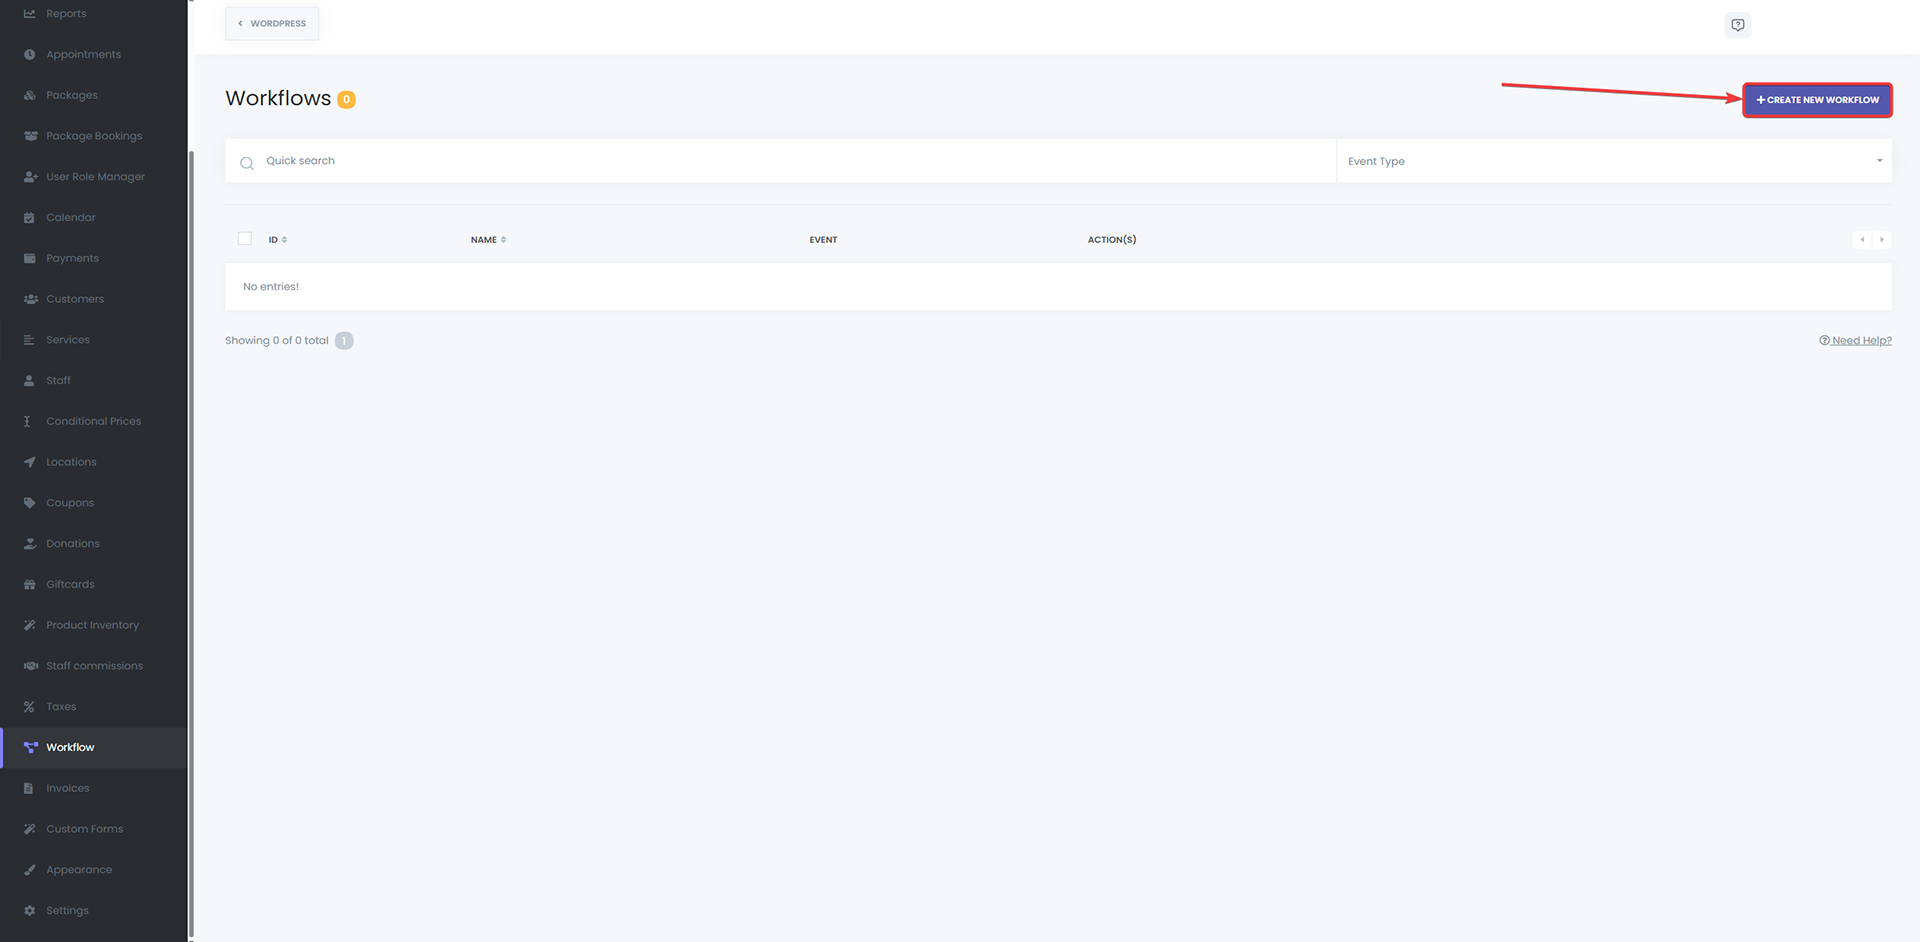
Add VivoMeetings Shortcode
- In the email or SMS content area, add the {vivomeetings_room_url} shortcode
- This shortcode will automatically be replaced with the unique VivoMeetings URL for each appointment

Example Email Template:
Hi {customer_name},
Your appointment for {service_name} with {staff_name} is confirmed for {appointment_date} at {appointment_time}.
Join your virtual meeting here:
{vivomeetings_room_url}
We look forward to seeing you!
- Click Save to apply the changes
How It Works
Once the integration is fully configured, here's what happens automatically:
- Customer Books Appointment: A customer books an appointment for a service that has VivoMeetings enabled
- Booknex Creates Meeting: Booknex automatically creates a unique VivoMeetings room linked to the staff member's account
- Notifications Sent: Both the customer and staff receive emails with the VivoMeetings link
- Meeting Time: When the scheduled time arrives, both parties click the link to join the meeting room
Customer and Staff Workflow
Customer Experience
- Books an appointment through your Booknex booking page
- Receives a confirmation email with the VivoMeetings link
- At the scheduled time, clicks the link to join the meeting
- Enters the meeting room (no account required for guests)
Staff Experience
- Receives a notification about the new appointment
- Gets the VivoMeetings link in the notification email
- At the scheduled time, clicks the link to start the meeting
- Hosts the virtual consultation with the customer
Troubleshooting
VivoMeetings Links Not Generating
Problem: Appointments don't have VivoMeetings URLs
Solutions:
- Ensure the staff member's profile is properly authorized with VivoMeetings
- Verify that VivoMeetings is enabled for the booked service
- Check that the integration is enabled in Booknex Settings > Integrations
Shortcode Not Populating in Emails
Problem: The {vivomeetings_room_url} appears as text instead of a URL
Solutions:
- Verify that the shortcode is correctly typed (no extra spaces or typos)
- Ensure the appointment was created after the integration was configured
- Check that VivoMeetings is enabled for that specific service
Staff Cannot Authorize Account
Problem: Authorization fails or doesn't complete
Solutions:
- Ensure the staff member has a valid VivoMeetings account
- Check that the API credentials are properly configured in Booknex integration settings
- Try authorizing in a different browser or incognito window
- Clear browser cache and cookies, then try again
Customers Cannot Join Meeting
Problem: Meeting link doesn't work or shows an error
Solutions:
- Verify the VivoMeetings account is active and not expired
- Check that the meeting wasn't accidentally deleted from VivoMeetings
- Ensure the meeting link was sent correctly (check email spam/junk folders)
Security and Privacy
- Account-Level Control: Each staff member maintains control over their own VivoMeetings account
- Limited Permissions: Booknex only requests permission to create meetings, not access other data
- Revocable Authorization: Staff can disconnect their VivoMeetings account at any time
- Secure Meetings: VivoMeetings provides encrypted video conferencing
Best Practices
- Test the Integration: Create a test appointment to ensure links are generating correctly
- Train Your Staff: Ensure staff members know how to join and host VivoMeetings
- Include Clear Instructions: Add joining instructions in your notification emails
- Set Up Reminders: Configure appointment reminders that include the VivoMeetings link
- Have a Backup Plan: Provide a phone number as an alternative if video issues occur
Frequently Asked Questions
Do customers need a VivoMeetings account?
No, customers can join meetings as guests by simply clicking the link. No account or download is required.
Can I use one VivoMeetings account for all staff?
While technically possible, it's recommended that each staff member uses their own account for better organization and meeting management.
What happens if a staff member disconnects their VivoMeetings account?
New appointments will not generate VivoMeetings links until the account is reconnected. Existing appointments with links will remain functional.
Is there a limit to how many meetings I can create?
Limits depend on your VivoMeetings account plan. Check your VivoMeetings subscription for specific details.
Support and Resources
- VivoMeetings Website
- VivoMeetings Support
- Booknex Support for integration-specific questions
Mailchimp Integration
Add your desired sender email. Contact Booknex team for more details
Telegram Bot Integration
Telegram add-on allows you to get instantly informed about the activities on the Booknex via sending a Telegram notification to you or your staff member(s). This feature is not considered for customers, so it will not be able to send Telegram notifications to your customers with the current version of this add-on. However, notifying your staff members is now an easy process. Since all the automation and notification features are now included in the Workflow, this add-on should also be used with Workflow.
Setting Up Your Telegram Bot
Step 1: Find BotFather on Telegram
To be started, find the BotFather on Telegram and Start a chat.
Step 2: Create a New Bot
When you start a chat, you will see various commands. For creating a new bot, you need to write the following command to the BotFather: /newbot
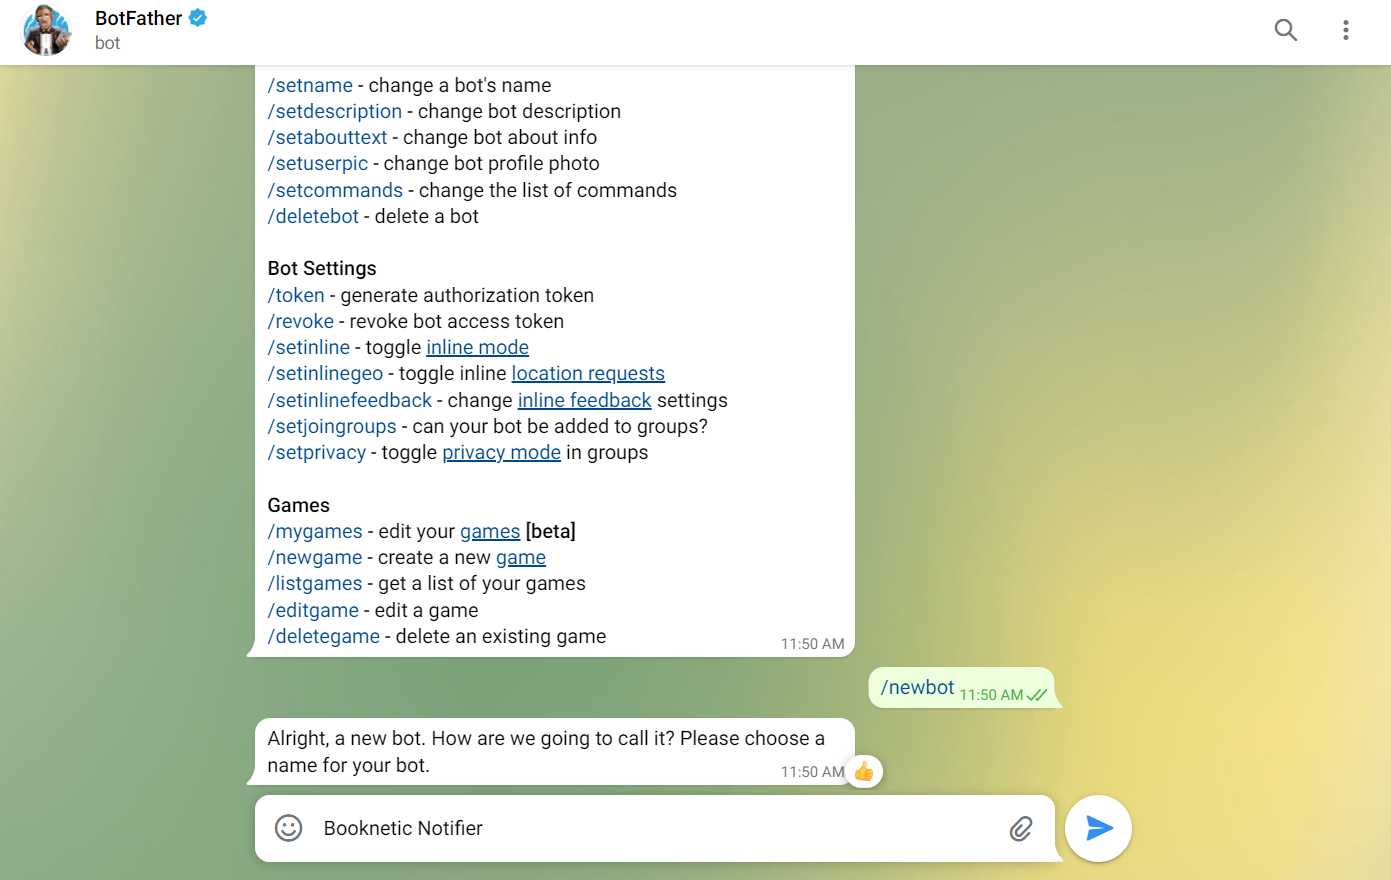
Step 3: Set Bot Name
Then, you need to set a name for your BOT. It is enough to type and send the Bot name to the BotFather.

Step 4: Set Bot Username
Then, set a username for your bot. We would like to let you know the BOT username must end with the _bot. So, please add _bot at the end of the username. For example: booknex_test_bot

Step 5: Copy the Token
Now, the BOT is ready! Copy the token and paste it to the proper place you see in the next screenshot.
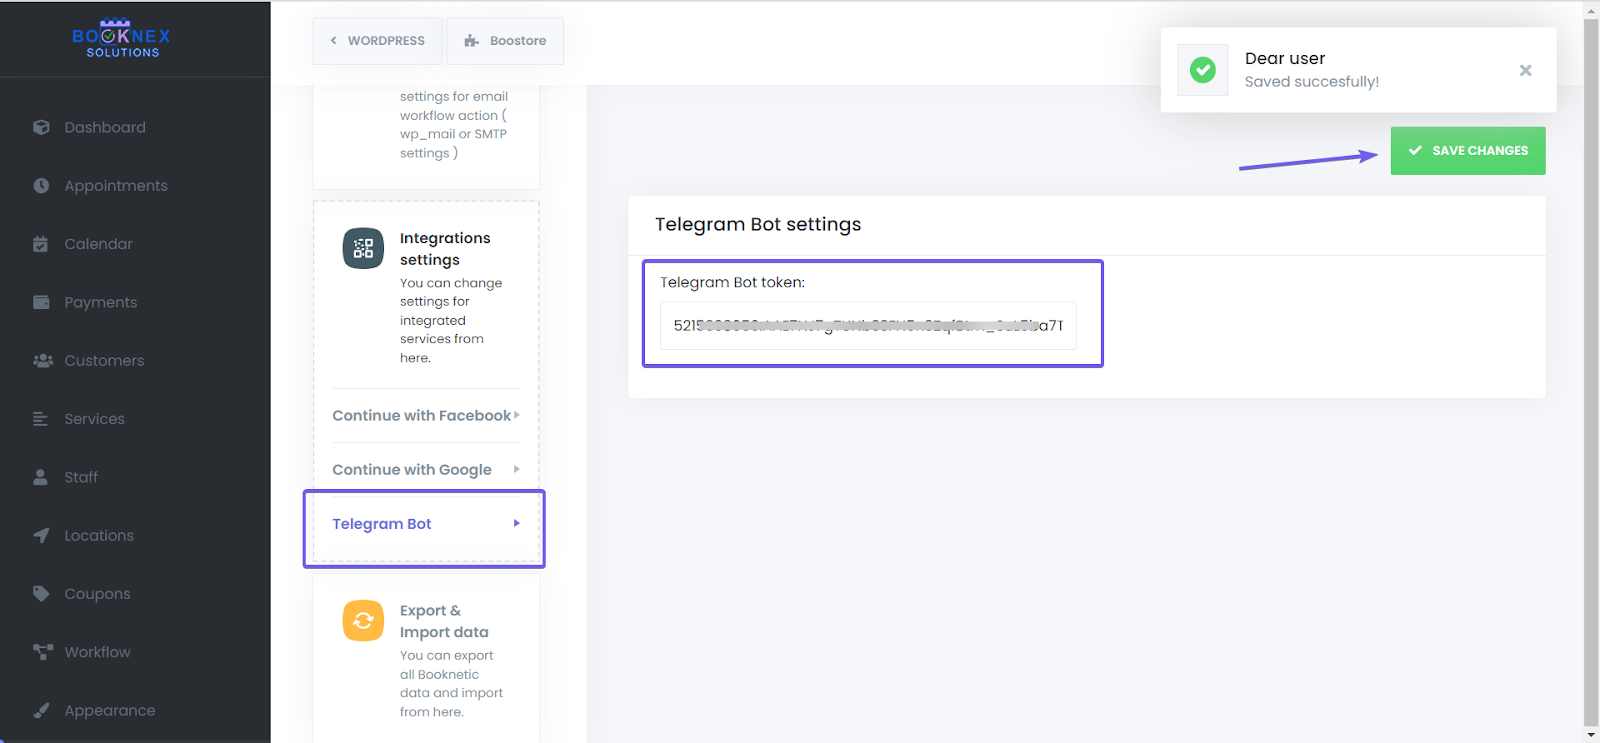
The process is nearly done. Only a few steps remain. So, please continue to follow the documentation.
Configuring Workflow for Telegram Notifications
Step 1: Go to Workflow Module
Go to the Workflow module and create a new workflow. Select the "Send Telegram message" as the action.

Step 2: Click Set Up
Click "Set up".

Step 3: Initial Setup Notice
When you click the "To" section, then it will show that "No results found". Do not worry. You just need to do the last step.

Step 4: Message Your Bot
Find your BOT on Telegram and greet your BOT by typing anything on the chat.

Step 5: Select Recipients
Then, check the Workflow again. Now, you will be able to select yourself in the "To" section.

To be able to receive notifications as staff, all your staff members need to find this BOT on Telegram and write anything on the chat. Thus, their Telegram names will be shown in the "To" section.
Step 6: Prepare Template and Test
Prepare your template and Save the workflow. Make a test appointment and check the feature.
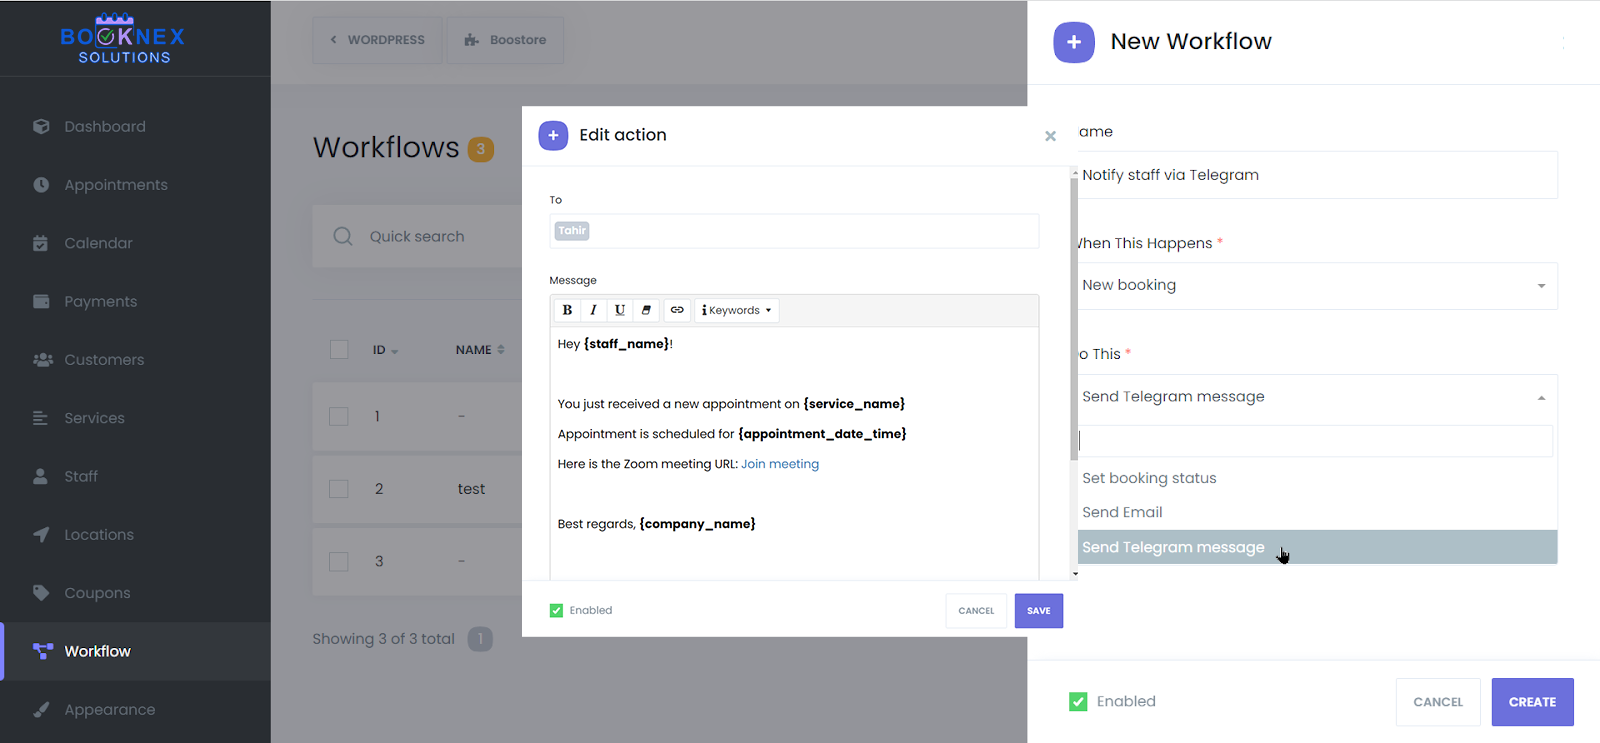
Now all is done and the BOT is ready to notify you instantly!
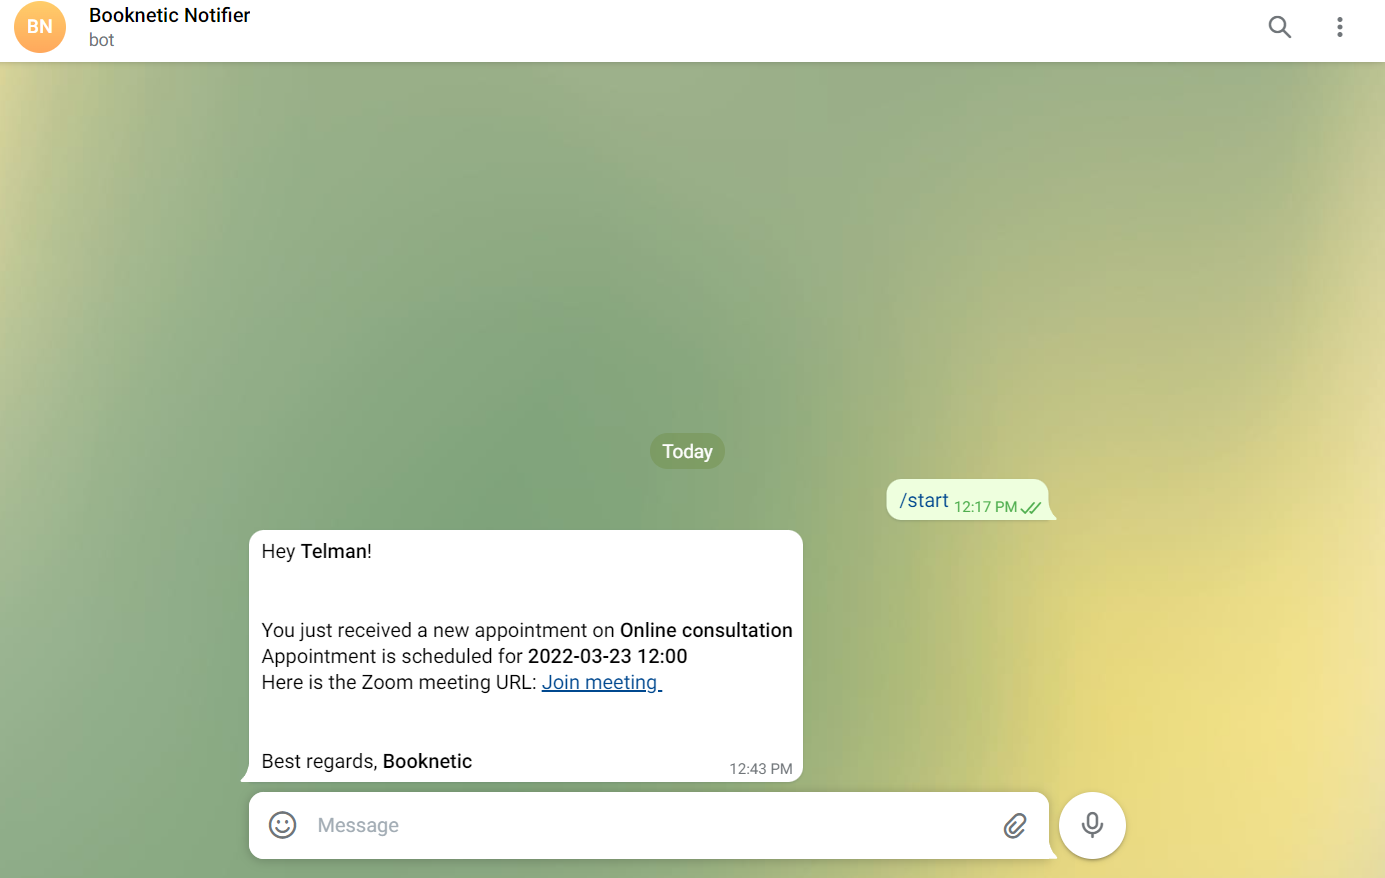
Zoom Integration
The Zoom Integration add-on for Booknex allows you to seamlessly schedule Zoom meetings when appointments are booked. This integration ensures that every appointment scheduled through Booknex is automatically linked to a Zoom meeting, making it simple for businesses to host virtual appointments without manual intervention.
This documentation will guide you through the steps to integrate Zoom with Booknex, configure the integration, and start managing Zoom meetings directly from the Booknex platform.
Overview
The Zoom Integration enables a smooth workflow where each scheduled appointment creates a Zoom meeting. This feature is ideal for businesses offering virtual appointments, consultations, and remote services. The integration helps reduce manual work by automating the creation of Zoom meetings whenever an appointment is scheduled through Booknex.
Setting Up Zoom Integration
Step 1: Create a Zoom App in the Zoom Marketplace
To integrate Zoom with Booknex, you first need to create an app in the Zoom Marketplace:
Sign in to Zoom
Go to the Zoom Marketplace and sign in with your Zoom account.
Create a New App
- Select Develop in the top menu and click on Build App.
- Choose OAuth App (Server-to-Server OAuth).
- Click on Create.
Fill in App Details
Enter a name for your app (e.g., Booknex Integration). After naming your app, you'll be taken to the app settings page where you can configure the app permissions.
Obtain Credentials
Once the app is created, note the Client ID, Client Secret and Account ID. These credentials are required for connecting Zoom with Booknex.
Step 2: Add App Information and Configure Zoom App Permissions
First, you should add information about your Zoom application, in the Information tab (There's nothing to do in the Feature tab so skip it).
After that, you must configure the necessary app permissions to allow the integration to function correctly.
In the Zoom app settings, under the Scopes section, add the following permissions:
meeting:write:meeting:admin: For creating and updating meetings.meeting:update:meeting:admin: For updating meetings.meeting:delete:meeting:admin: For deleting meetings.user:read:user:admin: For reading user information.user:write:user:admin: For writing user information.user:read:list_users:admin: For listing users and getting information about all users, including admins.
After adding the scopes, go to the next step and click Activate your app to enable the app.
Step 3: Connecting Zoom with Booknex
Now that you have created the Zoom app, it's time to connect it with Booknex.
Go to Booknex Admin Panel
In the Booknex Admin Panel, navigate to Settings > Integrations > Zoom.
Enter Zoom API Credentials
In the Zoom integration section of Booknex, enter the Account ID, Client ID and Client Secret from your Zoom app.
After that, fill the Meeting topic and Meeting Description fields. You can use Booknex's keywords in the Meeting topic and Meeting Description fields. To get a list of ready keywords, click on the Keywords icon. Additionally, you can enable random passwords for your Zoom meetings, by enabling the option Set random password for meetings. After all of the mandatory fields are filled, save the credentials.
Complete Authorization
After saving, go to Staff page, edit the staff which will need to connect to a Zoom profile, and then select the Zoom profile in that staff's profile.
How Zoom Integration Works
Once the integration is complete, Zoom meetings will be automatically created for appointments booked in Booknex. Here's how it works:
- Booking a Service: When a customer books an appointment through Booknex, the system will automatically generate a Zoom meeting linked to that appointment.
- Confirmation Emails: Both the customer and the staff member will receive a confirmation email with a link to the Zoom meeting.
- Virtual Appointments: When the scheduled time arrives, both the customer and the staff member can join the Zoom meeting via the provided link.
Managing Zoom Meetings
Editing an Appointment
If changes are made to the appointment, such as rescheduling, Booknex will automatically update the Zoom meeting time and send out new notifications to the customer and staff.
Cancelling a Zoom Meeting
If an appointment is canceled in Booknex, the Zoom meeting will also be canceled automatically. Both the customer and staff will be notified of the cancellation, if the Workflows are set up correctly.
Best Practices for Using Zoom Integration
- Double-check Credentials: Ensure your Client ID, Client Secret and Account ID are correctly entered in the Booknex settings to avoid issues with syncing.
- Test Before Going Live: Perform a test booking to ensure that the Zoom meetings are created successfully and that the integration is working as expected.
Troubleshooting
If you encounter any issues with the Zoom integration, consider the following troubleshooting tips:
- Check API Credentials: Ensure that the Client ID, Client Secret and Account ID are correctly entered in the Booknex integration settings.
- Zoom Permissions: Verify that the app permissions (scopes) in your Zoom app are properly set to allow meeting creation and updates.
- Reauthorize Integration: If the integration is not functioning correctly, try creating a new zoom app and reconnecting the Zoom integration to refresh the authorization.
Workflow Module
Managing appointments efficiently requires more than just a booking system, it requires automation. Booknex's Workflows Module enables businesses to streamline their operations by automating notifications, appointment updates, and customer interactions. Instead of manually sending reminders or confirmations, businesses can create custom workflows that trigger notifications at the right time, ensuring smooth communication between customers and staff.
How Workflows Power Notifications in Booknex
Booknex's Workflows Module acts as a trigger-based automation system. Instead of sending messages manually, you define rules that automatically execute actions when specific conditions are met.
Step 1: Go to the Workflow section
You can go to the Workflows section of the Booknex by clicking on the Workflows button in the list that is located on the left side:

Step 2: Create a new workflow
Click on the "Create new workflow" button to create a new workflow.
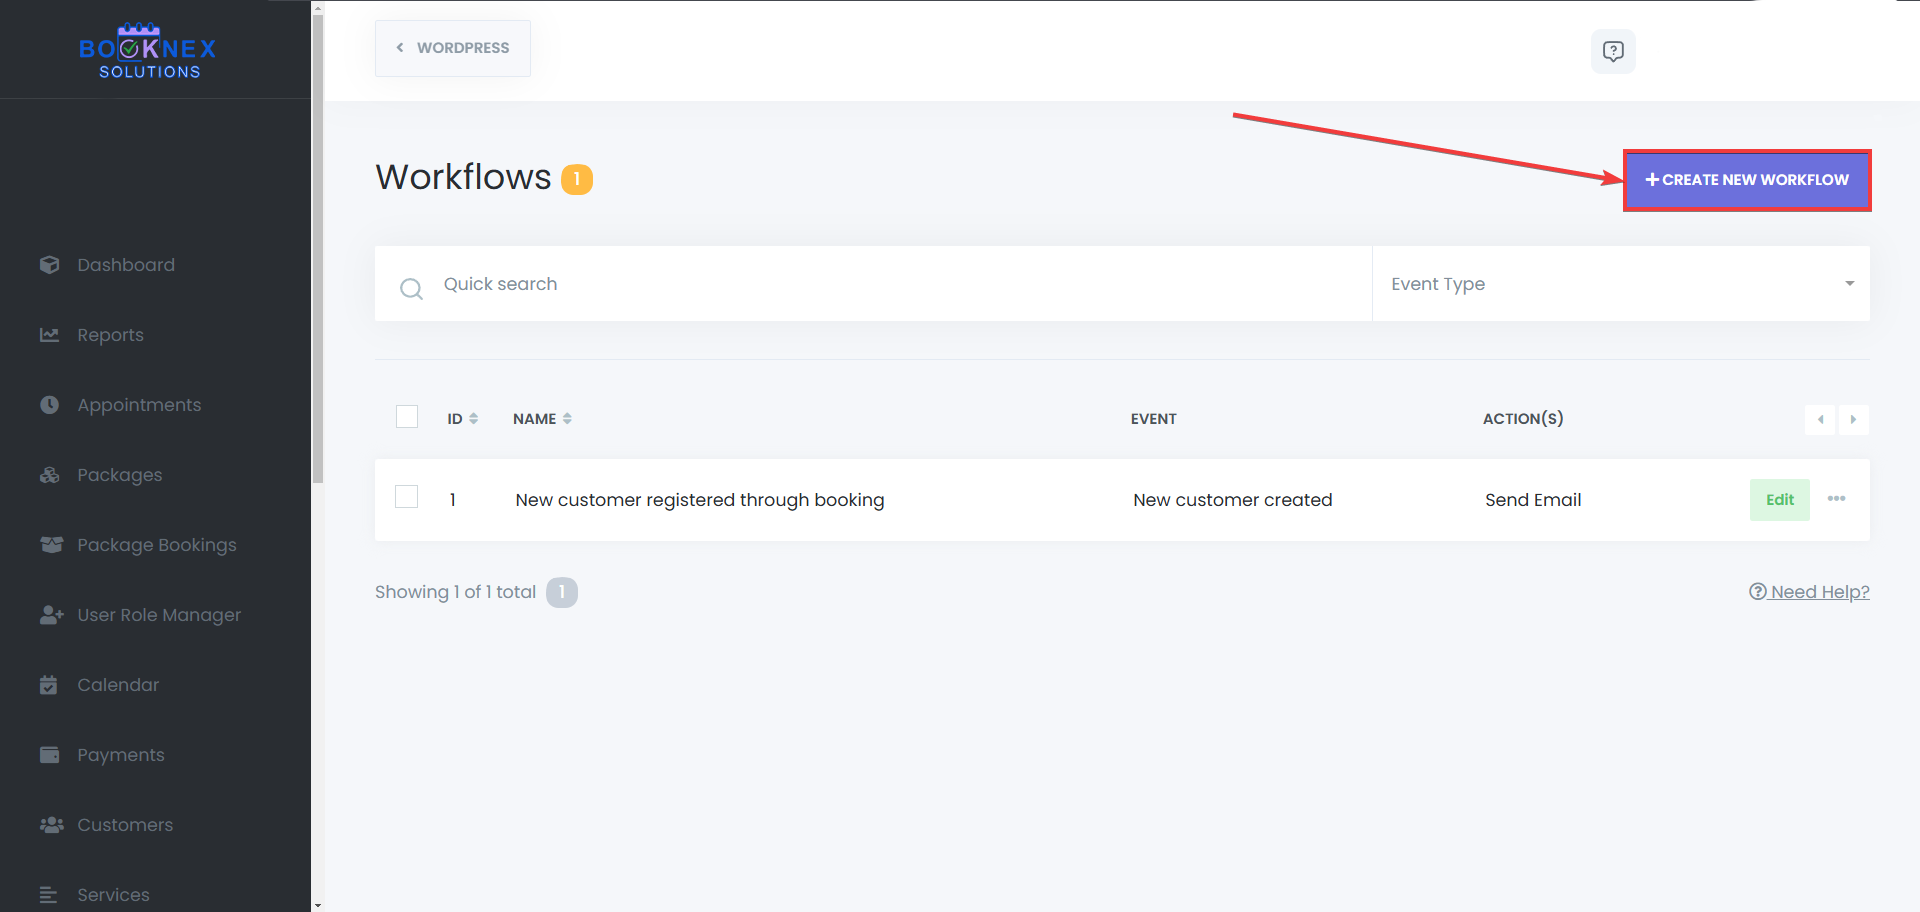
Step 3: Choosing a name and a trigger for the workflow
Make sure to name your workflow carefully, so you can find it easily if you try searching for it in a multiple page of workflow list. After that, you will have to set the trigger for that workflow. A trigger is an event that activates a workflow. Booknex supports multiple triggers, including:
- When an appointment is booked
- When a package is booked (Requires packages add-on)
- When an appointment is rescheduled
- When an appointment status is changed
- When an appointment starts
- When an appointment ends
- When a new customer is created through first time booking
- When a new customer is created through the sign-up panel (requires customer panel add-on)
- When a new customer clicks the button "Forgot password?"
- When a new customer reset their password
- When an appointment is paid
- When there's a new donation (requires the donations add-on)
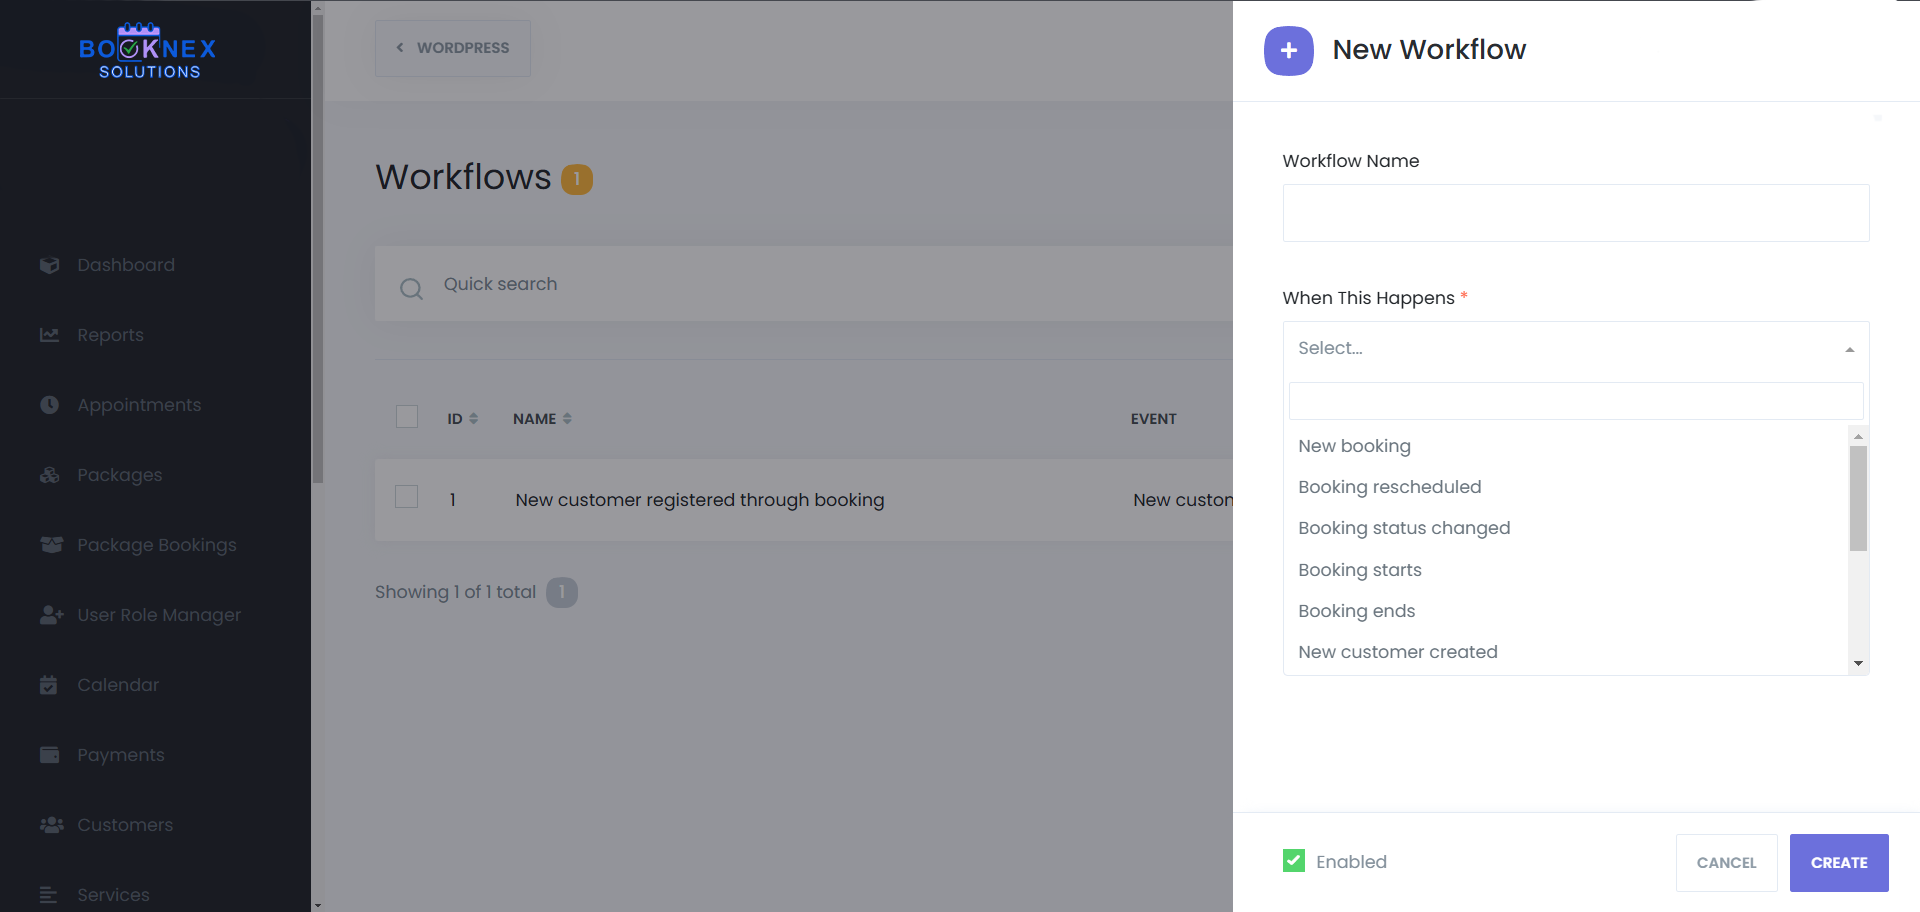
Once a trigger occurs, the system will execute predefined actions, such as sending notifications, updating customer records, or other action set up in the workflow.
Step 4: Defining Actions
After selecting a trigger, you can assign an action. Actions may include:
- Sending notifications via email, SMS, WhatsApp, or Telegram.
- Sending HTTPS request.
- Updating appointment status in the system.
Workflows eliminate manual tasks, ensuring that every notification and system update happens automatically.
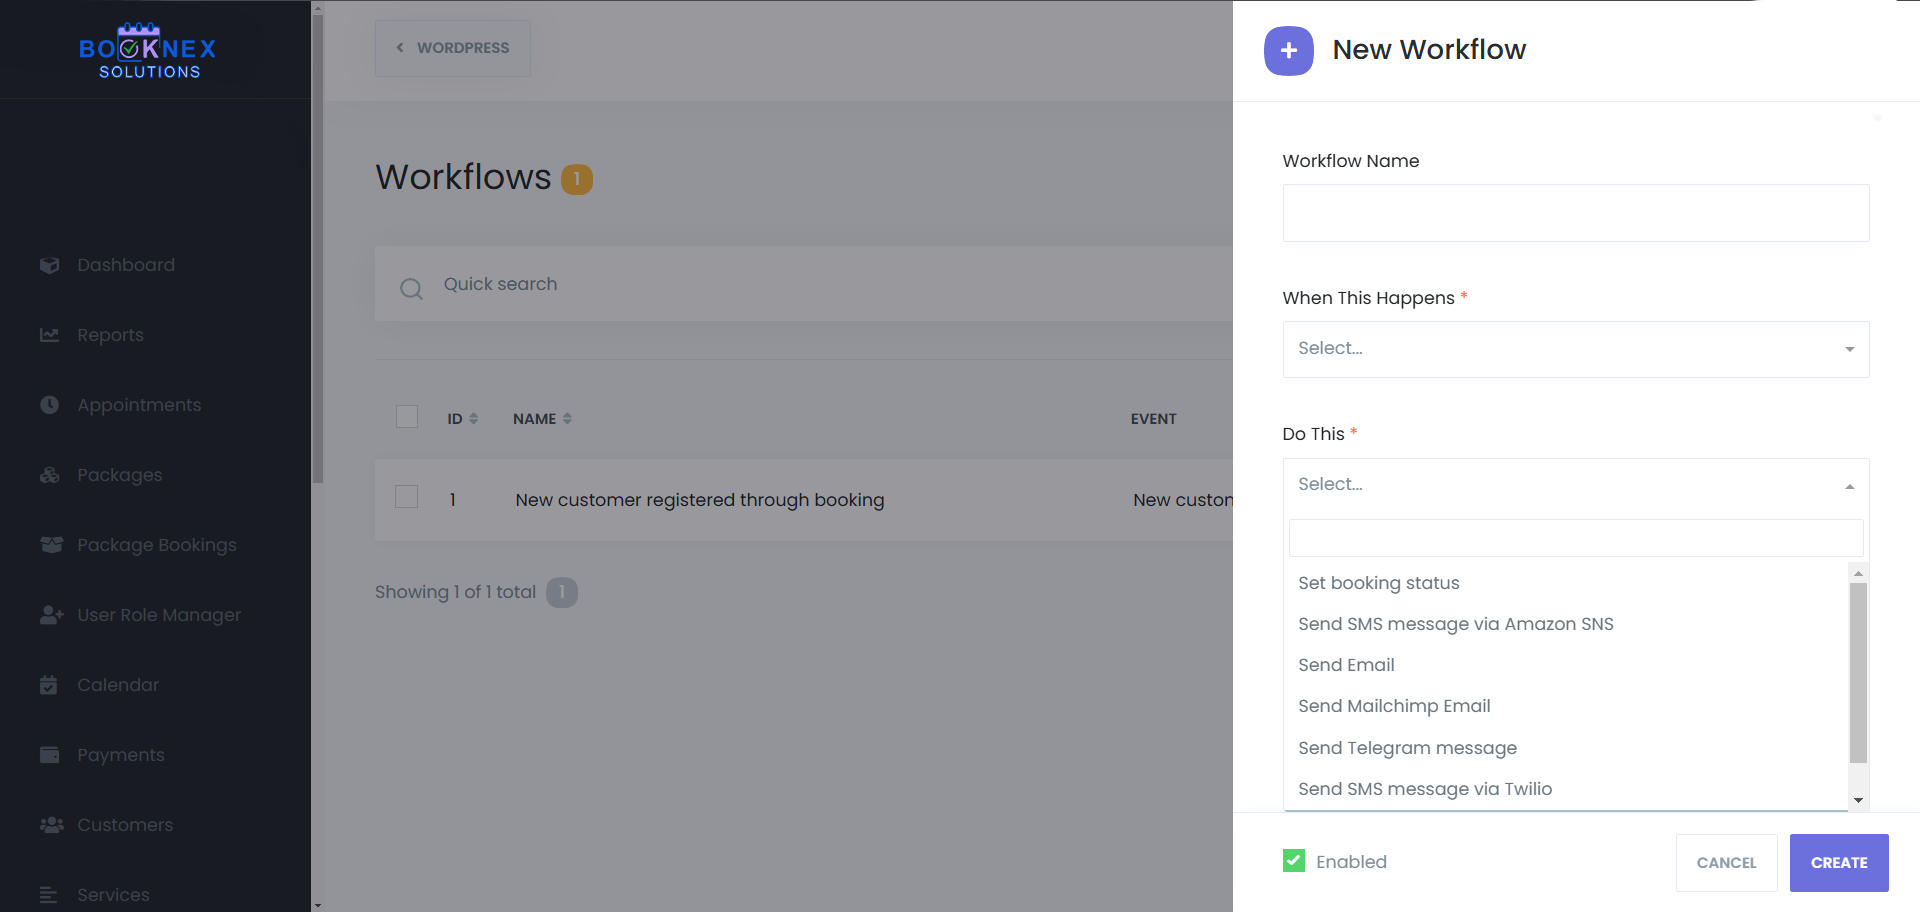
Writing the notification content
In Booknex, you can send emails to your customers, and your staff easily, without writing each of their email manually. When you select Customer email in the "To" section of the workflow's action, if the workflow triggers, it will send this notification to the customer which has triggered that notification.
By default, Booknex allows notifications to be sent to customers and staff based on booking-related events. However, the system also provides flexible email configuration, enabling businesses to send notifications to custom email addresses beyond just the customer or assigned staff member.
With this feature, businesses can add additional recipients, such as company email addresses for administrative tracking, team emails to keep managers informed, or custom external recipients as needed. This ensures that all relevant parties receive important booking updates, improving communication across the organization.
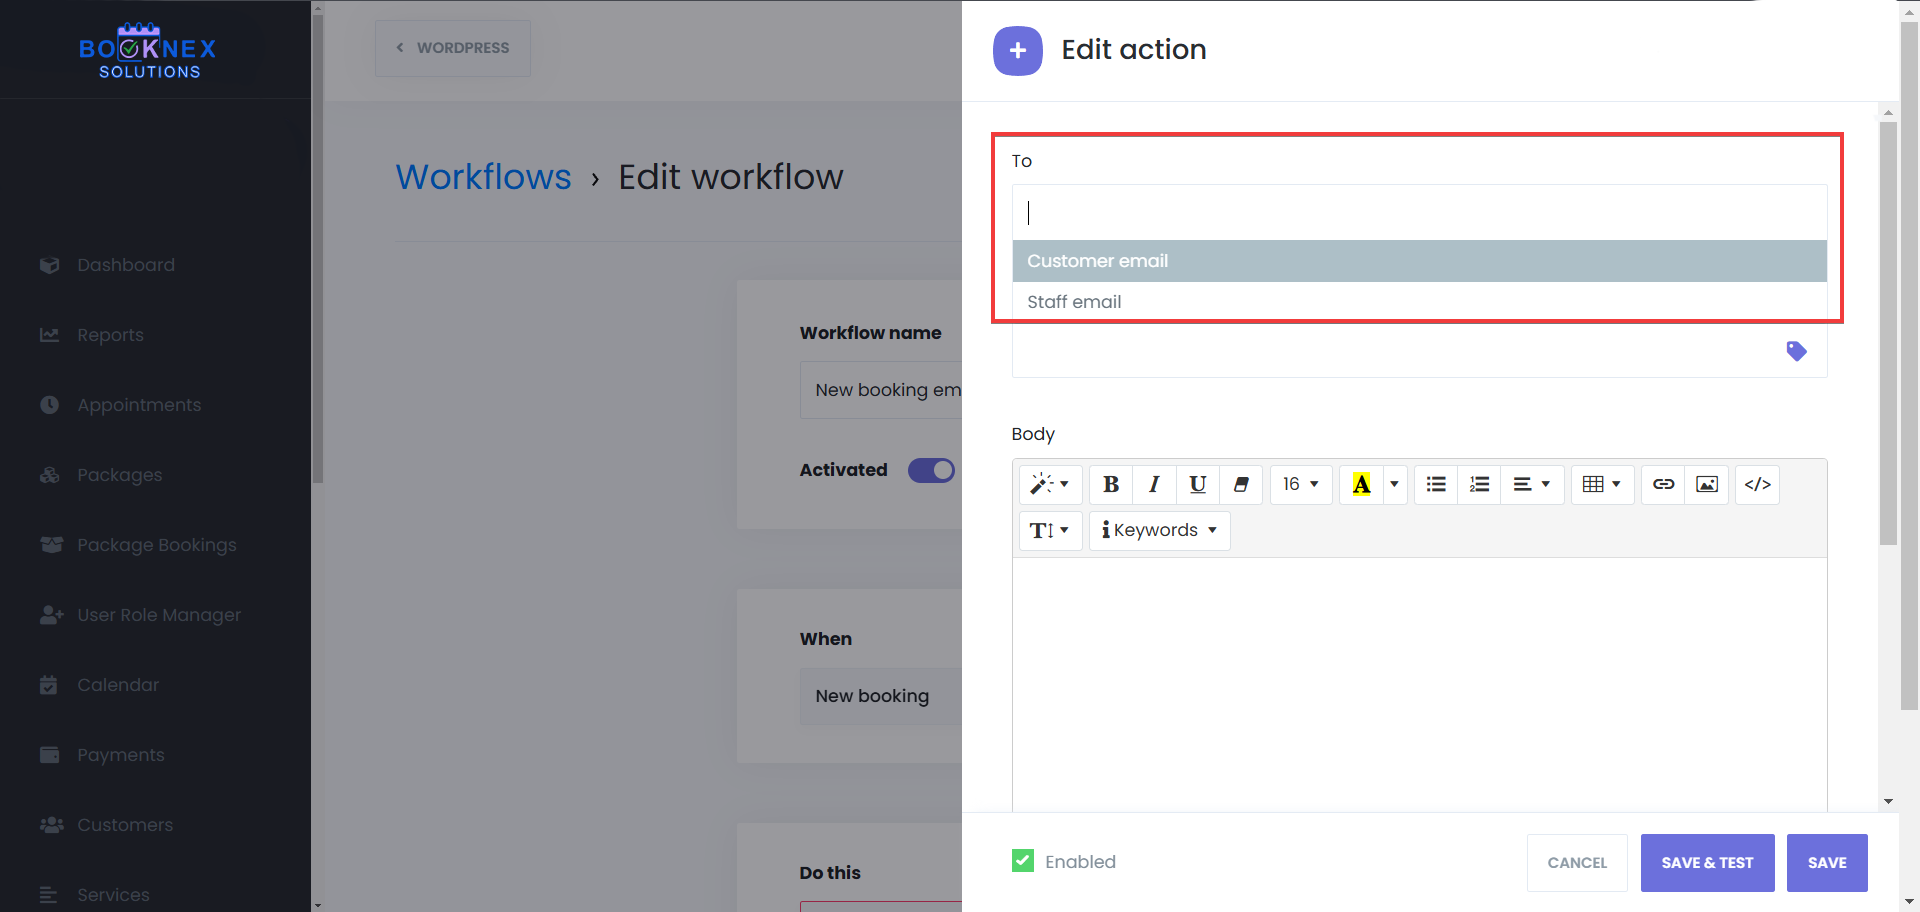
Editing notification body
You can also edit the body of the notification to your liking. You can set a style to your text, make your text bold, italic or underlined, based on your preferences, or if you'd like to clear those formattings, you can click on the eraser icon to do so. You're also able to change the font size of your text, change their and the background's color, list your text the way you'd like to, add tables to your notification, use the link function on your text, add picture to your notification, or, use the code view option (</>) to set up your notification the way you'd like using HTML format, which may make everything easier for you.

Using Keywords
You also can add keywords to your notifications, based on your workflow trigger. For example, if your trigger is customer registering, you will have access to the keyword about customer's password in the keyword list. And when you add a keyword to your notification, that keyword will work in the background when the notification is sent, and will be sent as real data to your customers, and in this case, it will be their password. However if you click on the button "Save & Test", it will send you the notification with the keywords as they are, because they are dynamic and they need real data from the appointments to process data, and convert the keywords to real data as well.

Adding Attachments
Lastly, it is possible to add files to your notifications. For example, if you have the Invoices add-on, you will be able to add your invoices as files to your notifications, and share it with anyone you'd like.
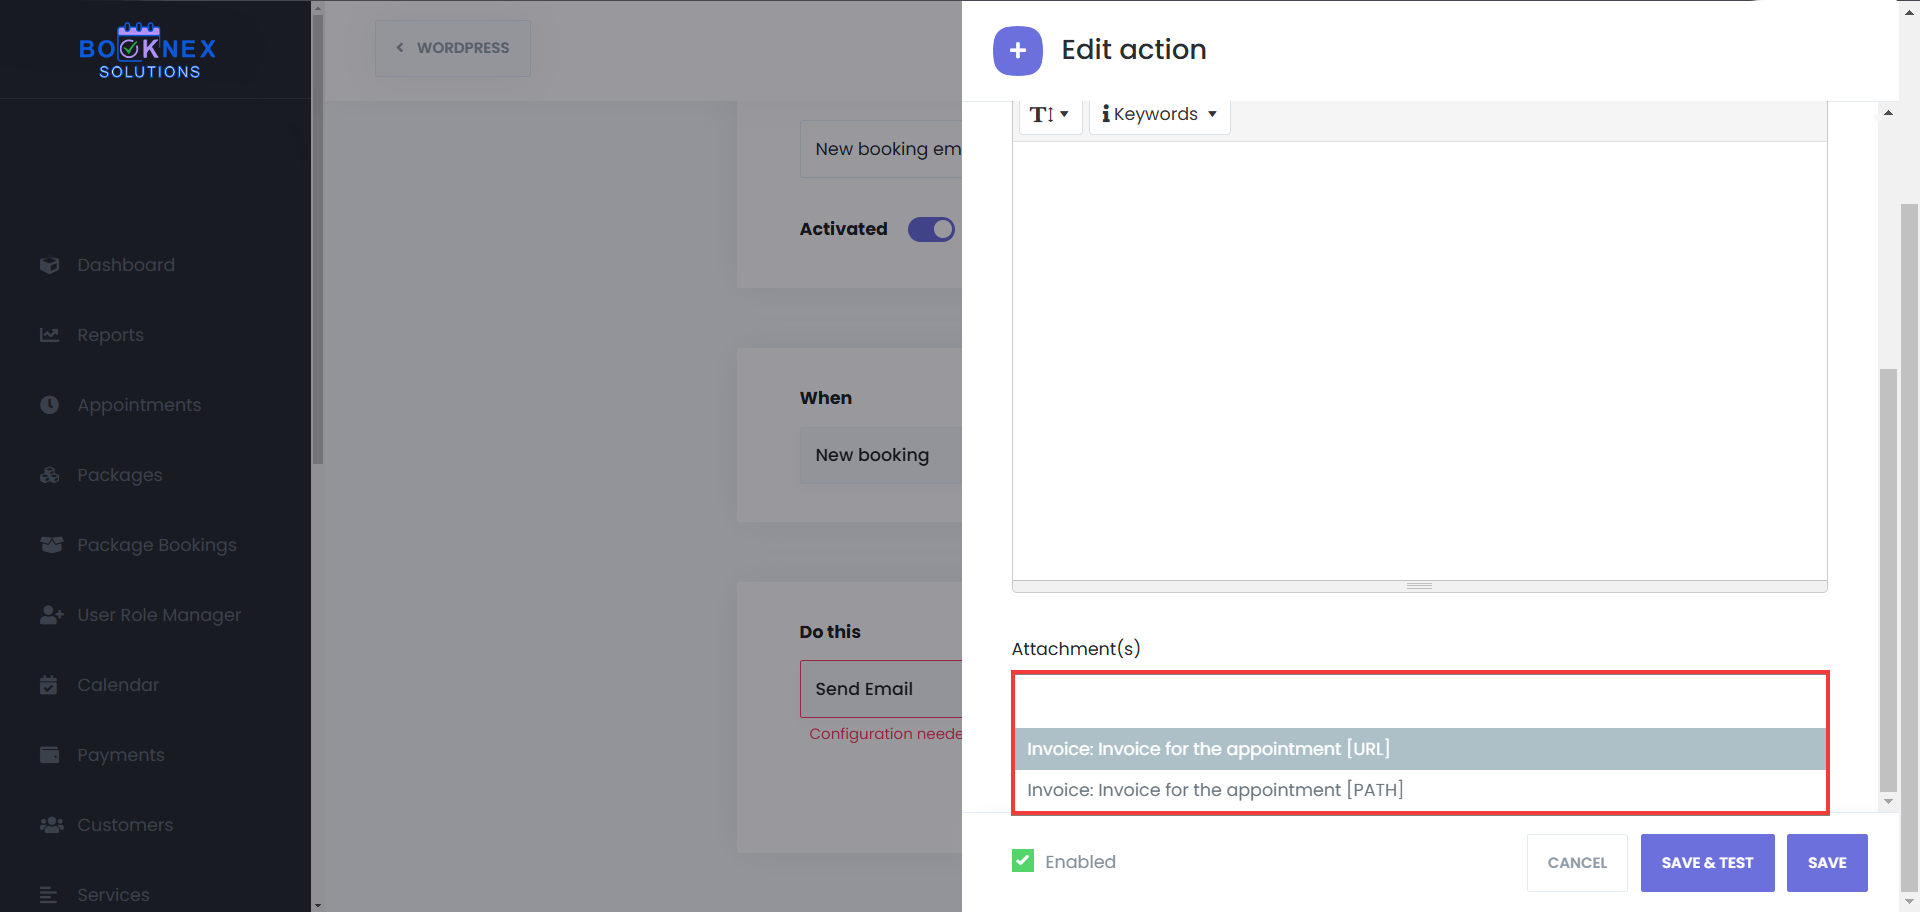
Automated Notifications in Workflows
A core part of the Workflows Module is automated notifications, which keep customers and staff informed about booking details.
Types of Automated Notifications
- Appointment Confirmations – Sent when a customer successfully books an appointment.
- Appointment Cancellations – Alerts customers and staff when a booking is canceled.
- Rescheduling Notifications – Sent when appointment times change.
- Reminder Notifications – Reduce no-shows by reminding customers of their upcoming appointment.
- Follow-Ups – Sent after an appointment to collect feedback or encourage repeat bookings. For example, using the "Ratings and Reviews" add-on.
- New Customer Registrations – Welcome emails that include login details for the customer panel.
Each notification type can be customized and scheduled through Workflows to ensure timely and relevant communication. To set up their timings, you can edit the trigger of the workflow, by clicking on the "Edit" button next to the trigger's name:

In this section, you can set the workflow to work before/after the trigger action happens, and apply multiple filters. You can set location, service, staff, and status filters, you can restrict the workflow to work based on the trigger side, for example if you set the "Called from" as "Backend", if your customers book an appointment using the booking panel, they will not be able to receive that notification, it will only work if the appointment is created from the admin panel, and the "Frontend" status works otherwise, it will not work if the appointment is made from admin panel. Lastly, if your website is multi-language, you can set a Locale filter to send notifications in the language that your customer used when booking through your site.

Multiple Actions
You can also add multiple actions to one trigger in a single workflow, meaning, for example, you can add multiple email notifications, change the appointment status, and still be able to add other types of notifications to that workflow, as displayed in the screenshot below:

Search and Filter
Lastly, when you have multiple pages of workflows, and it is difficult to find the workflow you look for, you can use the search and the filter functionality on the Workflows page to find the specific workflow that you're looking for:

Appearance Customization
The Appearance Module in Booknex allows businesses to customize the visual layout and design of their booking panel. This ensures that the booking experience aligns with the brand identity and provides a seamless user experience. With predefined themes, extensive customization options, and Custom CSS support, businesses have full control over how their booking system looks and feels.
Accessing Appearance Settings
Go to the Booknex plugin in your WordPress admin panel. Click on Appearance from the list on the left side to open the customization options.

Overview of Appearance Settings
The module provides predefined themes and customization tools to modify colors and the style of the booking panel.
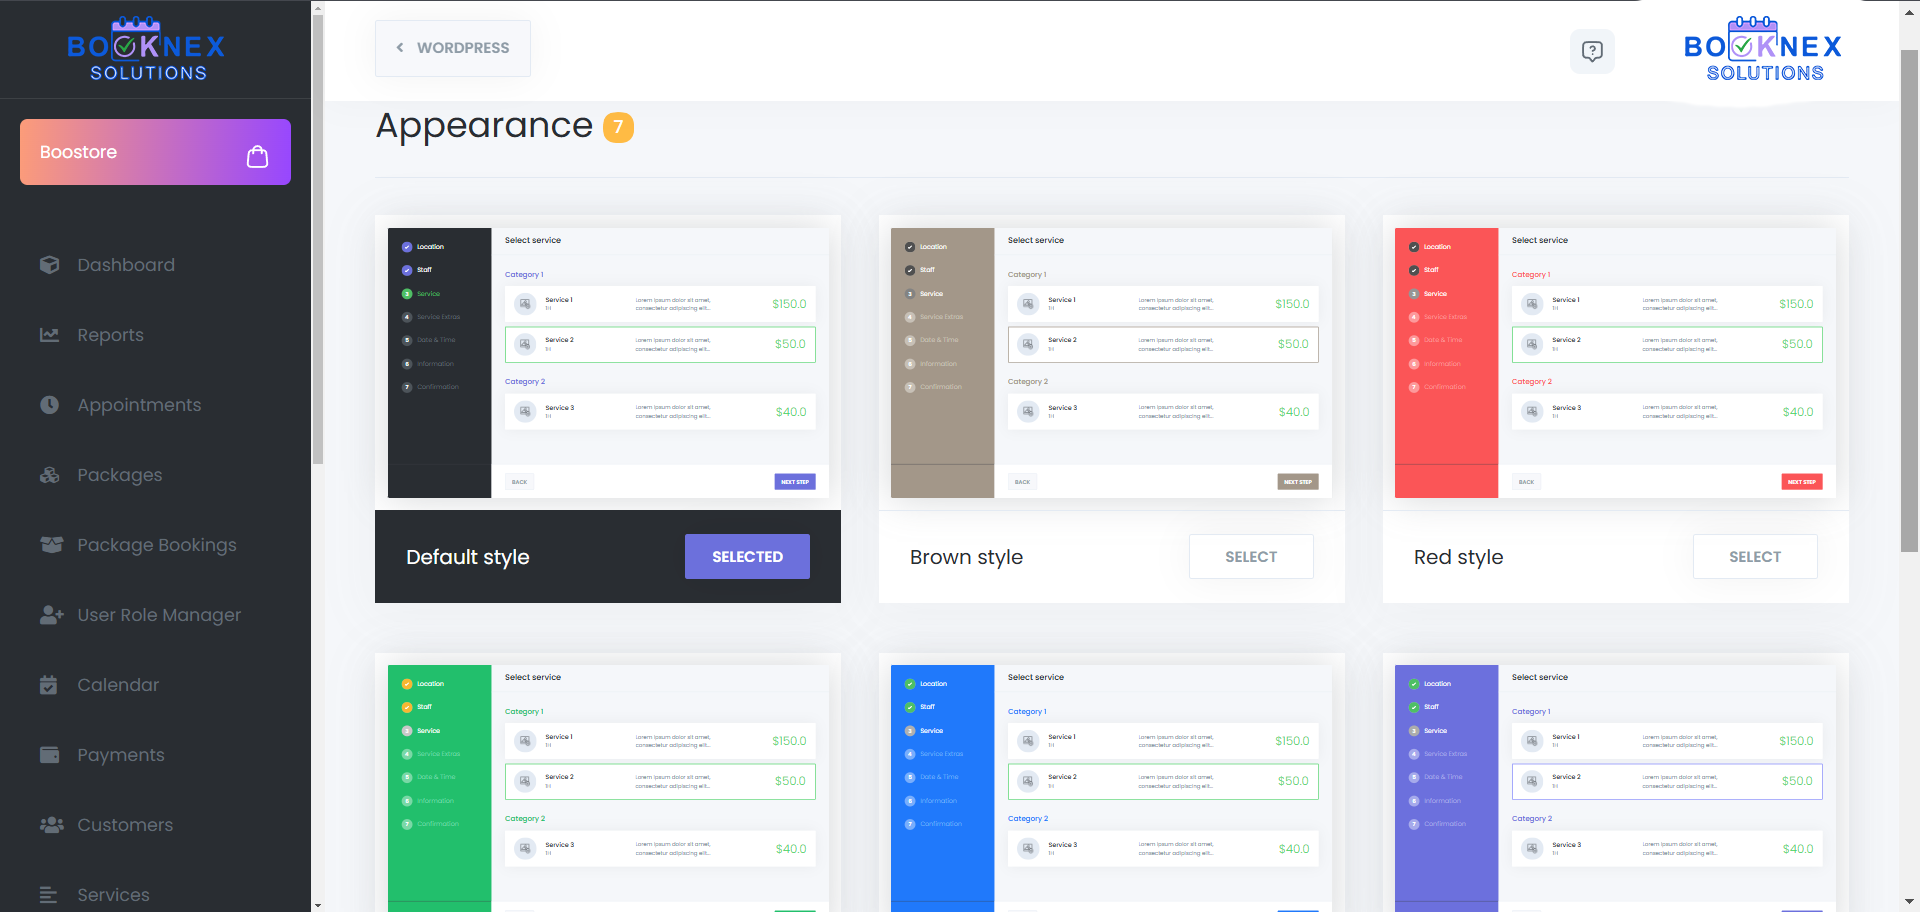
Changes are reflected in real-time, allowing businesses to preview modifications before applying them.
Choosing a Predefined Theme
Booknex offers seven built-in themes, each with a distinct color scheme:
- Default
- Brown
- Red
- Green
- Blue
- Purple
- Pink
How to Apply a Theme
- Open the Appearance Module in the Booknex dashboard.
- Select a predefined theme from the available options.
- Click Choose to apply the theme instantly.
Using a predefined theme provides a quick and effortless way to customize the booking panel without requiring manual adjustments.

Creating a Custom Theme
For businesses that require a fully personalized booking panel, Booknex allows users to create and edit custom themes.
Steps to Create a Custom Theme
Click "Create New Style"
This opens the theme editor, where colors and styles can be customized.
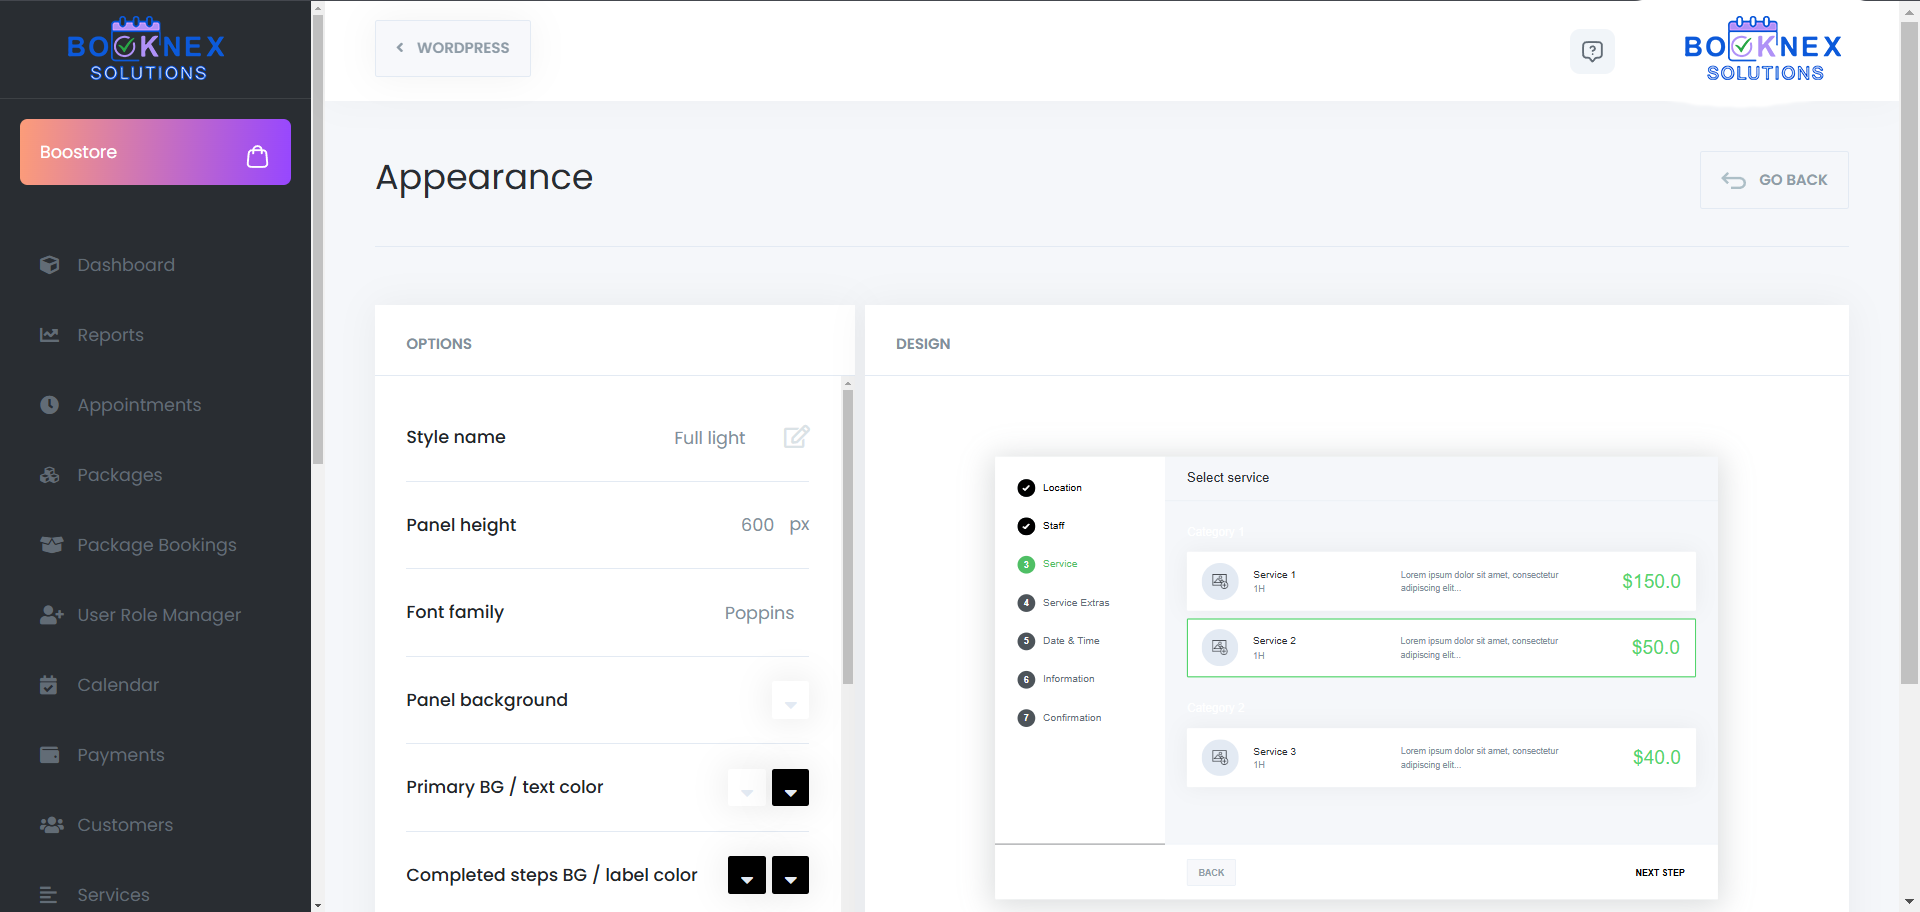
Define Style Attributes
For a fully personalized look, businesses can create a Custom Style and modify individual elements of the booking panel.
Available Customization Options:
- Style Name – Assign a custom name to your appearance settings.
- Panel Height – Adjust the height of the booking panel for better display.
- Font Family – Select a font that matches your website's typography.
- Panel Background – Customize the background color of the booking panel.
- Primary BG / Text Color – Define the primary color used for buttons, text, and key elements.
- Completed Steps BG / Label Color – Set the color for steps that have already been completed.
- Active Steps BG / Label Color – Define the color of the current active step in the booking process.
- Other Steps BG / Label Color – Adjust colors for steps that have not been completed yet.
- Title Color – Customize the color of titles and headings in the booking panel.
- Border Color – Set a custom border color for the elements inside the booking panel to match your design.
- Price Color – Modify the text color used for service prices.
- Hide Steps – Hide the steps for this particular appearance, this will not affect other designs.
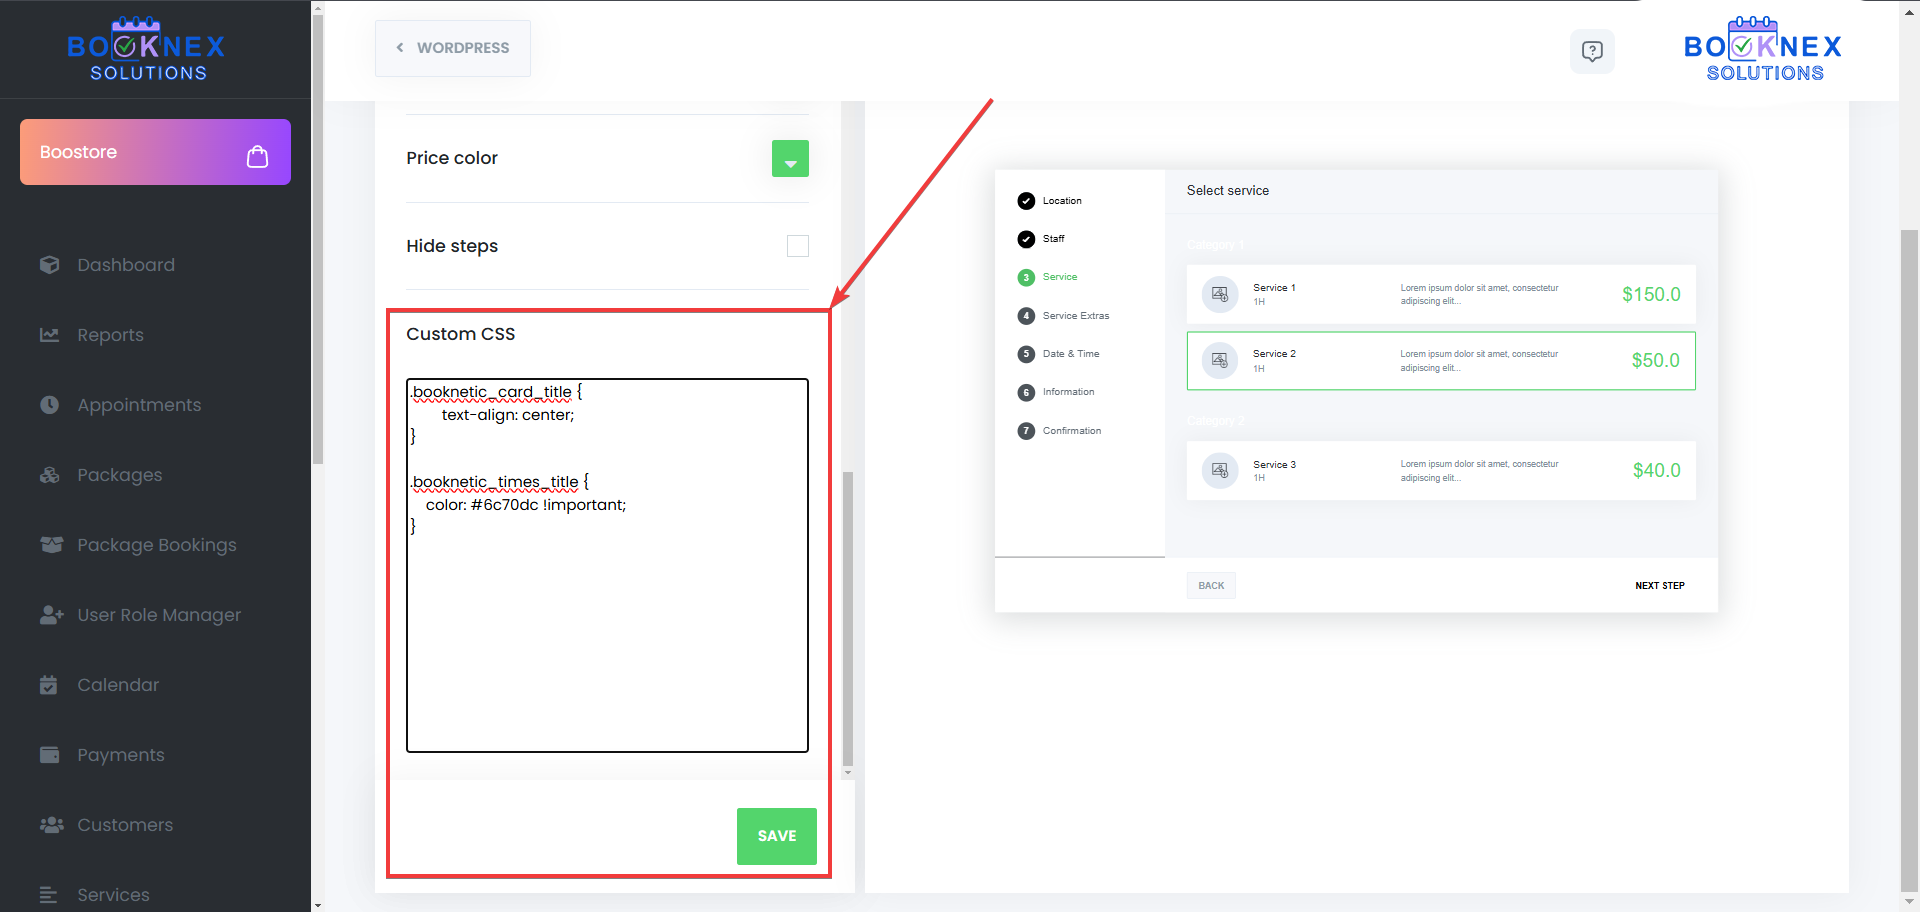
Advanced Customization with Custom CSS
For businesses that require deeper customization, Booknex allows users to apply Custom CSS. This enables full control over design elements beyond the built-in appearance settings.
How to Use Custom CSS
- Locate the Custom CSS section.
- Add your custom CSS code to modify specific design elements.
- Save the changes, and the new styles will apply instantly.
With Custom CSS, businesses can create a truly unique booking panel that integrates seamlessly with their website's overall design.
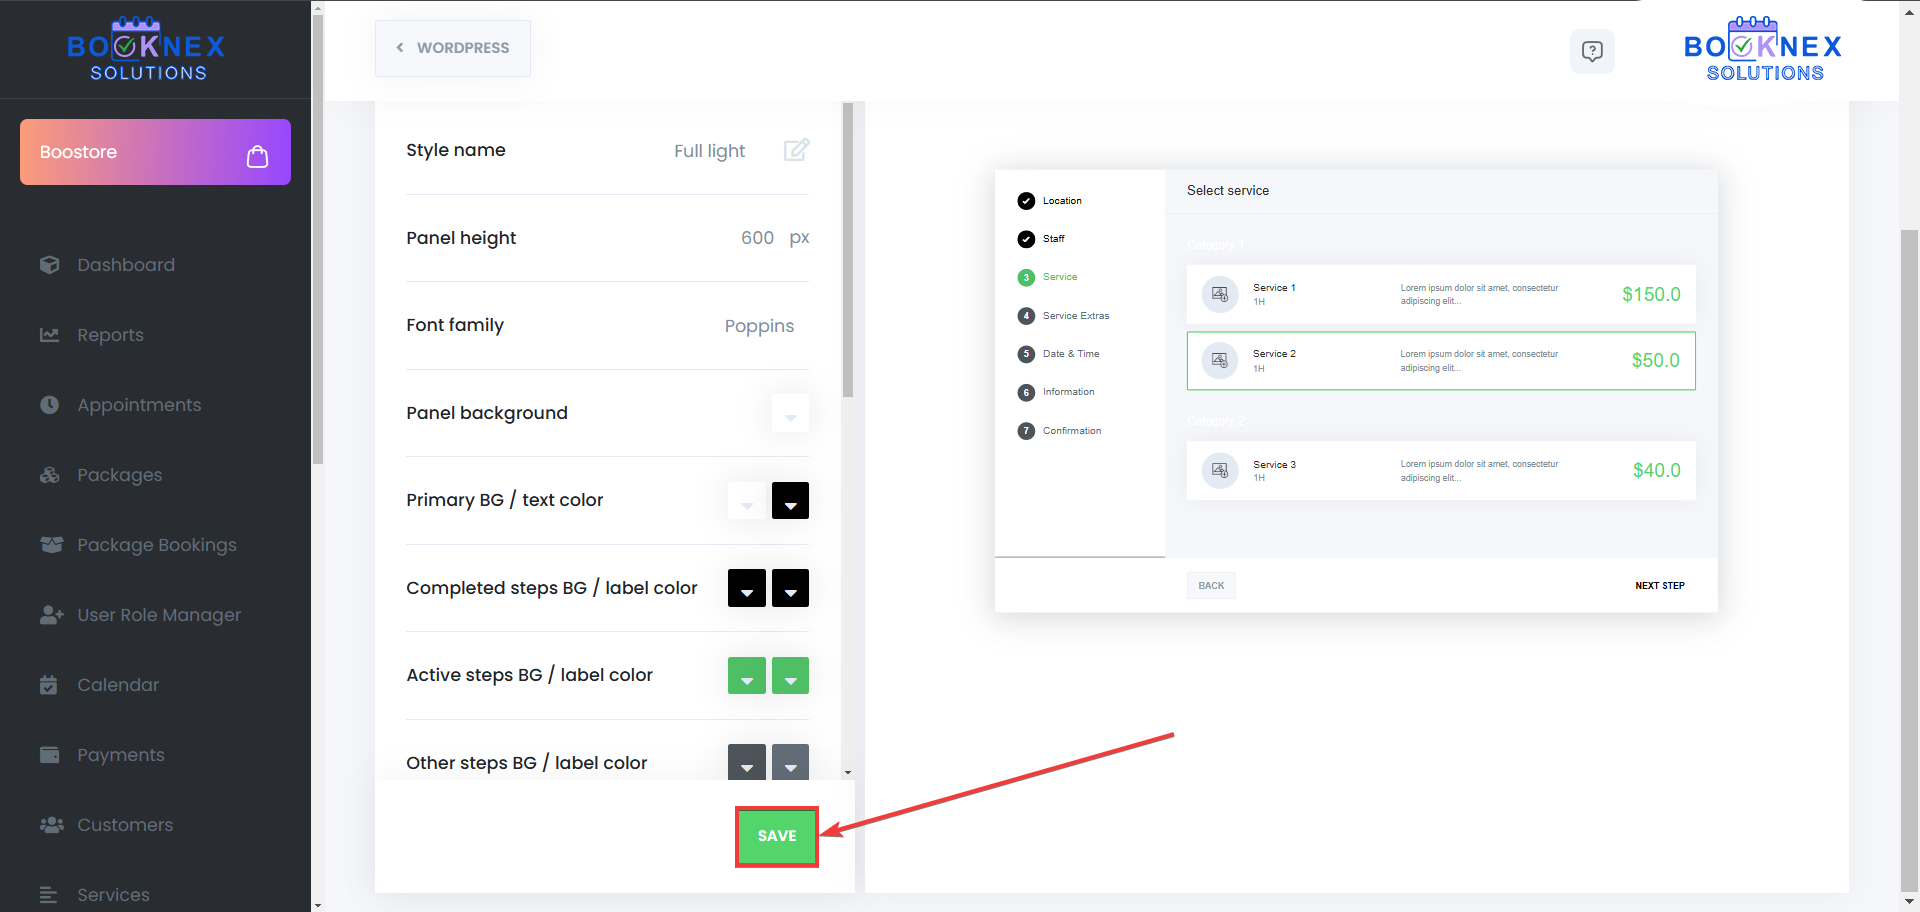
Save and Apply the New Style
- Once satisfied with the design, click Save.
- The newly created theme will appear in the custom themes list.
- Click Choose to activate the custom style.
Creating a custom theme ensures that the booking panel remains consistent with brand guidelines while maintaining an intuitive user experience.

Editing and Managing Custom Themes
Booknex allows businesses to edit, update, and delete custom themes as needed.
Editing an Existing Theme
- Select the custom style from the list.
- Make changes to colors, fonts, or button styles.
- Click Save to apply updates immediately.
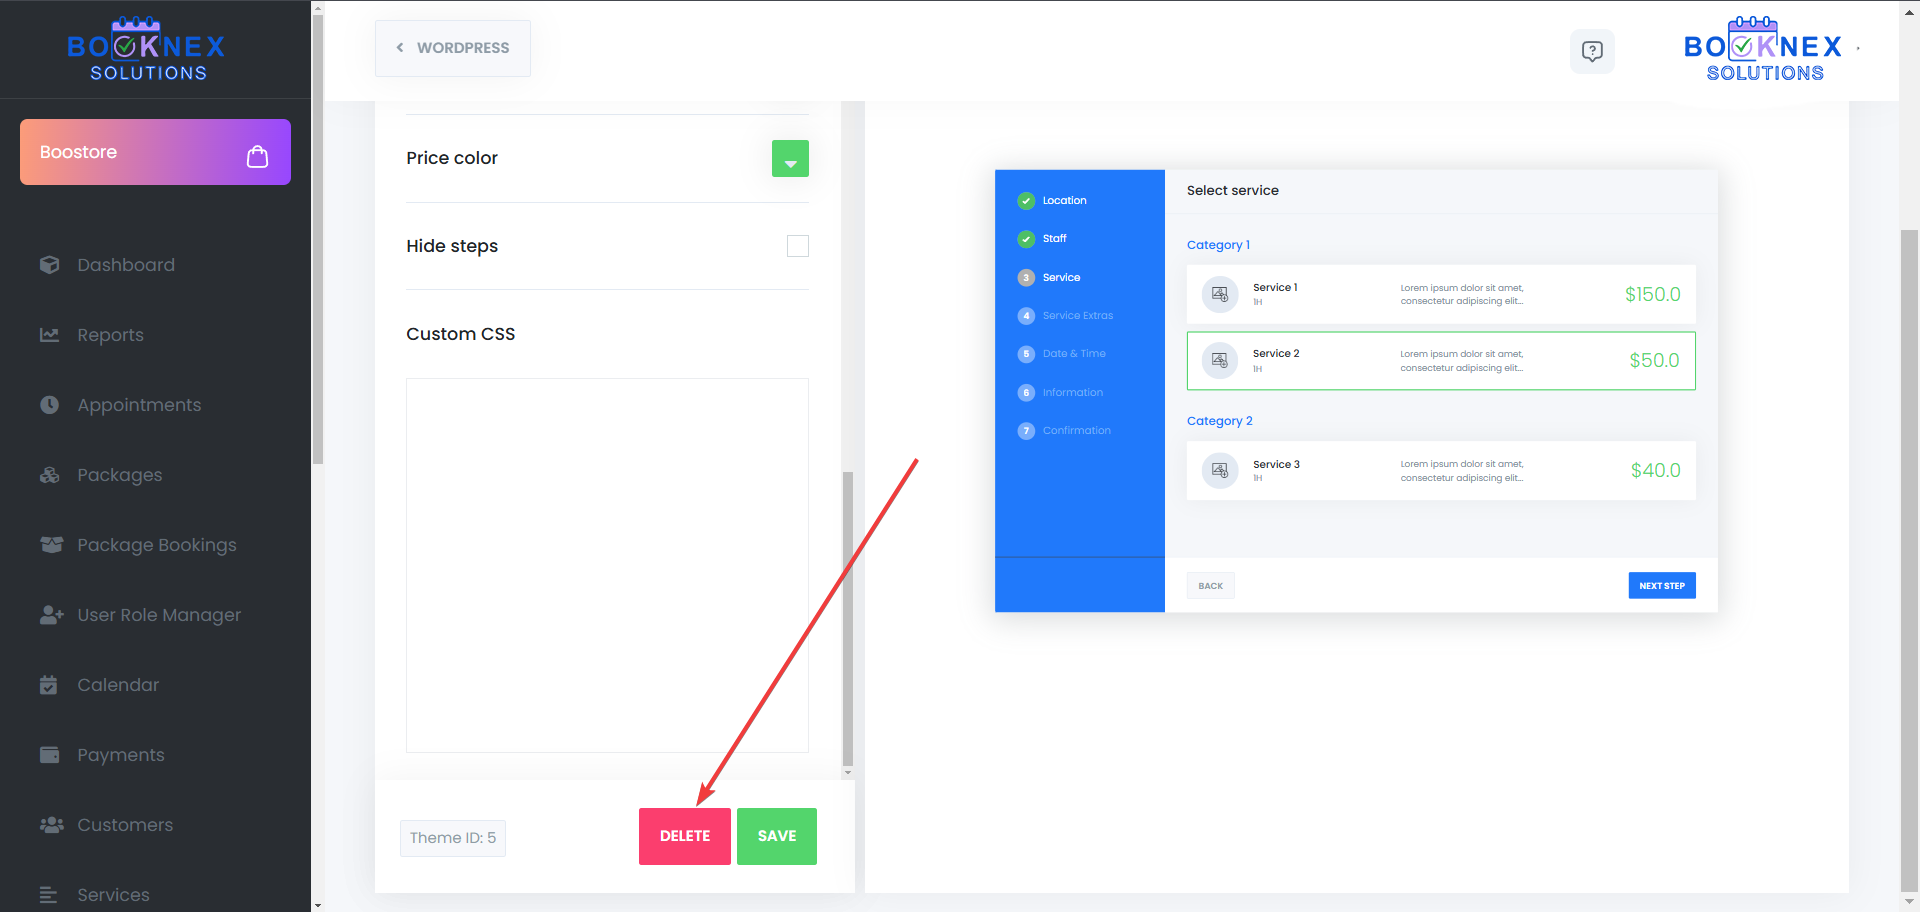
Deleting a Custom Theme
- Navigate to the custom themes list.
- Select the style to be removed.
- Click Delete to permanently remove it.
Note: The currently active theme cannot be deleted. To remove it, first switch to another style.
Coupons
Select the Coupons tab to open the coupons interface.
Creating a New Coupon
Add a New Coupon
Click the "ADD COUPON" button.

Configure Coupon Details
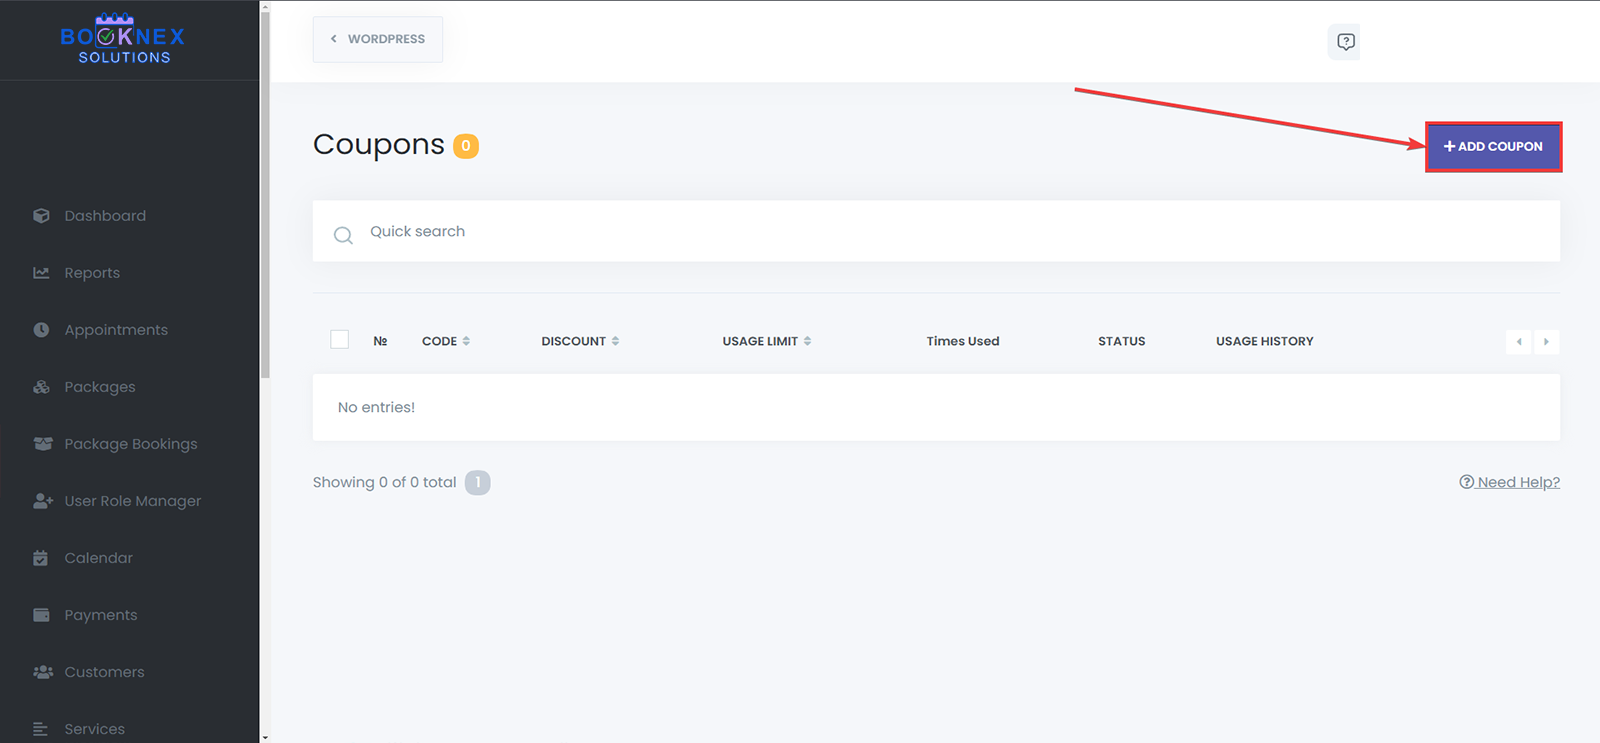
- Code: Enter a unique code for the coupon. Customers will use this code during booking to receive the discount. Ensure the code isn't already in use.
- Discount: Specify the discount type and amount:
- Percentage (%): e.g., 20% off.
- Fixed Amount: e.g., $25 off.
- Applies Date From: Set the start date for the coupon's validity. Leave empty if the coupon should be active immediately.
- Applies Date To: Set the end date for the coupon's validity. Leave empty for indefinite validity.
- Usage Limit: Define how many times the coupon can be used. Leave empty for unlimited usage.
- Once per Customer/Booking: Check this box if the coupon is allowed to be used only once by customer, or for only one booking.
- Services Filter: Select specific services to which the coupon applies. Leave empty to allow the coupon for all services.
- Staff Filter: Select specific staff members for whom the coupon is valid. Leave empty to apply the coupon to all staff.

Save the Coupon
After entering all details, click the "ADD COUPON" button to save.
Managing Existing Coupons
Editing a Coupon
In the coupons list, click the options icon (three dots) next to the desired coupon.
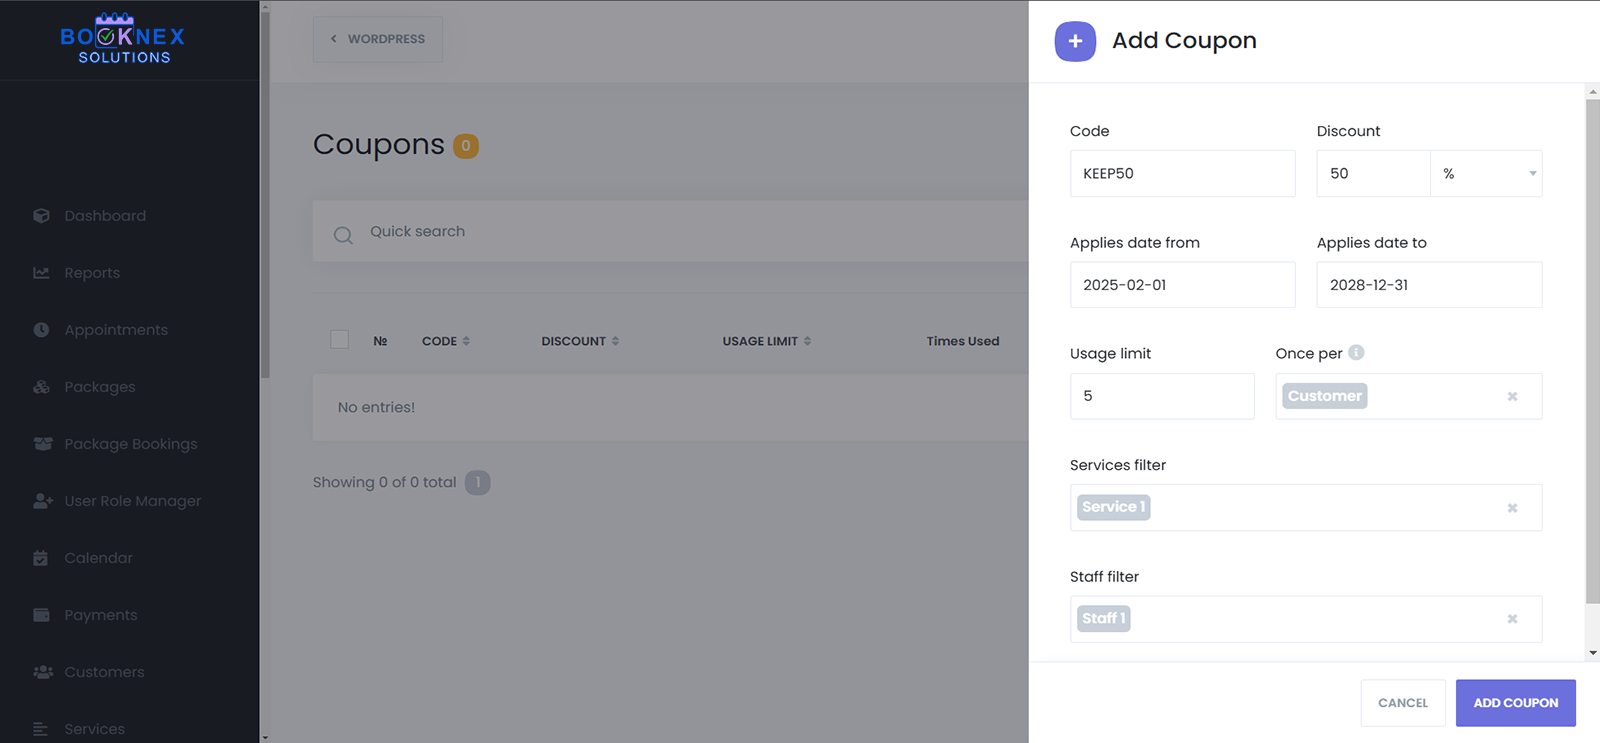
Select "Edit" to modify the coupon details.
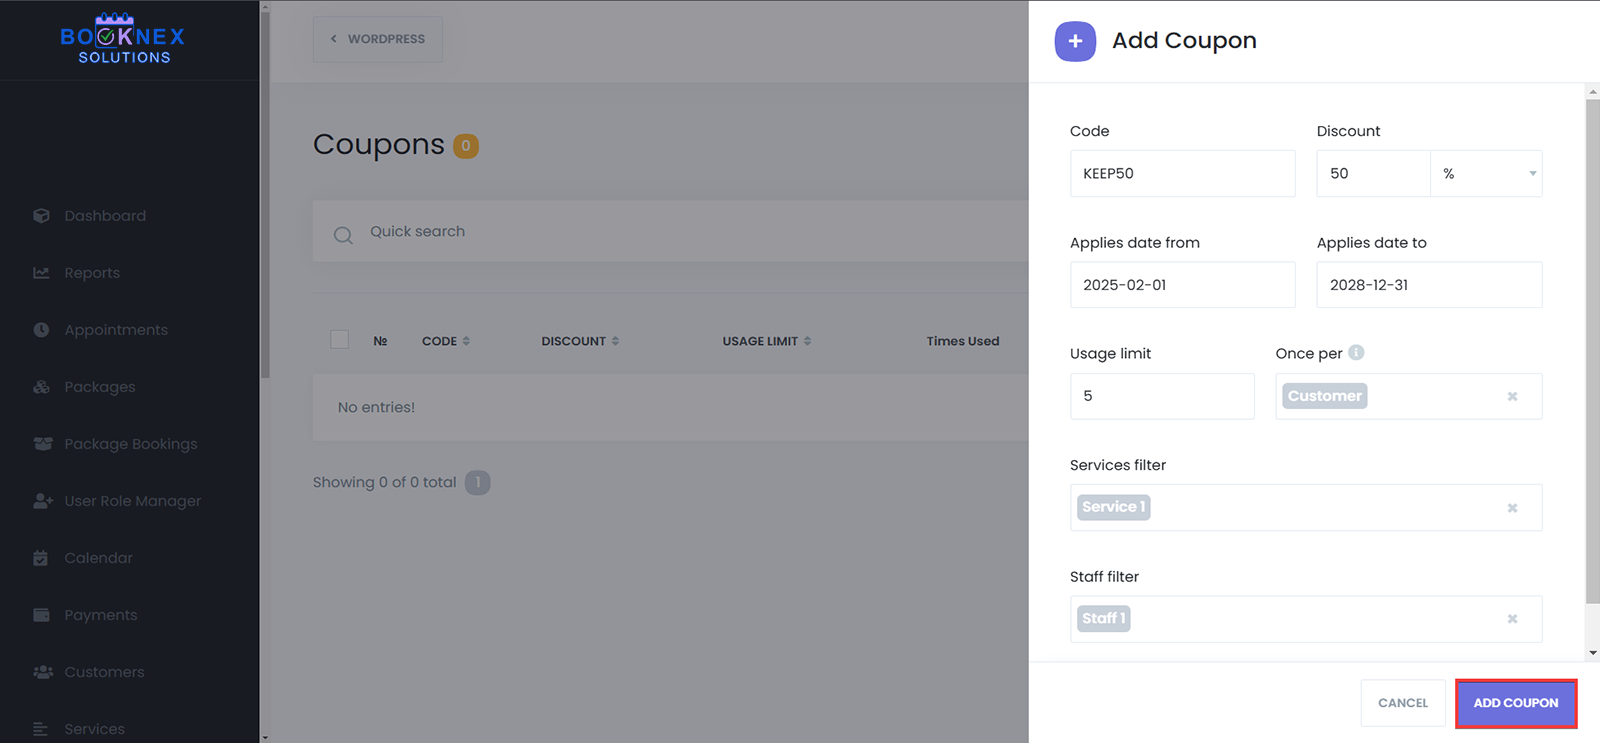
After making changes, click "Save".
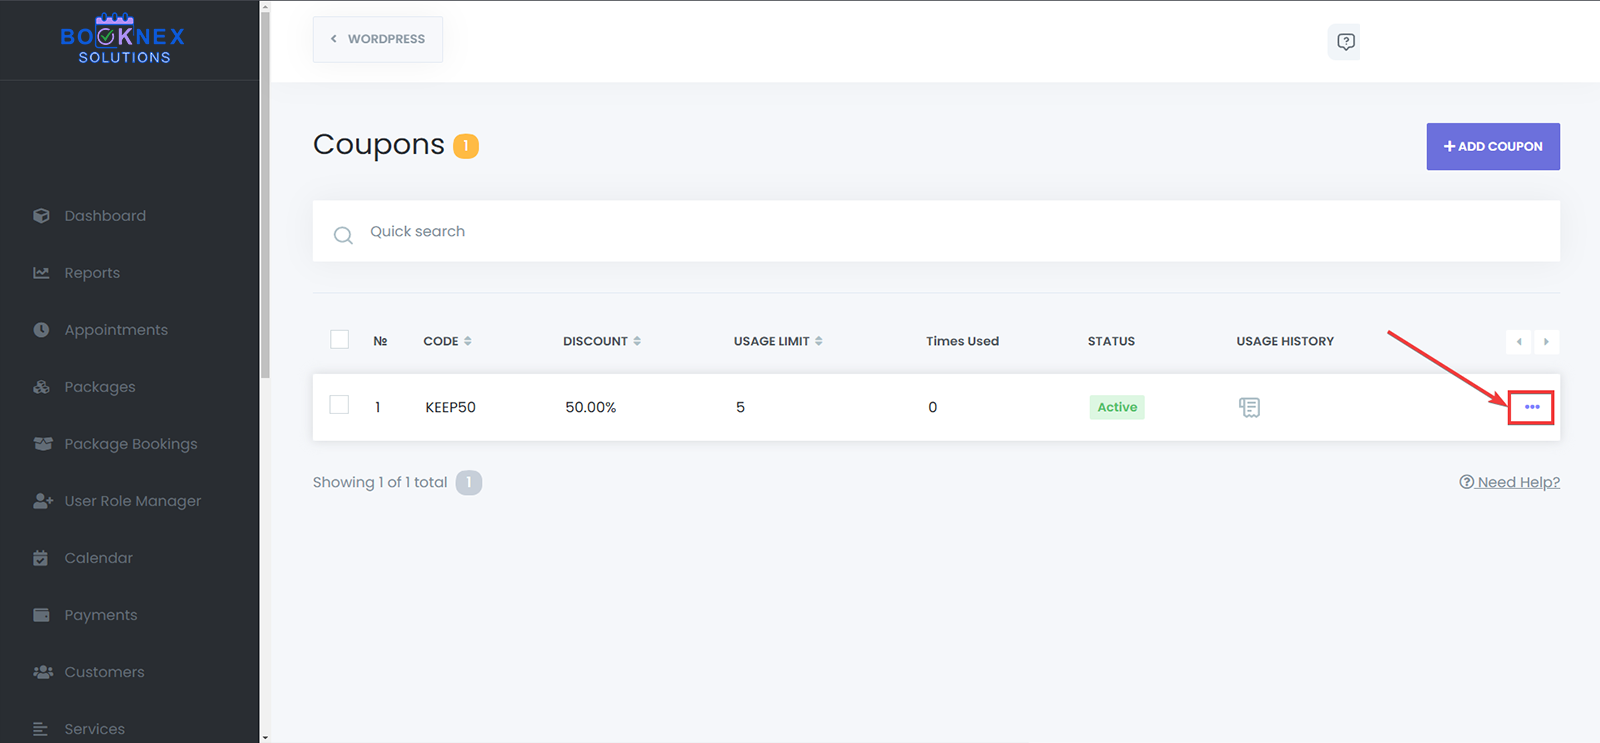
Deleting a Coupon
Click the options icon next to the coupon you wish to remove.

Select "Delete" and confirm the action.

For bulk deletion, select multiple coupons using the checkboxes, select the action "Delete" and click the "Apply" button at the bottom.
Viewing Usage History
To see how many times a coupon has been used and by whom, click on the cheque icon in the list.

A detailed usage history will be displayed, showing appointment details associated with the coupon.
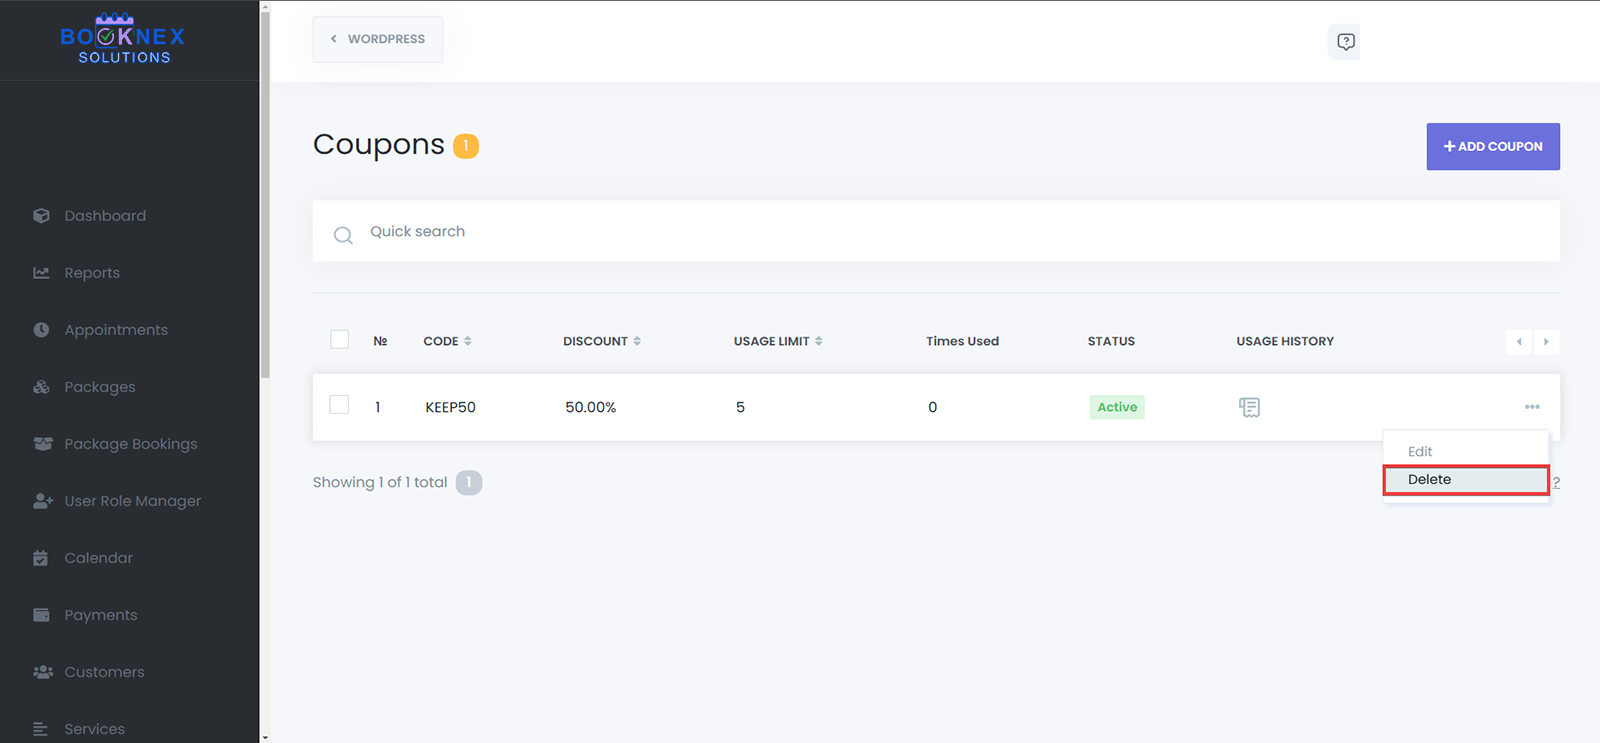
Using the Coupons in Booknex
In Booknex, you can use the coupons from your admin panel, where you may use the Appointments menu, or the Calendar module to create a new appointment, or you can let your customers use the coupons in the booking panel, where they may book their appointment.
Using coupons while creating appointments from the admin panel
Go to the Appointments menu, or the Calendar module, and click on "New Appointment":
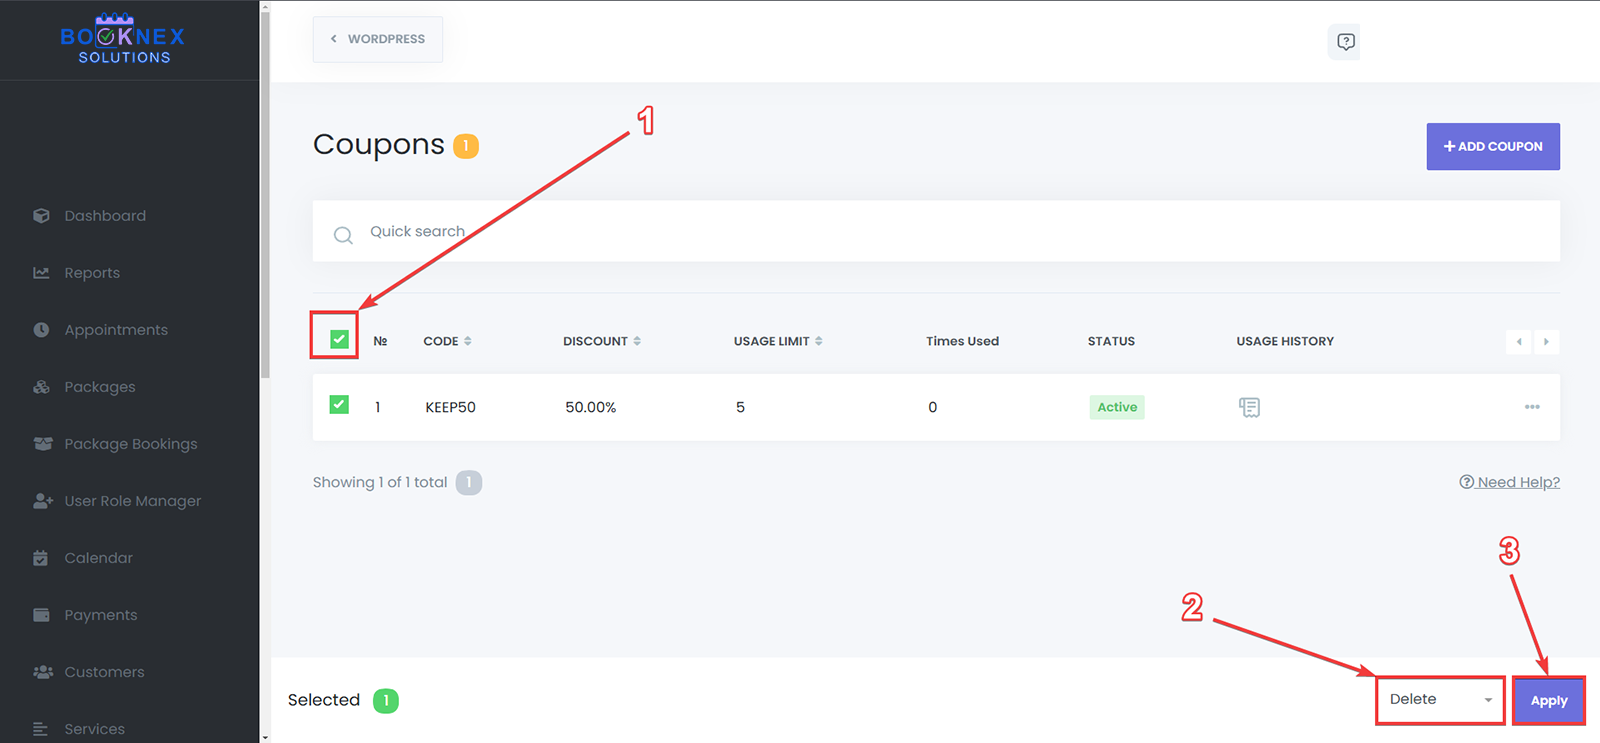
Select the mandatory options from the "Appointment details" tab:
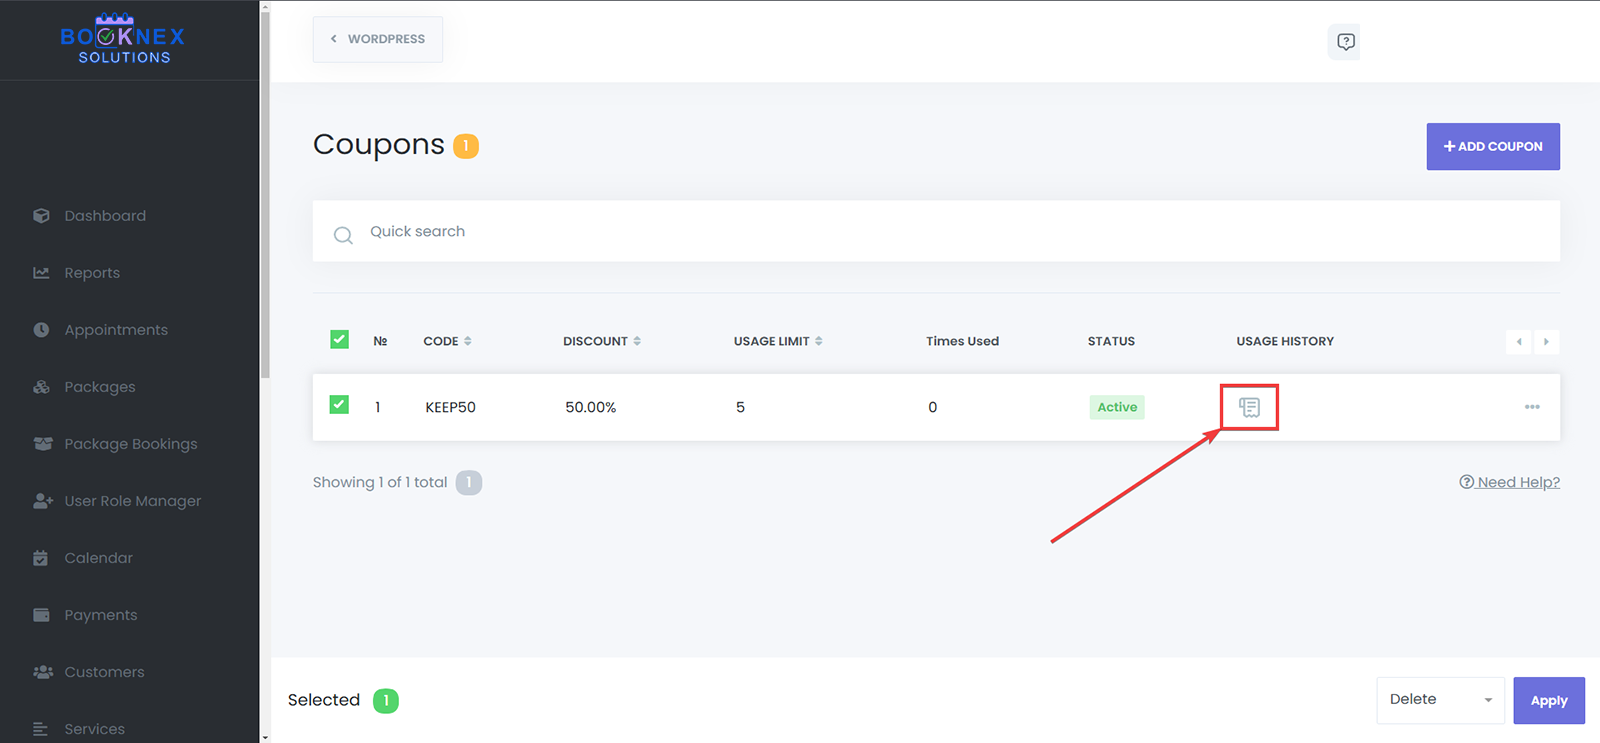
After that, go to the "Coupons" tab, and select the coupon that you want to use for that appointment, and click on save:

Using coupons while creating appointments from the booking panel
Go to the booking panel, continue with the steps, reach the Confirmation step.

Type in the coupon code that is intended to be used, and click on "OK":

Removing a coupon discount from an appointment
If there's an appointment that should not have the coupon discount, but there is already a coupon added to that appointment, you can remove the coupon easily. To do so, you should go to the Appointments menu, or the Calendar module, find the appointment that you're looking for, edit it, go to the "Coupons" tab, and select the "- none -" option:

Custom Forms
Accessing the Custom Forms Section
Log in to Your Booknex Dashboard
Open your WordPress admin panel, and click on Booknex.
Navigate to the Custom Forms Module
From the left-hand menu, click on Custom Forms to launch the module.
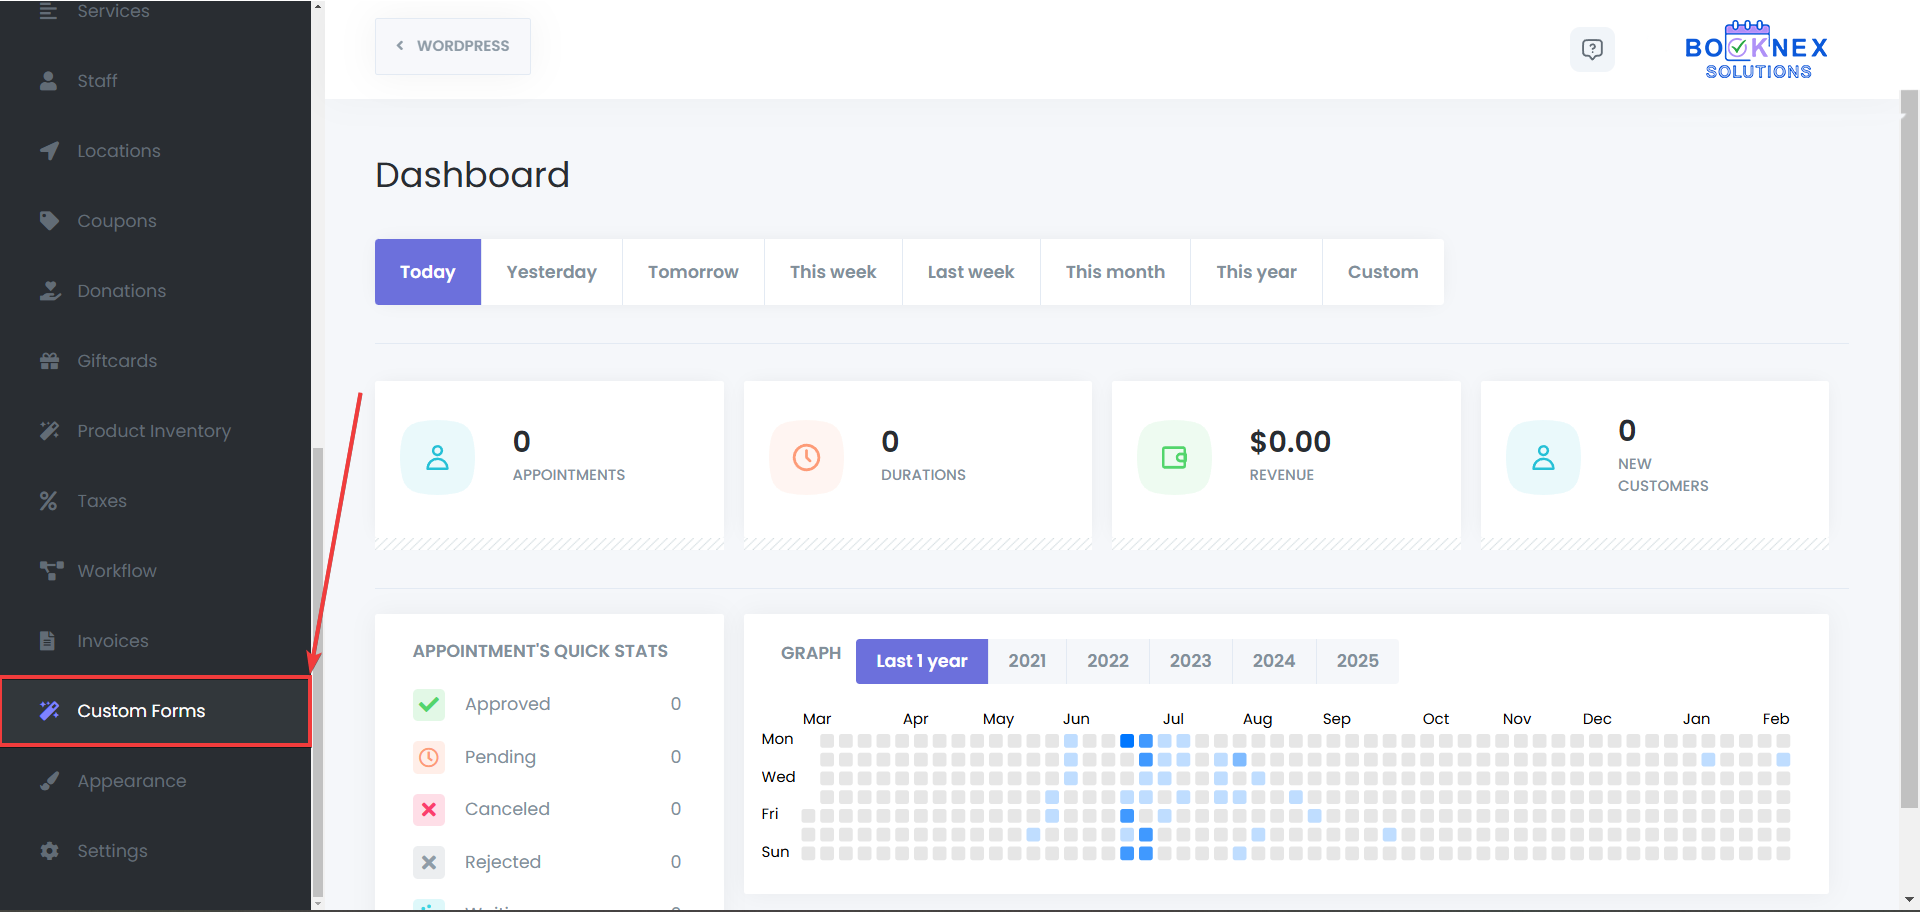
Creating and Customizing a Form
Create a New Form
Click the CREATE NEW FORM button.

Enter a unique name for your form.

Select the service(s) to which this form will be applied. If you don't select any services, this custom form will be available for all of the services.

Click on the "Create" button.

Building Your Form
Use the drag & drop Form Builder to add fields from the left panel into your form layout. The available field types include:
- Label: Displays static text to guide or inform customers.
- Text Input: Collects short text responses.
- Text Area: Gathers longer text entries.
- Number Input: Captures numeric values.
- Date Input: Allows customers to select dates.
- Time Input: Allows customers to select time.
- Select: Provides a dropdown list for single selections.
- Checkboxes: Permits multiple selections.
- Radio Buttons: Lets customers choose one option from a list.
- File Upload: Accepts file submissions.
- Link: Collects URL links.
- Email: Email input form.
- Phone: Phone number input form.

Customizing Field Settings
After adding a field, adjust its settings using the right-side panel. Configure properties such as labels, placeholders, and validation rules to match your requirements. Select a field first to modify its settings.

Setting Conditional Fields
The Form Conditions feature allows you to show or hide, disable or enable, set value for specific fields or throw error in the form based on the user's previous choices. This functionality provides a more personalized and dynamic form experience, making it easier to collect relevant information only when necessary.
How to Set Up Conditional Fields
Enable Conditional Logic: Click on the Form Conditions on the top right of the screen.
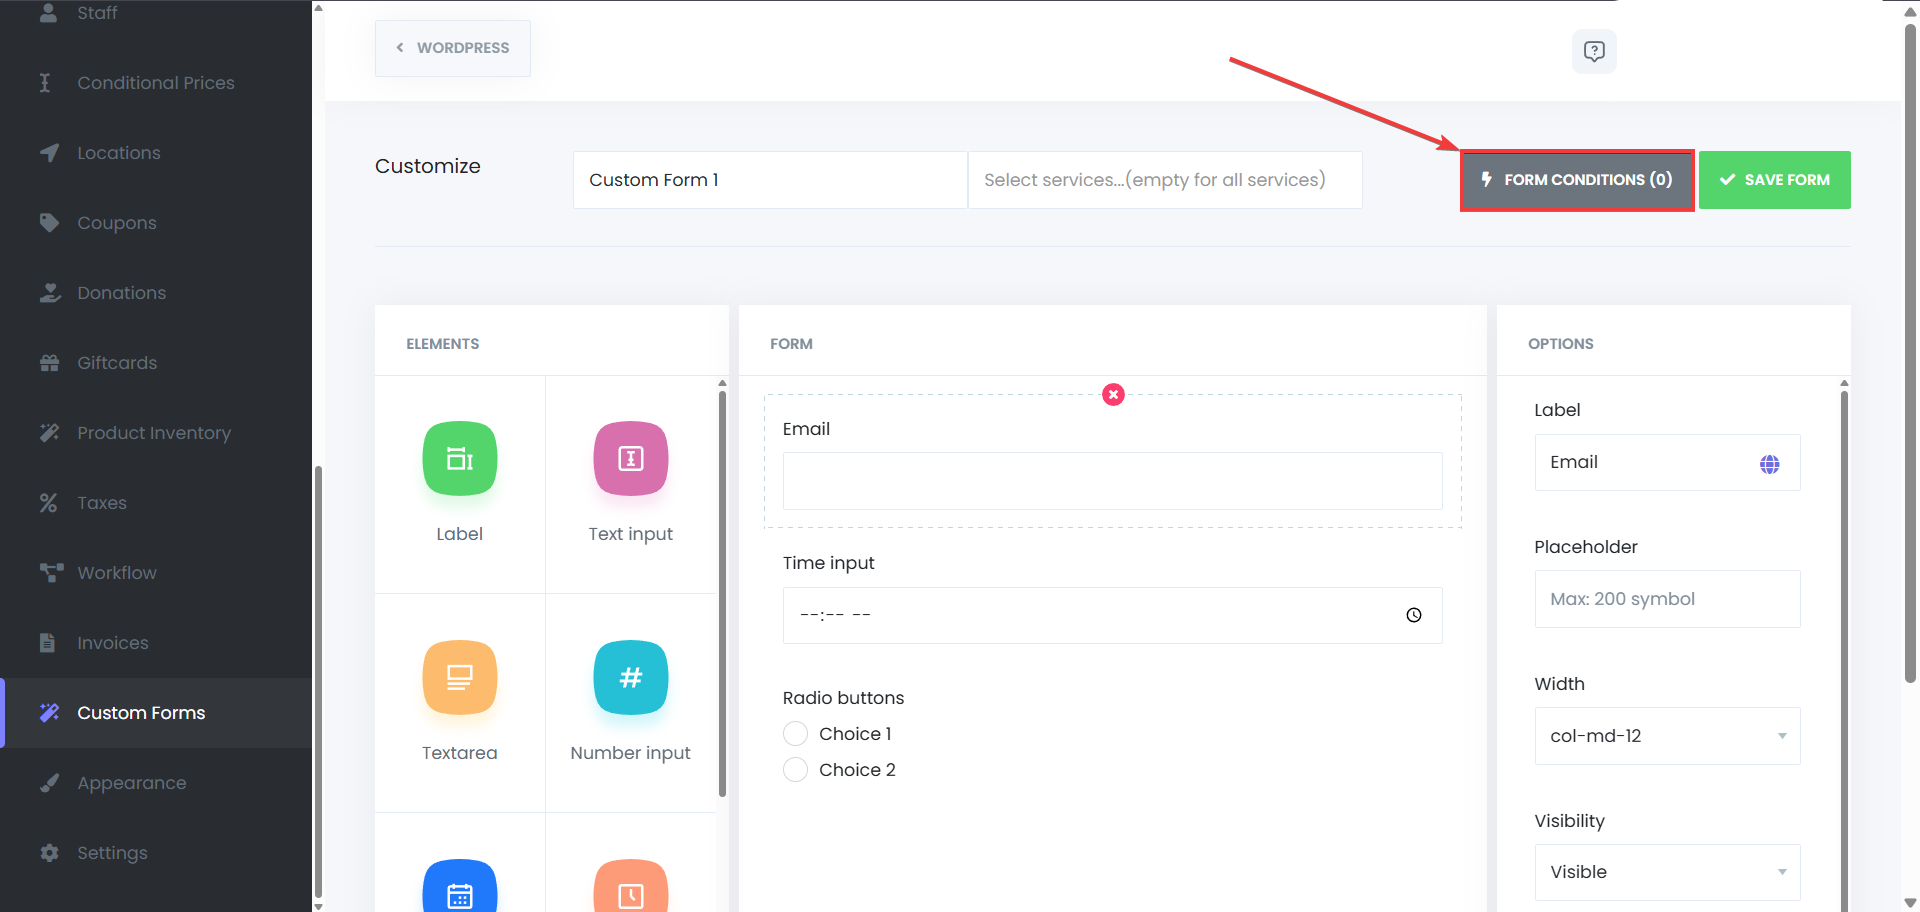
Click on the New Condition and New Action buttons.

Set the Conditional Rule: Define the condition that must be met for the field to appear. If you set more than one rules you can use the "AND/OR" options to make sure that they will work the intended way. You can set rules such as: If the service "Service 1" is selected, show Email field. If second location is selected, display Time input.

You can also configure conditions to hide fields when the rule is not met.

Save Your Form: After setting up the rules, click Save to apply the changes.

Use Cases for Conditional Fields
- Dynamic Service Options: For example, if a customer selects a specific service from a dropdown menu, you can display additional fields related to that service (e.g., if the customer chooses a "Wedding" package, additional questions about the wedding details can appear).
- Location-Based Fields: Show location-specific fields based on the country or region a customer selects.
- Customer Preferences: Customize the form experience by asking specific questions based on previous answers (e.g., showing a text field for details only if the customer selects "Other" as an option).
Benefits of Conditional Fields
- Enhanced User Experience: Customers only see relevant fields, making the form easier and quicker to complete.
- Simplified Forms: Eliminate unnecessary fields and make the form more streamlined by showing only the fields that are necessary based on user choices.
- Data Accuracy: By displaying fields only when necessary, you ensure that you collect the right information at the right time.
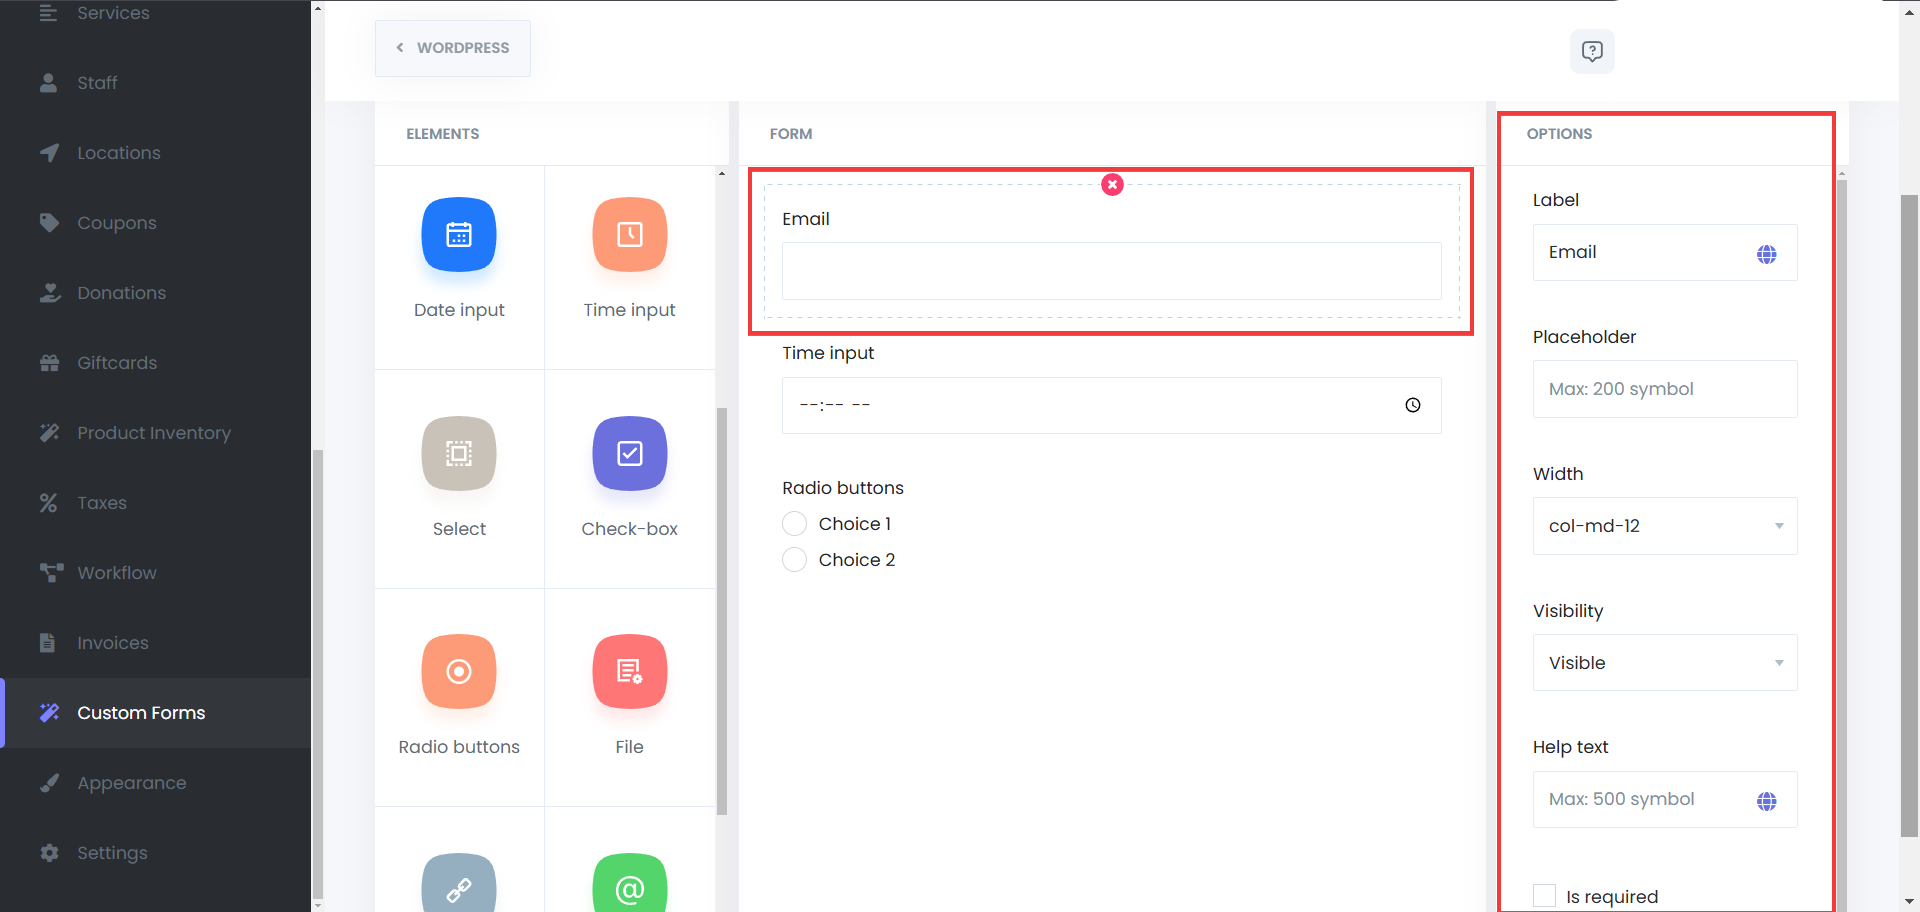
Saving and Managing Forms
Click SAVE FORM once your form is complete.

To update or remove a form, use the action options available next to each form listing.

Bulk deletion is also available by selecting multiple forms.

Viewing Customer Responses
To review the information submitted via your custom forms, follow these steps:
Access Appointments or Calendar
In your Booknex dashboard, navigate to the Appointments or Calendar section.

From the Calendar Module - Select an Appointment
Click on the appointment for which you want to view details.

View Form Responses
Click on the "Custom fields" tab within the appointment details to access the customer's responses to the custom form.
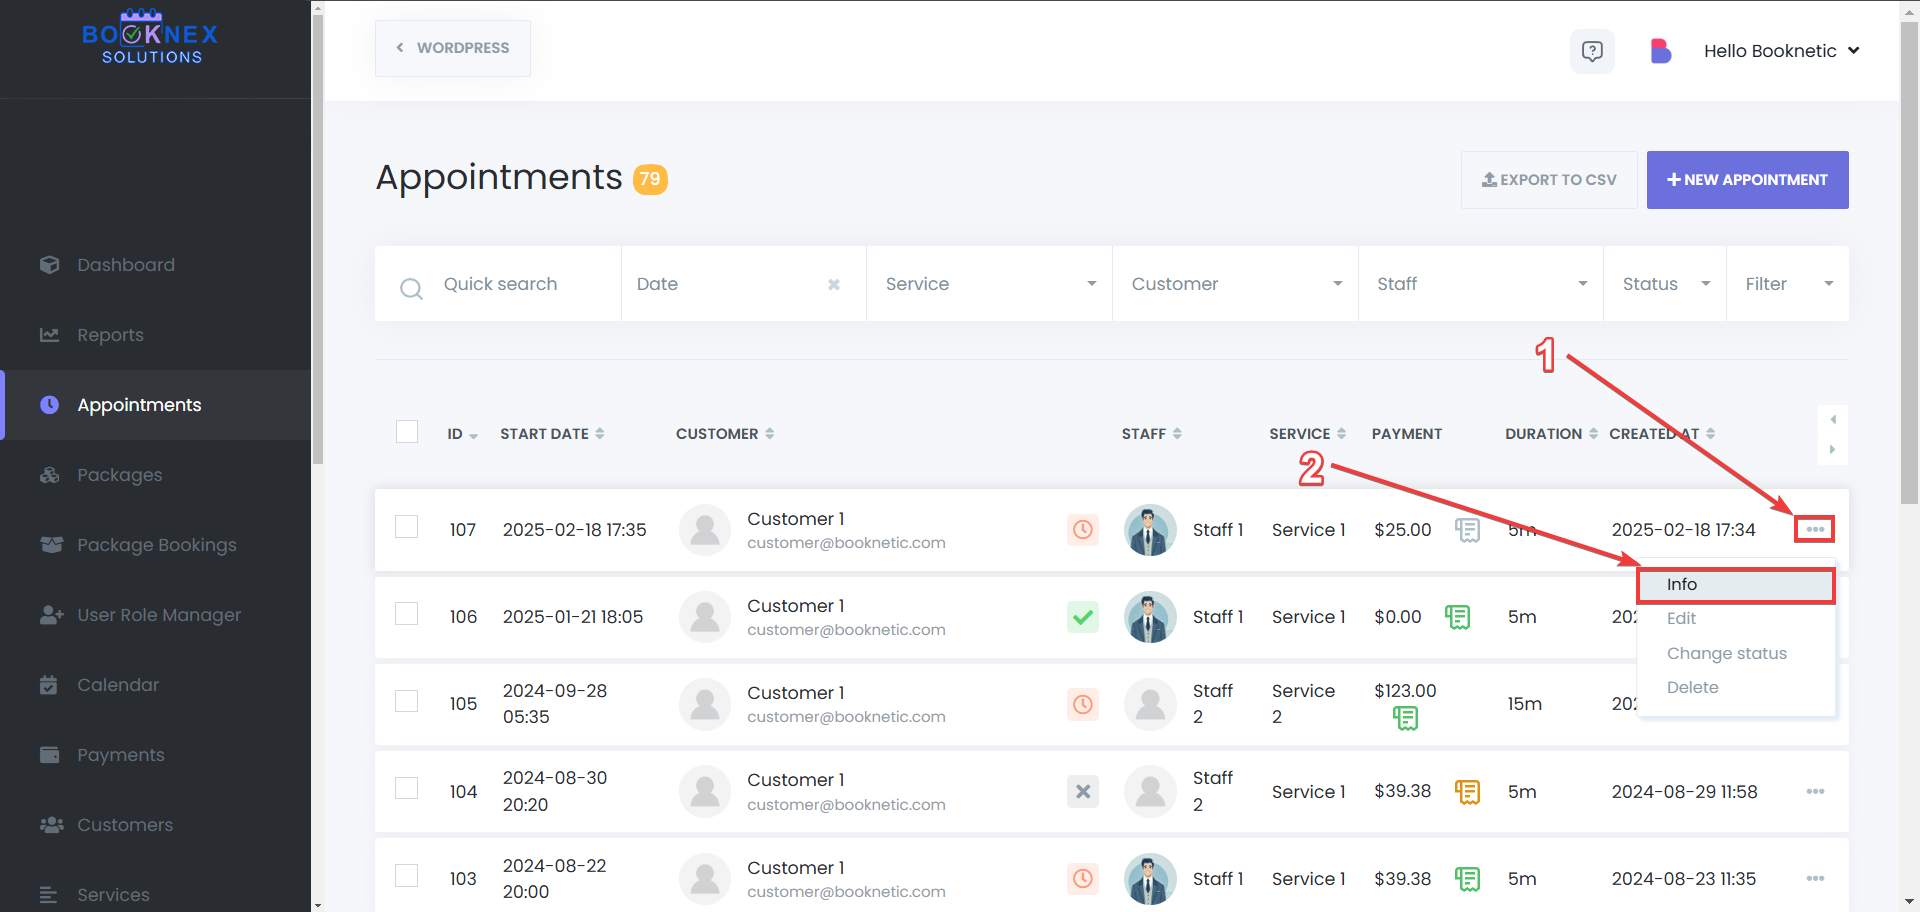
From the Appointments Module - Select an Appointment
Click on 3 dots next to the appointment for which you want to view details, then select "info" button:
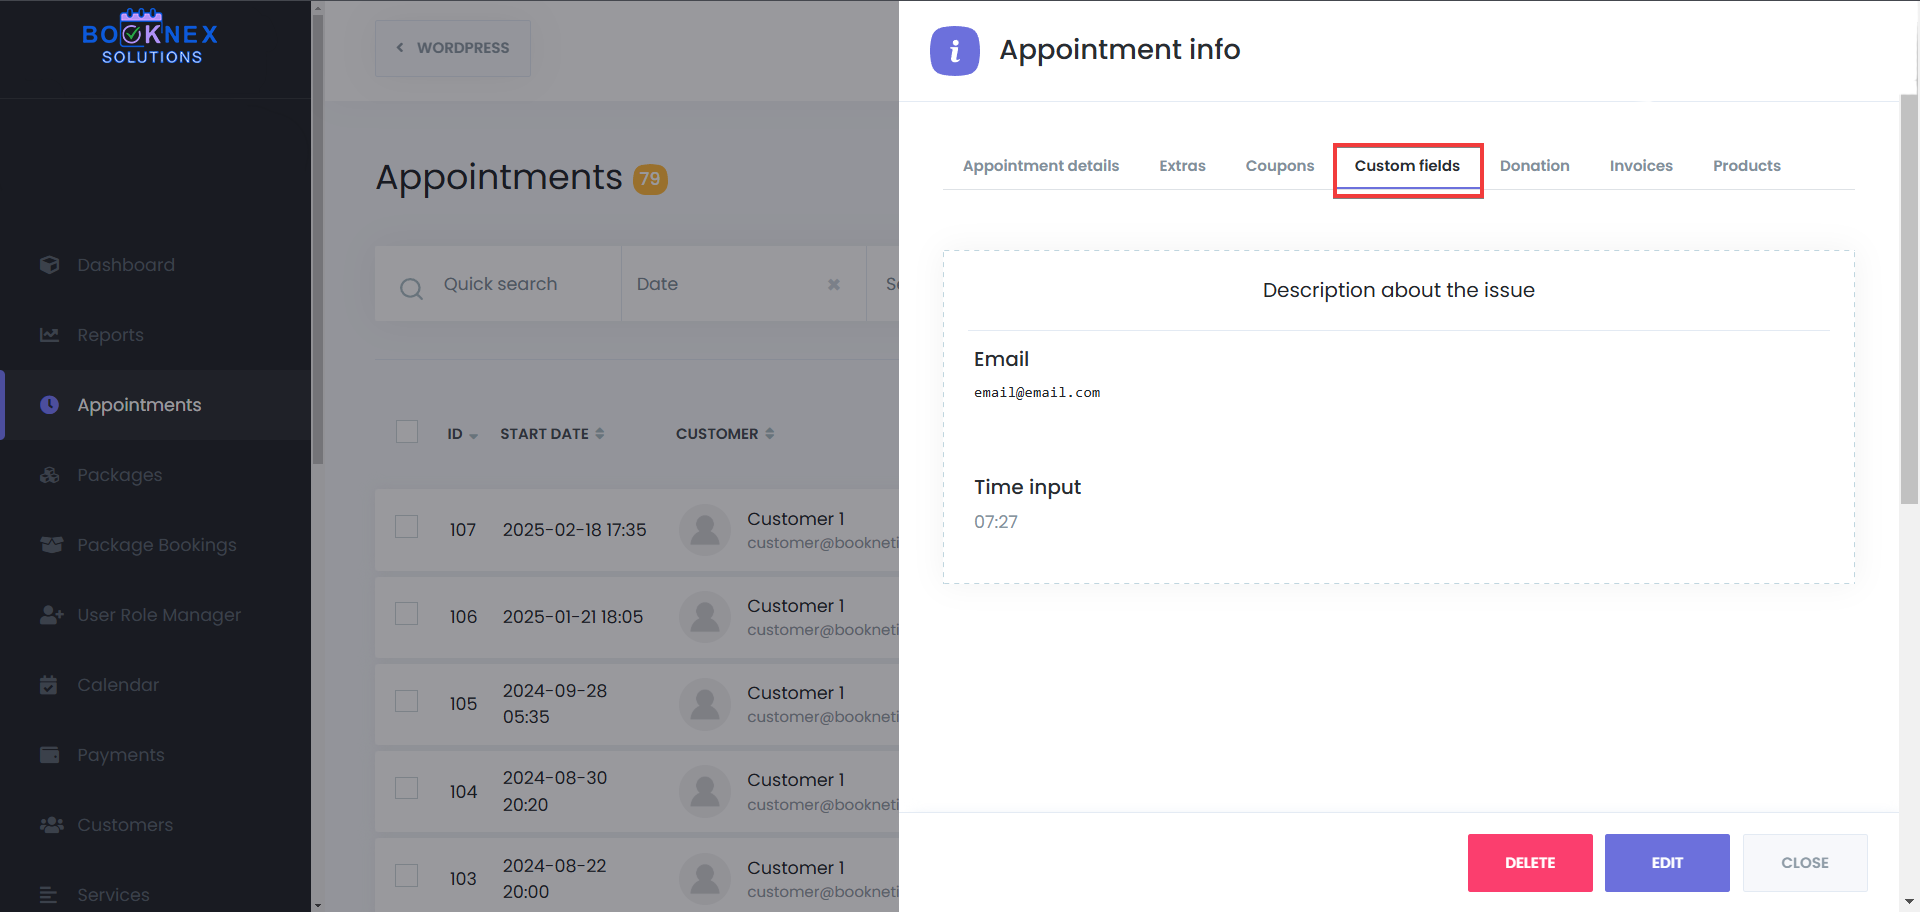
View Form Responses
Click on the "Custom fields" tab within the appointment details to access the customer's responses to the custom form.

Using Custom Forms responses in the workflows
The Custom Forms add-on in Booknex allows you to collect data from your customers during the booking process. With the integration of Custom Forms responses into Workflows, you can automatically use the data gathered from forms in your automated processes. This enables you to send tailored notifications, update booking statuses, or trigger specific actions based on customer responses.
To Use Custom Forms Responses in Workflows, follow these steps:
Navigate to Workflows
Go to Booknex > Workflows in your WordPress admin panel.

Create or Edit a Workflow
Click Add New Workflow or select an existing workflow to modify.
Use Dynamic Form Data in Workflow Actions
When configuring workflow actions (e.g., Send Email, Send SMS), you can include data collected from the Custom Forms using dynamic variables.

For example, if your form collects customer information like "Customer Name" or "Special Request", you can reference these fields directly in your workflow notifications.
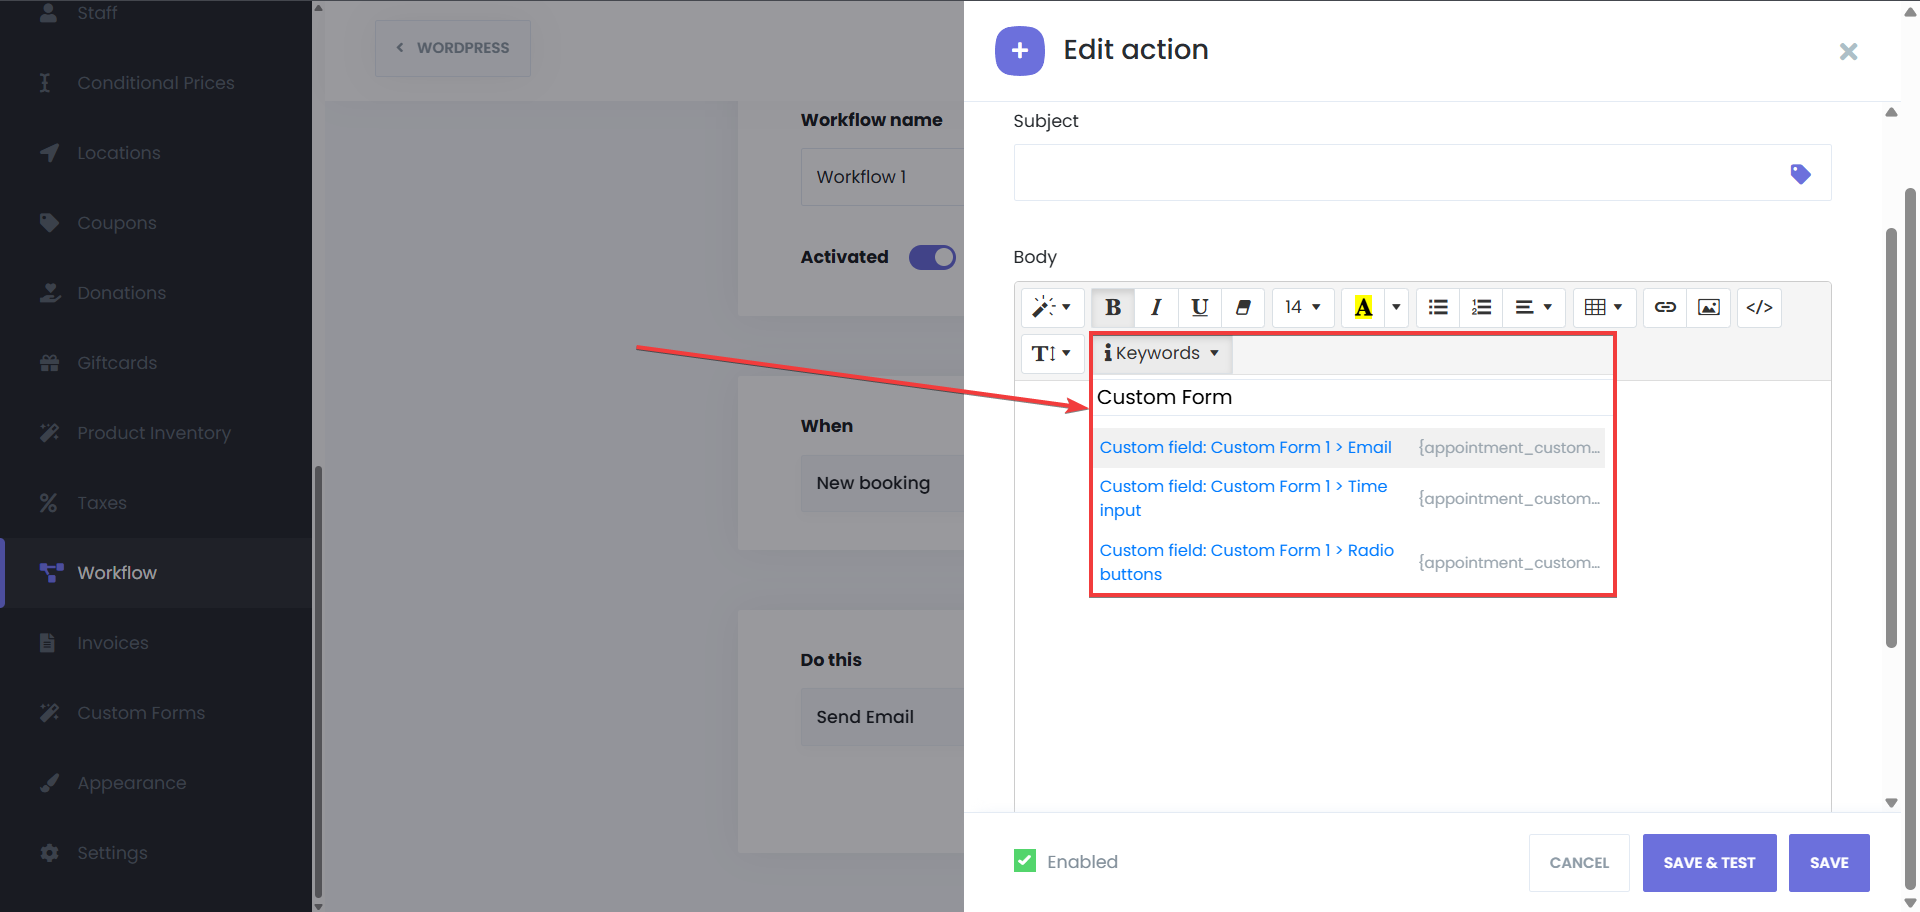
Reports

It is easier to analyze your business with the help of the Reports feature. You can now make a more detailed analysis with the four charts. These charts are the following:
- Reports by the number of appointments: With the help of this chart, you can see what days you accept more appointments, how many appointments you receive on specific days, and you can make comparisons according to the report.
- Reports by appointment earnings: With the help of this chart, you can see what days you earned more, how much you earned and make comparisons according to the report.
- Most earning locations: What locations made more money, and the income from locations will be shown here.
- Most earning staffs: A useful feature to view information such as what staff earned the most income, what staff earned a lot, how much a staff earned. This is also a nice feature to determine the employee of the months.
Also, you can see the weekly, and monthly reports together with daily reports.

Service, location, and staff filters can be applied to see the exact information on graphs.

Custom Appointment Status
Navigate to the Custom Appointment Statuses section
Go to Settings > General Settings > Appointment Statuses.
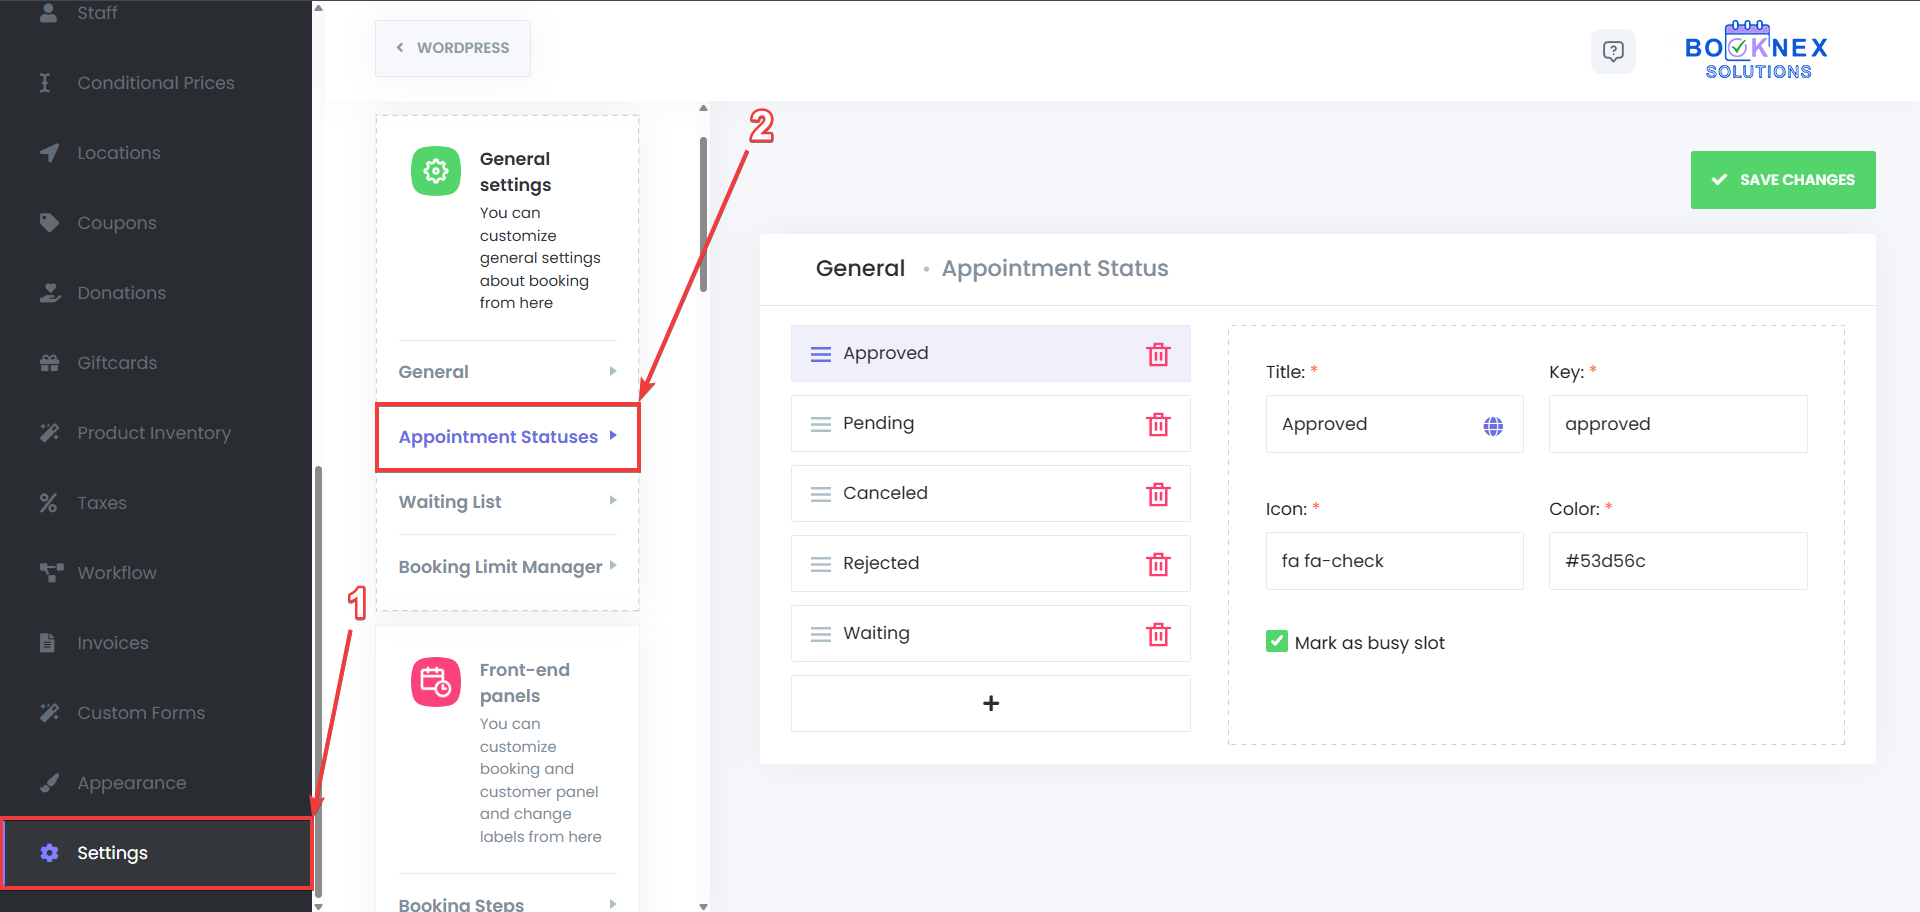
Creating a New Custom Appointment Status
Add a New Appointment Status
Click the ➕ button to create a new appointment status.
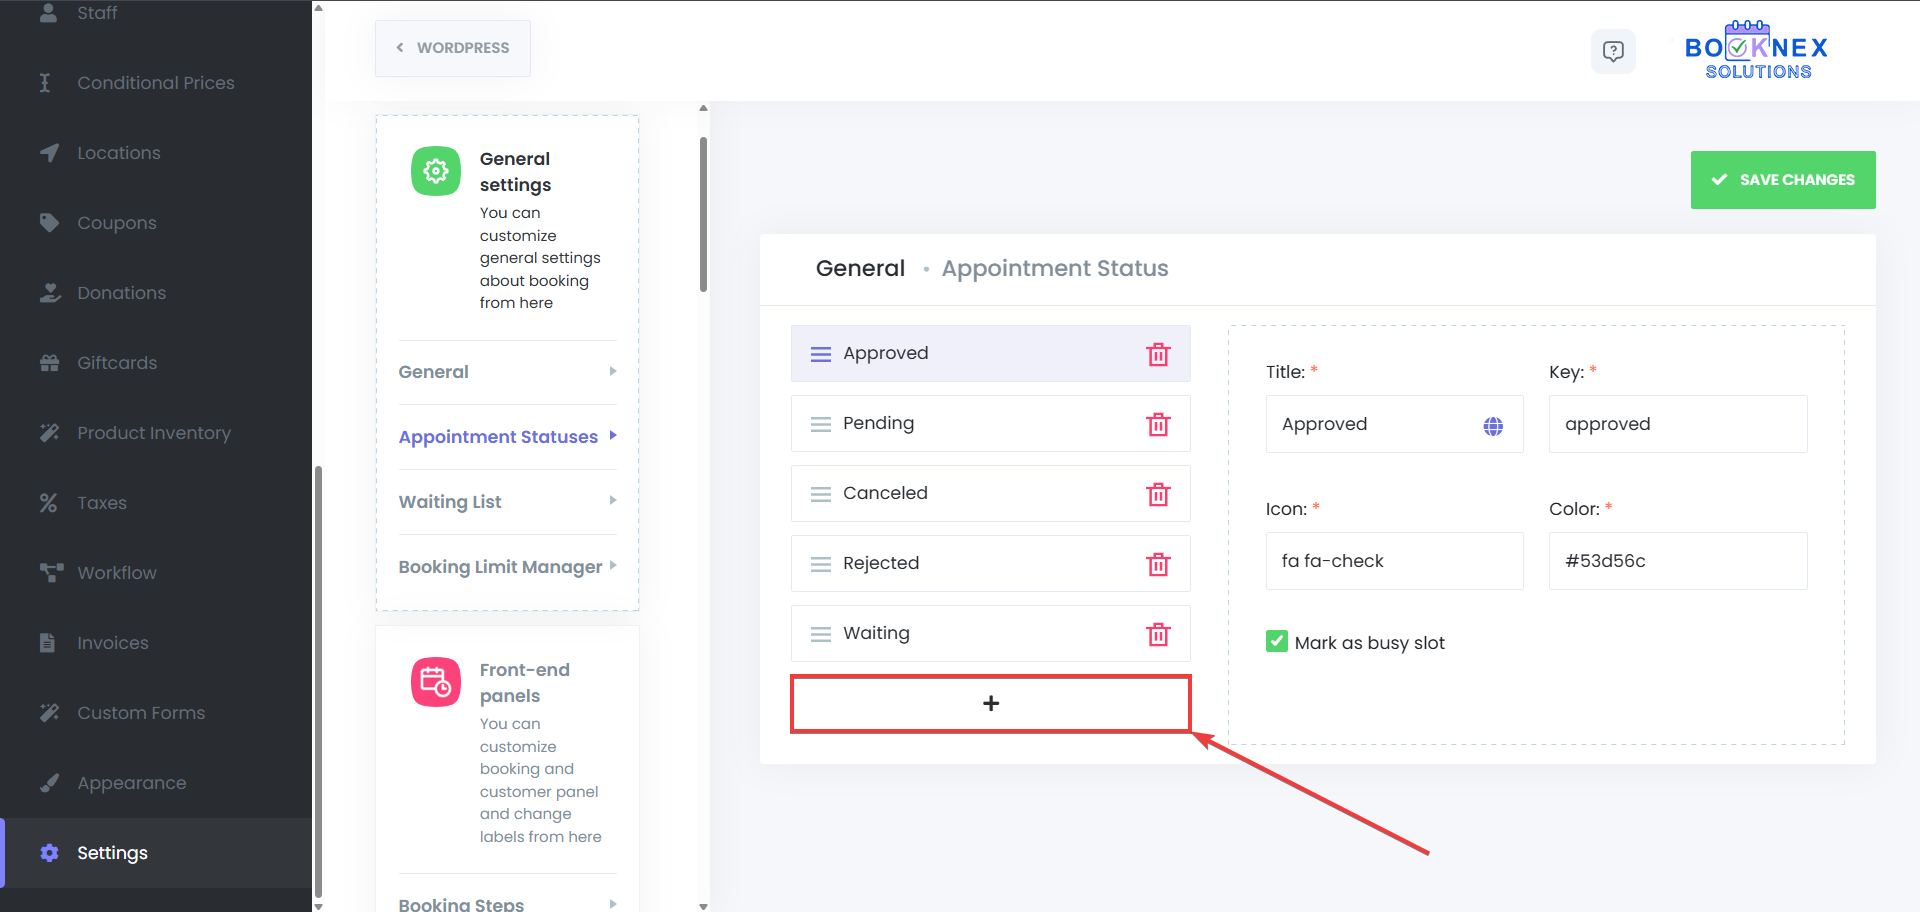
Enter a Title for the status (e.g., "On Hold", "In Progress", "Cancelled").
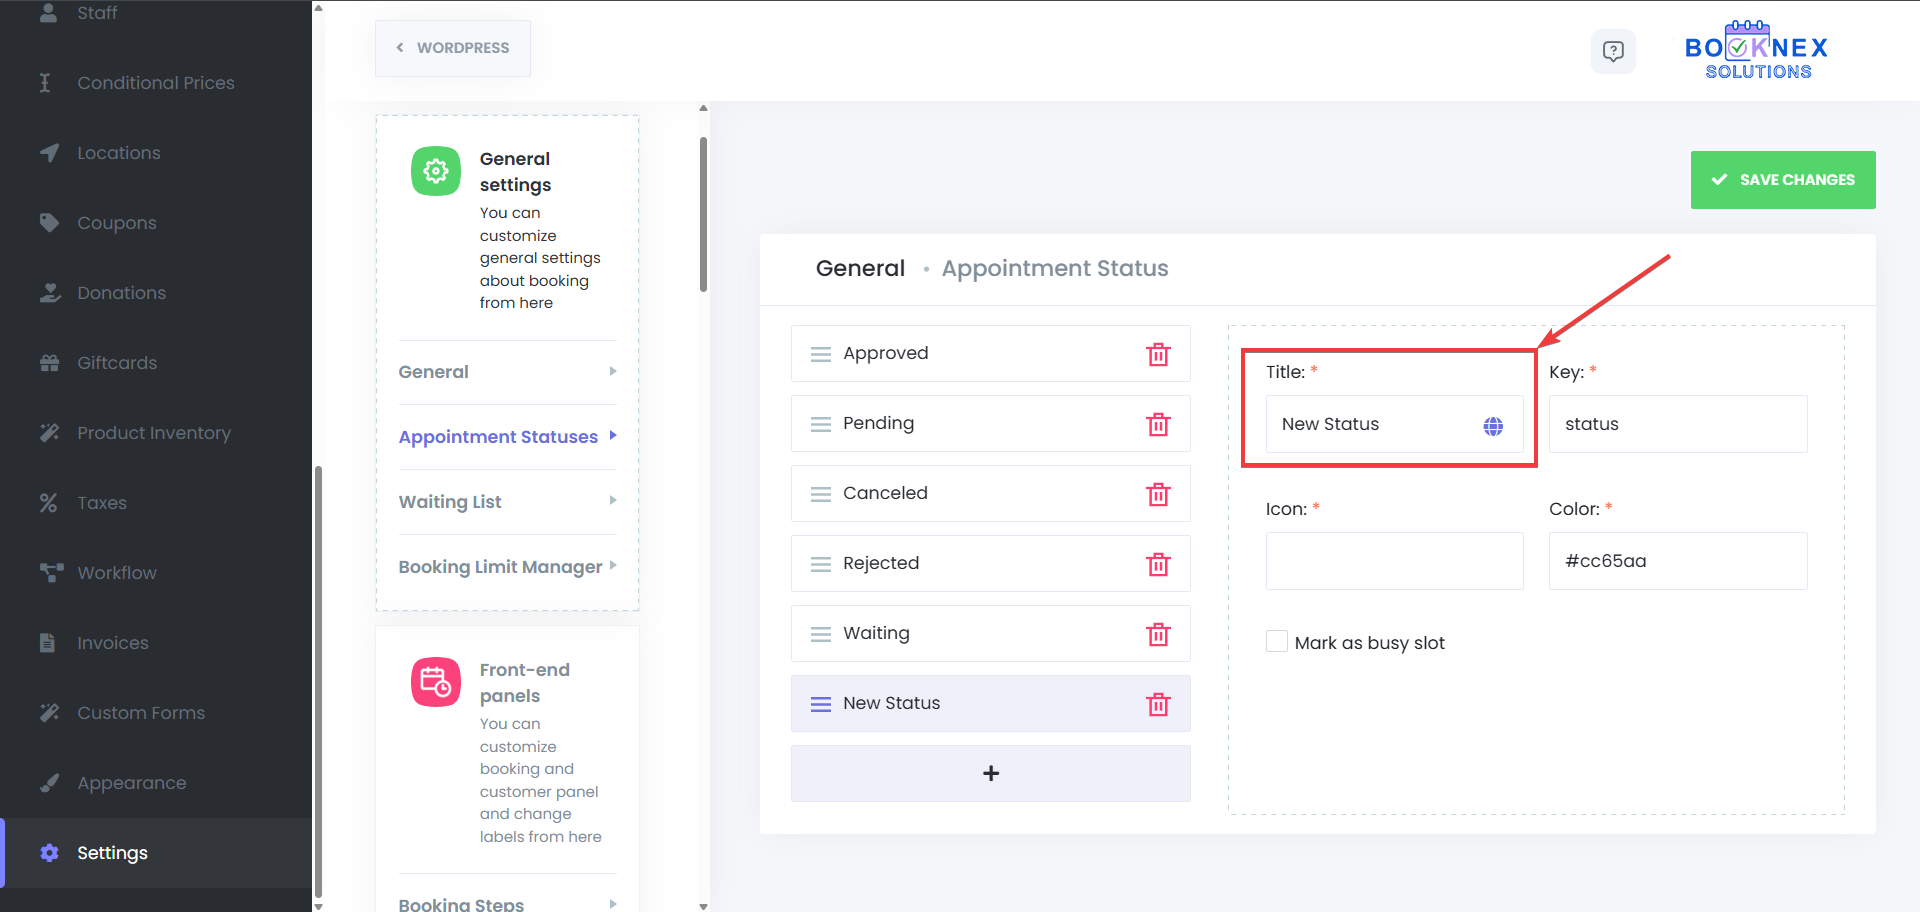
Customize the Status Appearance
Icon: Choose an icon for the status from the FontAwesome library. Icons help easily distinguish between different appointment statuses.

Color: Select a color to represent this status in the calendar and throughout the interface.

Mark as Busy Slot: If enabled, the status will occupy a time slot on the calendar (e.g., a status like "In Progress" could block the timeslot).

Save the New Status
After configuring the status, click Save to finalize.

Managing Existing Appointment Statuses
Edit an Existing Status
To modify a status, go to the "Appointment Statuses" menu in the settings and then select the status that you want to edit. After making the changes, click Save.
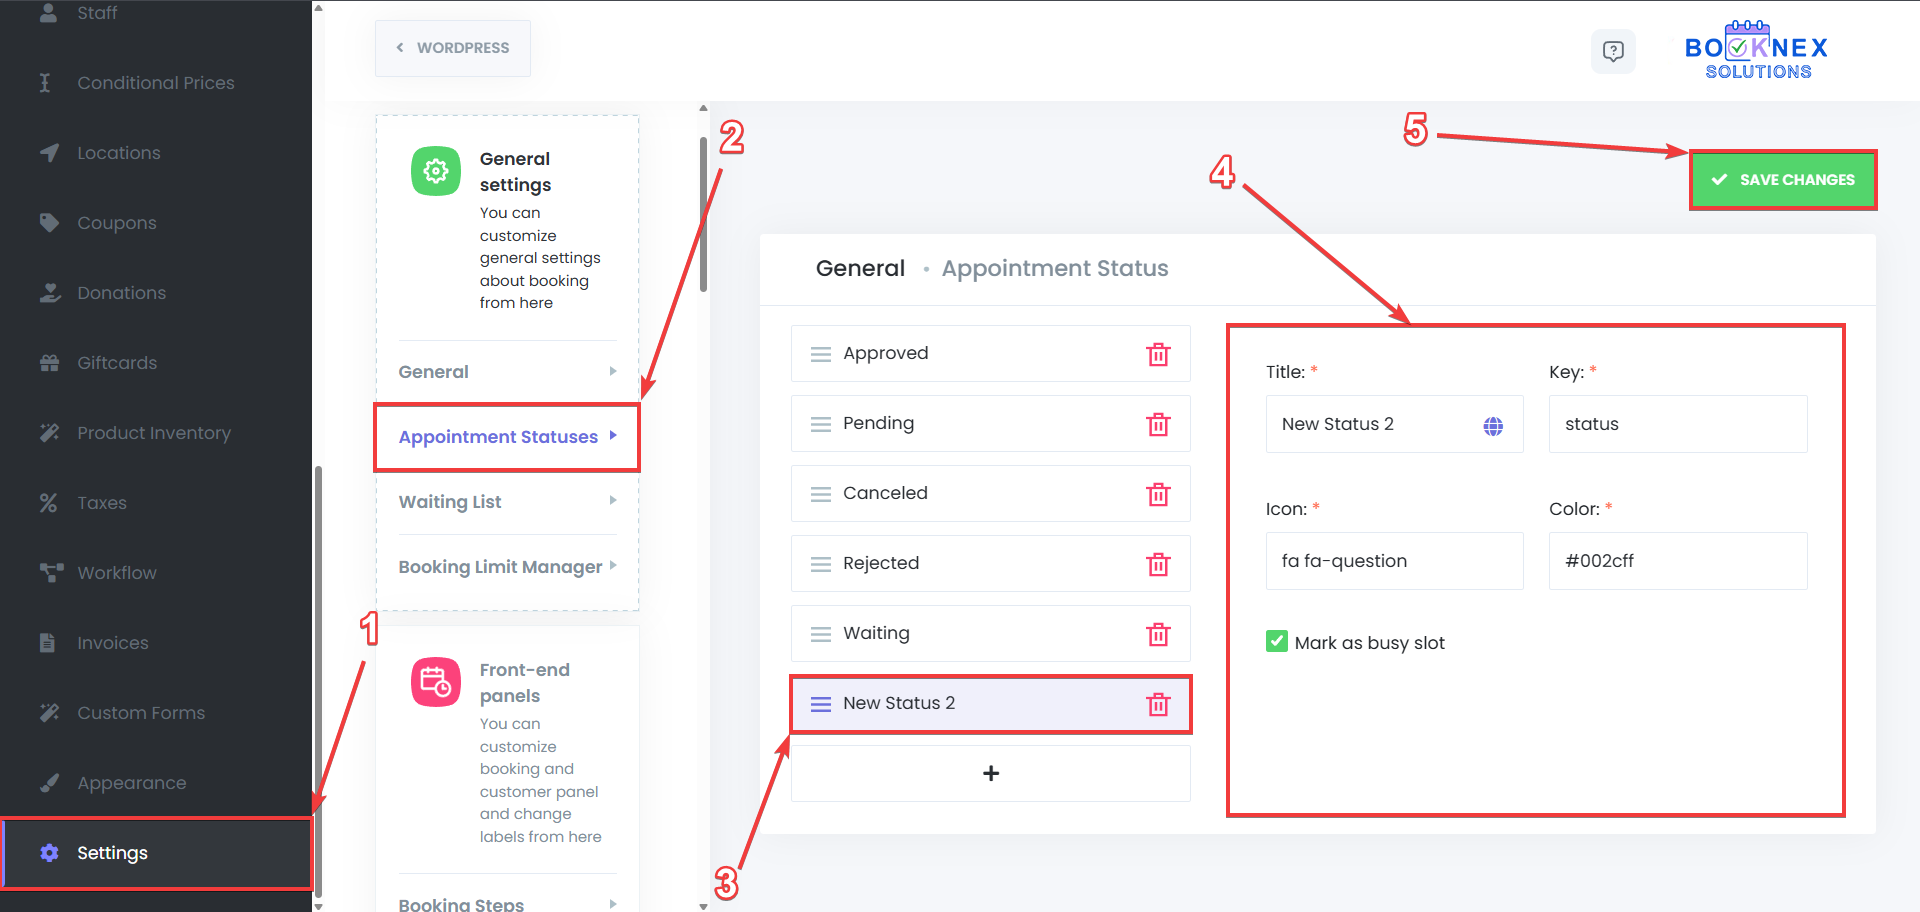
Delete a Status
To remove a status, click the trash bin icon and select Delete. Confirm the deletion to remove the status from your system.
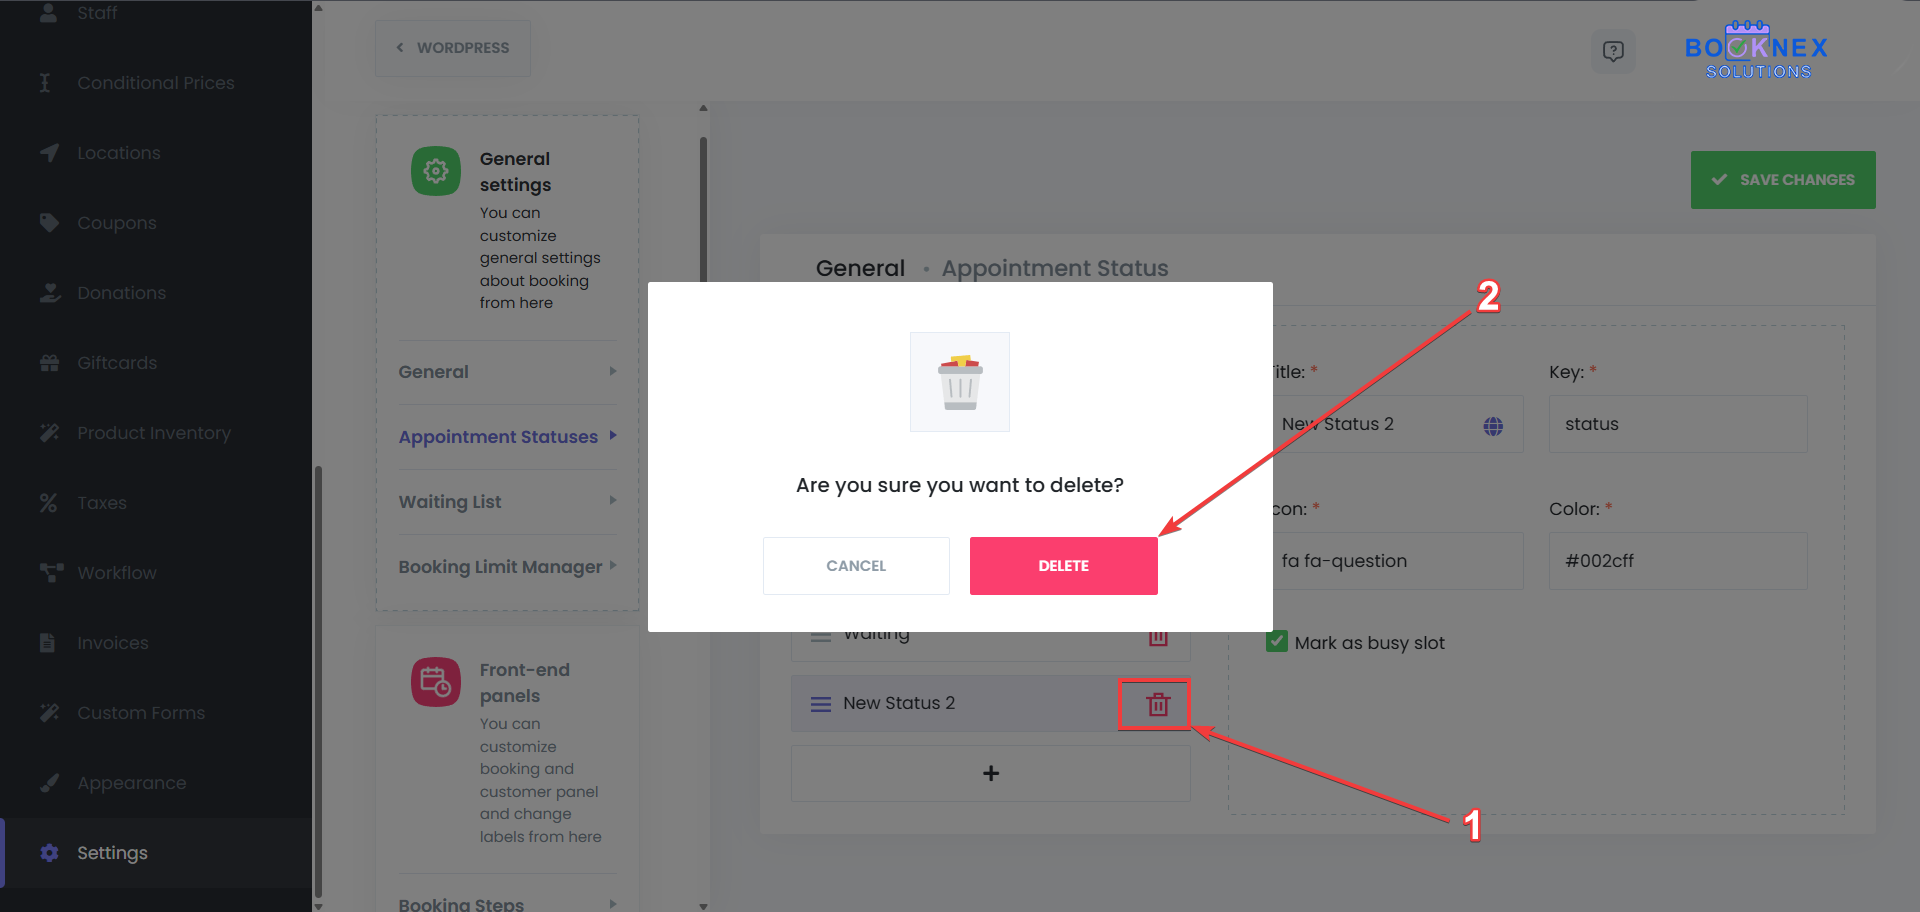
Default Appointment Statuses
Previously, there were only four default appointment statuses in Booknex. With the Custom Appointment Statuses add-on, you now have the ability to modify, delete, or completely replace those default statuses to better fit your business needs. You can use your custom appointment status as default appointment status by going to Settings > General Settings > General > Default appointment status:
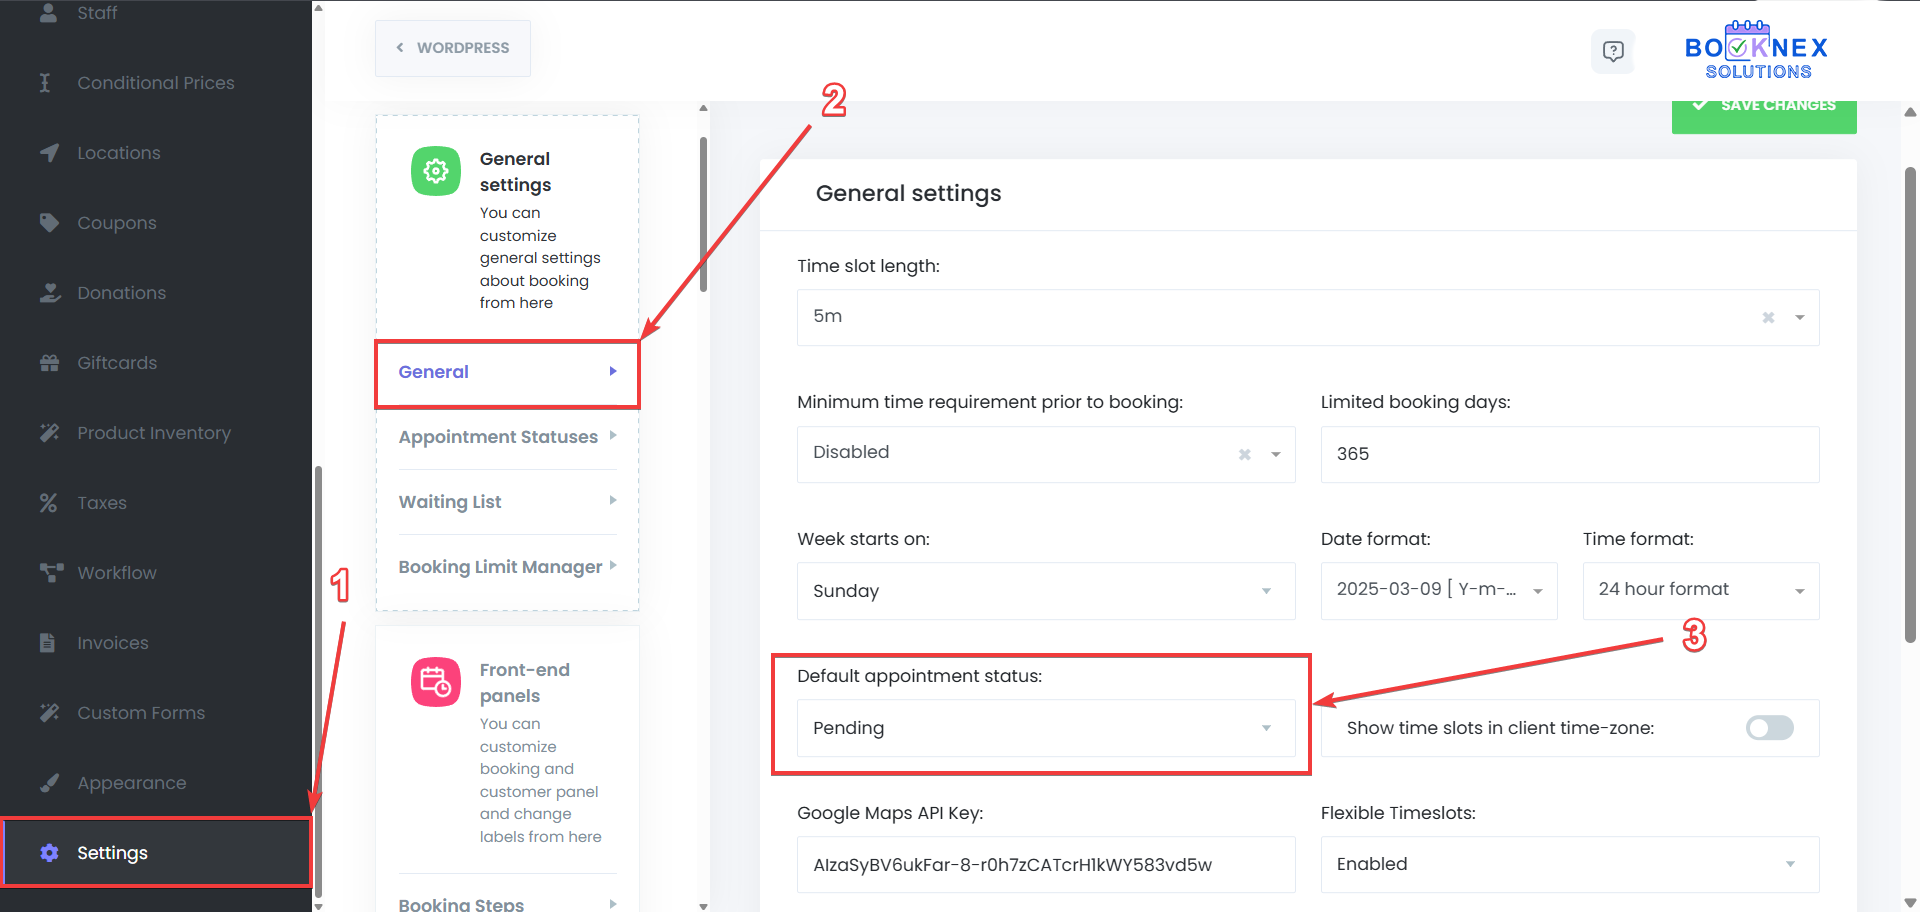
After doing so, click on the Save changes button on the top-right side to save your new default appointment status change.
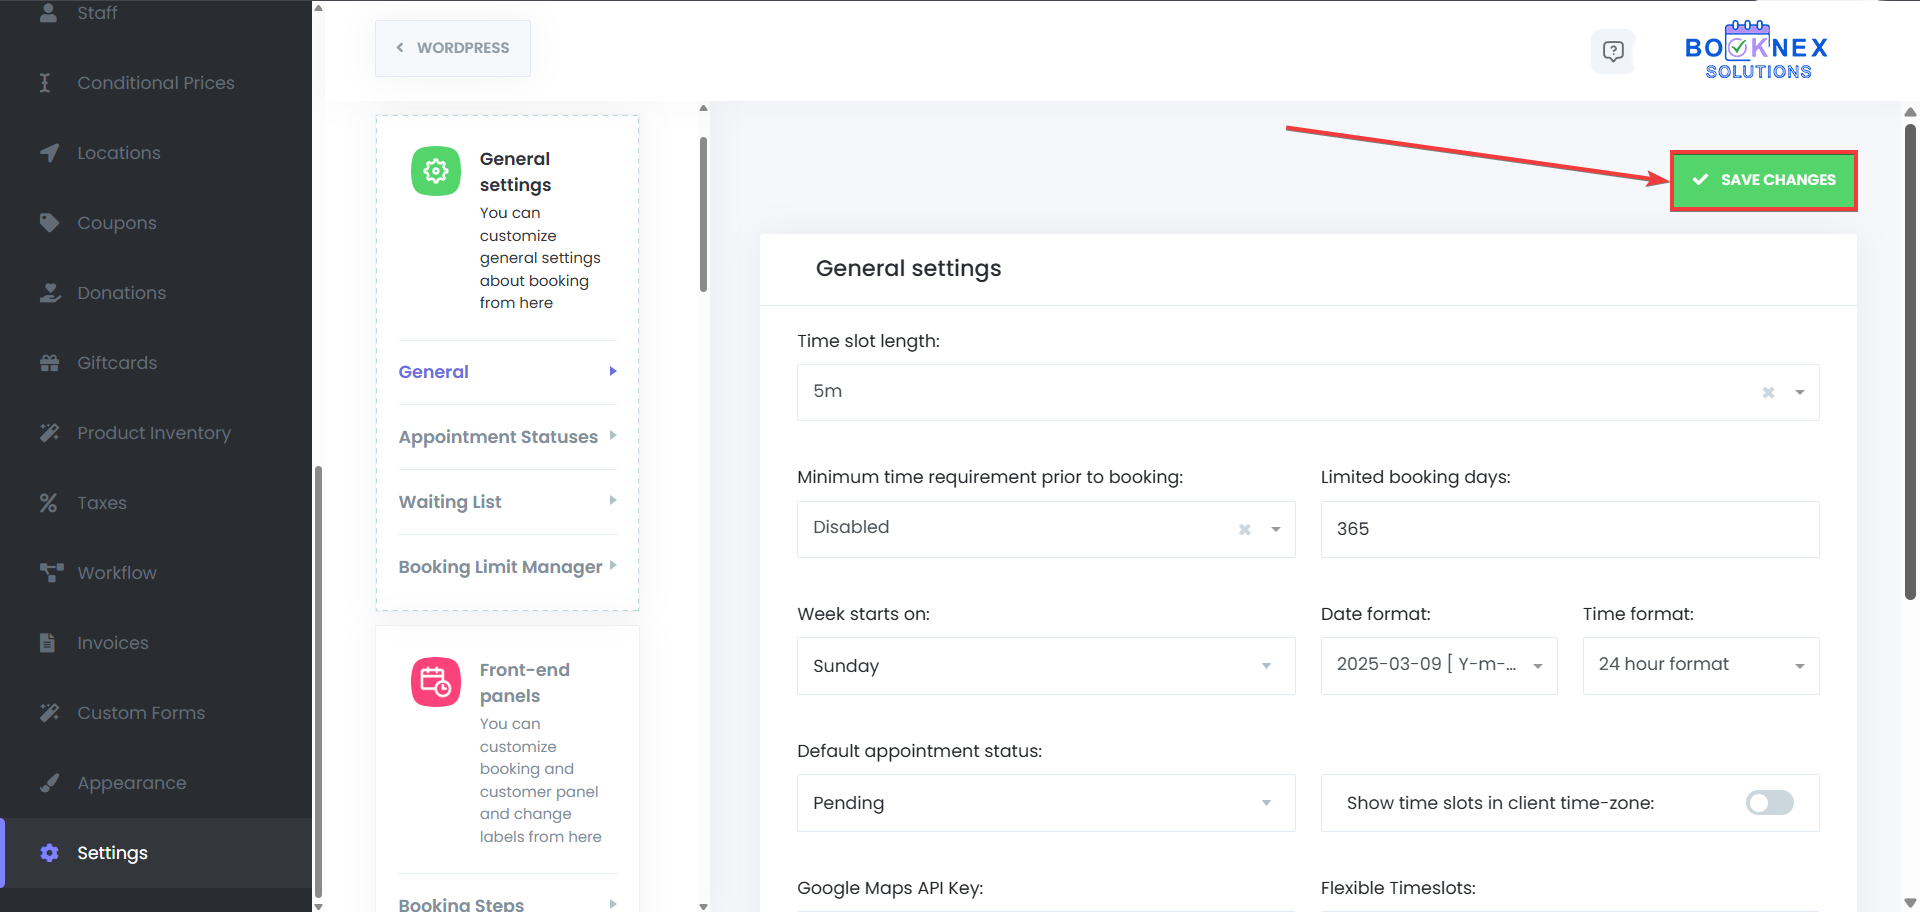
It is also possible to use your custom statuses for the customer panel, to determine the rules for your customers based on the appointment statuses. To use the custom statuses in the customer panel settings, go to Settings > Front-end panels > Customer Panel > then select the custom status for "Customers can change appointment status to" option, or the "Customers can reschedule with these appointment statuses" option based on your preferences. After that, click on the Save Changes button on the top-right side of the page to save your changes.

Using custom statuses for the workflow filters
As it is possible to use the default appointment statuses for filtering the workflows (to determine of the workflow will be used based on the appointment status), it is also possible to do so with the custom appointment statuses. To set it up:
Go to the Workflows tab

Edit an existing workflow, or create a new workflow
Make sure that the Event is related to an appointment so that it is possible to set appointment status filter to that workflow.
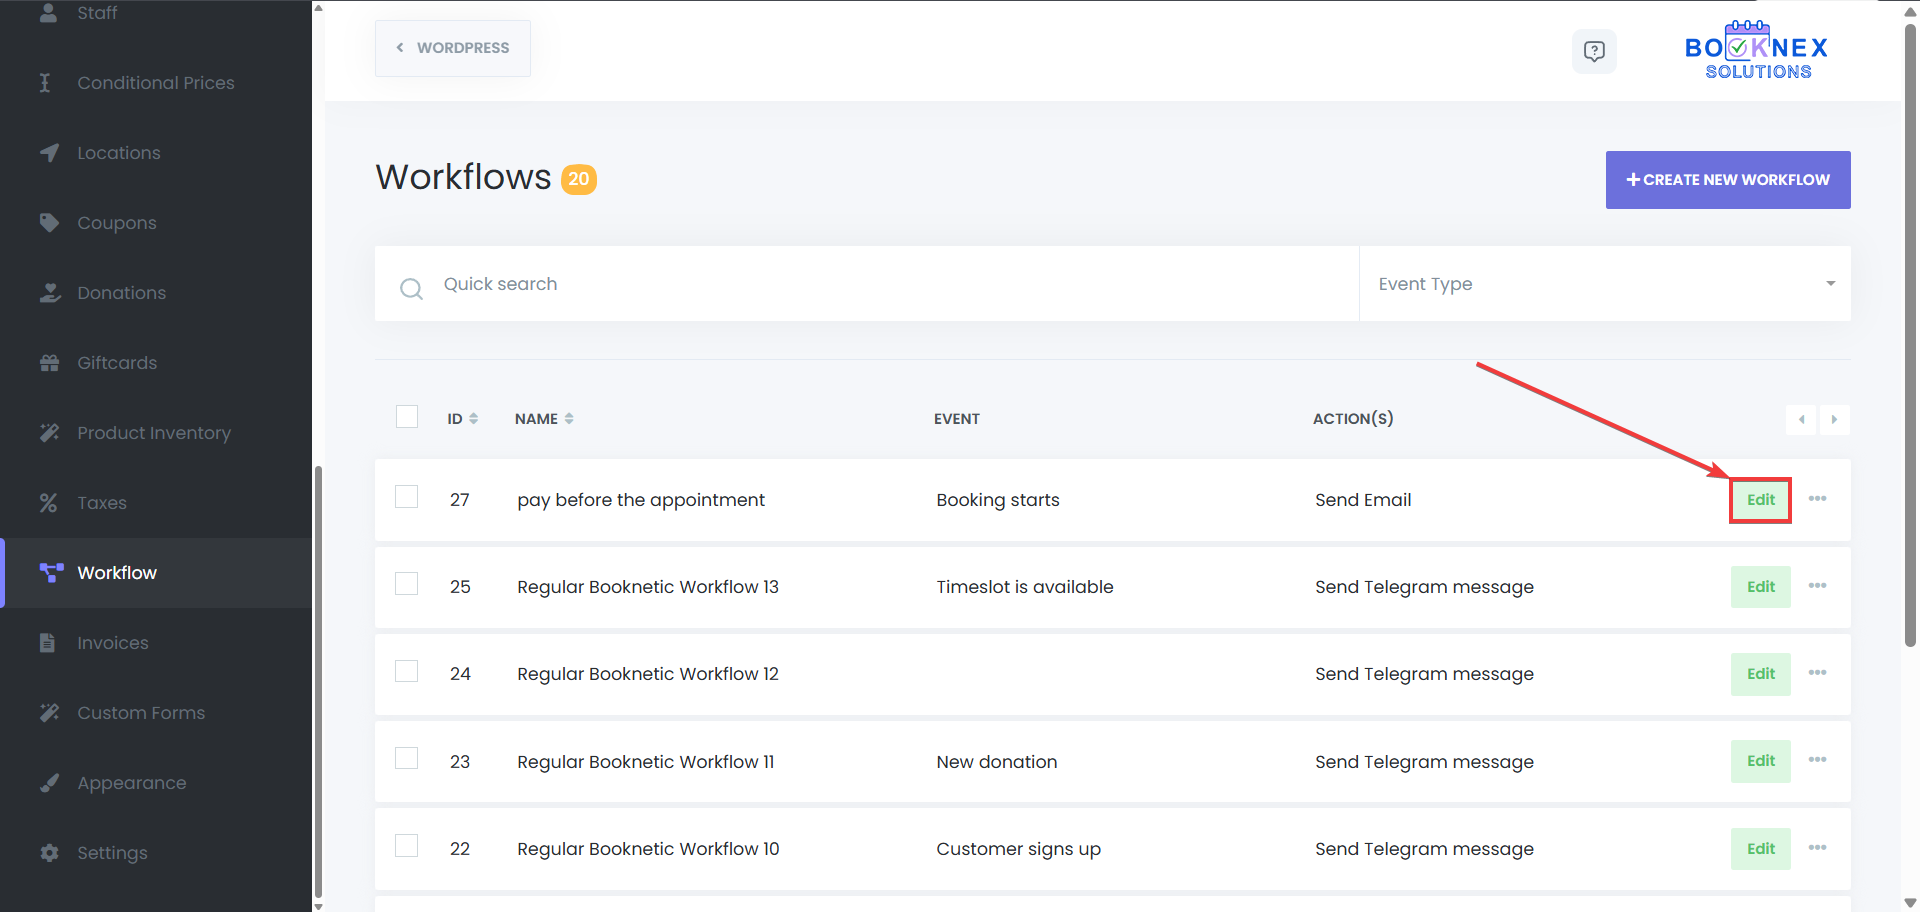
Edit the event/trigger of the workflow
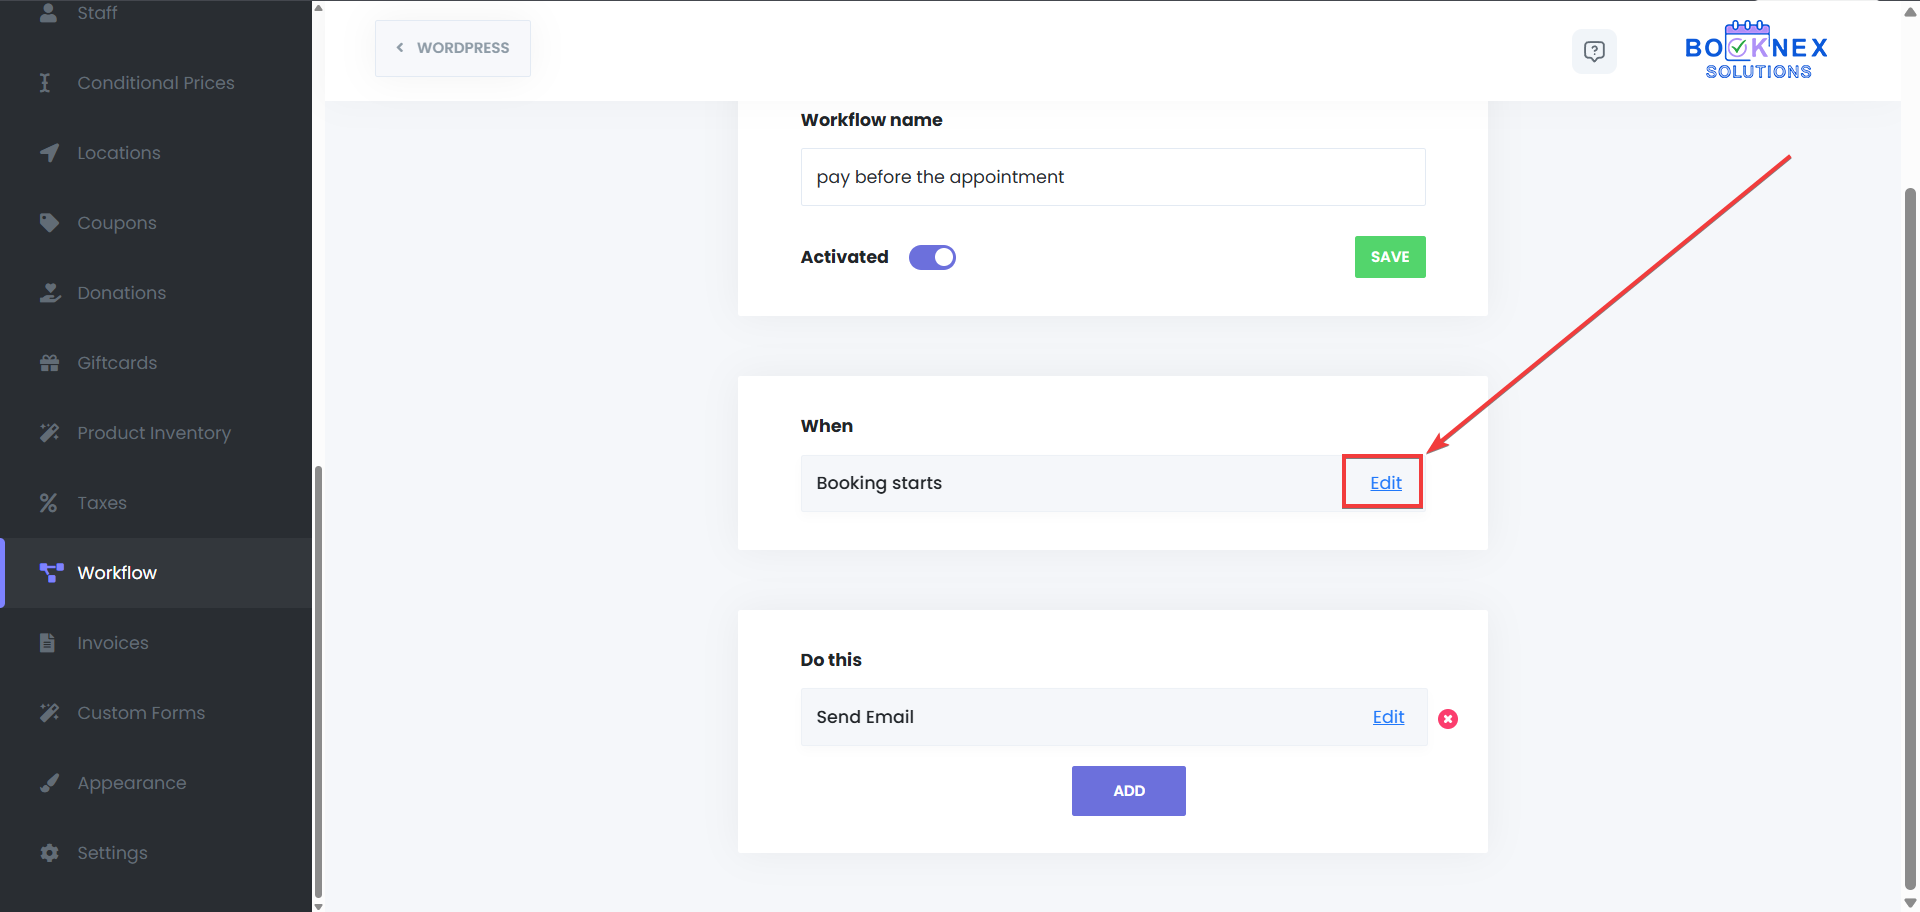
Use your custom appointment status in the Status filter section

Adding a new appointment with custom status from the admin panel
When your customers use the booking panel to book an appointment, their appointment will get a status based on your settings, however, when you add a new appointment using the Appointments menu, or the Calendar module, you will be able to use any of the statuses you have for that appointment. To use the custom statuses in the mentioned way:
Go to the Appointments menu, or the Calendar module, and click on the New Appointment button

Select the custom status that you want to use from the status list

Fill in the other necessary details, and then click on the Save button to add the appointment
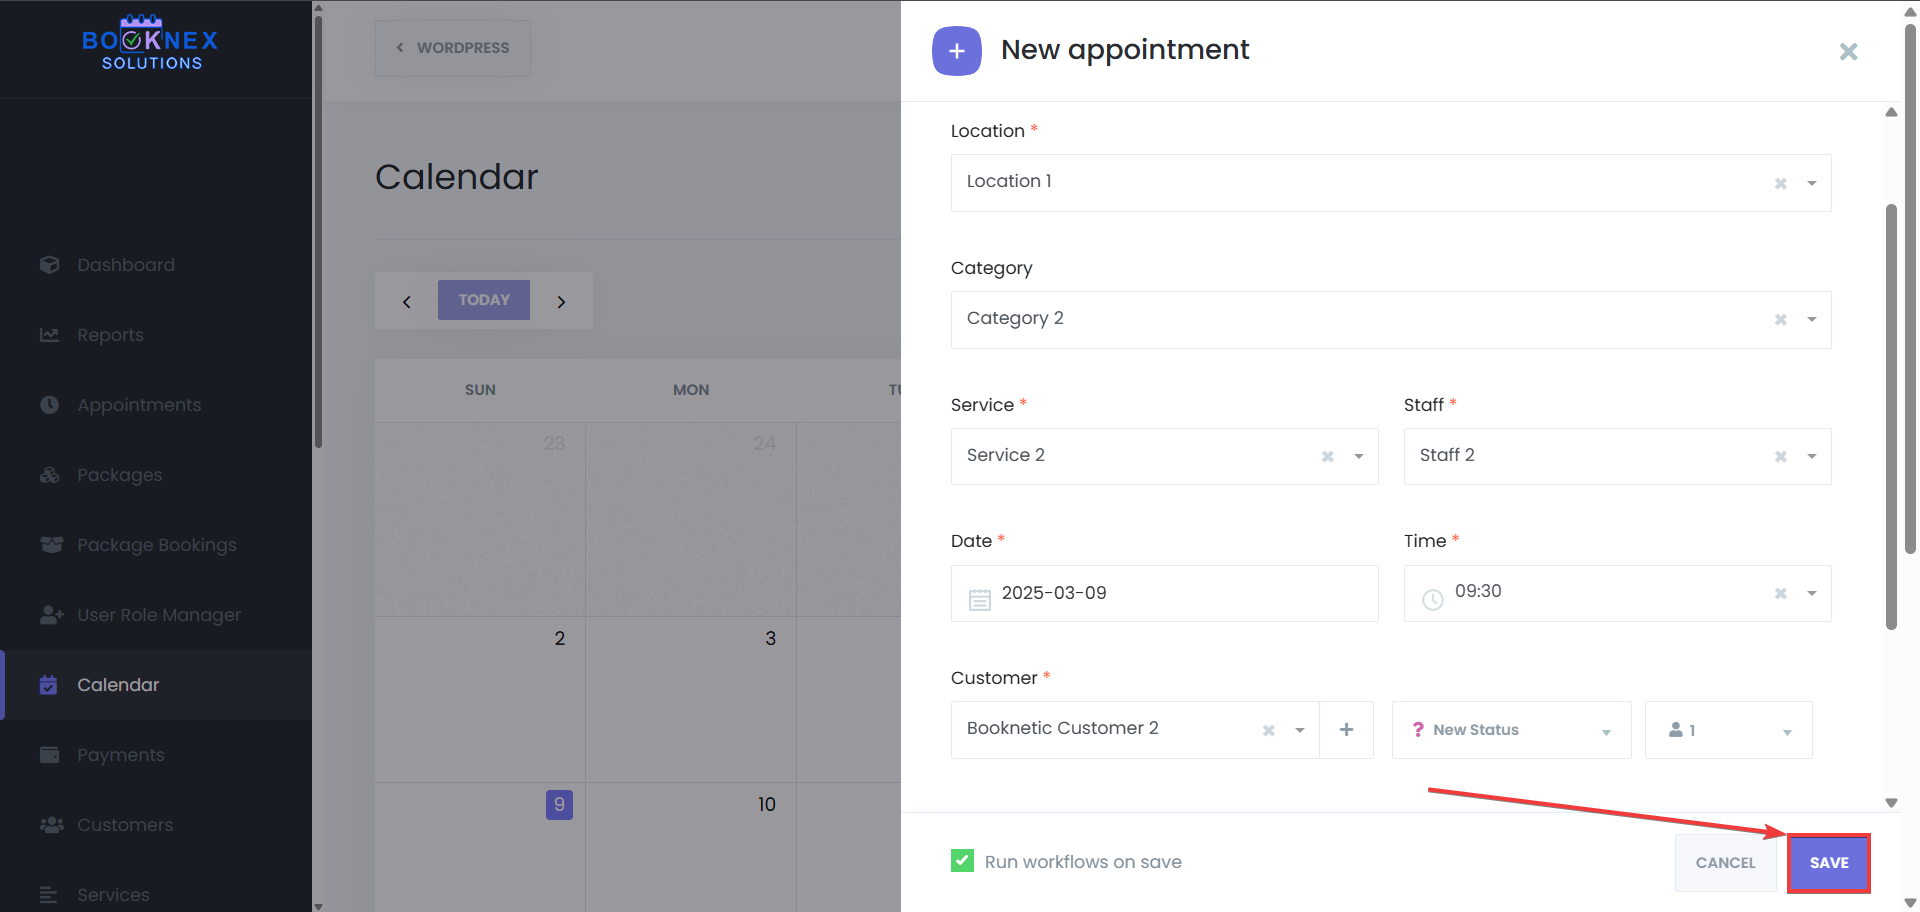
Benefits of Custom Appointment Statuses
- Personalization: Tailor appointment statuses to match the unique needs of your business.
- Efficient Scheduling: Better manage appointment availability by marking specific times as "Busy" or "On Hold".
- Improved Organization: Clearly differentiate between different appointment stages or conditions with customized icons and colors.
User Role Management
Go to Booknex > User Role Manager
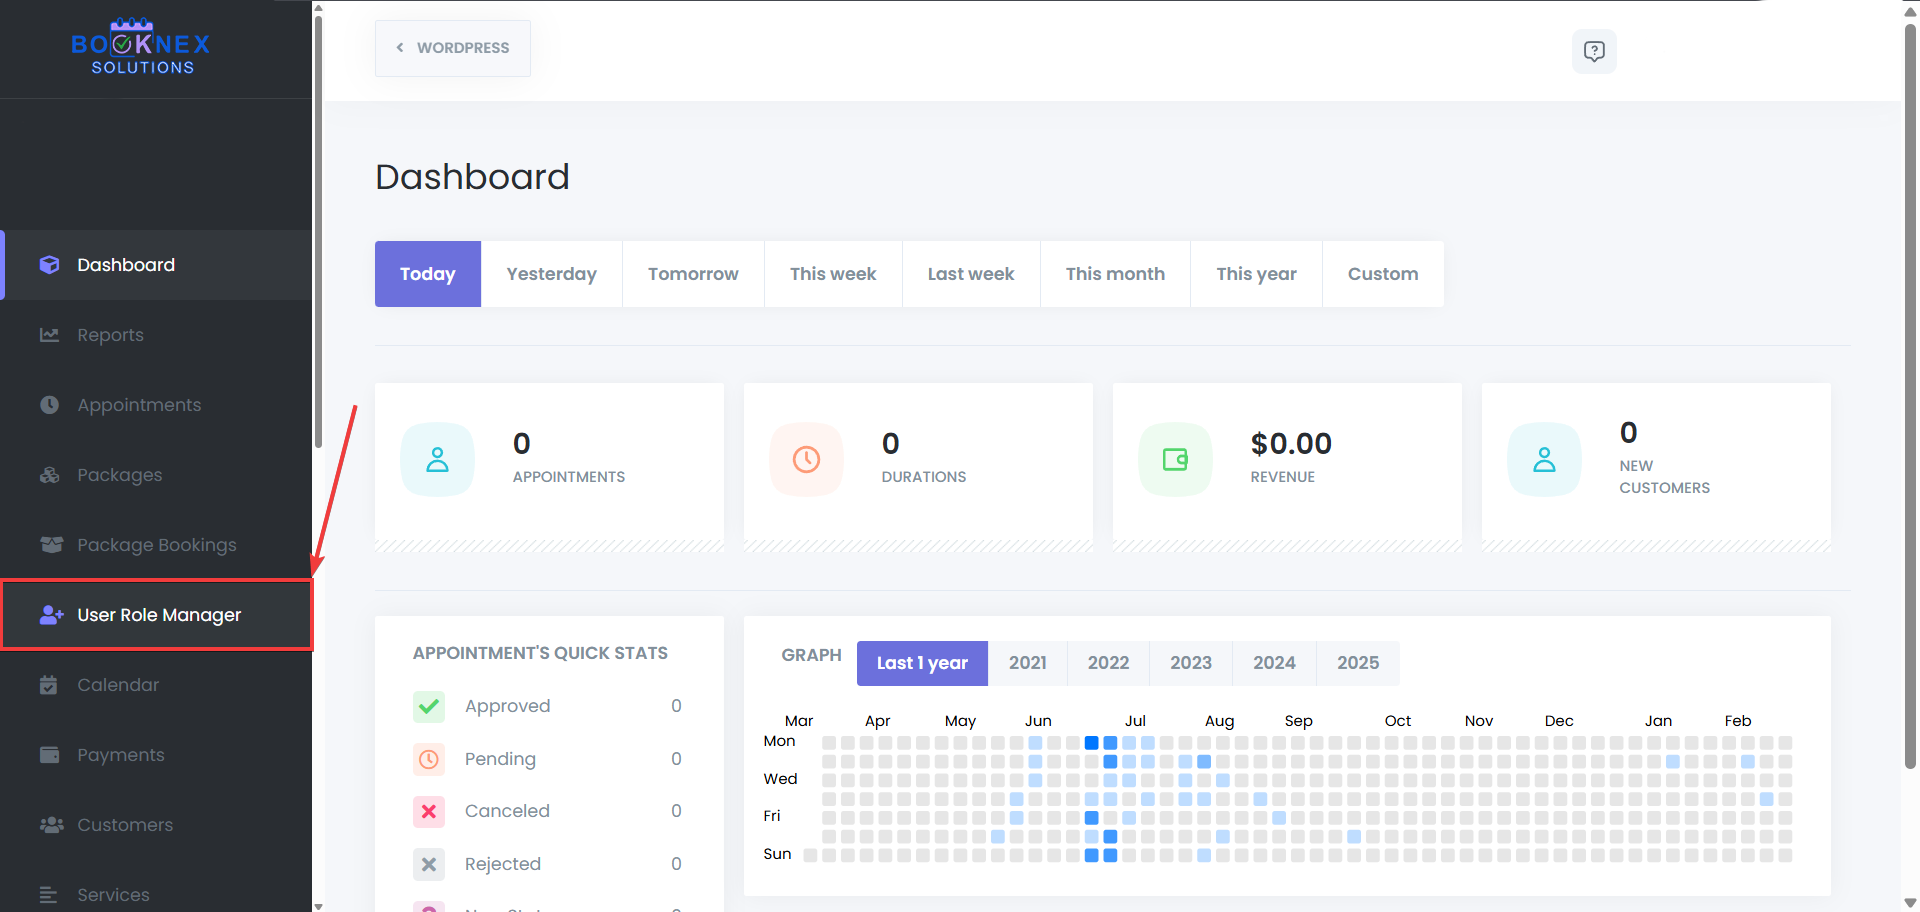
Creating and Managing Roles
Create a New Role
Click Add New Role to create a new custom role and assign them to your staff.

Enter the role's name (e.g., "Manager," "Receptionist").
Select the staff that this rule will be applied to.
Add notes to the role, if needed to clarify its purpose, or for any other reason.

Set Permissions
After creating the role, set specific permissions for the staff under this role. You can set 3 status per permission set such as "Appointments module". If the option "none" is selected, it stops the staff with this role from having that permission. If the option is "My", they can have limited access, which is set by their role. And lastly if the option "All" is selected, then those staff will have full access permission, and they will also be able to access other staff's data and manage them. You can control access to various core modules, or additional purchased add-ons such as:
Appointments: Allow the staff to view, edit, or manage appointments.

Customers: Control whether the staff can access customer data.
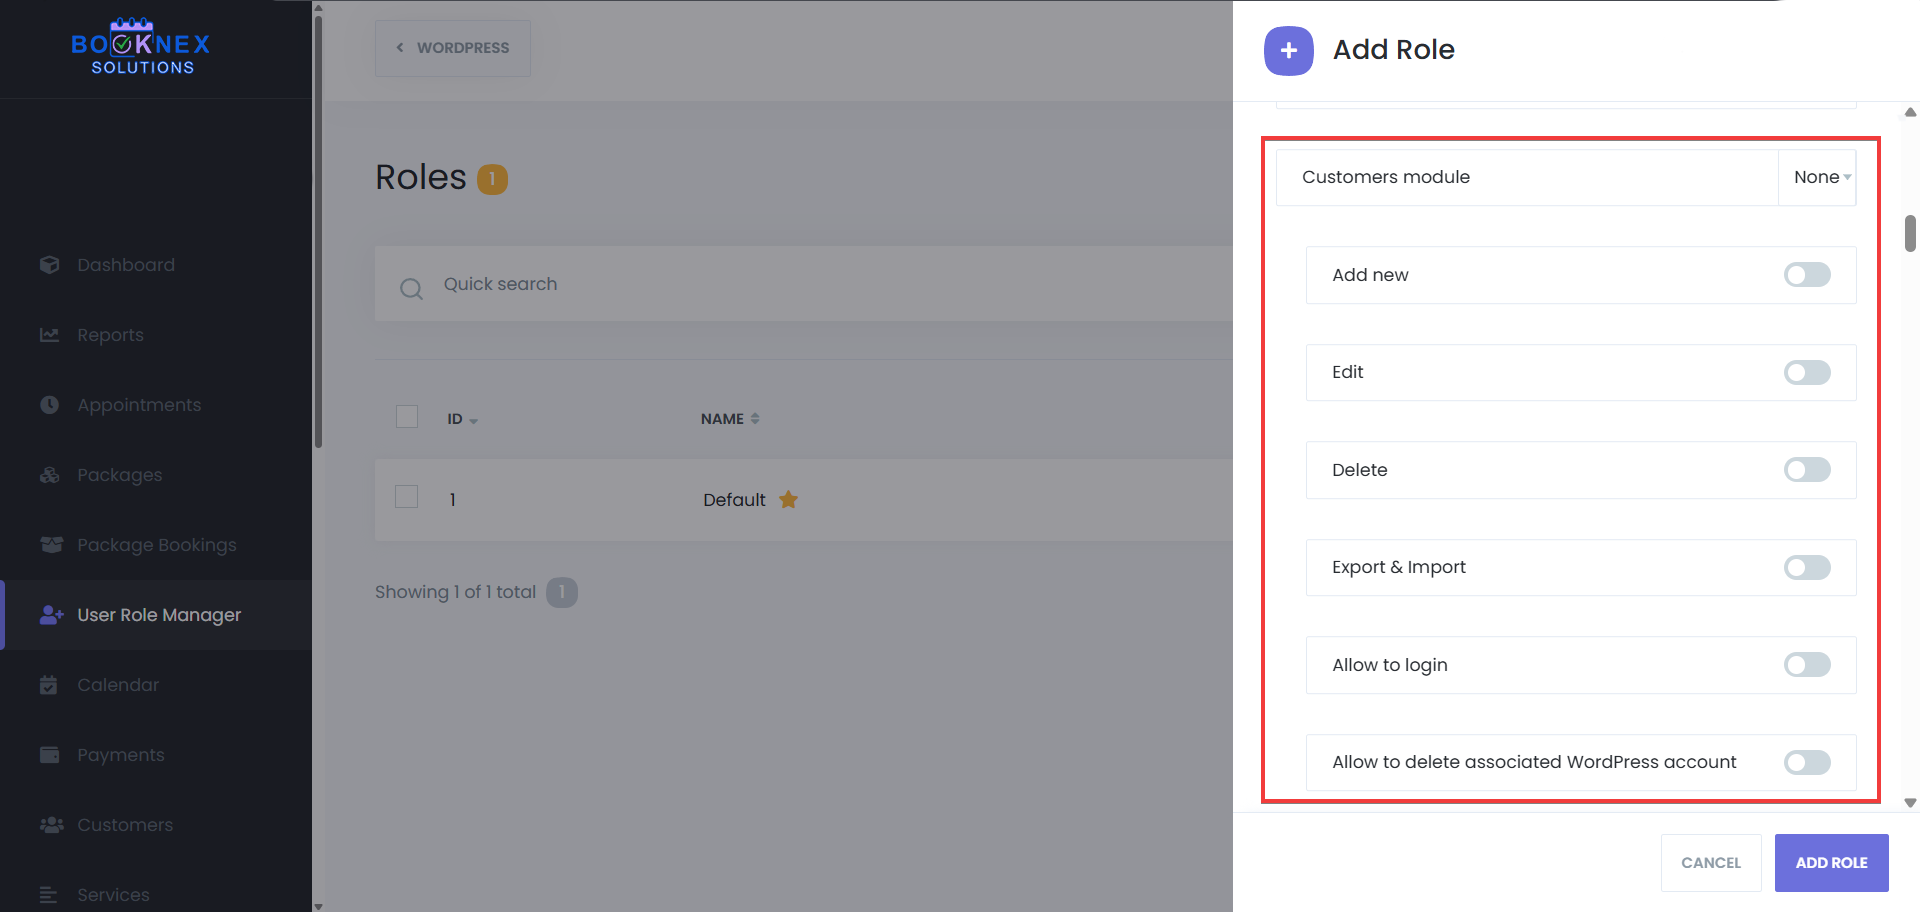
Reports: Restrict access to reporting and analytics.
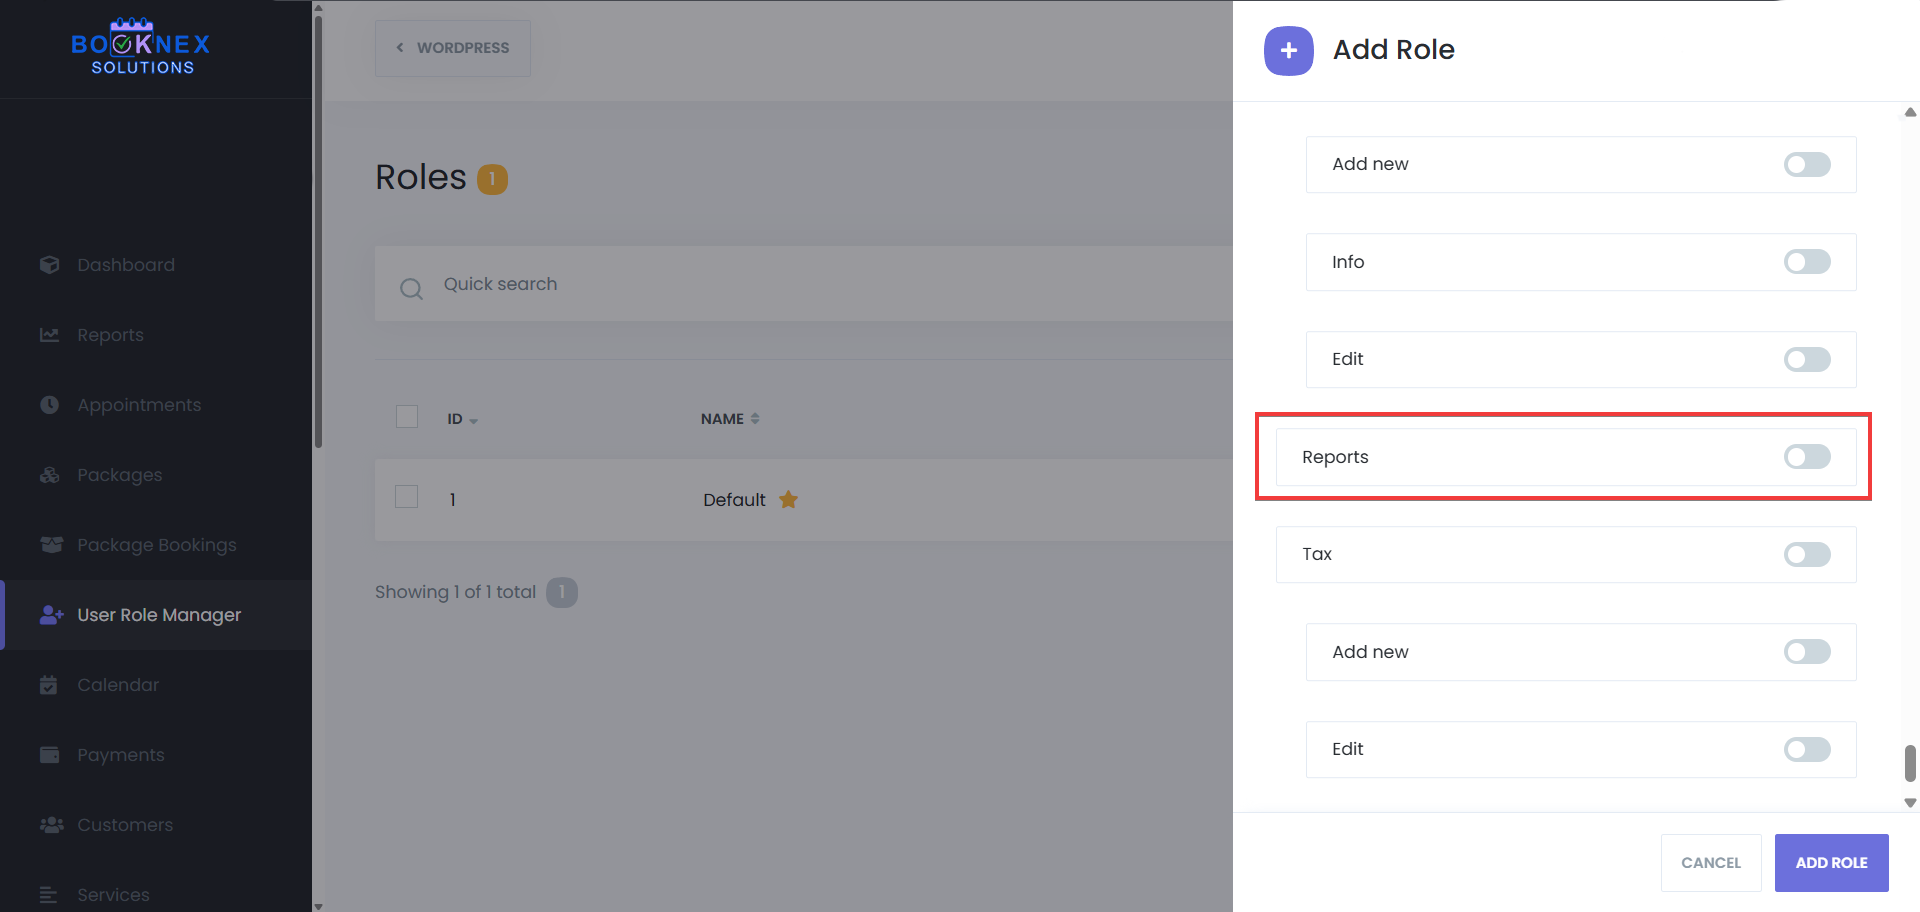
Save the Role
After configuring the permissions, click Save to apply the changes.

Managing Existing Roles
Set as default
Click on the three-dot menu next to the role you want to modify and select Set as default.

This will make sure that the new staff profiles will get the permission set in the role you've set as default.
Edit a Role
Click on the three-dot menu next to the role you want to modify and select Edit.

Update the role permissions and click Save to apply the changes.

Delete a Role
To remove a role, click the three-dot menu and select Delete.
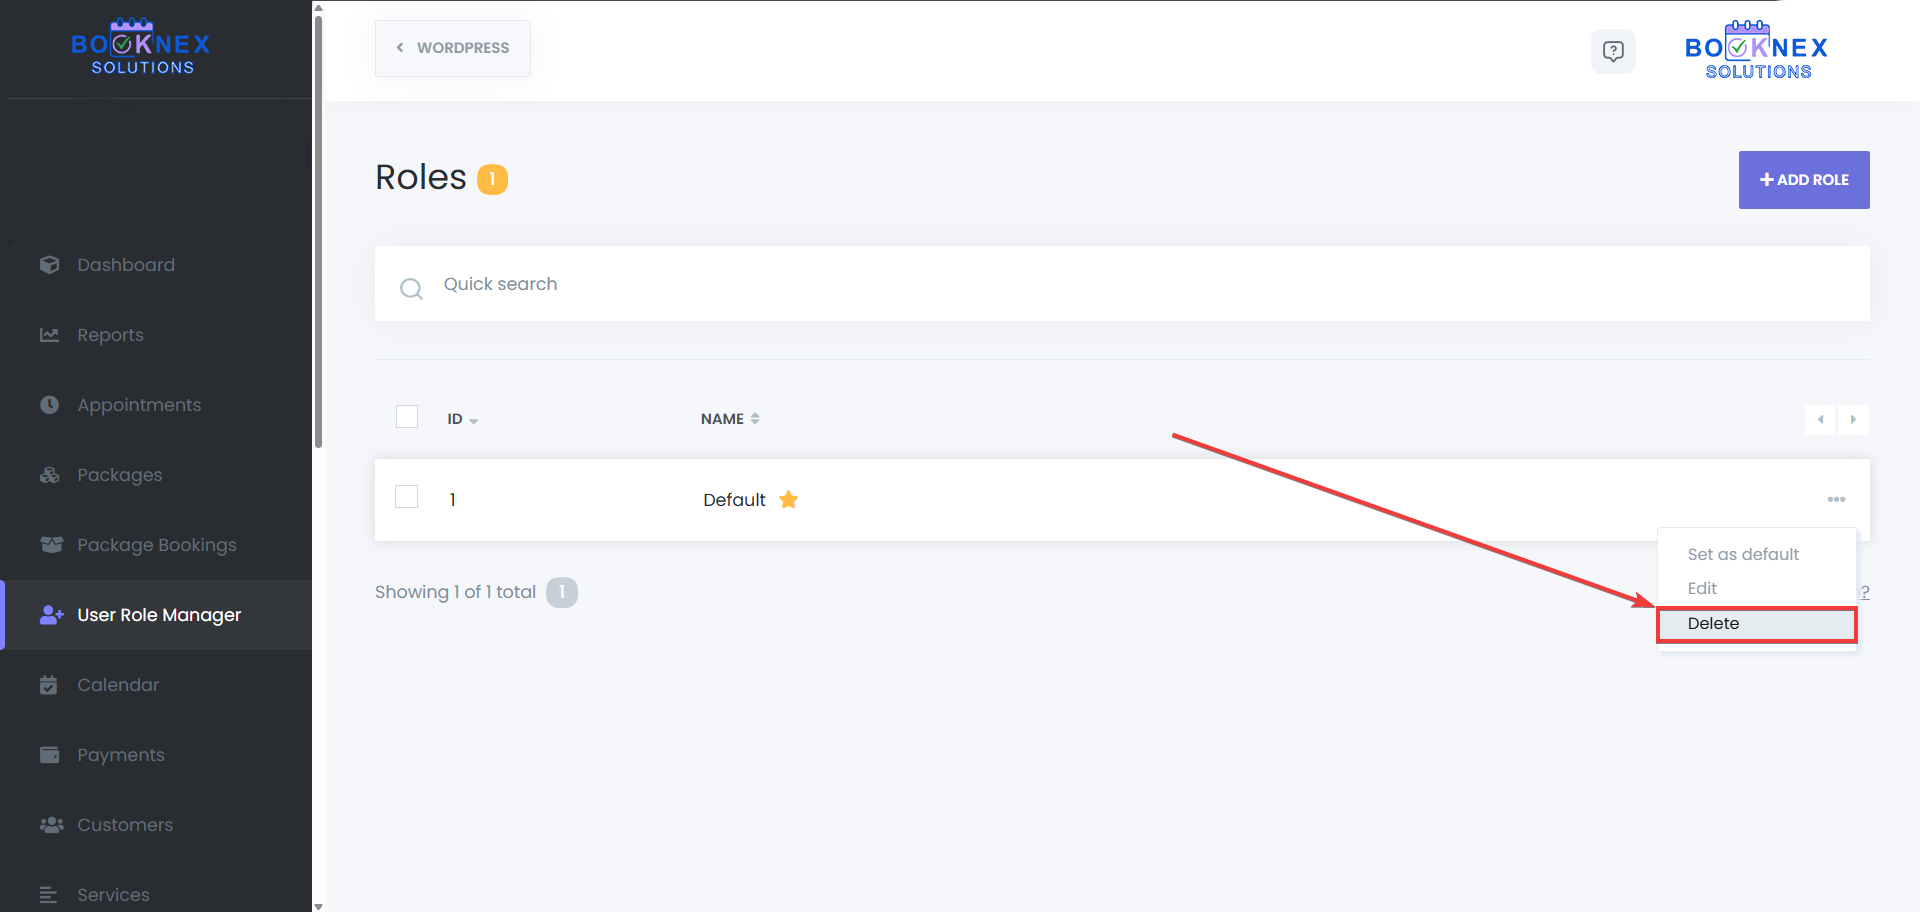
Confirm the deletion to remove the role from the system.
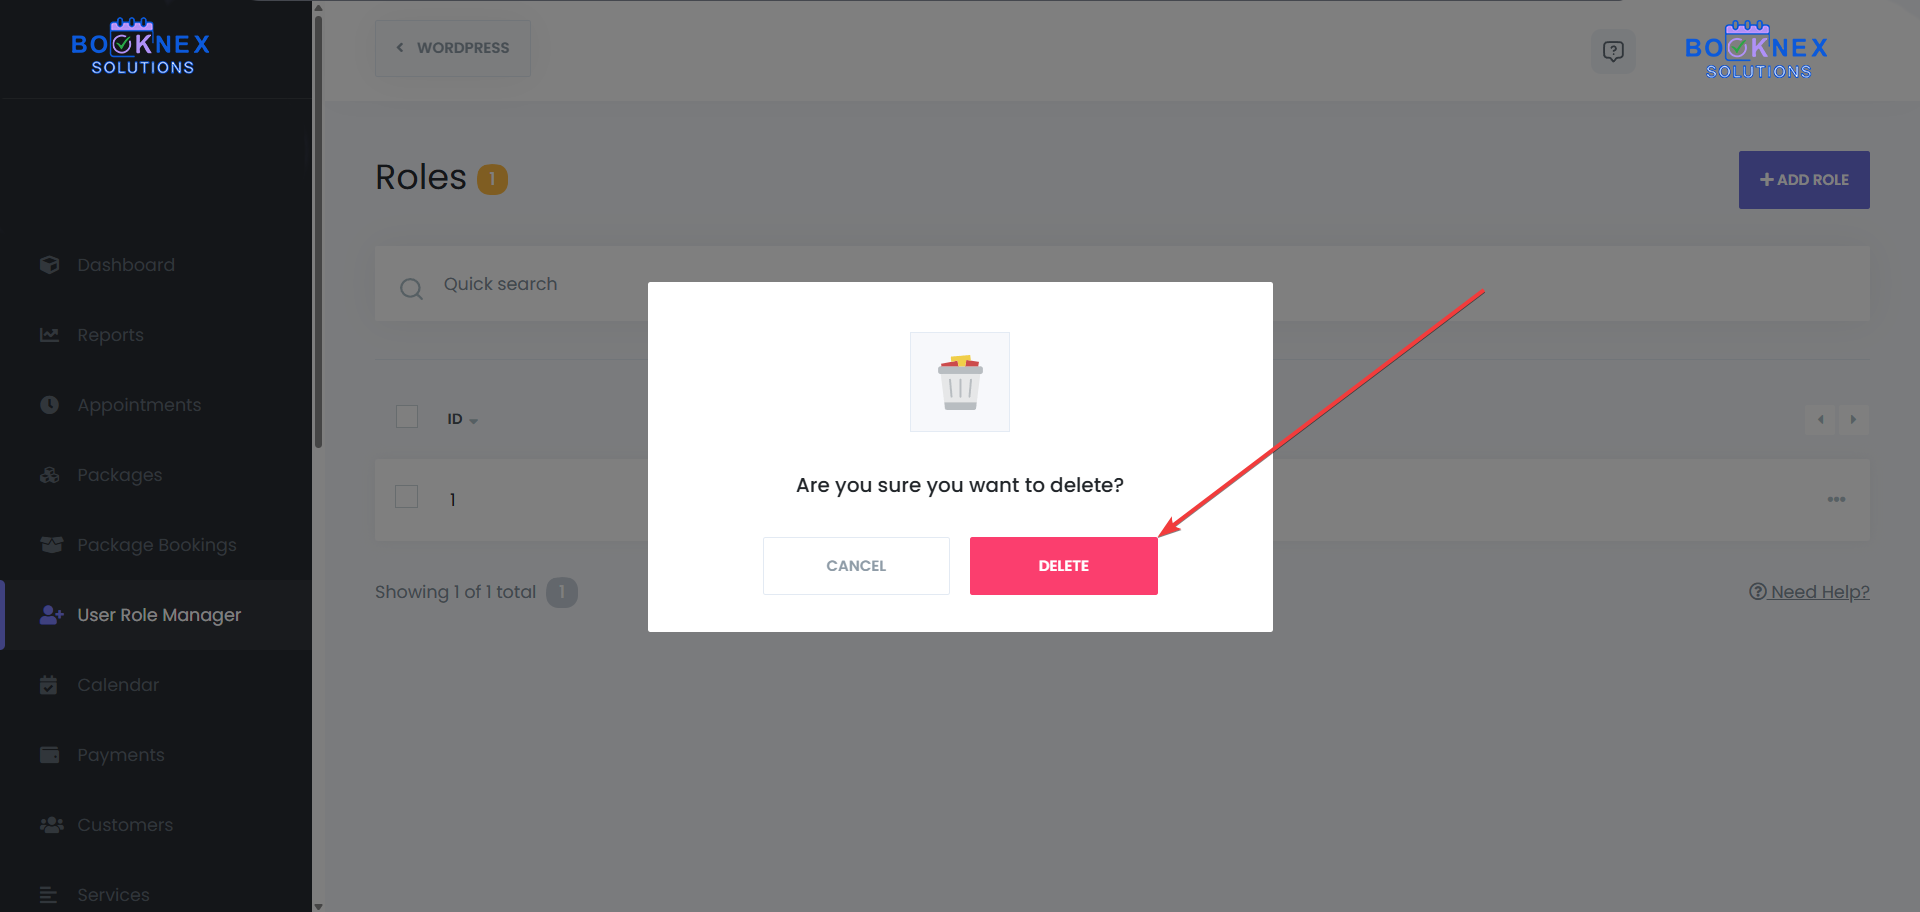
Bulk delete the Roles
To remove roles in bulk, click the checkbox and select Apply as displayed in the screenshot below:

Confirm the deletion to remove the roles from the system.

Benefits of Using User Role Manager
- Custom Permissions: Create and assign roles with customized access based on the needs of your business.
- Improved Security: Limit access to sensitive data by assigning permissions only to staff who need it.
- Efficient Staff Management: Easily manage the visibility of appointments, customers, and other critical information for different staff members.
The User Role Manager add-on in Booknex ensures that your staff has the appropriate level of access based on their responsibilities. Whether you're managing appointments, customer data, or sensitive reports, this feature offers flexible control over who can see and do what within the system.
Conversion Tracking
With Booknex - Conversion tracking features, you can measure the conversion of your Appointment Bookings. This feature consists of 2 integrations:
- Google Analytics integration
- Google Tag Manager integration
By using the Google Tag Manager integration, you will also get indirect integration with the Facebook pixel and many other analytics tools.
Now let's talk about how you can install both integrations in turn.
Google Analytics integration to Booknex Appointment Booking Plugin
First of all, of course, you must have a Google Analytics account and have Google Analytics installed on your site. Conversion Tracking does not add Google Analytics to your site. You have to do it yourself, it's a very simple process and Google Analytics provides you with ready-made instructions to do it. If Google Analytics is not linked to your site, this functionality will not work on your site.
Note that the current integration supports both Google Analytics 4 (GA4) and Universal Analytics.
To enable Conversion Tracking via Google Analytics, complete the following steps:
- Log in to your Booknex admin control panel
- Go to Settings > Integration Settings > Conversion tracking
- Click the new tracker button.
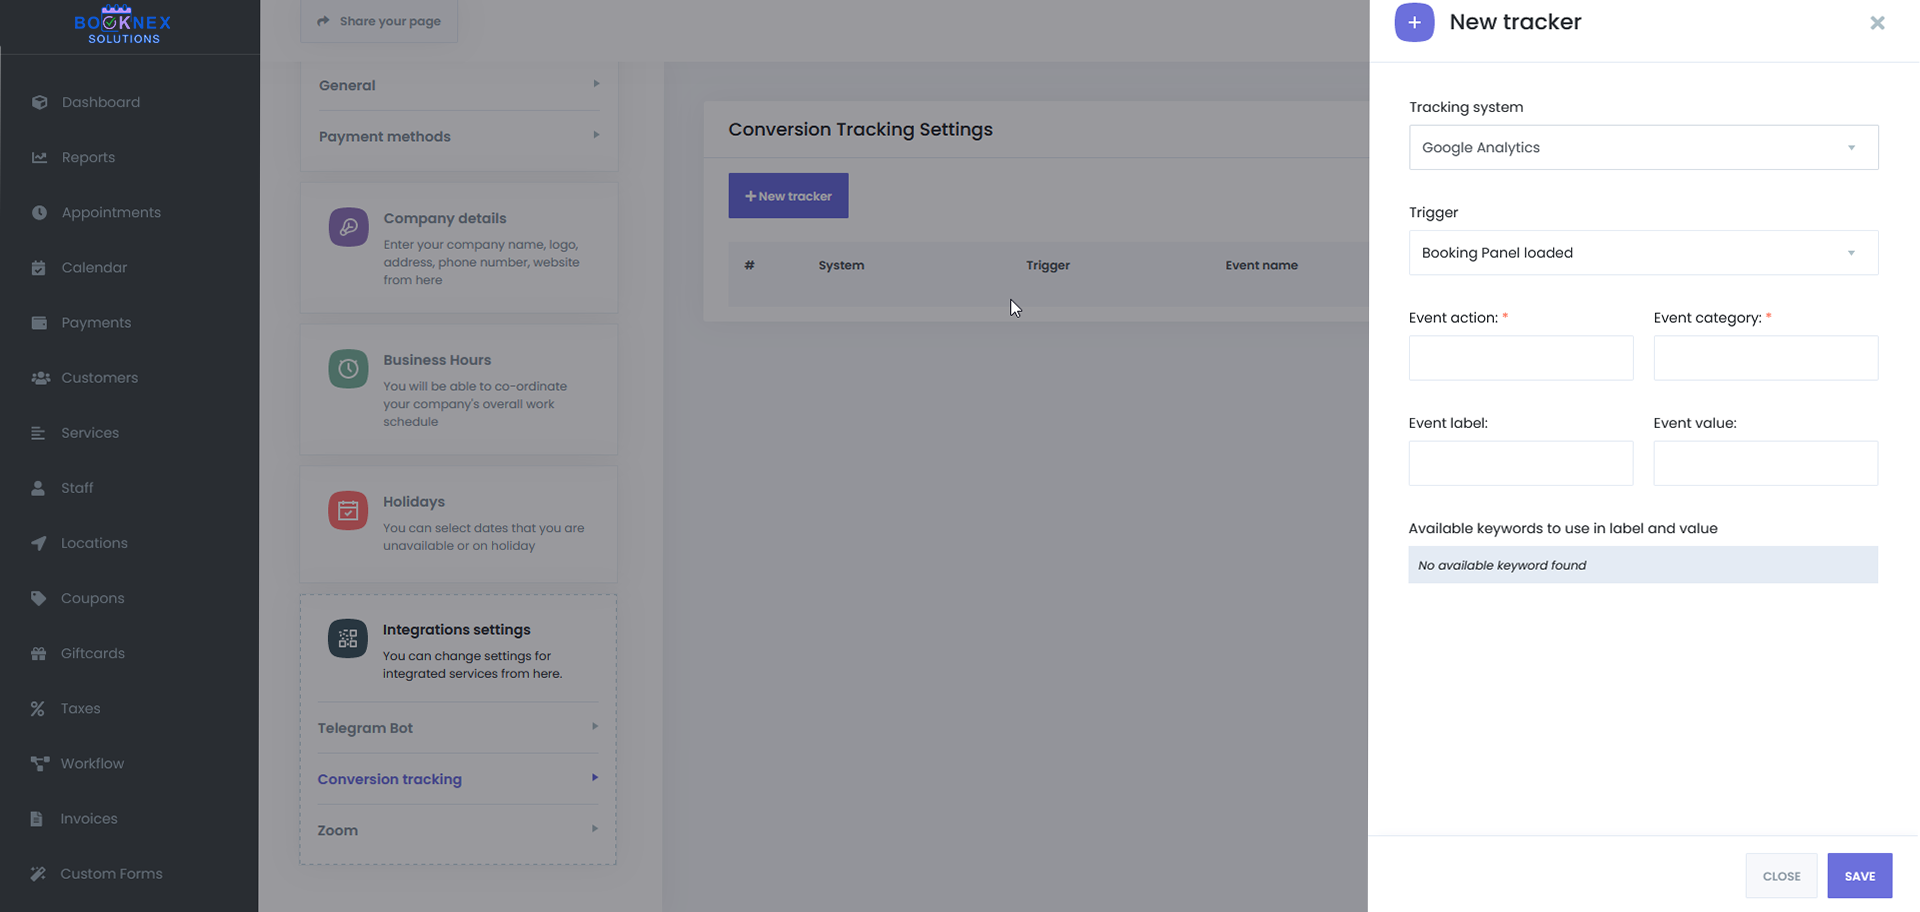
In the modal that opens, we choose Google Analytics as the Tracking system.
In Trigger, you find and select the option you want to monitor. The following triggers are available:
- Booking Panel loaded - When any user logs into your Booking panel in this tracker, the event you entered is automatically sent to Google Analytics.
- Location selected - In this tracker, the event you entered is automatically sent to Google Analytics when the user/customer in the Location step selects any location during the Booking process and proceeds to the Next step.
- Service selected - During the Booking process in this tracker, the event you entered is automatically sent to Google Analytics when the user/customer in the Services step selects any service and proceeds to the Next step.
- Staff selected - During the Booking process in this tracker, the event you entered is automatically sent to Google Analytics when the user/customer in the Staff step selects any staff member and proceeds to the Next step.
- Selected date - When the user/customer in the Date and time step selects any date during the Booking process in this tracker, the event you entered is automatically sent to Google Analytics.
- Selected time - When the user/customer in the Date and time step selects any time during the Booking process in this tracker, the event you entered is automatically sent to Google Analytics.
- Information step completed - When you fill in the information of the booking user/customer in this tracker and complete the next step, the event you entered will be automatically sent to Google Analytics.
- Booking completed (Local payment method) - This tracker is activated when the Booking is completed with a cash (local) payment method.
- Booking completed with payment - This tracker is activated when the Booking process is completed and the customer pays with any online payment method.
- Payment error - If any error occurs during checkout, you can submit your event to Google Analytics via this tracker.
After selecting the trigger you need, you fill in the next 4 fields - Event action, Event category, Event tag, and Event value fields. These fields are the event data that will go to Google Analytics. Here you can use ready-made shortcodes. For example:
{appointment_id}{appointment_payment_method}{appointment_sum_price}{appointment_paid_price}{service_name}.etc
The list of these shortcodes varies depending on the audience selected. For example, the shortcode appointment_price_price is only valid on Booking completed with payment tracking. The list of keywords you can use for the selected tracker is at the bottom of the mod you are working on and you can easily use it by copying it from there.
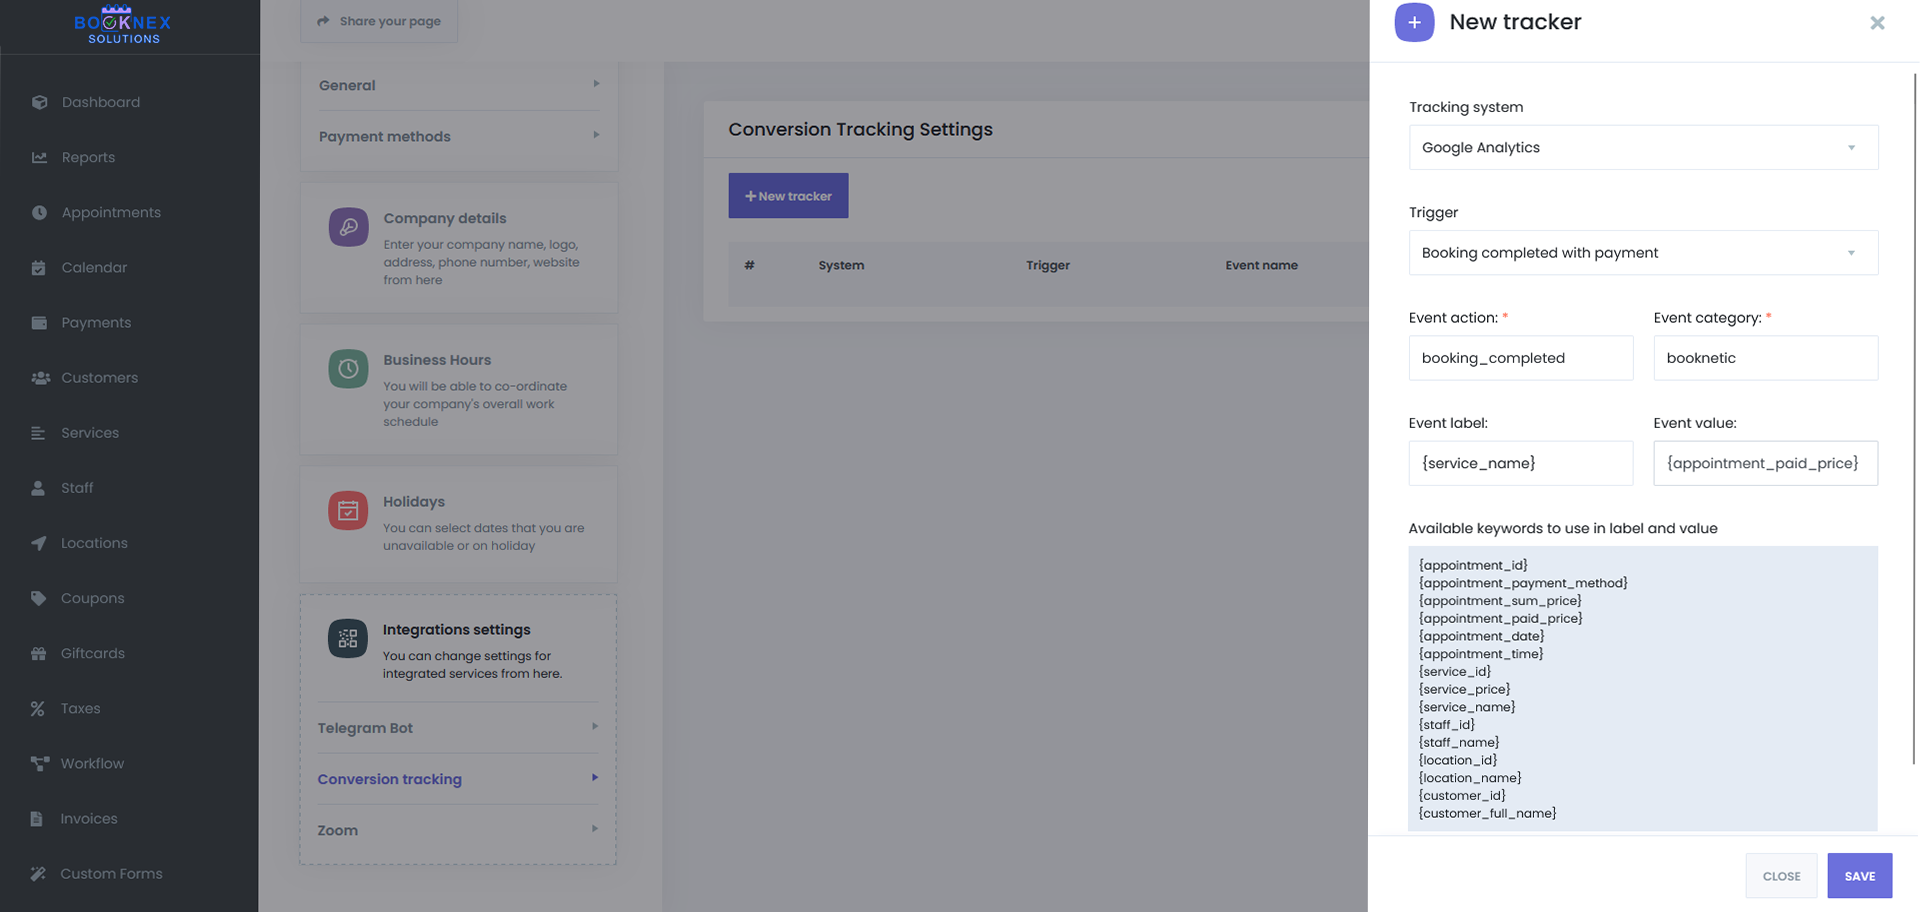
After entering the data, you save it by clicking the SAVE button. In this way, you can add as many Trackers as you want.
After adding the tracker, if you want to test whether the event you added in Google Analytics is working properly, you can use the Google Analytics Debugger chrome extension.

After downloading and installing this extension in Chrome, enable it. You can then monitor events sent to Google Analytics here by opening the Console log in your browser (pressing F12 on the keyboard or right-clicking the mouse > Inspect item).
Also if you are using the GA4 version, there is a simpler method instead of watching events in the Console Log.
Get involved with Google Analytics. Go to Configure > DebugView. And after waiting for a while, if you did everything right, you will see that your event is triggered in DebugView when you enter the Booking Panel and perform the operation according to the tracker you added. In the new version, events in GA4 will be arranged very neatly in DebugView as a timeline. You can also track the tag and value you sent by clicking on the event here.
Google Tag Manager Integration to Booknex Appointment Booking Plugin
For this integration to work, you must first have a Google Tag Manager account and have this account set up on your site. The current integration of Booknex does not install Google Tag Manager on your site. You have to do it yourself, it's a very simple process and the Google Tag manager gives you the instructions to do it. If your site does not have Google Tag Manager enabled, this feature will not work on your site.
To enable Conversion Tracking via Google Tag Manager, complete the following steps:
- Log in to your Booknex admin control panel
- Go to Settings > Integration Settings > Conversion tracking
- Click the new tracker button.
In the opened modal, we select Google Tag Manager as the Tracking system.
In Trigger, you find and select the option you want to track. The following triggers are available:
- Booking Panel loaded - When any user logs into your Booking panel in this tracker, the event you enter is automatically sent to Google Tag Manager.
- Location selected - During the Booking process in this tracker, the event you entered is automatically sent to Google Tag Manager when the user/customer in the Location step selects any location and proceeds to the Next step.
- Service selected - During the Booking process in this tracker, the event you entered is automatically sent to Google Tag Manager when the user/customer in the Services step selects any service and proceeds to the Next step.
- Staff selected - During the Booking process in this tracker, the event you entered is automatically sent to Google Tag Manager when the user/customer in the Staff step selects any staff member and proceeds to the Next step.
- Date selected - When the user/customer selects any date during the Booking process in this tracker, the event you entered will be automatically sent to Google Tag Manager.
- Time Selected - When the user/customer in the Date and time step selects any time during the Booking process in this tracker, the event you entered is automatically sent to Google Tag Manager.
- Information steps complete - Once you fill in the information of the booker/customer in this tracker and do the next step, the event you entered will be automatically sent to Google Tag Manager.
- Booking completed (Local payment method) - This tracker is activated when the Booking is completed with a cash (local) payment method.
- Booking completed with payment - This tracker is activated when the Booking process is completed and the customer pays with any online payment method.
- Payment error - If any error occurs during checkout, you can submit your event to Google Tag Manager through this tracker.
After selecting the trigger you need, you write the name of the event you want to send to Google Tag Manager in the Event action entry.
If necessary, you can send any number of custom parameters to Google Tag Manager by clicking the + Add parameter link. Here you can use ready-made shortcodes both in parameter name and parameter value. For example:
{appointment_id}{appointment_payment_method}{appointment_sum_price}{appointment_paid_price}{service_name}.etc
The list of these shortcodes varies depending on the selected tracker. For example, the appointment_paid_price shortcode is valid only in Booking completed with the payment tracker. The list of keywords that you can use for the selected tracker is at the bottom of the mod you are working on, and you can easily use it by copying it from there.
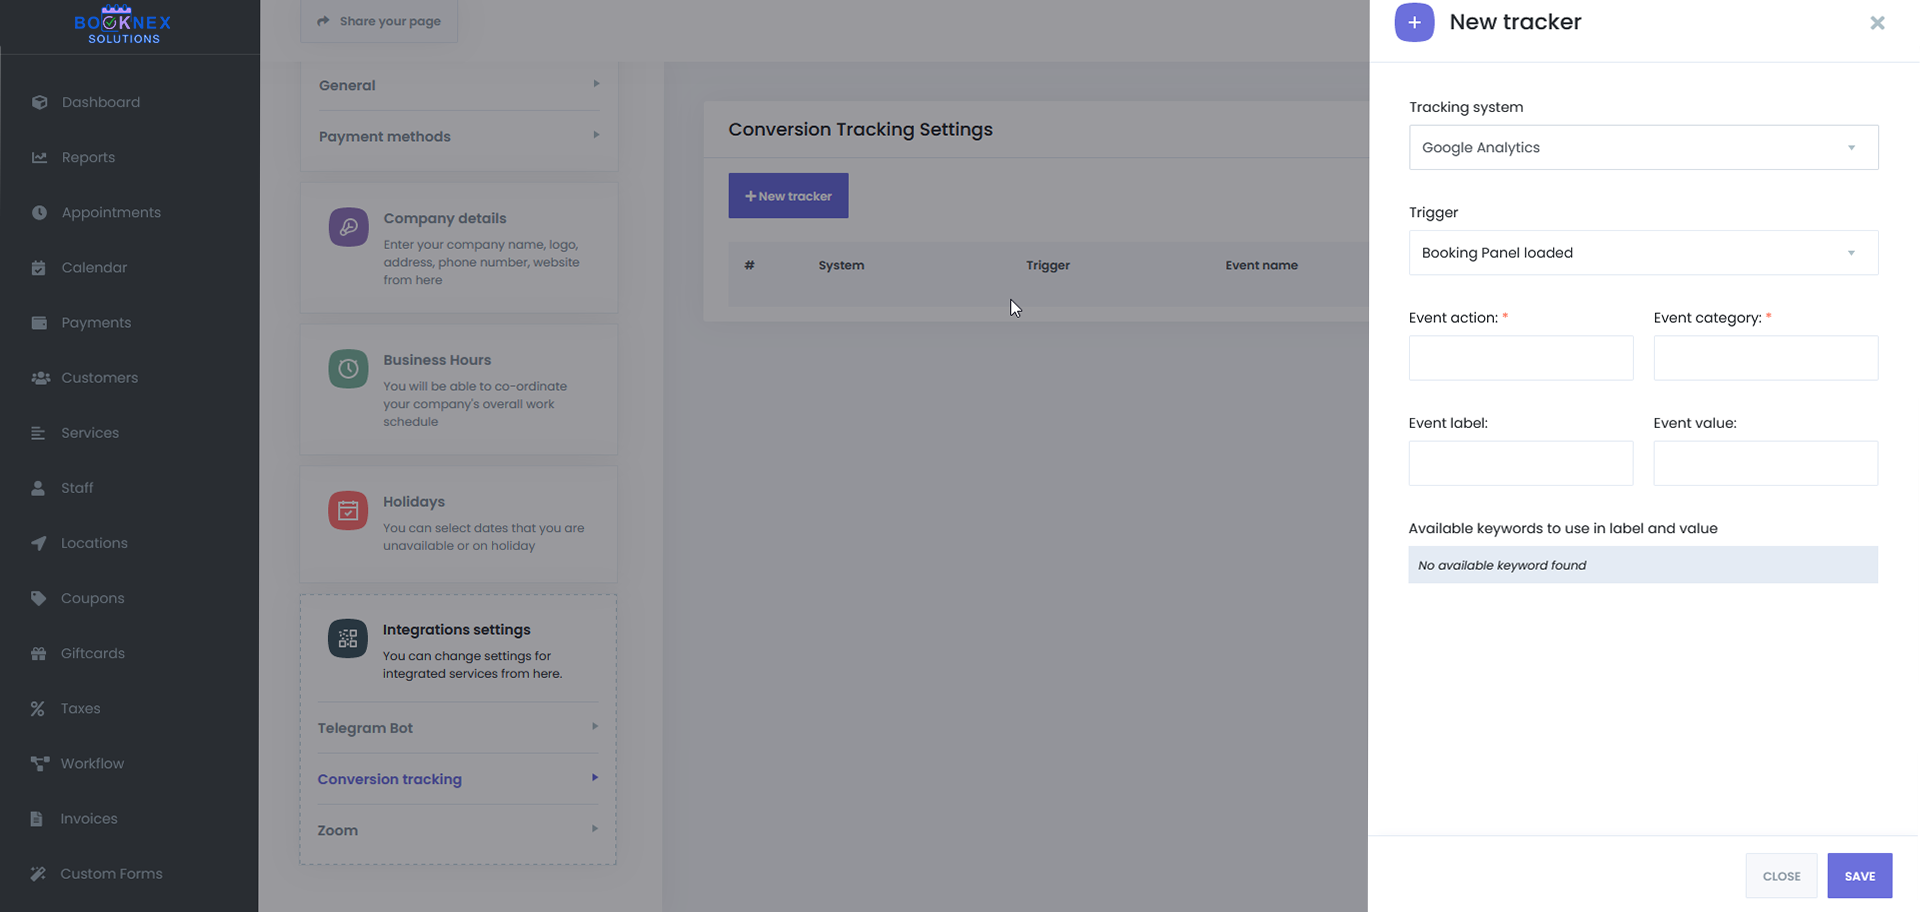
After entering the data, you save it by pressing the SAVE button. In this way, you can add as many Trackers as you want.
To verify that the events you've added are correctly reflected in Google Tag Manager, complete the following steps:
- Sign in to your Google Tag Manager account.
- Click the Preview button in the upper right corner.
- In the new window that opens, enter the URL where your booking panel is located and click the Connect button.
- Your site will open in a new window in debug mode. After performing the actions you want to follow in the booking panel, you will be able to return to the previous open window and see the list of triggered events there. You can also monitor the settings you sent here by clicking on the event.
Note that you can integrate with Google Analytics, Facebook Pixel, and many analytics tools at the same time using the Google Tag Manager integration.
Donation Form
Configuring Donation Form Settings
Access Donation Settings
Go to Booknex > Settings > Front-end Panels > Donation.

General Settings
- Display Donation Form On: Select the page you created from the dropdown menu.
- Title – Set a custom heading for the donation form (e.g., "Make a Difference Today").
- Finish URL – Redirect users to a thank-you page after a successful donation.
- Payment Method – Choose the available payment gateways for donation processing.
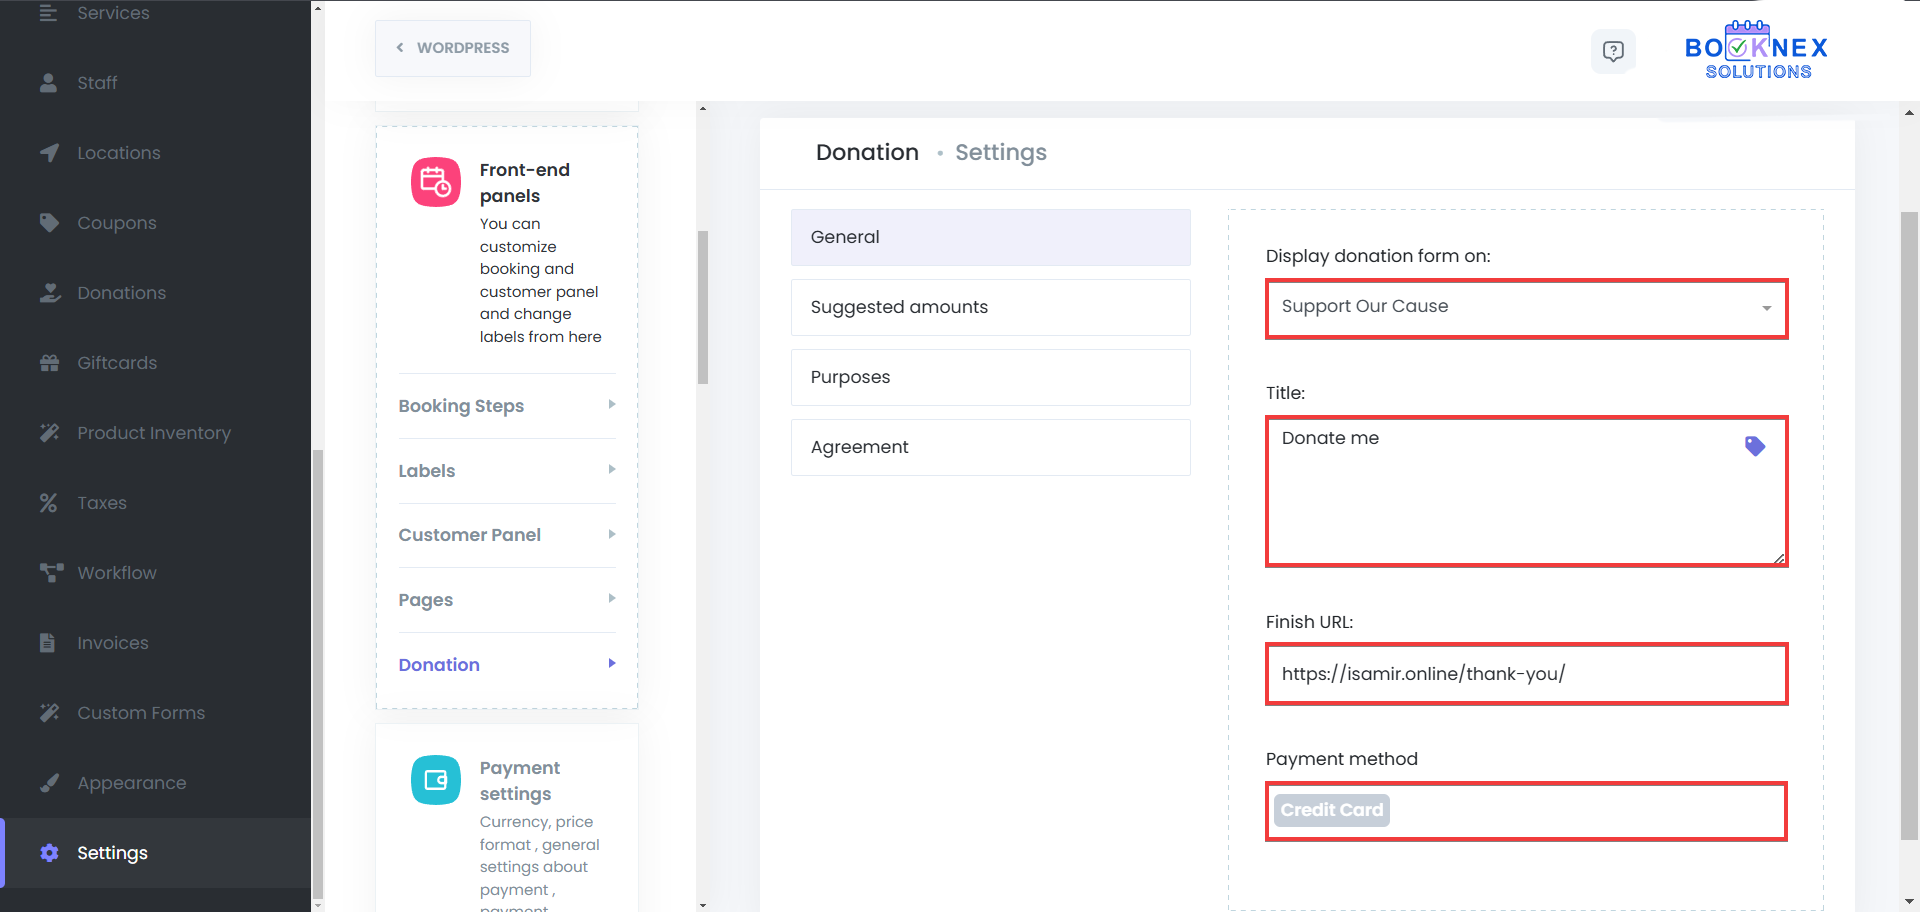
Suggested Amounts
The Suggested Amounts feature allows you to provide predefined donation options, making it easier for donors to contribute with a single click. Instead of manually entering an amount, users can select from preset values, ensuring a smoother donation experience. This feature helps guide donations by encouraging users to contribute common amounts based on your fundraising goals.

Purposes
The Purposes Section in the Donation Form Add-on allows businesses and organizations to define specific causes or initiatives for which donors can contribute. Instead of a general donation, users can select a purpose that aligns with their interest, ensuring transparency and giving donors more control over where their contributions are allocated.
Key Features of the Purposes Section
- Multiple Donation Purposes – Create different categories such as "Medical Assistance," "Education Fund," or "Animal Welfare."
- Better Transparency – Let donors know exactly how their funds will be used.
- Customizable Purpose Names – Define unique names for each purpose.
- Streamlined Donation Process – Donors can select a purpose, making the process faster and more intuitive.
This feature is ideal for nonprofits, charities, and organizations that support multiple initiatives and want to provide donors with greater choice and clarity when making contributions.

Agreement
The Agreement Section allows you to include a terms and conditions checkbox that donors must accept before completing their contribution. This ensures compliance with legal or organizational policies and helps set clear expectations for donors. You can customize the agreement text to include privacy policies, refund terms, or donation usage details, ensuring transparency and trust with your supporters.
Save Changes
Click "Save Changes" to apply your configurations.
Integrating Donations into Notifications
To encourage donations, include a link to your donation page in customer notifications:
Modify Notification Templates
- Go to Booknex > Workflows.
- Edit the desired workflow (e.g., appointment confirmation emails).
Add Donation Link

In the message body, insert a call-to-action with a link to your donation page. Example: "Support our initiatives by making a donation."
Save Workflow
Click "Save" to update the notification template.
Viewing Donations
View Donation of a Appointment
Navigate to Booknex > Appointments or Booknex > Calendar to see your appointments.

Check the information about the donation
Click on 3 dot next to an appointment, then click on info.
Lastly switch to the "Donation" tab to see the donation made from that appointment.
By utilizing the Donation Form add-on, you can seamlessly integrate fundraising efforts into your booking system, providing an easy and efficient way for supporters to contribute to your cause.
Booking Limit Manager
Location-Based Booking Limits
The Location Booking Limit feature allows you to set specific booking limits for each location within your business, offering detailed control over how many appointments can be made at a given time. This feature helps prevent overcrowding at any one location while ensuring a smooth flow of appointments.
Setting Location Booking Limits
Accessing Locations
Go to Locations on the left side of the dashboard.
Selecting a Location
A list of all locations will be displayed.
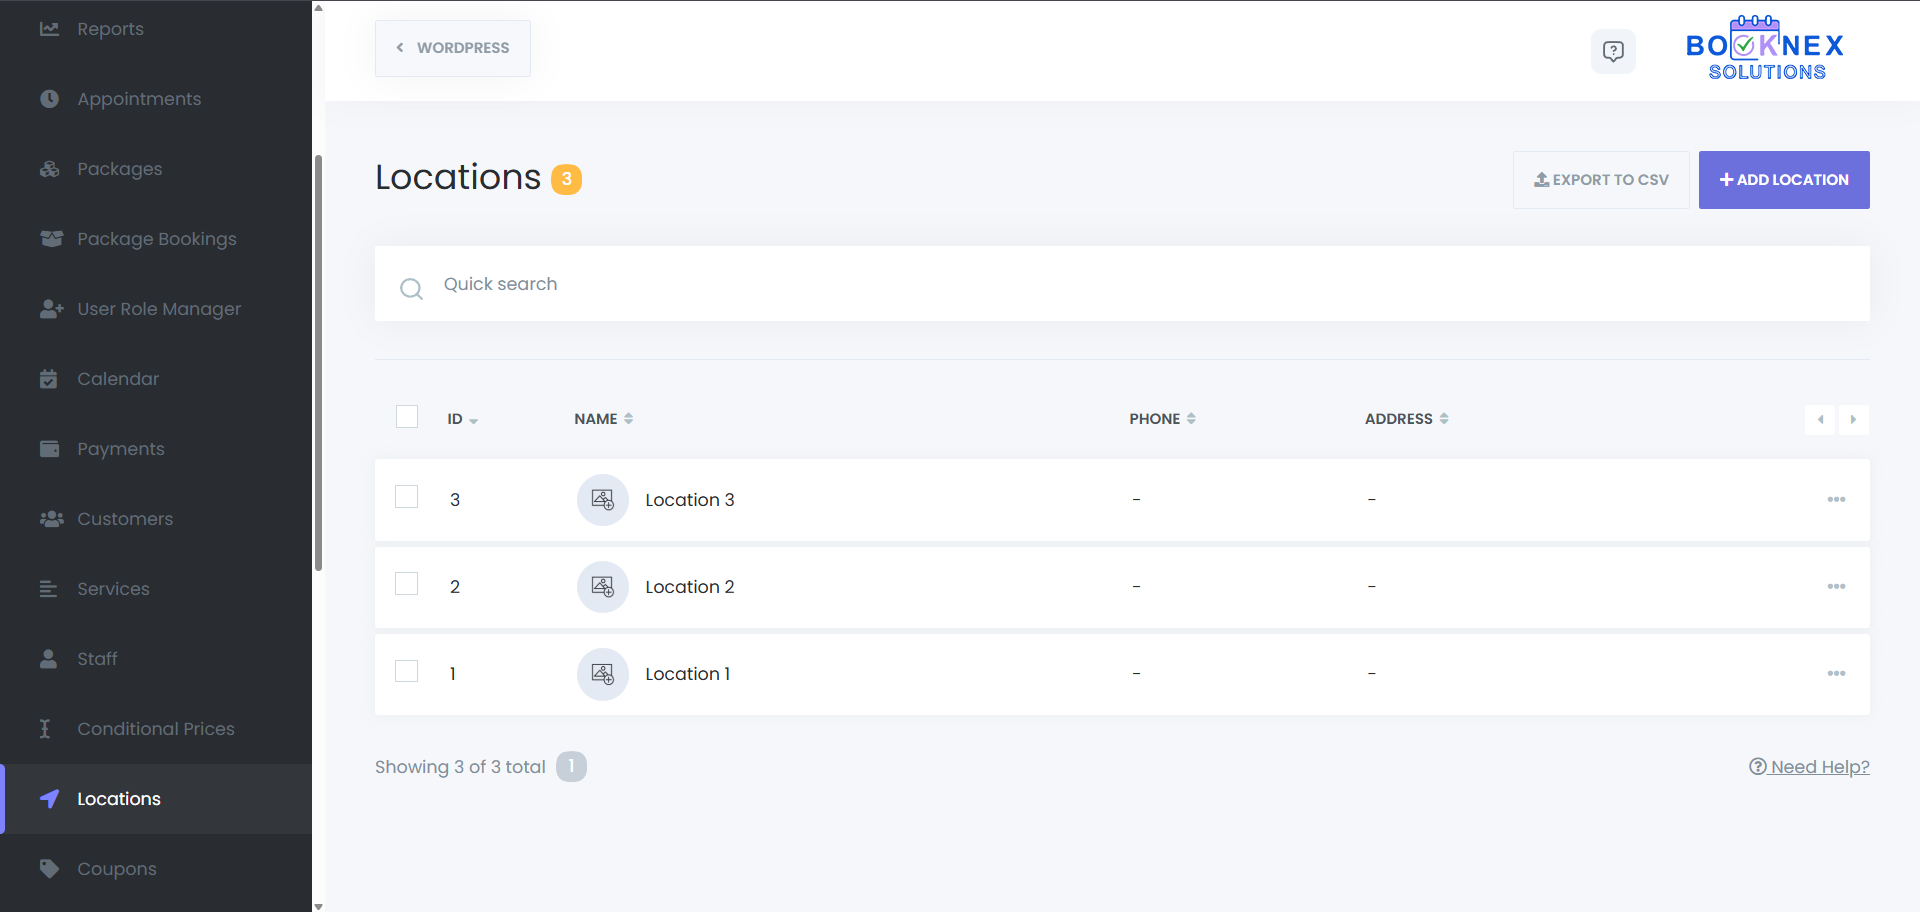
Click the 3 dots next to the location for which you want to set booking limits, then click on "Edit".

Configuring Booking Limits
Switch to the "Booking Limiter" tab.
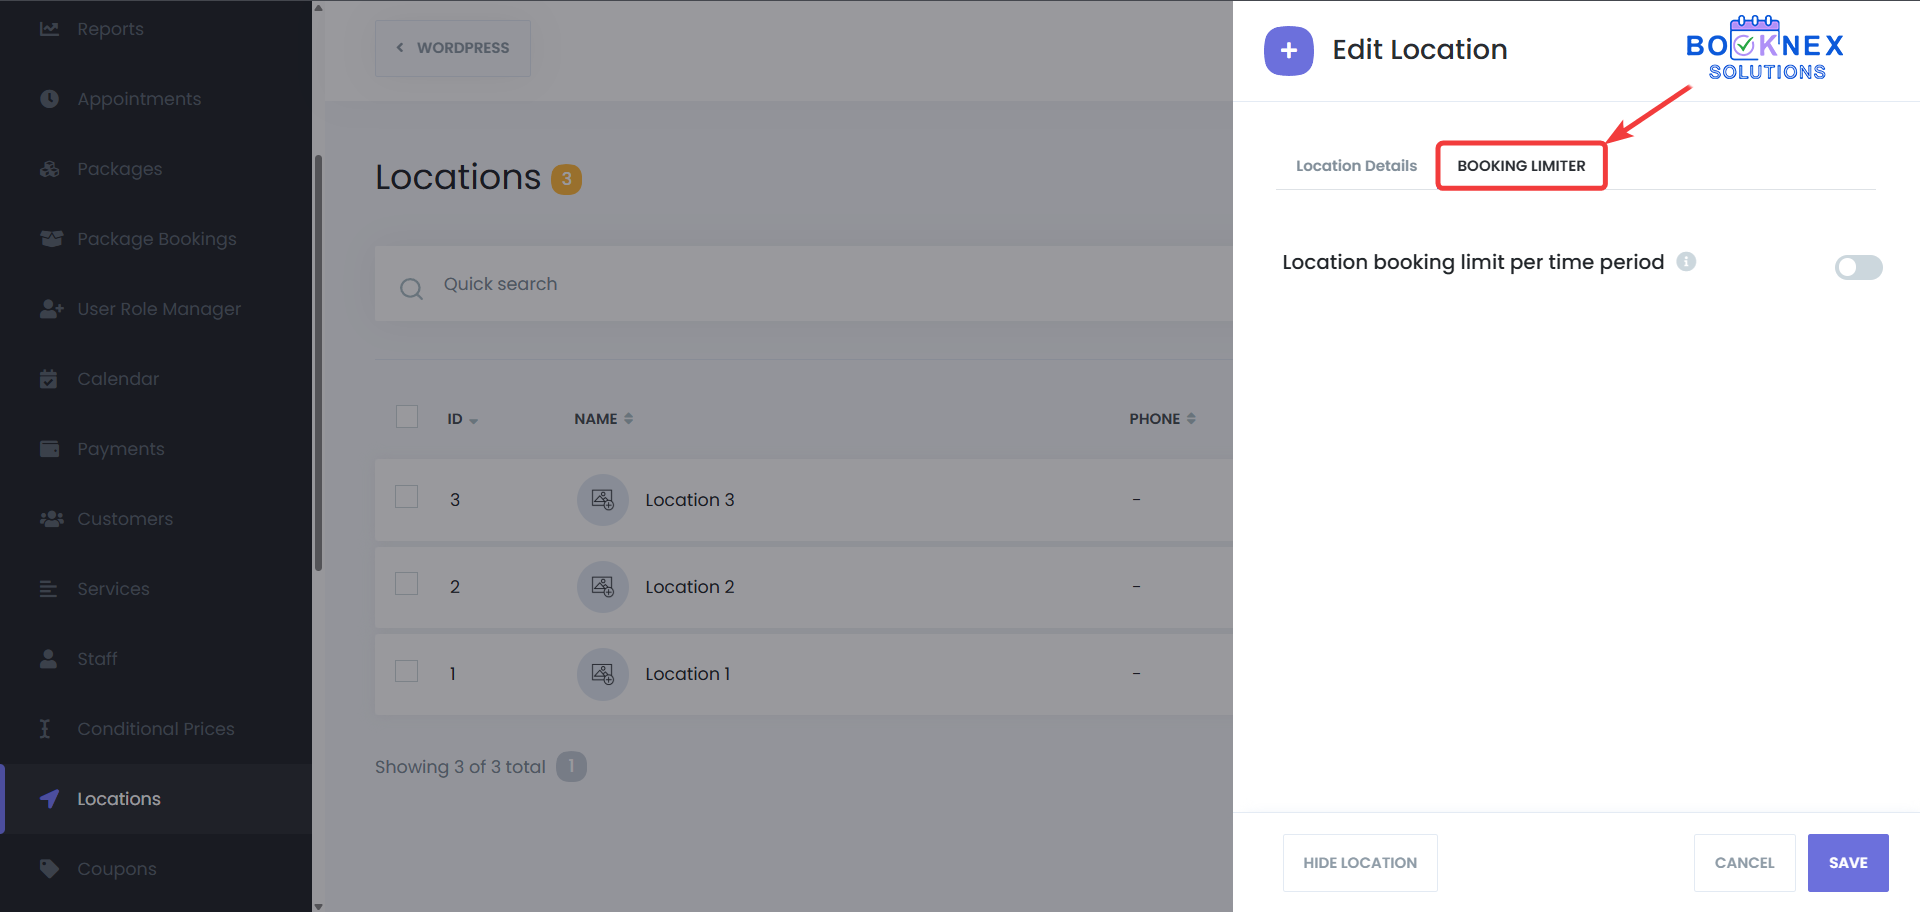
Specify the maximum number of bookings allowed for that location within a defined time period (e.g., per day or week).

Save your settings.
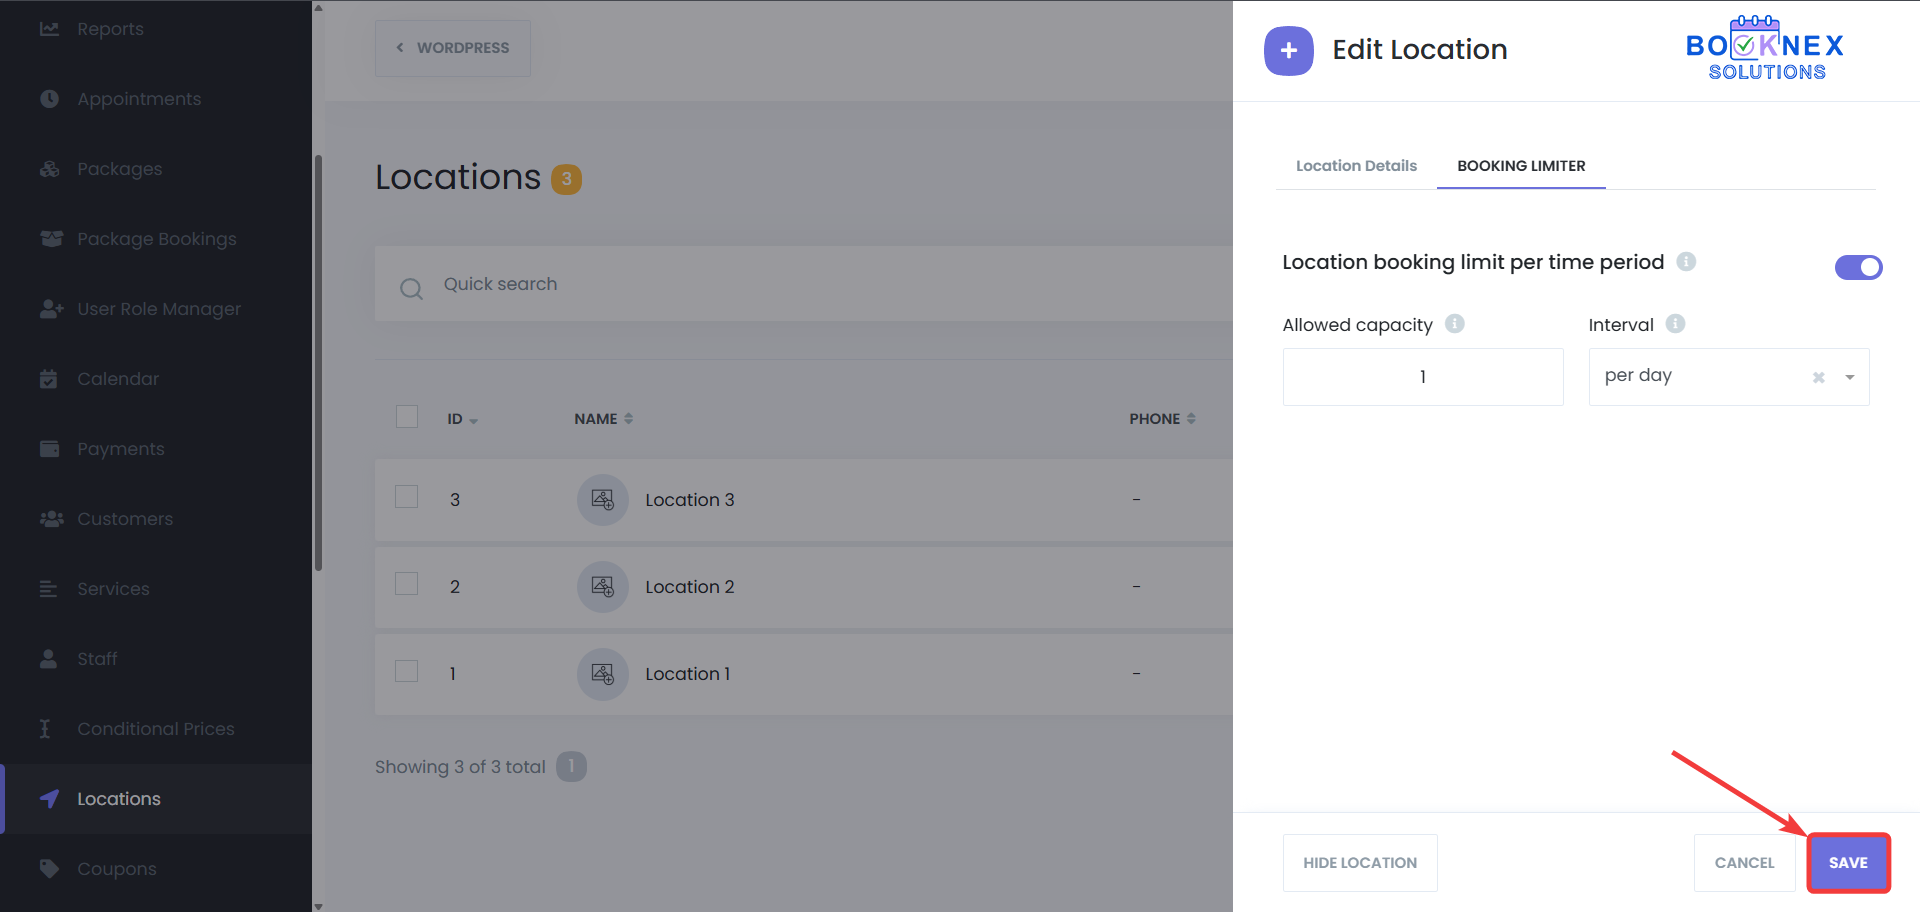
How It Works
The Location Booking Limit Manager prevents overcrowding at each location by restricting the number of appointments within a specified period. This optimizes service quality and ensures that each location operates within its capacity.
Staff-Specific Booking Limits
With the Staff Booking Limit feature, you can set limits for individual staff members, ensuring they are not overbooked and can provide high-quality service without being overwhelmed by too many appointments.
Setting Staff-Specific Booking Limits
Accessing Staff Settings
Go to Staff in the Booknex Dashboard.

Selecting a Staff Member
A list of all staff members will be displayed. Click the 3 dots next to the staff member for which you want to set booking limits, then click on "Edit".

Configuring Booking Limits
Switch to the "Booking Limiter" tab.
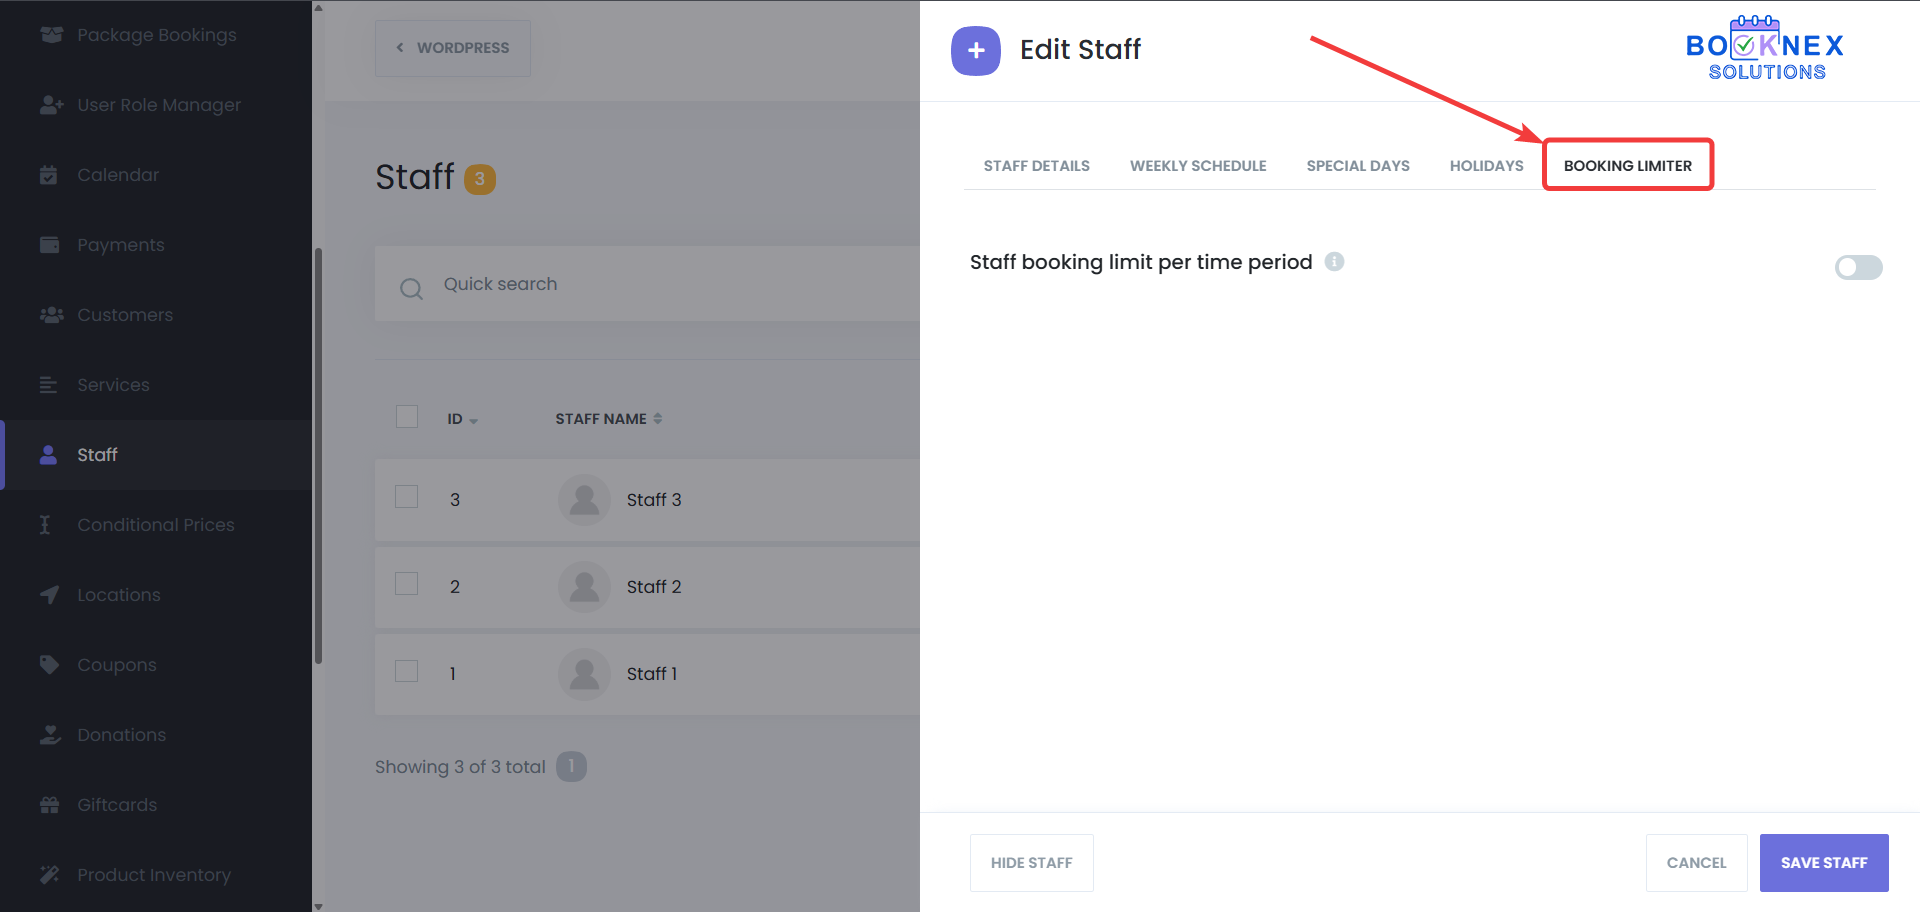
Specify the maximum number of bookings allowed for that staff member within a defined time period (e.g., per day or per week).
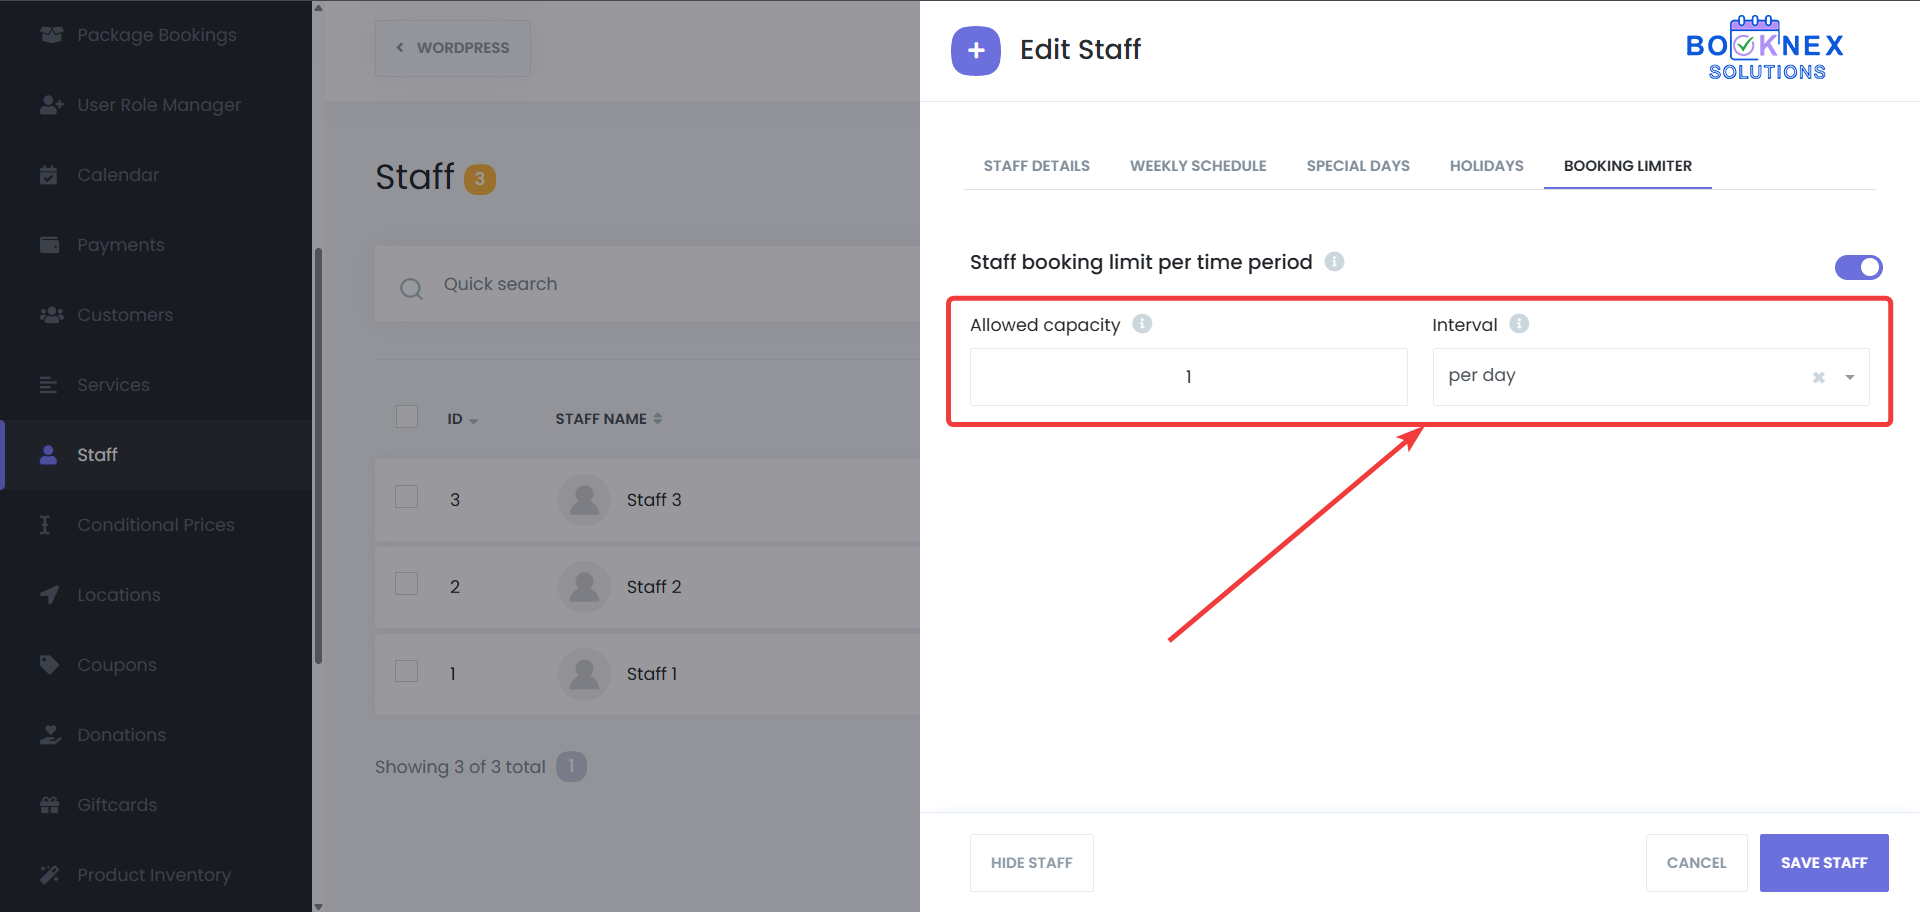
Save your changes.

How It Works
The Staff Booking Limit helps ensure a balanced workload for each team member by customizing the number of appointments they can handle. This prevents staff burnout and maintains a productive work environment.
Service-Specific Booking Limits
The Service Booking Limit feature allows you to control the number of appointments for specific services, which is ideal for managing high-demand services and ensuring efficient use of your resources.
Setting Service-Specific Booking Limits
Accessing Services
Go to Services on the left side of the dashboard.
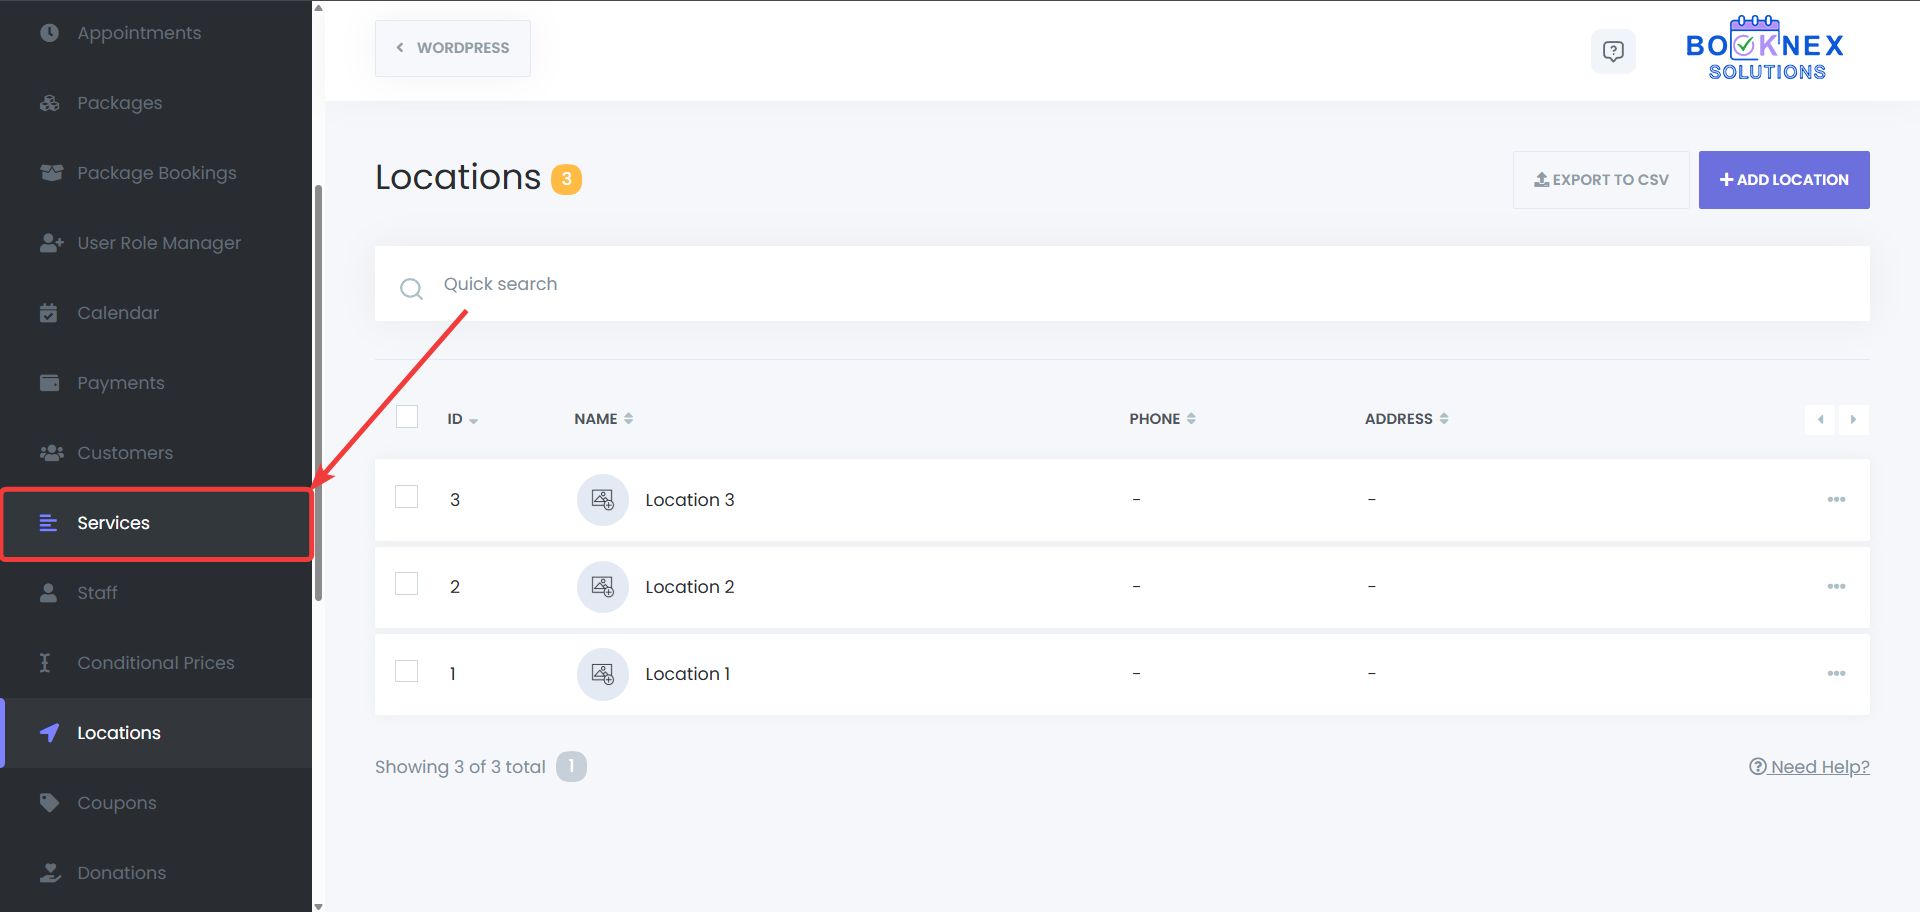
Selecting a Service
Choose the service for which you want to set booking limits.
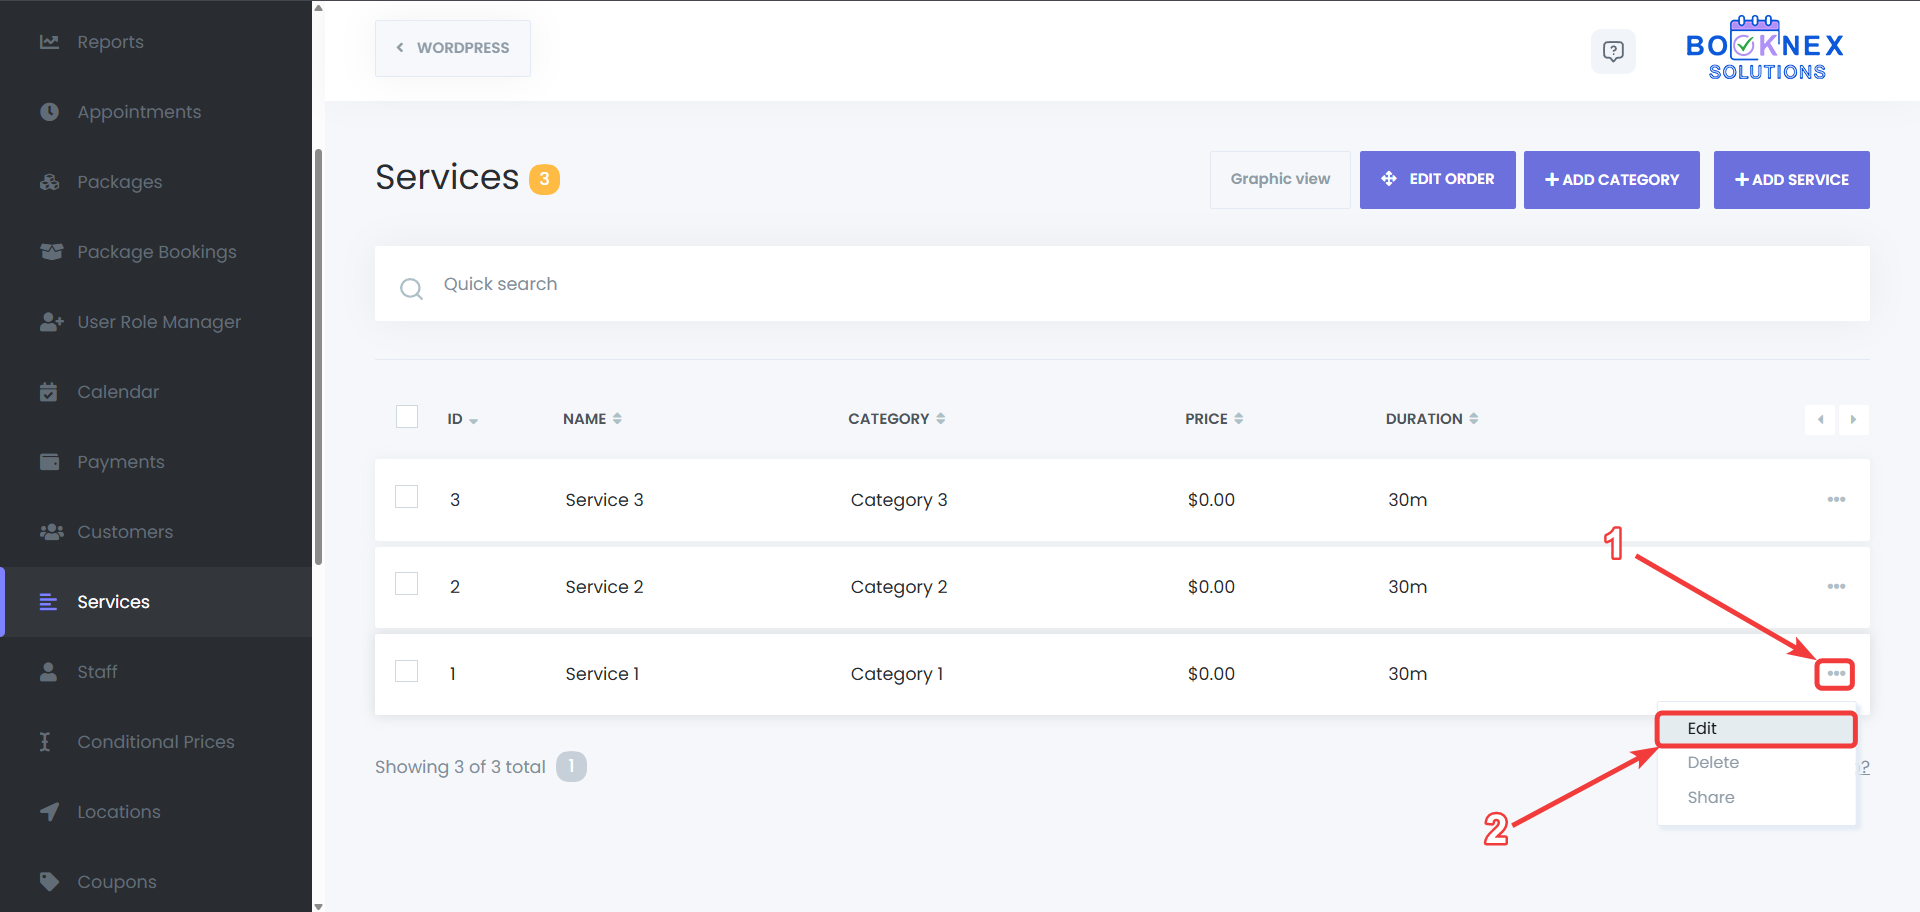
Configuring Booking Limits
If you're using List view, click the three dots next to the service and select Edit.

If you're using Graphic view, click the pen icon next to the service.

Switch to the "Booking Limiter" tab.

Specify the maximum number of bookings allowed for that service in a given time period (e.g., per day or week).
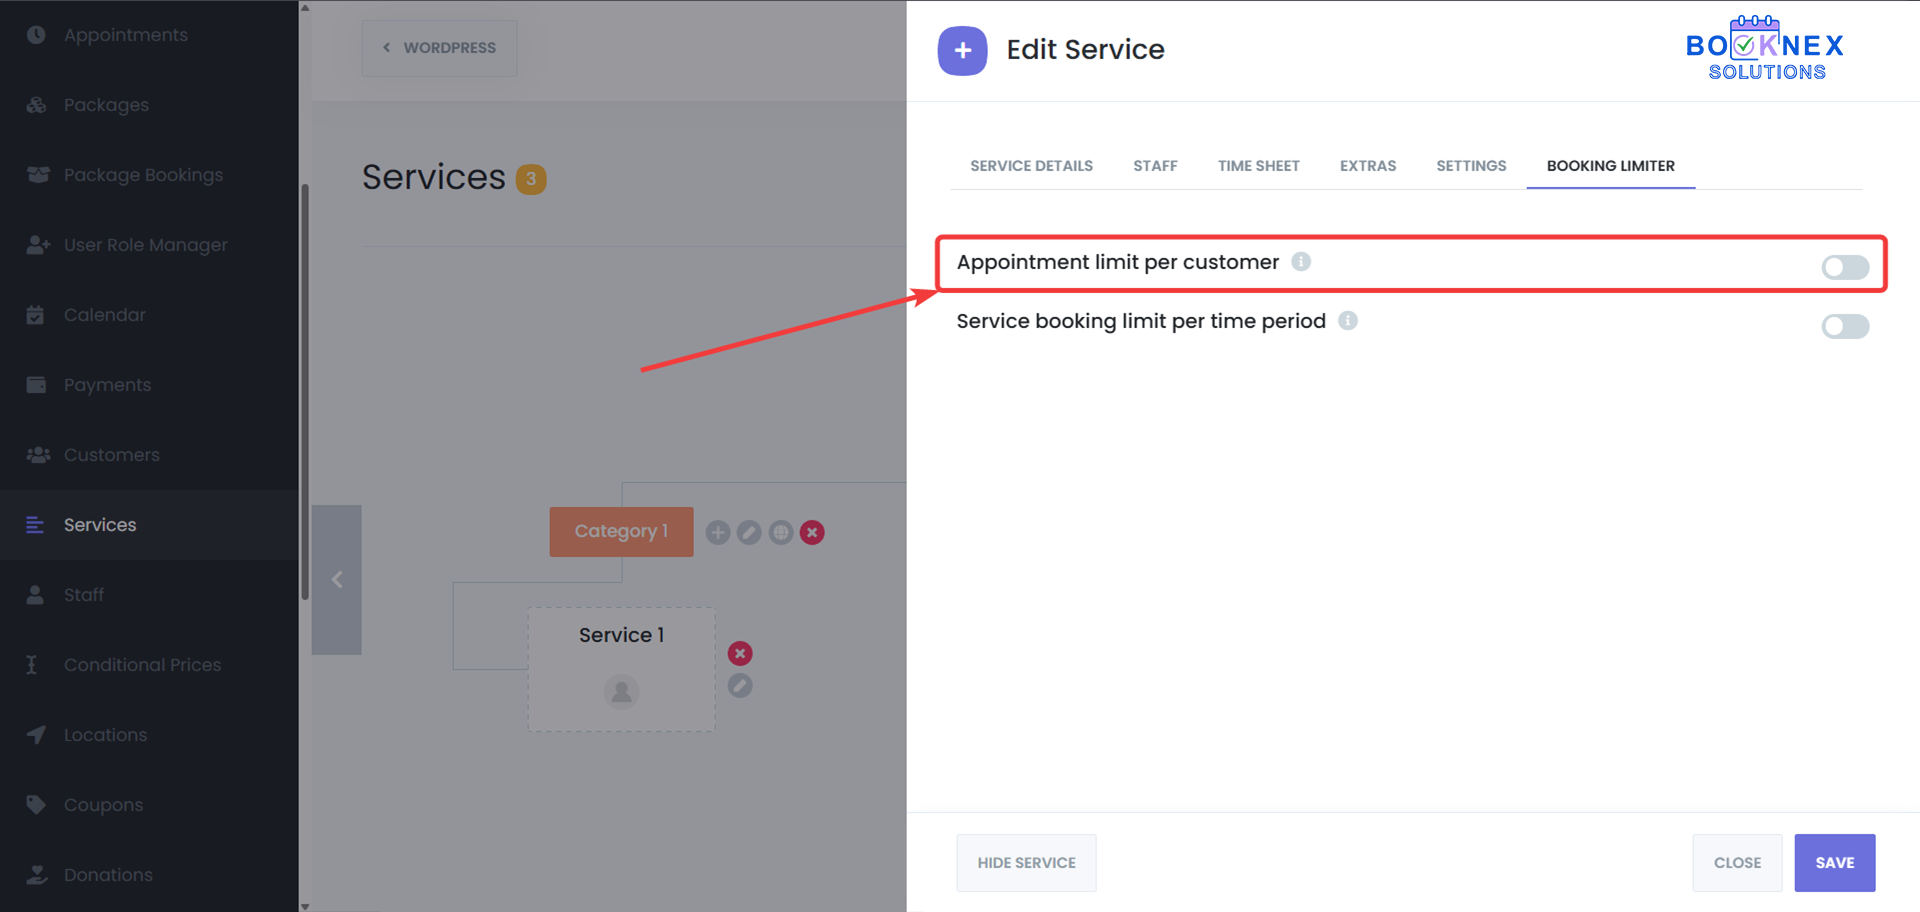
You can also set a limit for each customer for a specific service, such as limiting them to 1 booking per hour for a service.
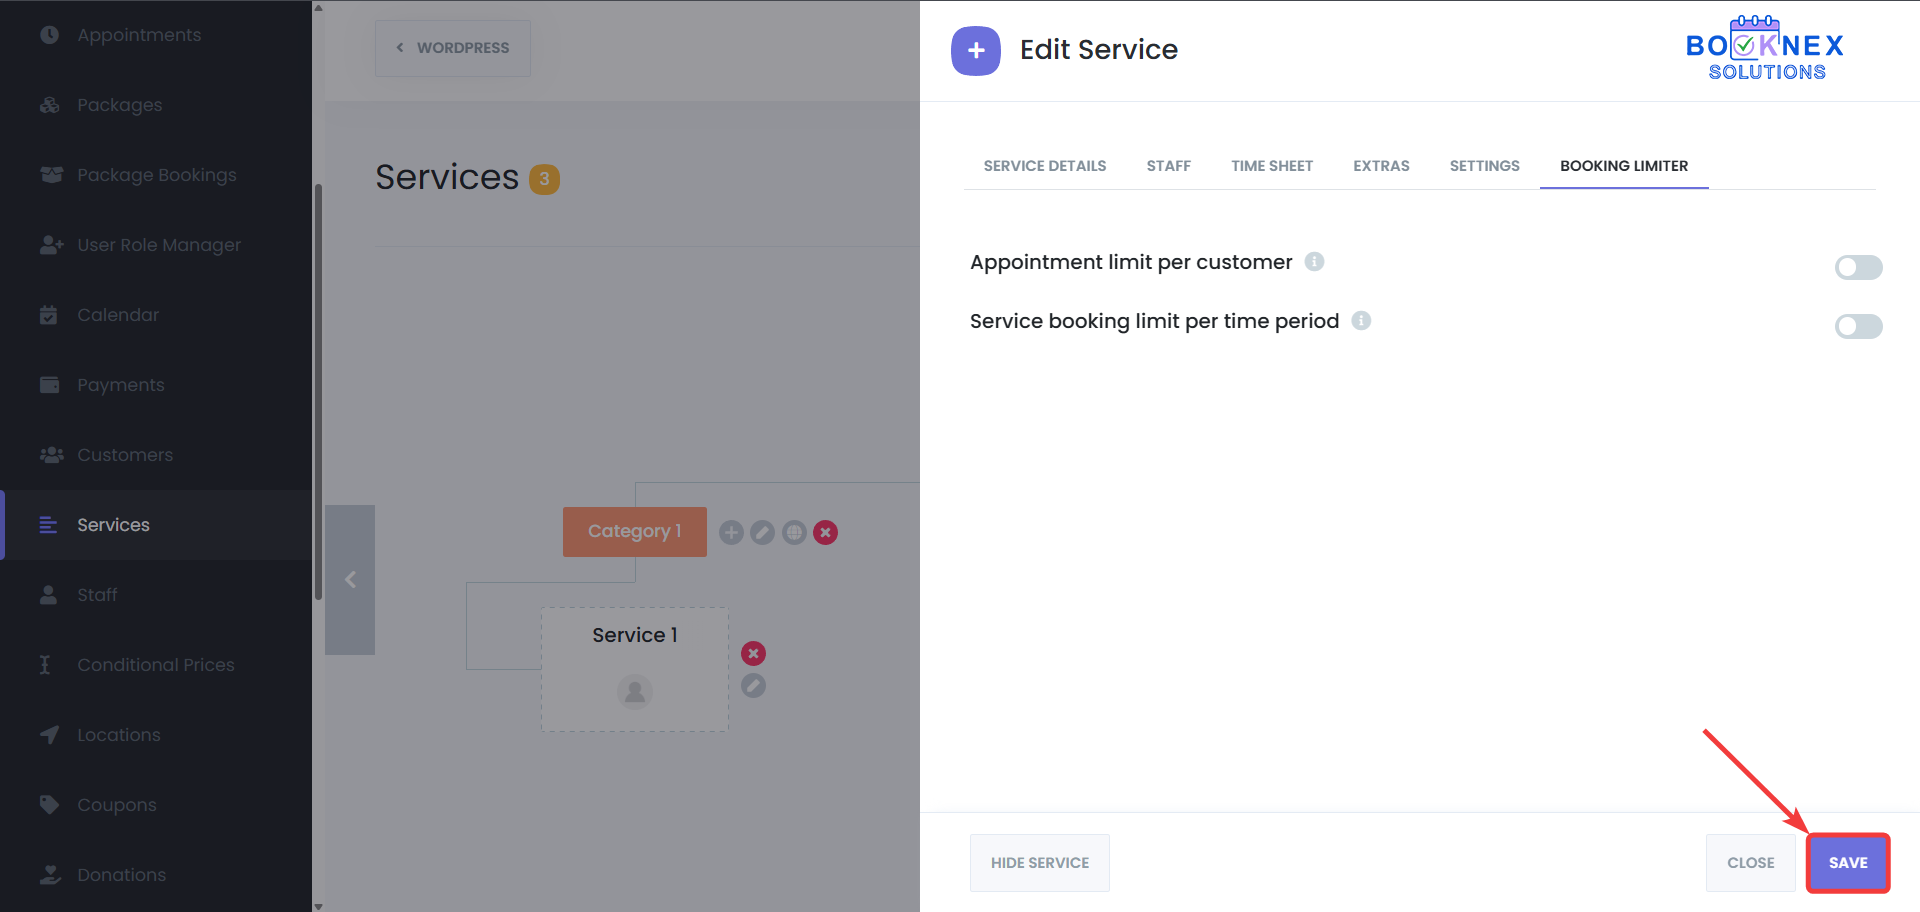
Save your settings.
How It Works
The Service Booking Limit feature helps optimize service utilization by limiting the number of bookings per service, preventing overbooking, and ensuring that resources are allocated effectively. It allows you to fine-tune your scheduling strategy, especially for high-demand services.
Customer Booking Limit
The Customer Booking Limit feature allows you to implement global limits on the number of bookings each customer can make, ensuring fairness and equal access to appointments.
Setting Global Customer Booking Limits
Accessing Settings
Go to Settings > General Settings, and then select Booking Limit Manager.
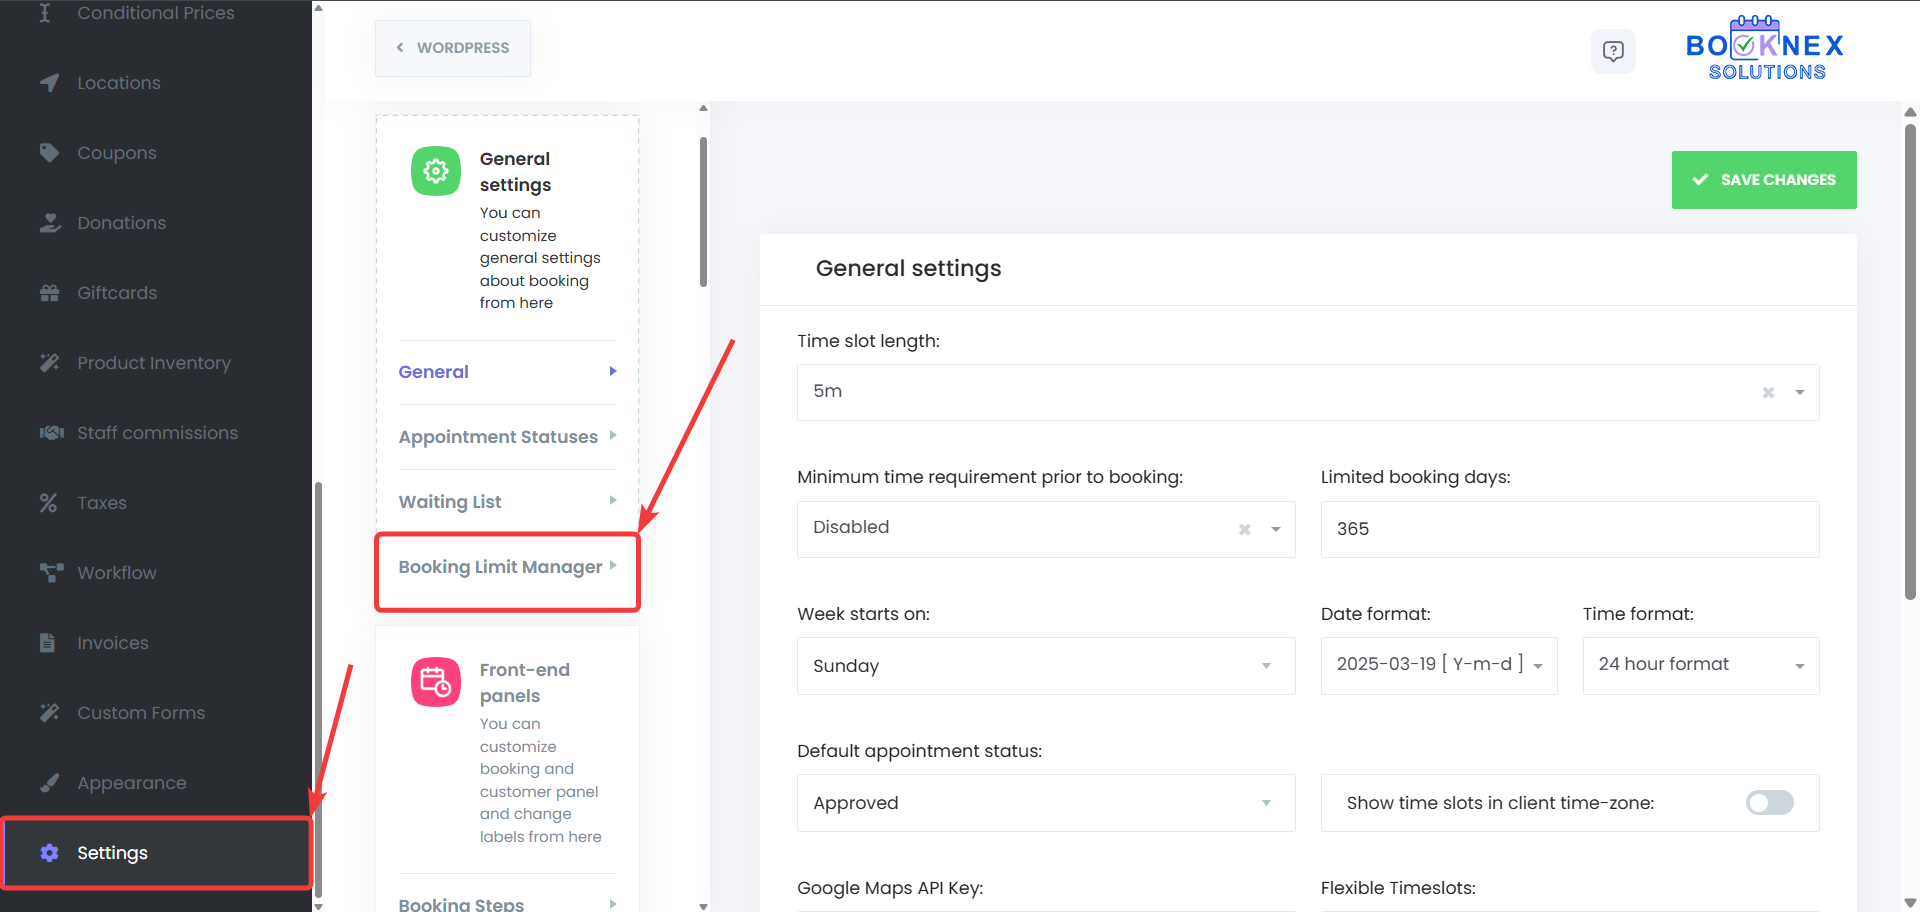
Configuring Booking Limits
In the settings, specify the maximum number of bookings a customer can make within a defined time period (e.g., per day or per week).

Save your settings to apply the changes.

How It Works
The Customer Booking Limit ensures that all customers have an equal opportunity to book appointments, preventing any individual customer from monopolizing time slots. This feature helps prevent bottlenecks in the booking system and enhances overall customer satisfaction.
Why Use the Booking Limit Manager?
- Prevent Overcrowding: Control the number of appointments for locations, staff, services, and customers to maintain a smooth workflow.
- Balance Workload: Ensure staff and services are properly managed without overloading them, leading to higher service quality.
- Fairness and Accessibility: Provide equal access to customers by setting global limits on bookings and prevent any one customer from dominating the system.
- Optimized Service Delivery: Manage high-demand services more effectively and prevent overbooked time slots to ensure each service runs smoothly.
Custom Duration
Enhance your service offerings with the Custom Durations add-on, allowing you to define multiple durations for the same service while assigning different prices for each option. This feature provides greater flexibility, enabling customers to choose from various time slots based on their needs.
Accessing the Custom Durations Feature
Navigate to the Services Module
From the left-hand menu, go to Booknex > Services.
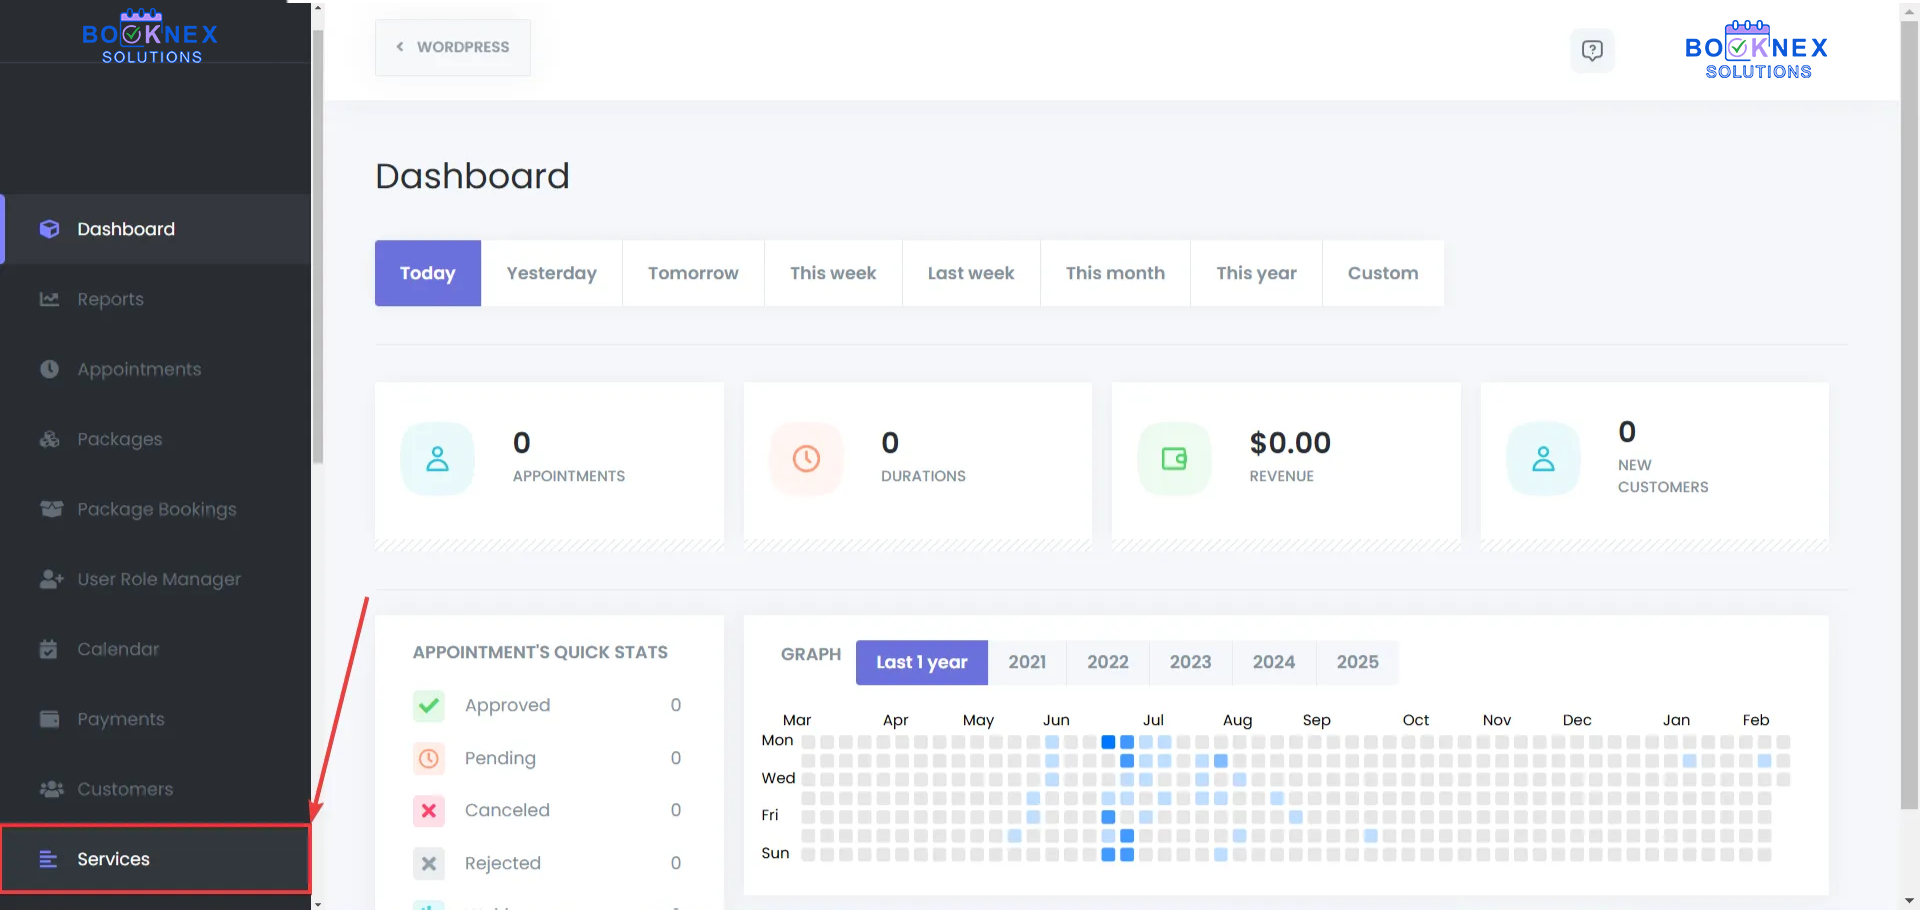
Select a Service to Edit
Edit the service where you want to enable custom durations.
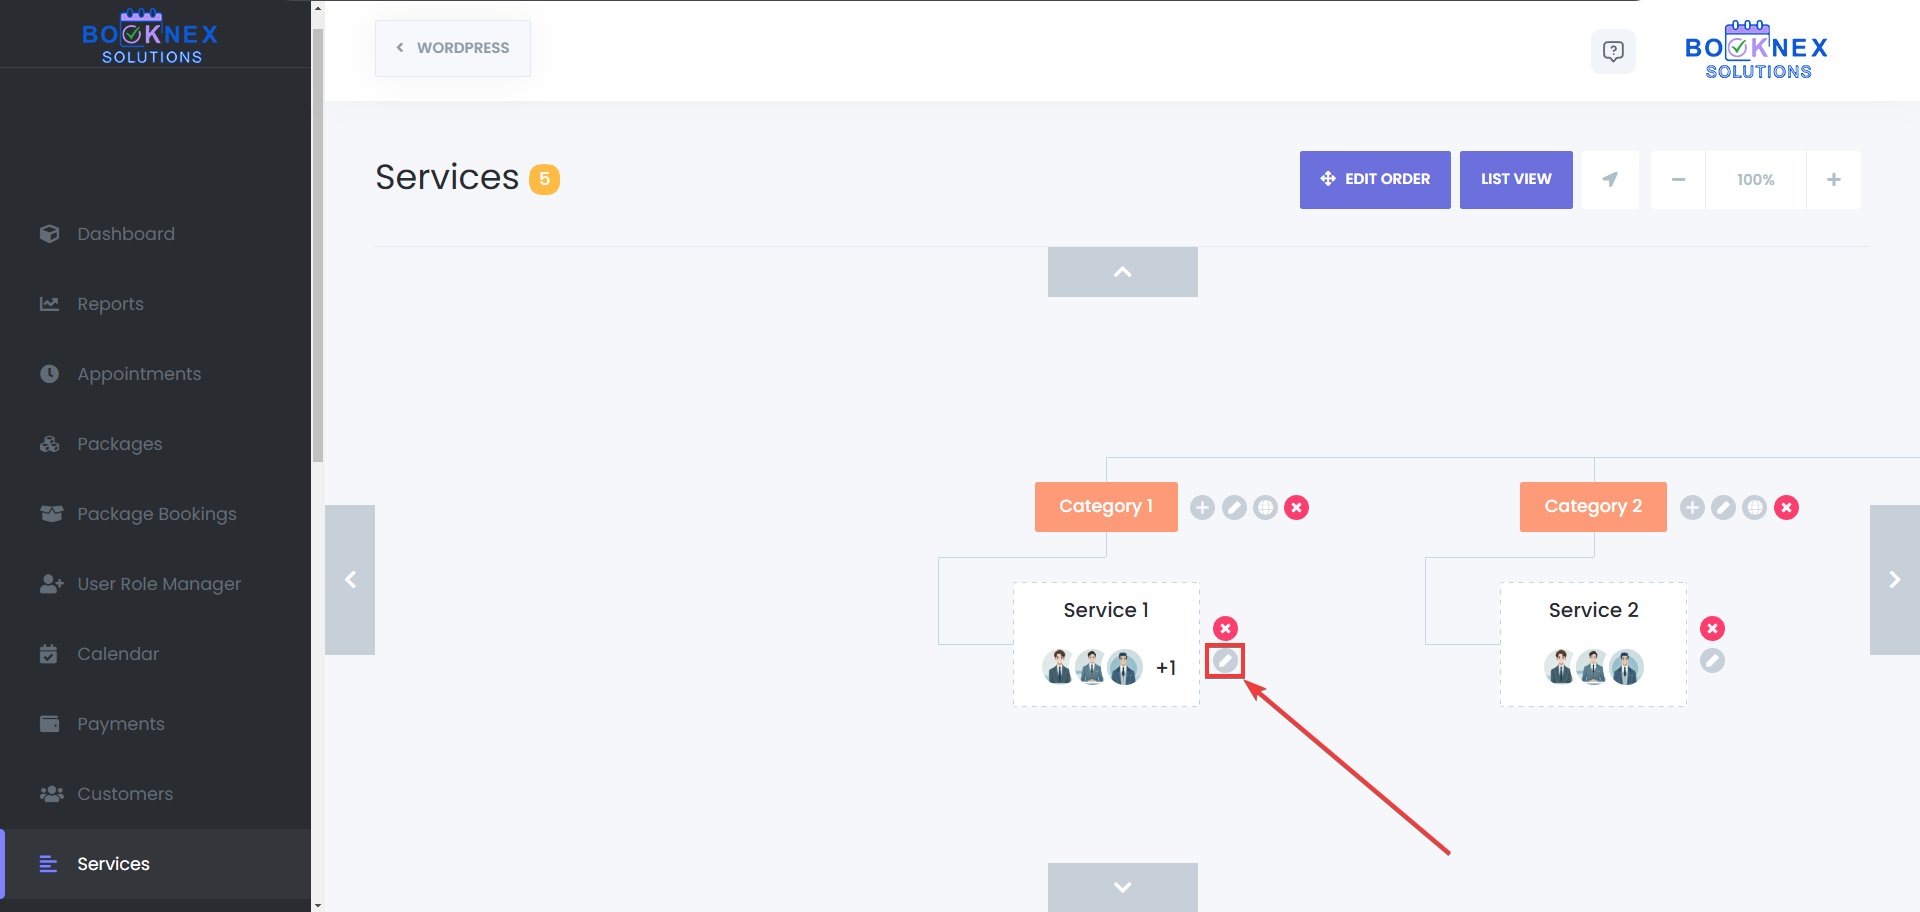
Enable the Custom Duration Option
In the service settings, activate the Custom Duration toggle.

Adding Custom Durations
Once enabled, follow these steps to create multiple durations for a service:
Click on "Add Duration"
Inside the service settings, locate the Add Custom Duration button.
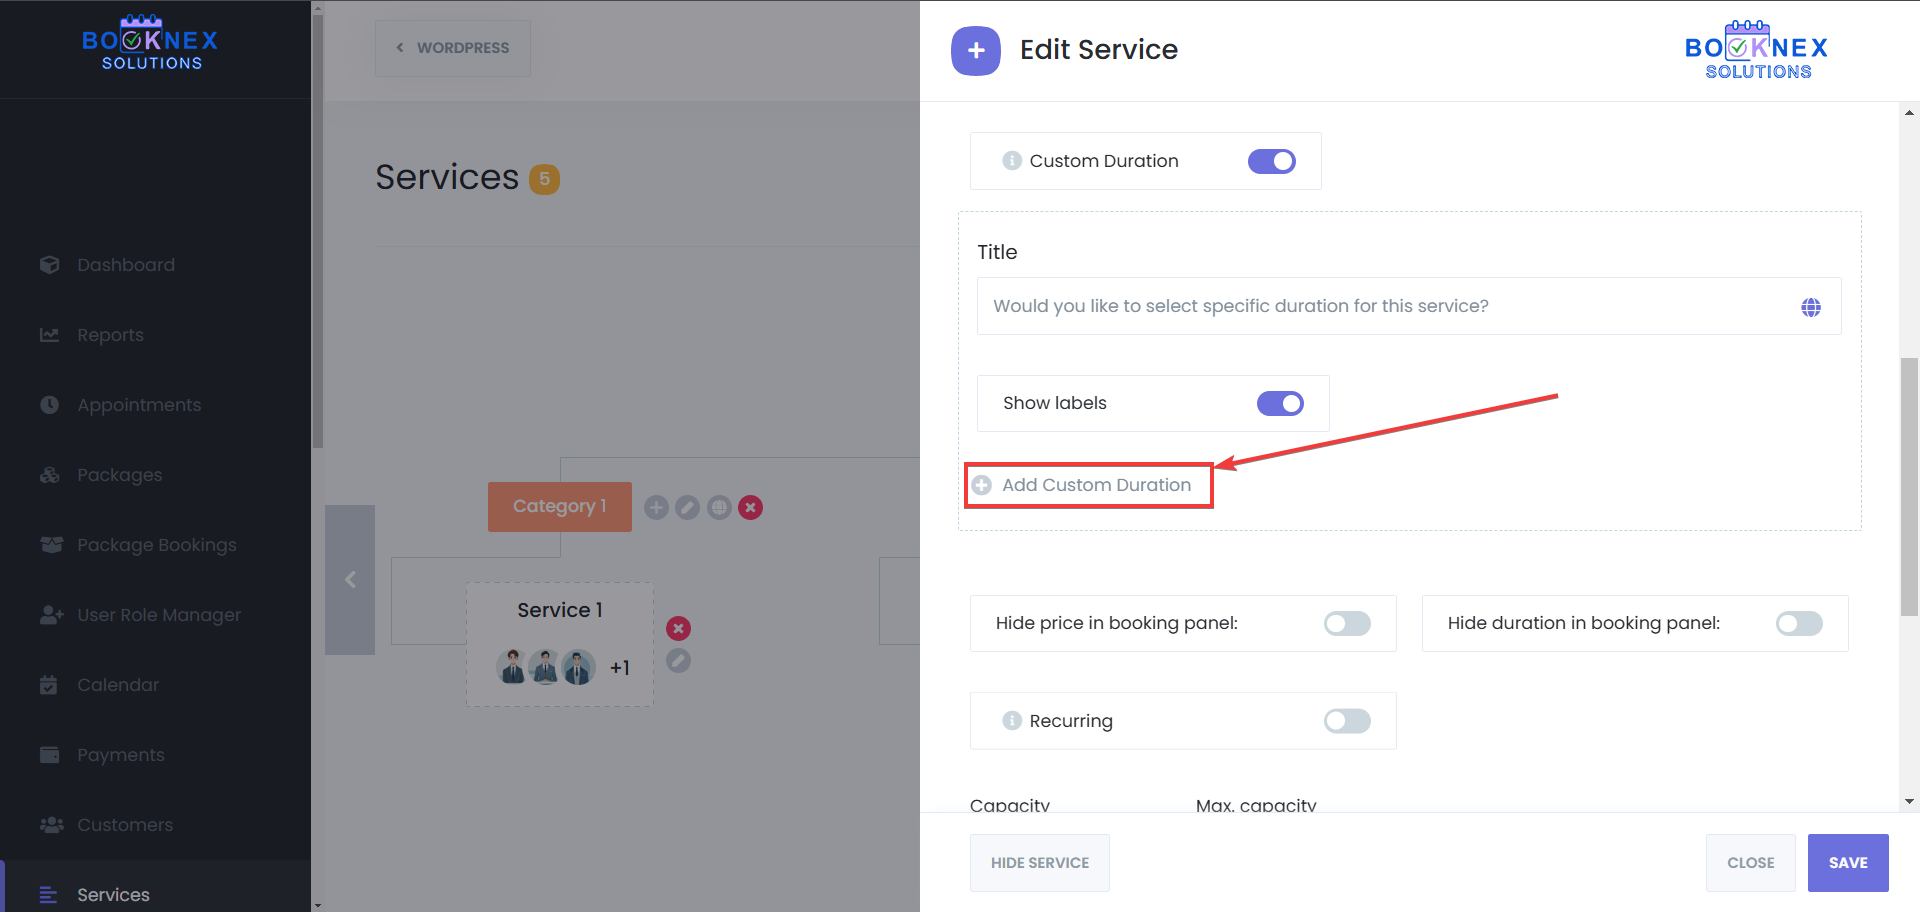
Define Duration and Pricing
Set a custom time duration (e.g., 30 minutes, 60 minutes, 90 minutes). Assign a specific price for each duration.
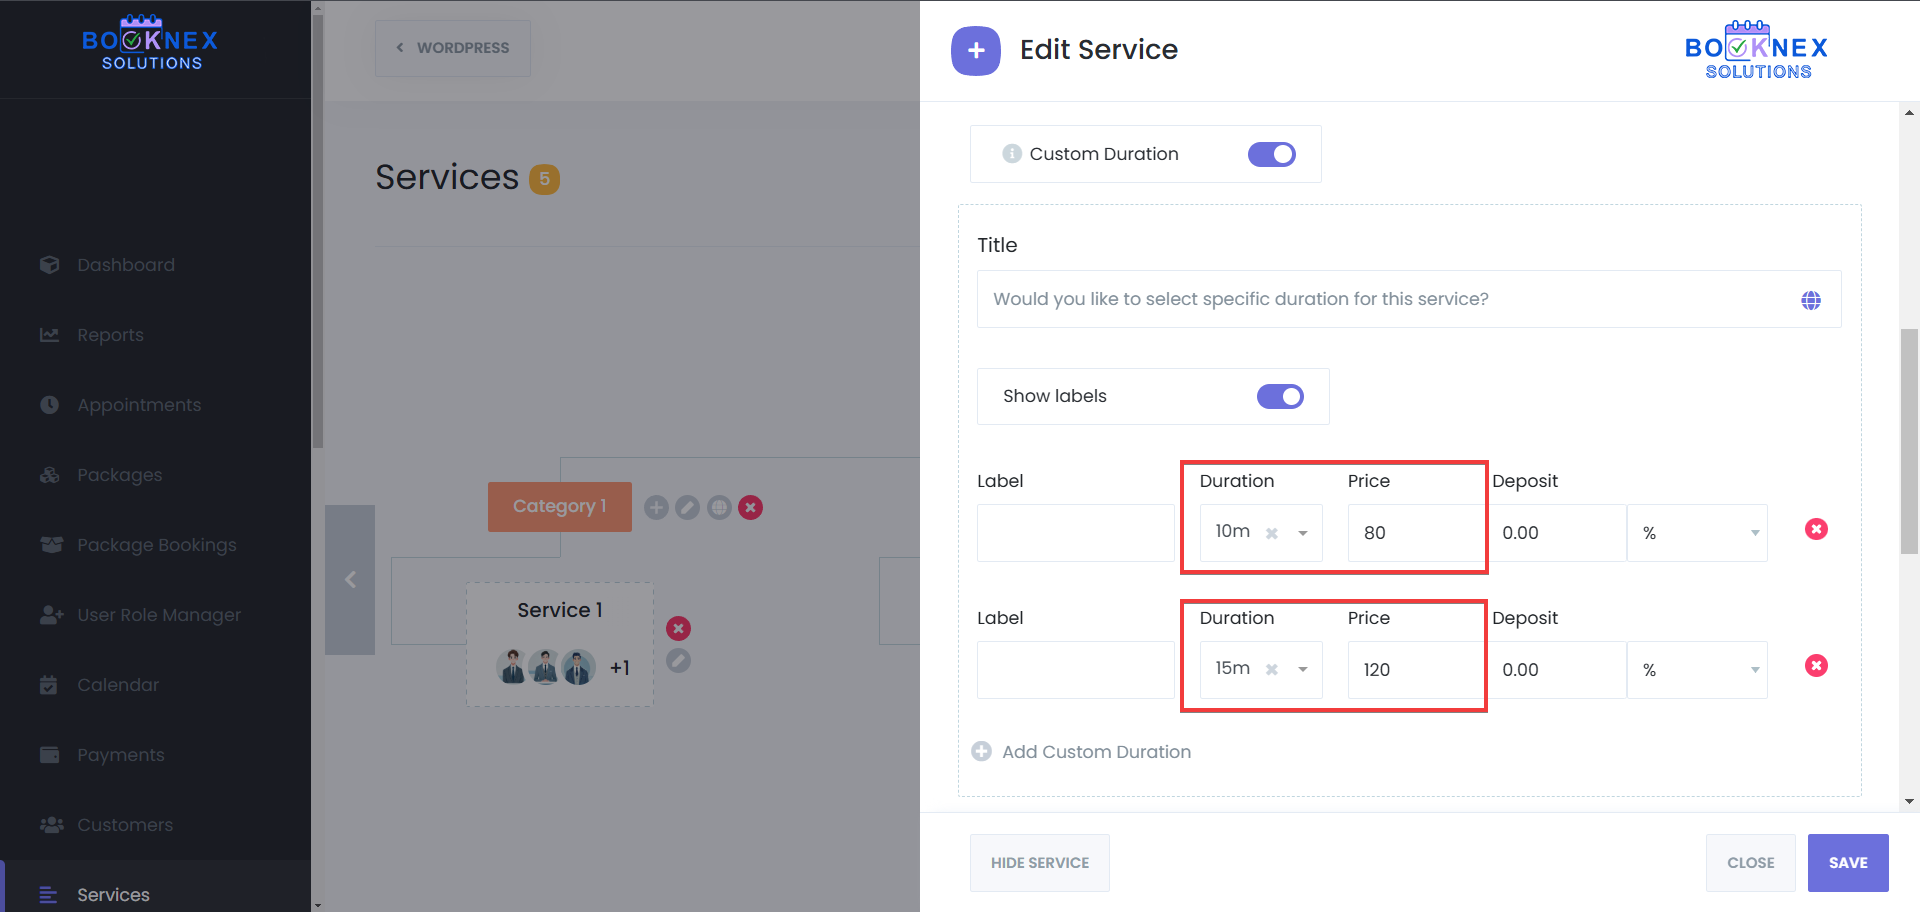
Specify Deposit Amount (Optional)
If applicable, set a deposit amount for each custom duration. You can set the deposit amount as a percentage of the service price, or, specific amount.
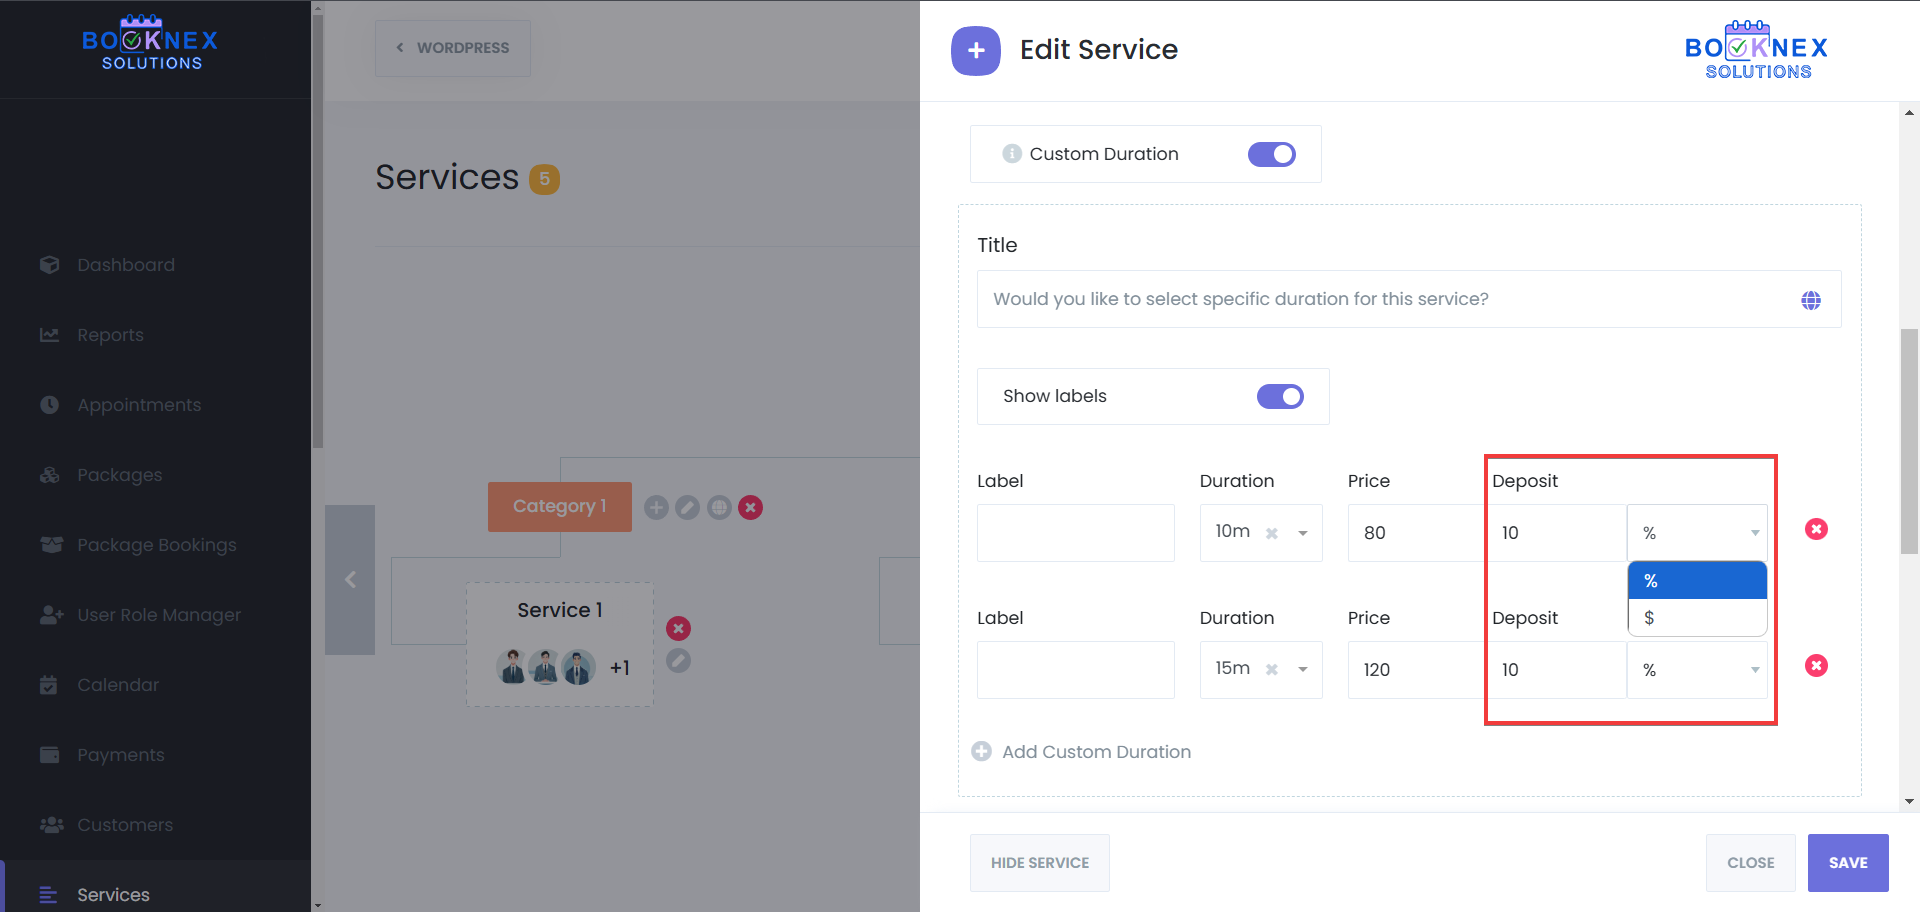
Set Duration Titles
Add unique titles for each duration, which will be displayed in the booking form to provide clarity for customers.
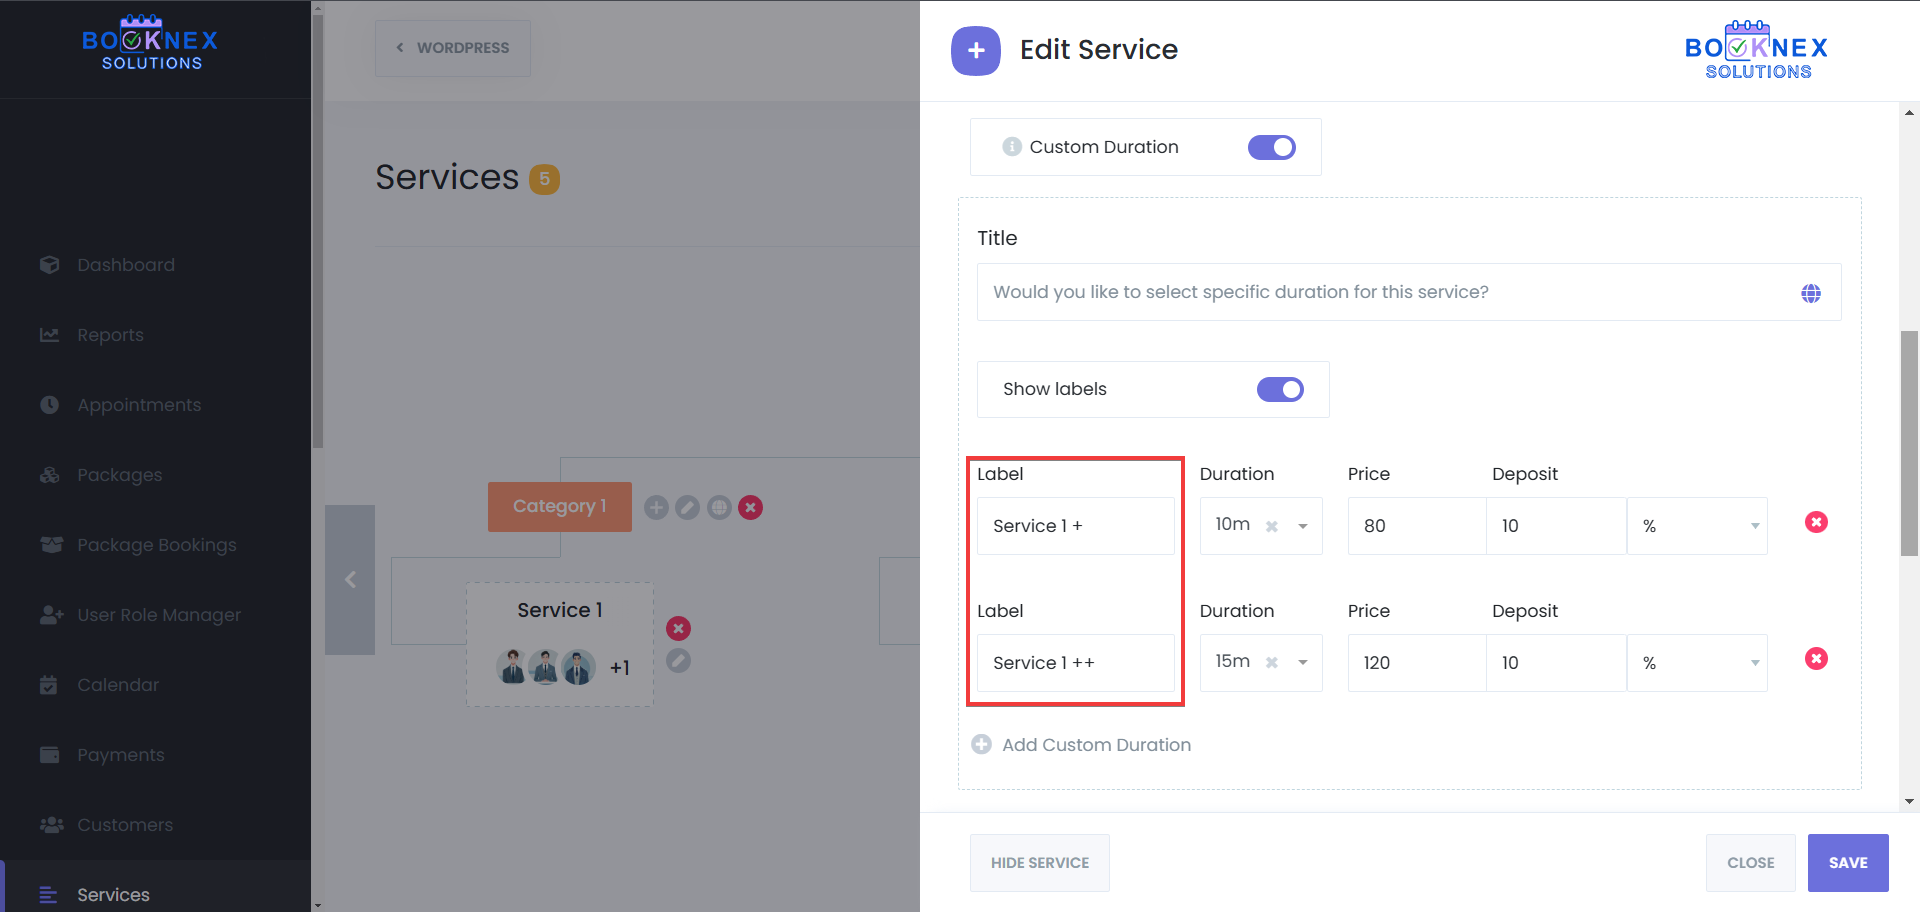
Aside from adding unique titles for each duration, you can also add a title for the custom durations for each service. That title also supports multi language, in case your site is multi-language.
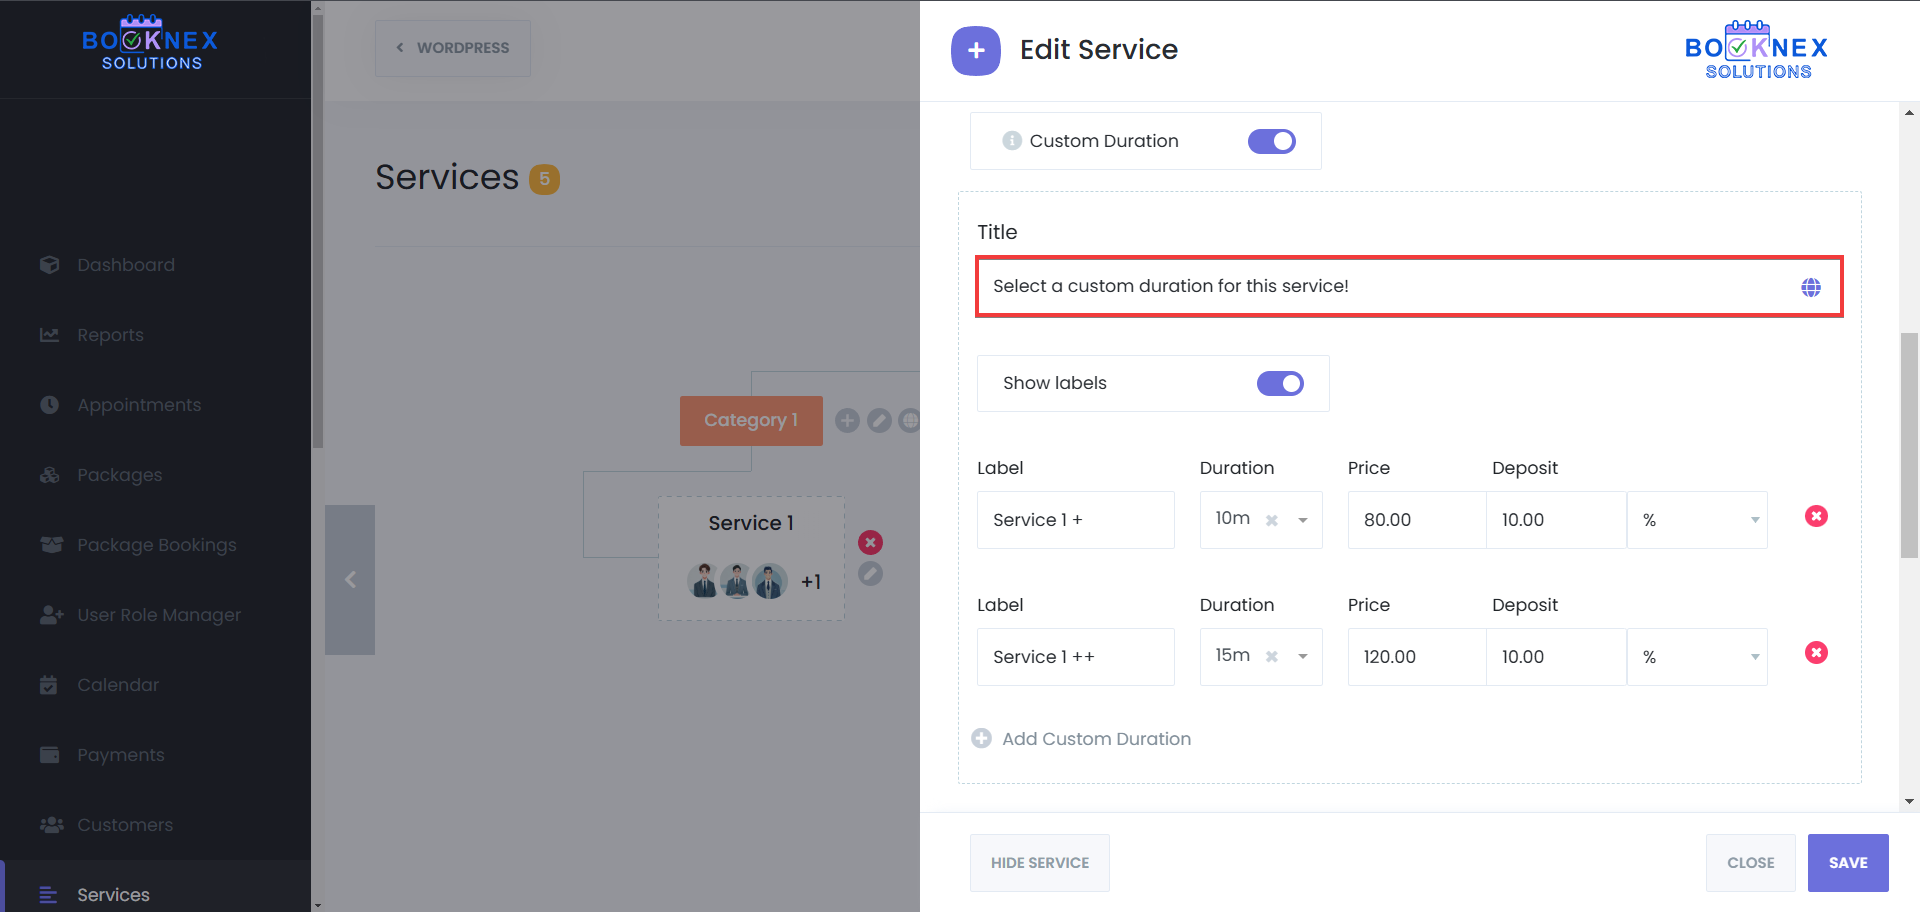
Save Changes
Click Save to apply the new durations.

Assigning Staff-Specific Pricing
If your service pricing varies based on the assigned staff member, you can customize the pricing per staff member:
Navigate to the "Staff" Section in the Services Module
Select the Staff tab to configure pricing for individual employees.
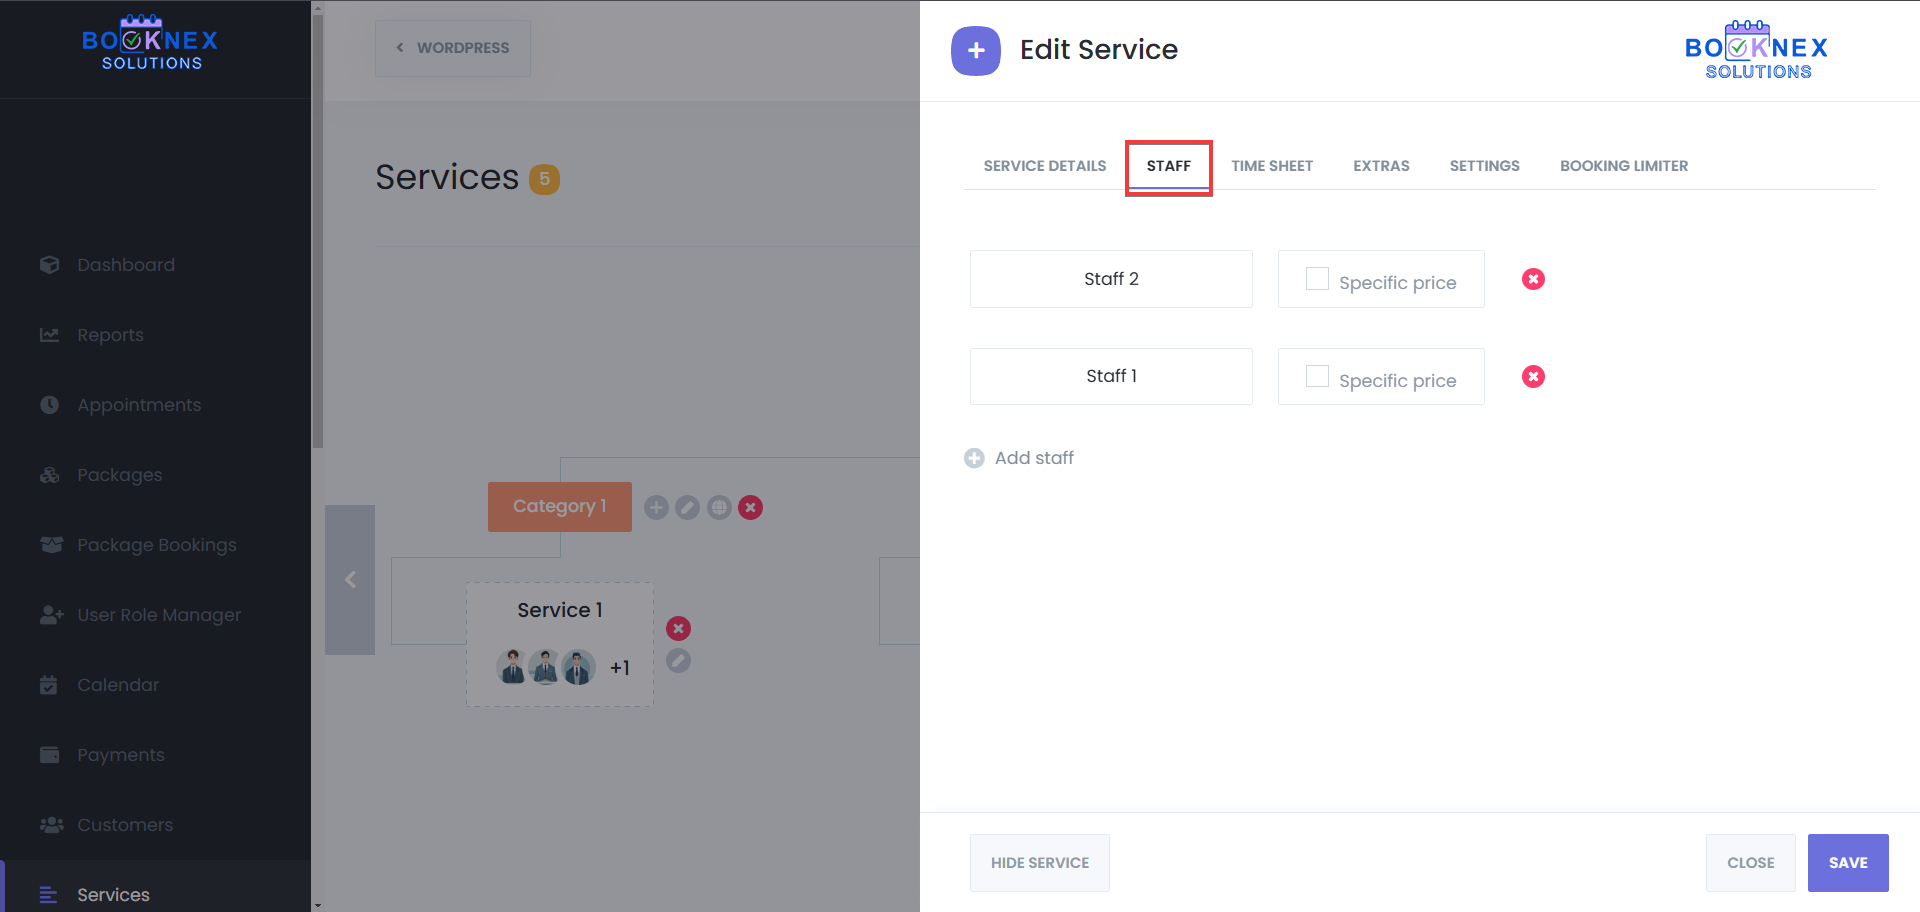
Set Custom Prices for Each Duration
Adjust the price per duration based on the assigned staff member.

Save Changes
Ensure all adjustments are saved before exiting the settings.
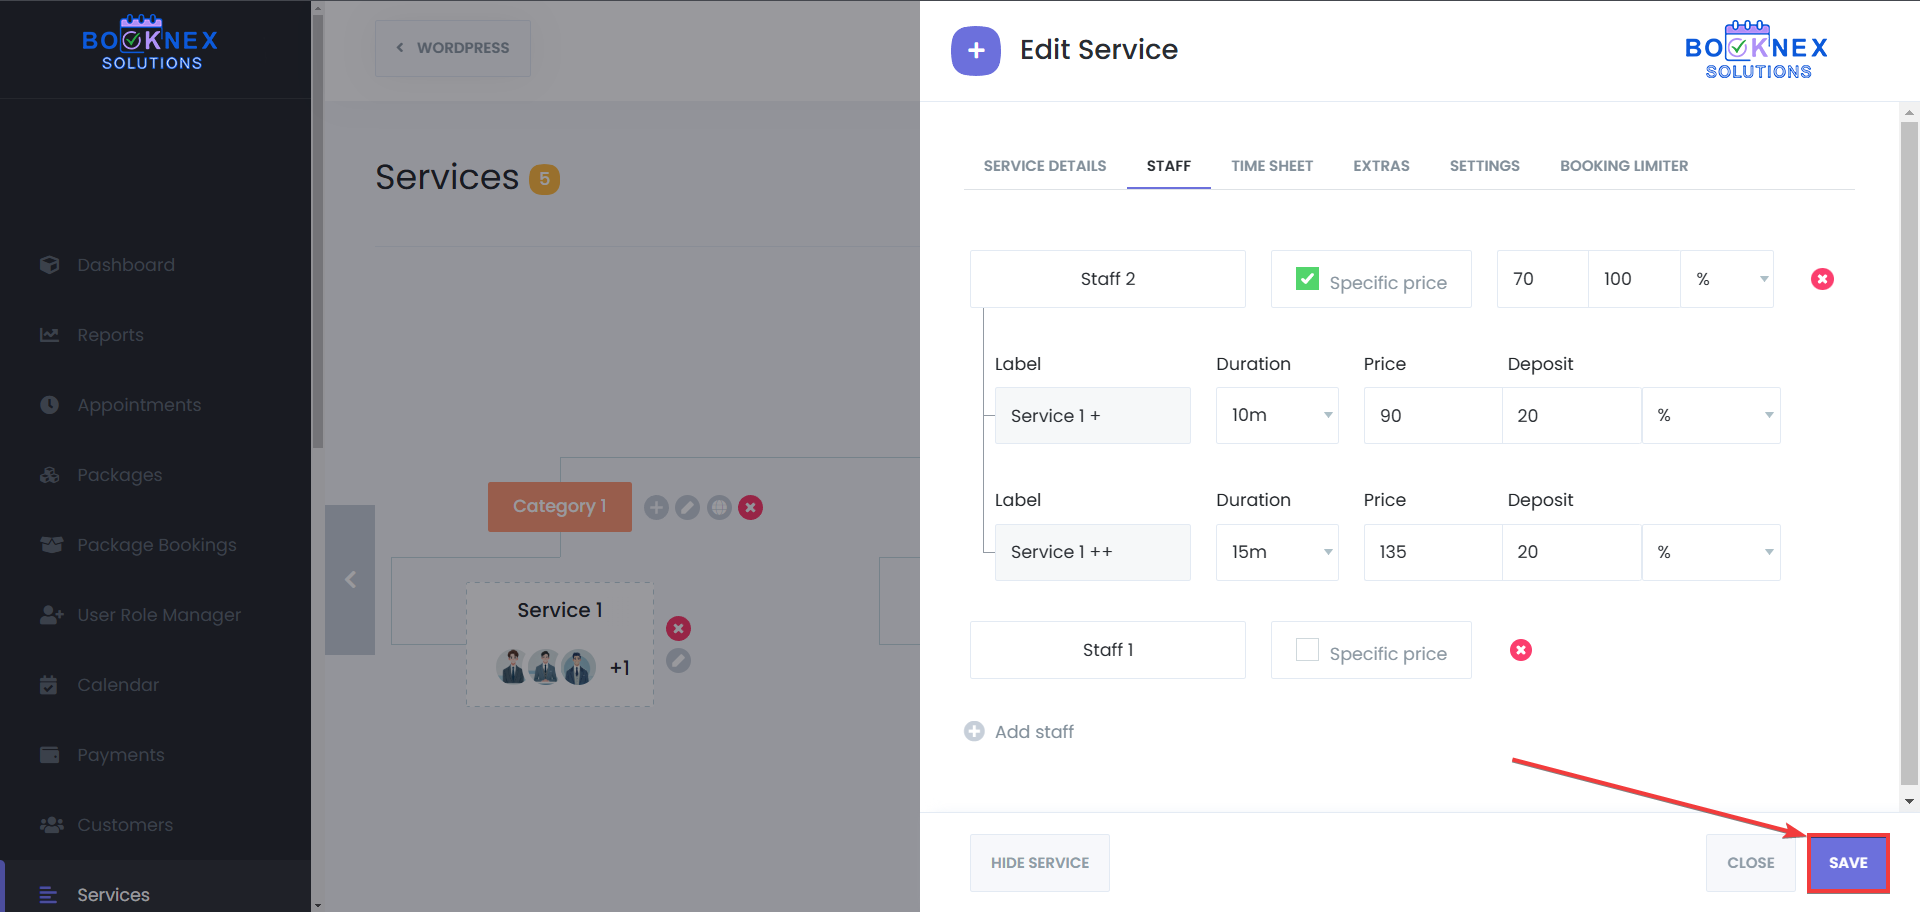
Customer Booking Experience
When a customer books a service with multiple durations:
A Popup Will Display Available Durations
The customer will see a selection of durations along with their respective prices.
Customer Selects a Duration

The customer can choose from one of the available durations. Alternatively, they can proceed with the default service duration.
Custom durations for admin panel
You can also use the custom duration from your Booknex admin panel, when you create new appointments. To do so, you have to:
Go to the "Appointments" or "Calendar" module, and add a new appointment.
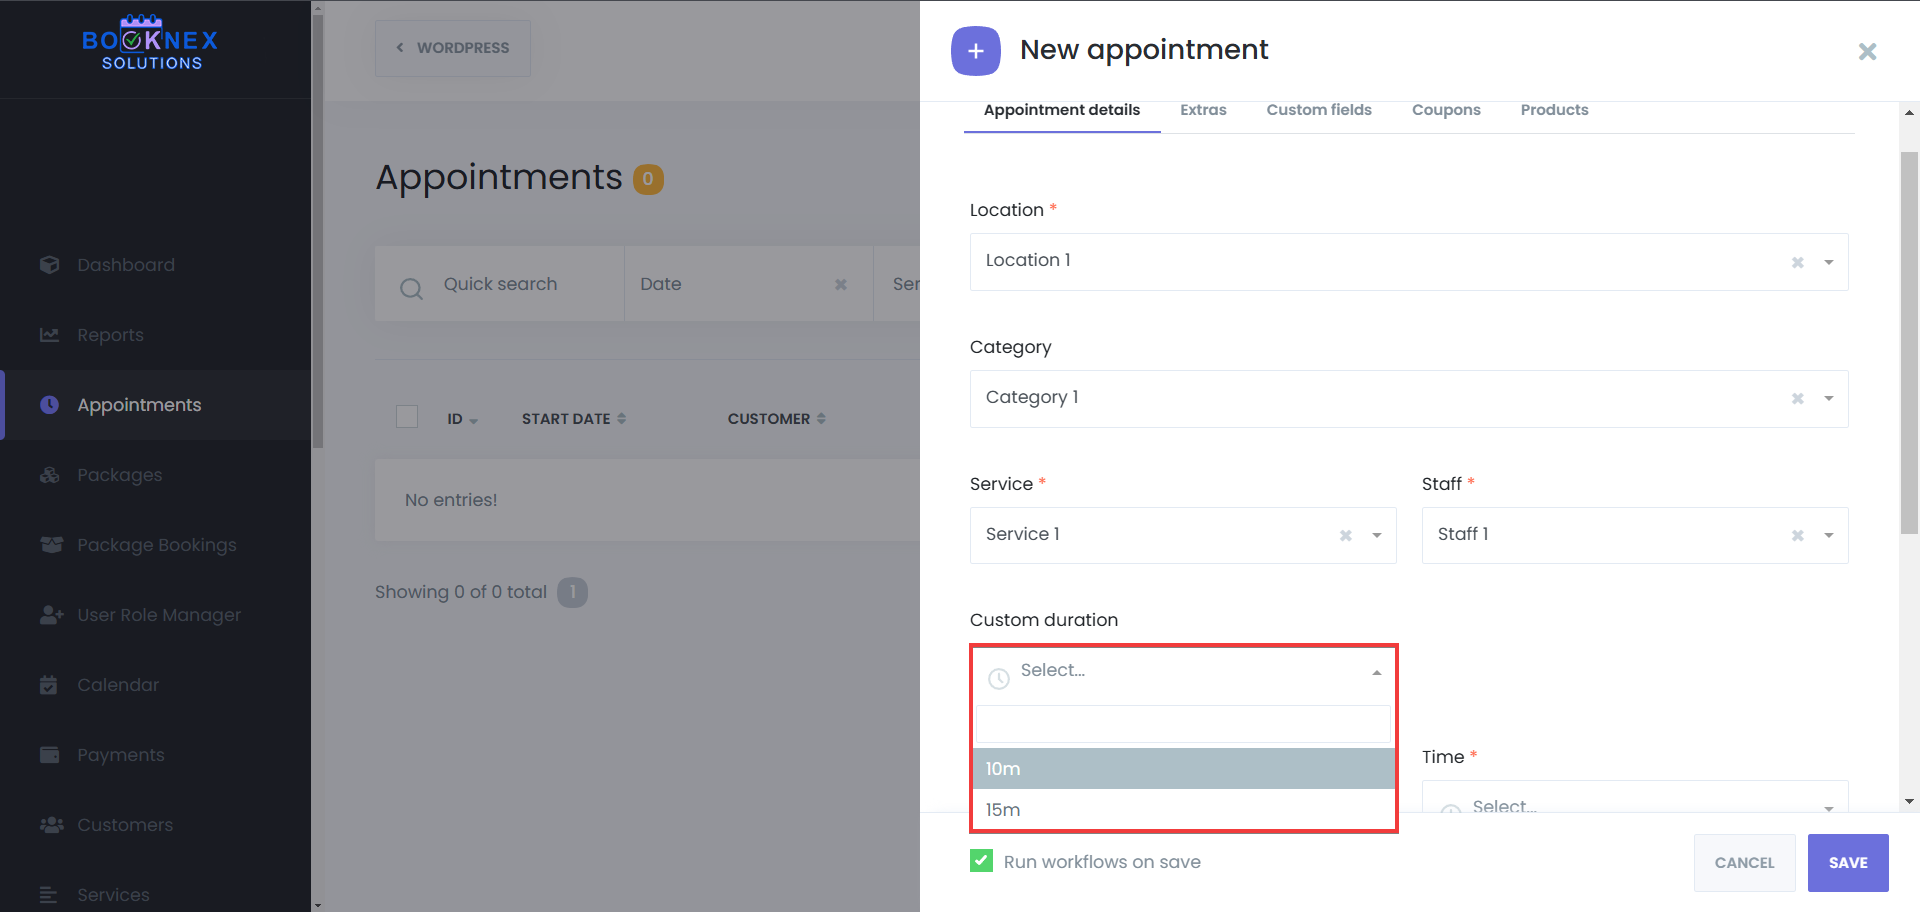
Select and fill the mandatory fields, then select the service which has the "Custom durations" feature enabled.

Finish filling the other fields, and click on "Save" button to add the appointment.
Example Use Case
A spa offering massage services might use Custom Durations to allow customers to book a 30-minute, 60-minute, or 90-minute session at different rates. This flexibility helps businesses provide customized pricing while improving the booking experience.
Packages
The Packages add-on for Booknex allows businesses to create and manage bundled service packages, offering customers a more streamlined booking experience. This add-on enables you to bundle multiple services together at a discounted price, allowing clients to book and manage these services more efficiently.
Overview of Key Features
The Packages add-on offers several powerful features for both admins and customers. Admins can create and manage service packages, while customers can easily book and manage their purchased packages through the Customer Panel.
Setting Up and Managing Packages (For Admins)
1. Creating a Package
To create a service package, follow these steps:
Navigate to the Packages Section
In your Booknex Admin Panel, go to Packages on the left-hand side of the dashboard.
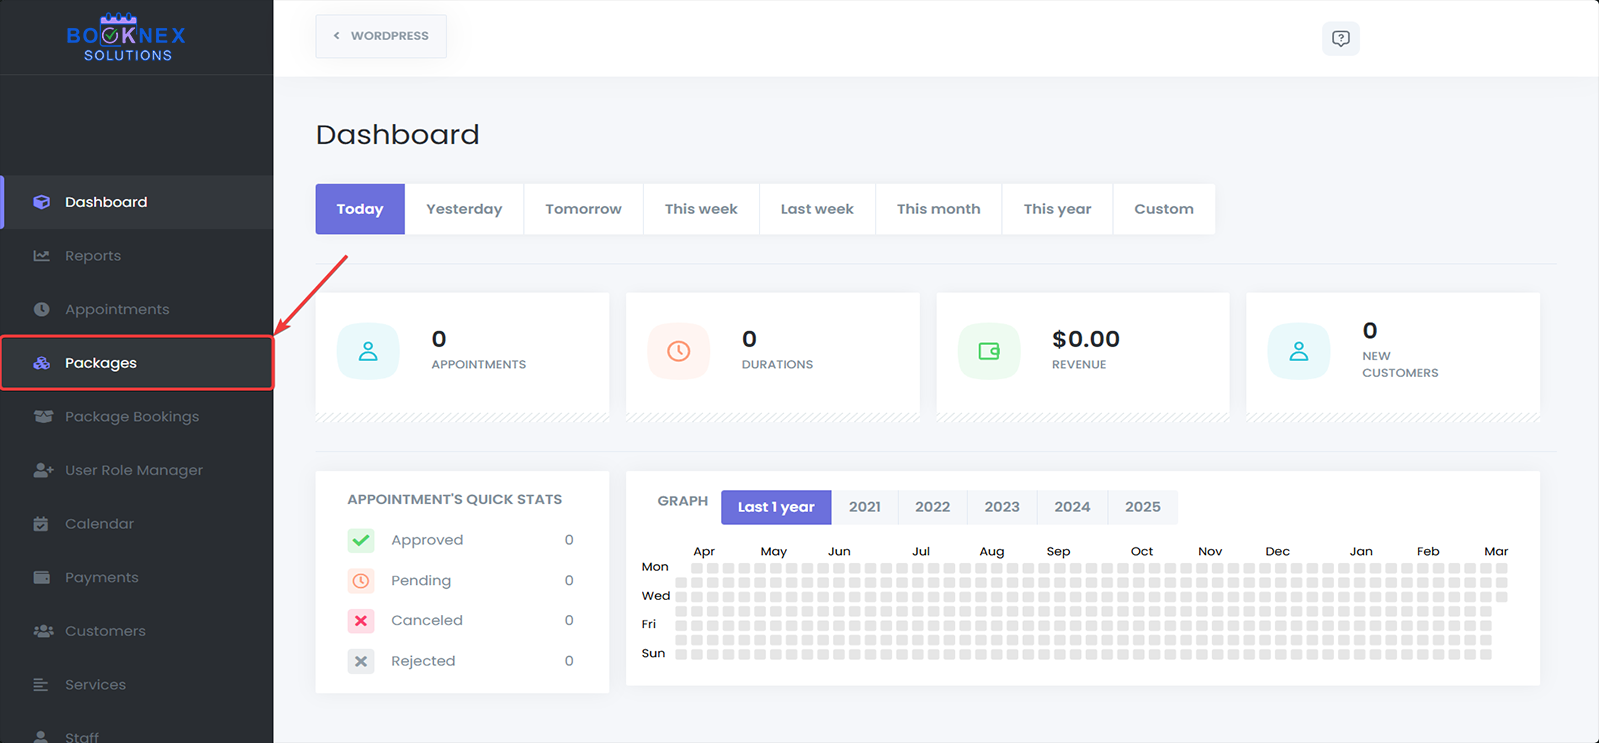
Add a New Package
Click on the Add New Package button to begin creating a new package.

Configure Package Details
- Package Image: Upload a package image.
- Package Name: Enter a name for the package.
- Expiration date: Specify how long the package will be valid (e.g., 1 month, 3 months).
- Payment method: Set the available payment methods for the package.
- Make Package Private: make the package only visible to and only bookable by admin/staff member.
- Description: Add a brief description explaining the services included in the package.

Select Services
Choose the services that will be part of this package. One thing to keep in mind there is that if the added service has Custom Durations*, and it's been booked with a package, then it will be booked with the default duration.

Pricing
Set the package price, which can either be a fixed price or based on a discount.

Save the Package
After entering all the required details, click Save to create the package.
 https://booknexsolutions.com/how-to-start/#staff-commission
2. Editing or Deleting a Package
To edit or delete an existing package, follow these steps:
Access the Packages List
Go to Packages in the admin panel.

Select the Package
Locate the package you want to edit or delete and click on the three dots next to it.
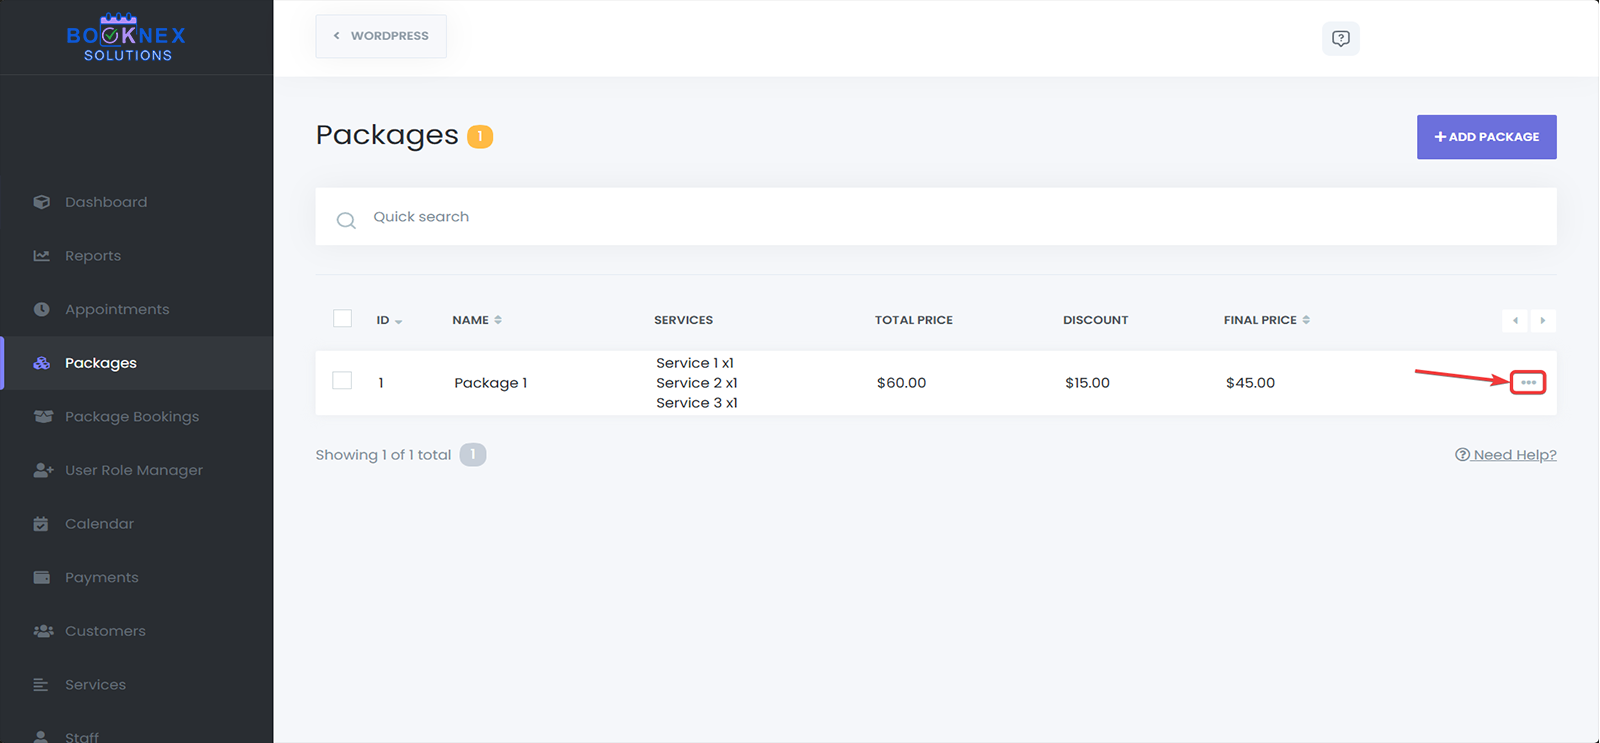
Edit the Package
To edit, select Edit, make the necessary changes, and click Save to update the package details.

Delete the Package
To delete, select Delete, and confirm the action. Be cautious when deleting packages, as this action cannot be undone.
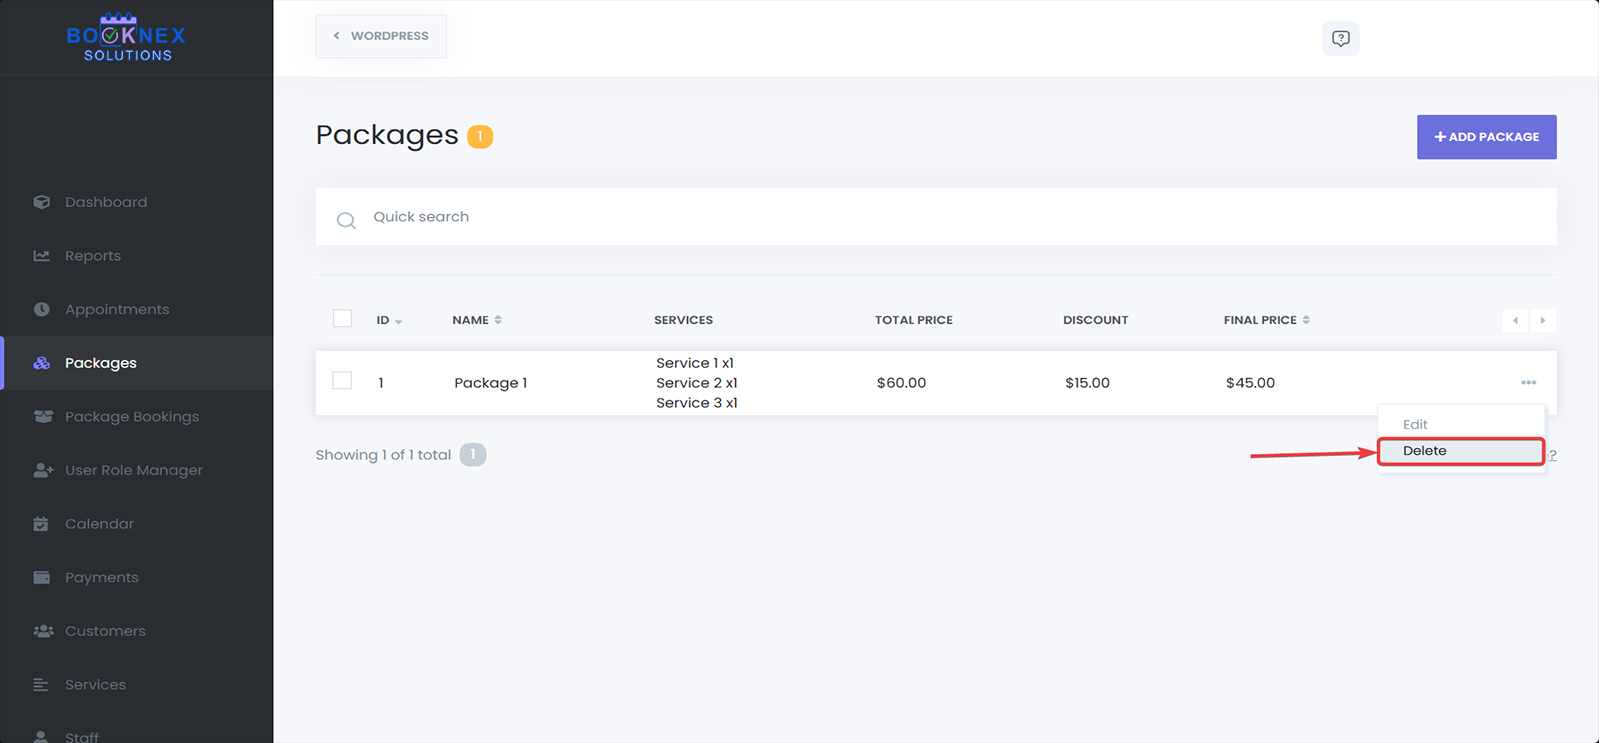
Managing Packages in the Customer Panel (For Customers)
1. Viewing Purchased Packages
Once a customer has purchased a package, they can view their available packages directly from the Customer Panel. To view their packages:
Log into the Customer Panel
Customers log into their Customer Panel using their credentials.
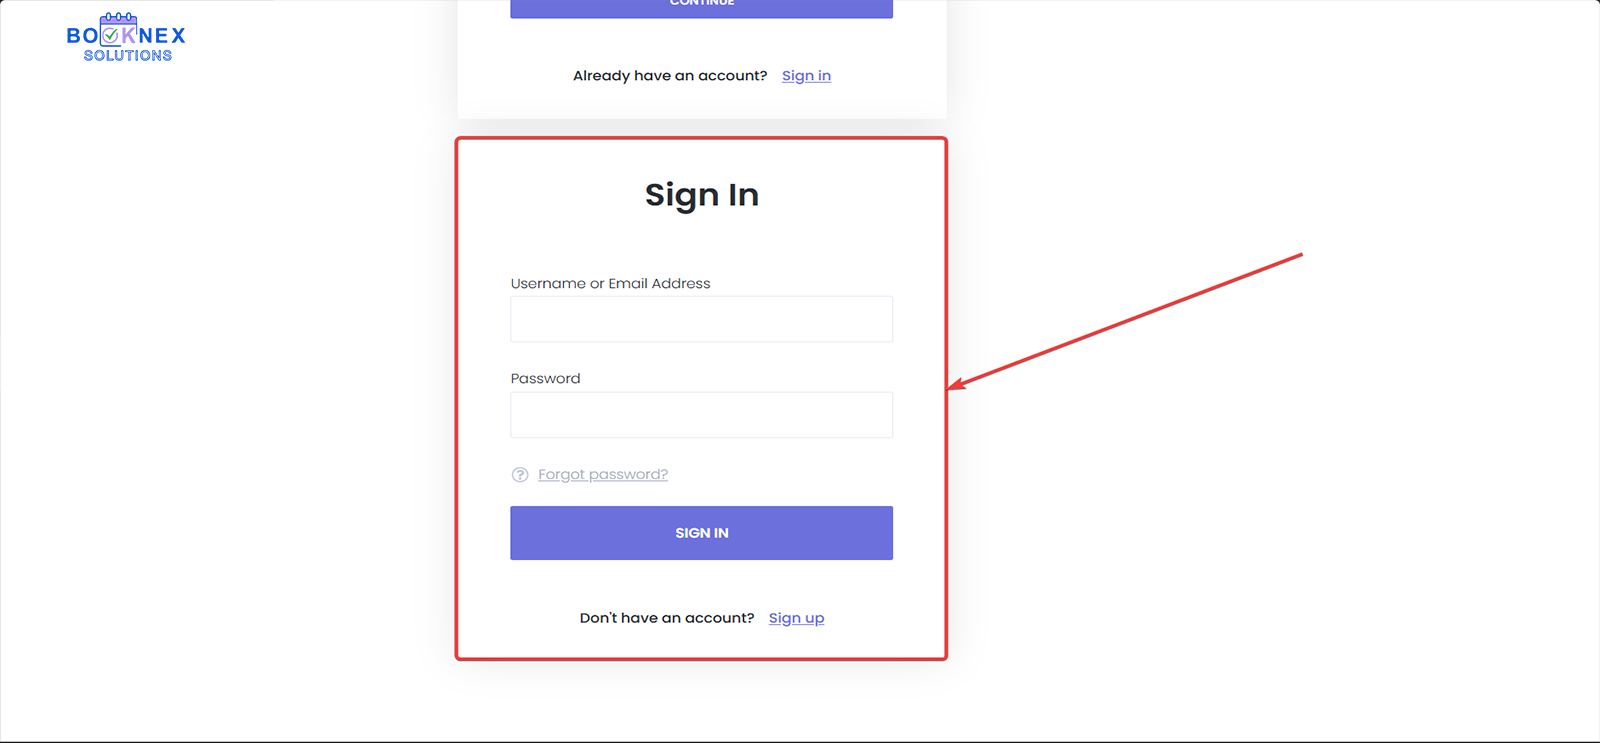
Access the Packages Section
Navigate to the Packages section where all purchased packages will be displayed.

Review Package Details
Customers can see the name, the number of remaining sessions, and the creation date of each package.

Book the remaining appointments
Customers can book their remaining appointments from their package purchase by clicking on "Manage Package", then scheduling the appointments they have left.
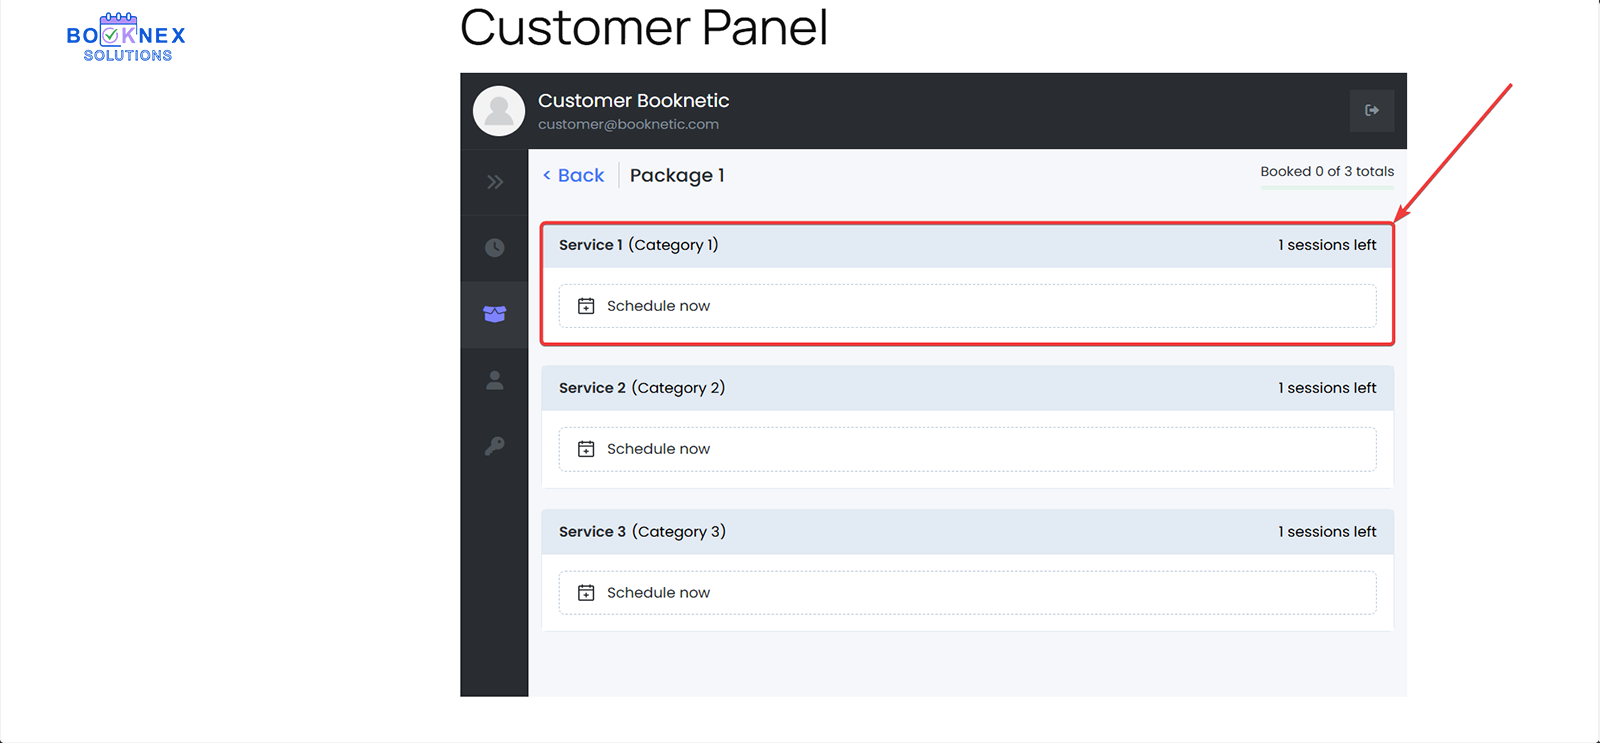
2. Booking Appointments Using a Package
To book an appointment using an available package:
Select a Package During Booking
When making a new booking, the customer will be prompted to select a package during the booking process.

Confirm Appointment
The customer adds their personal information such as name, email, phone number, they can confirm the appointment.

3. Redeeming Package Services
After purchasing a package, customers can redeem their services as needed. Each time a service is booked using a package, the remaining sessions are updated, and the customer can view the updated balance in the Customer Panel.
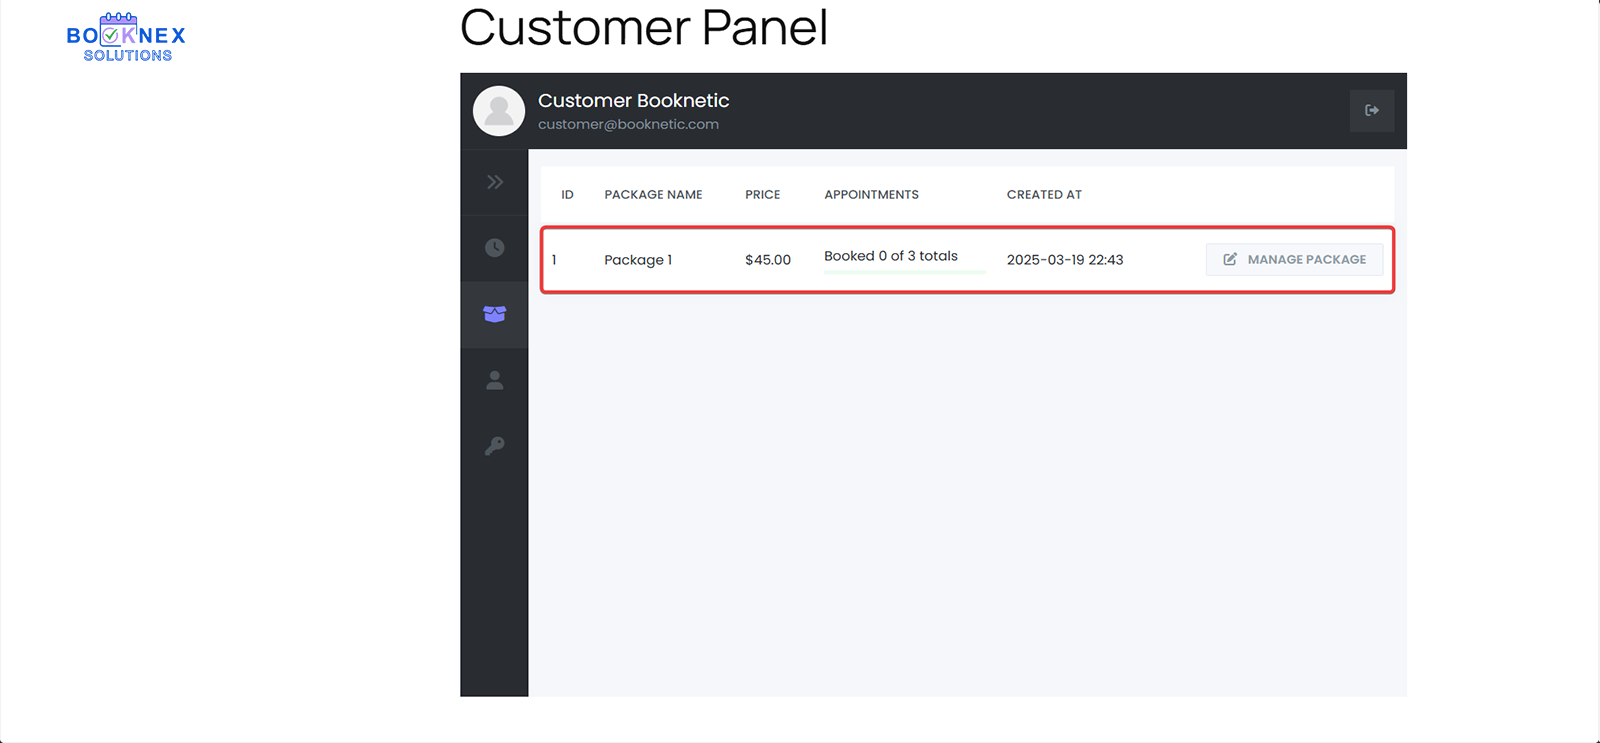
Best Practices
- Offer Popular Service Combinations: Create packages that combine frequently booked services to make them more attractive to customers. For example, a Spa Package could combine a massage, facial, and body treatment at a discounted rate.
- Set Expirations for Limited-Time Packages: Use expiration dates to create time-sensitive promotions, encouraging customers to book services within a certain period.
- Monitor Package Usage: Keep track of the most popular packages to better understand customer preferences and adjust your offerings accordingly.
- Customize for Specific Clients: If needed, offer personalized packages tailored to specific customer needs or high-value clients.
Keep in Mind: The following feature mentioned in this documentation require separate paid add-on to be purchased from the Boostore: Customer Panel
Product Inventory
Setting Up Products
1. Accessing the Product Inventory Section
To begin setting up your products, you need to navigate to the Product Inventory section in the Booknex Admin Panel.
Steps:
In the Admin Panel, go to Product Inventory on the left-hand side menu.
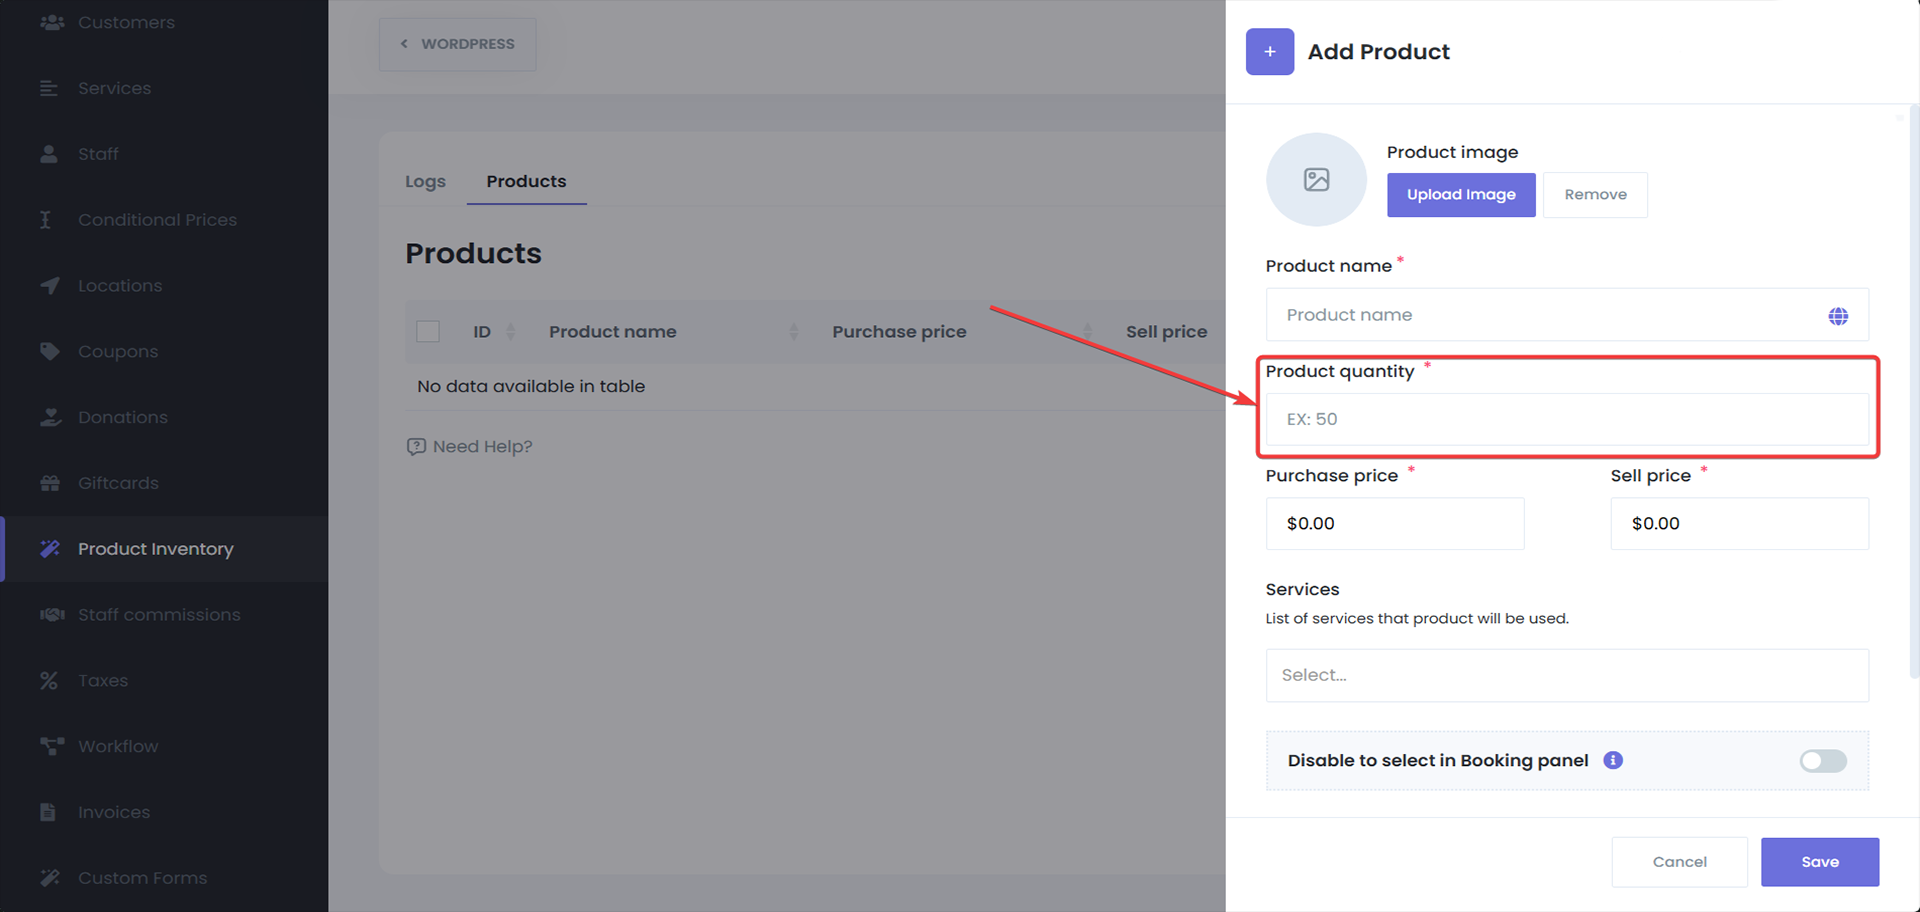
2. Adding a Product
https://booknexsolutions.com/how-to-start/#staff-commissionTo add a new product to your inventory:
Switch to the Products tab
In the Product Inventory section.
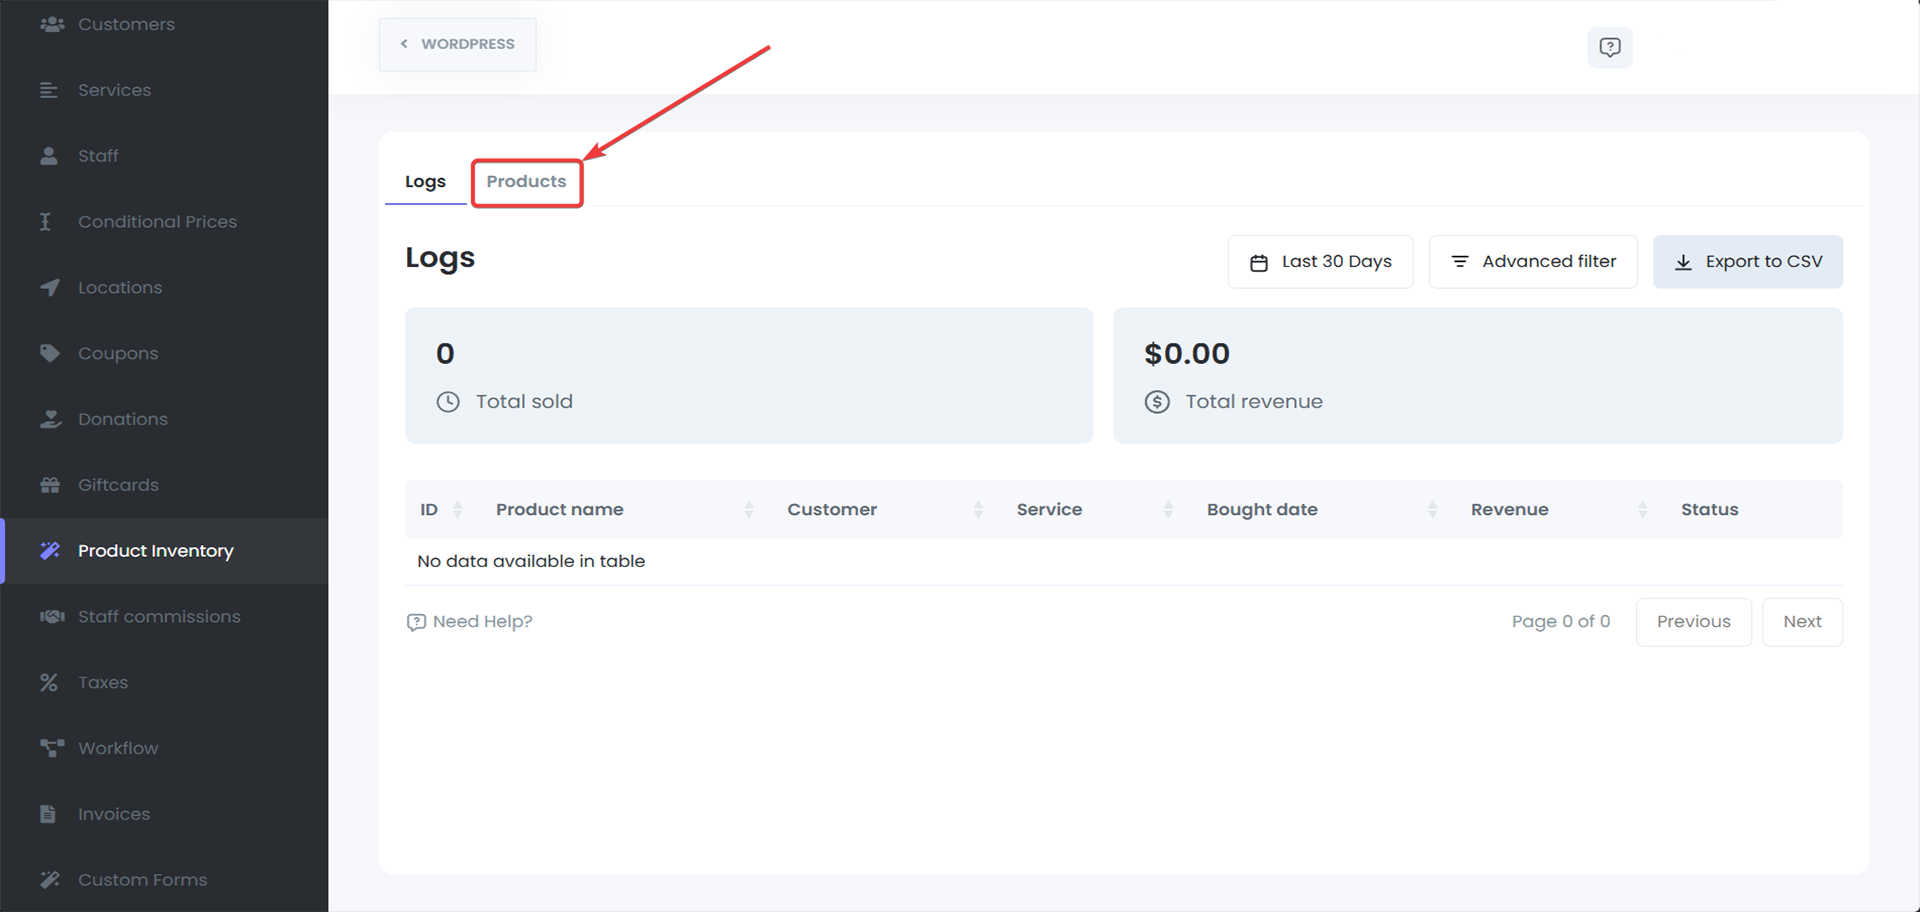
Click the Create Product + button
In the Products section.
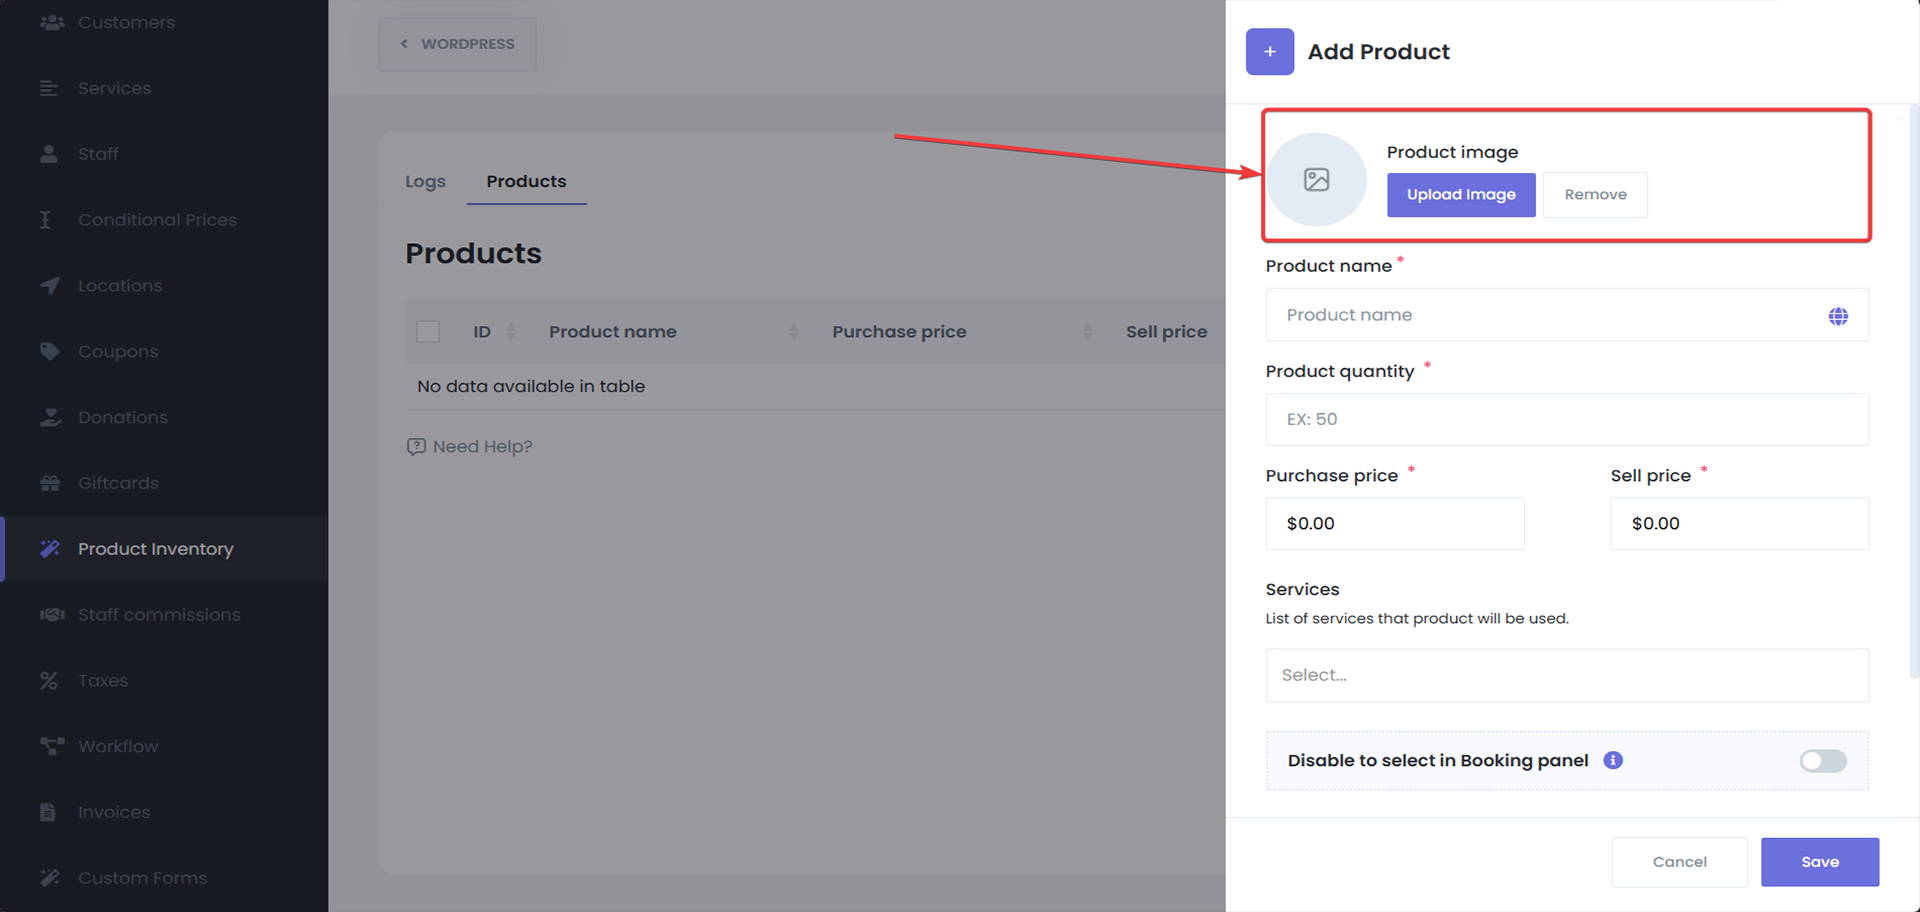
Add the image of the product
(Optional)
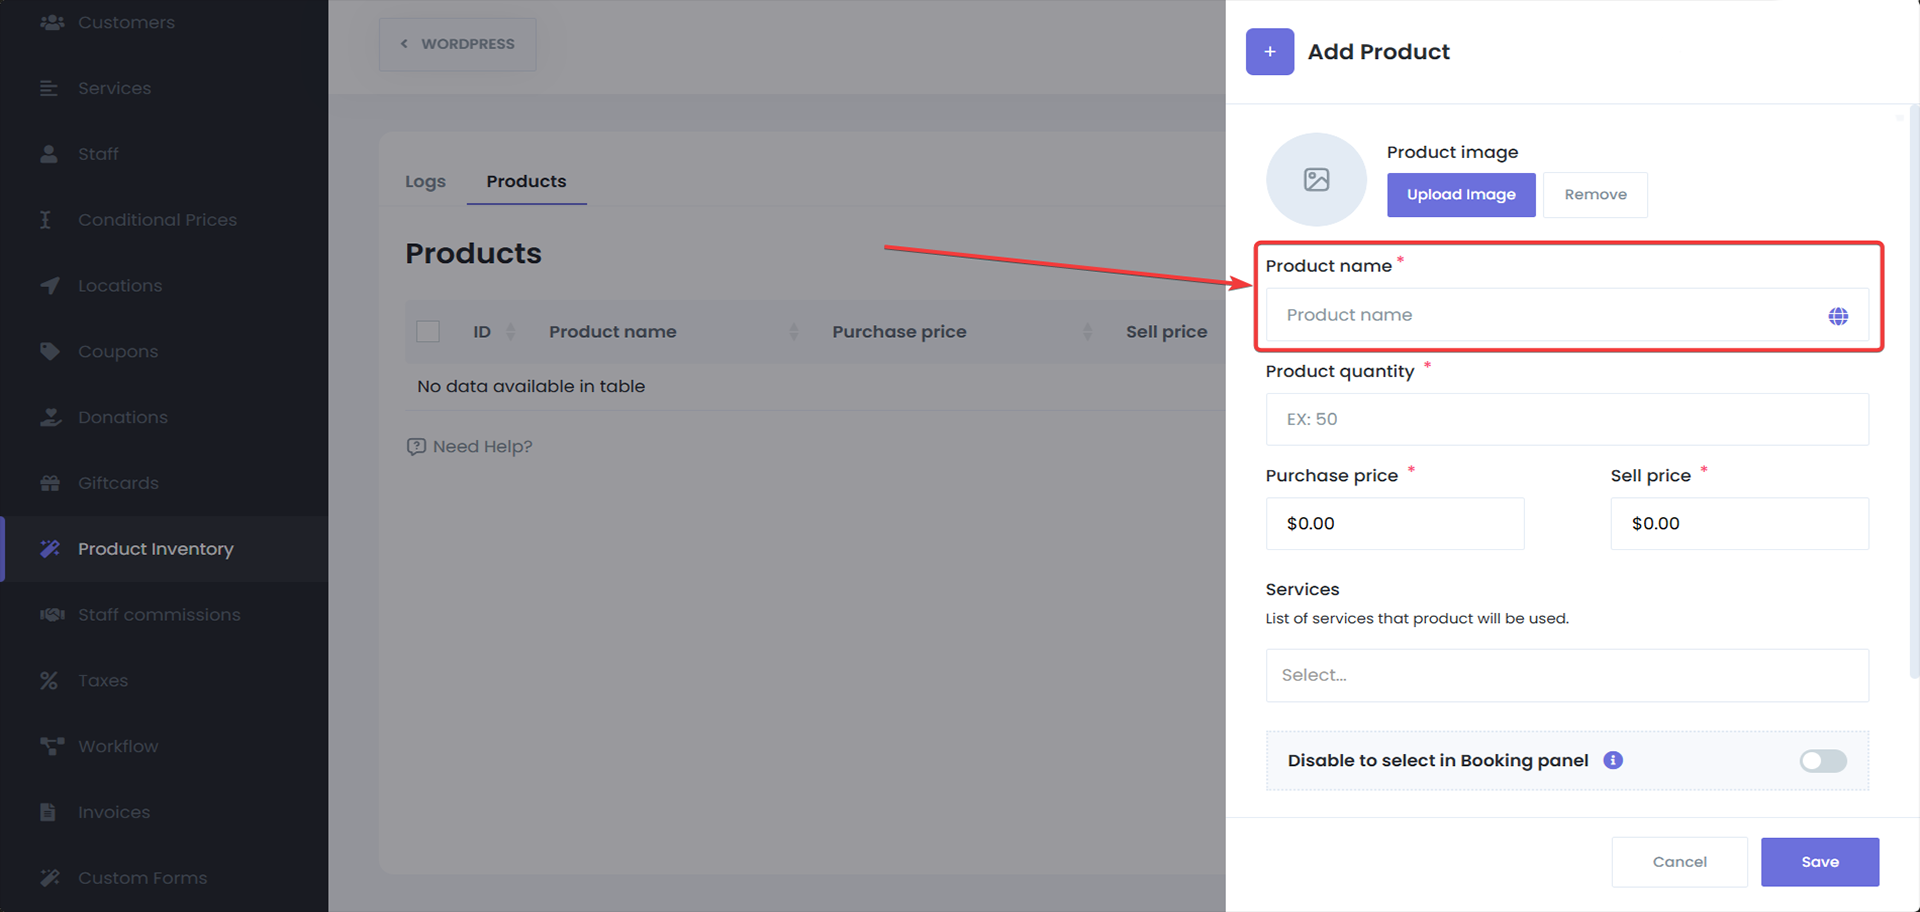
Enter the name of the product
(Mandatory)

Set the quantity available for the product
This number will decrease automatically as products are sold. (Mandatory)
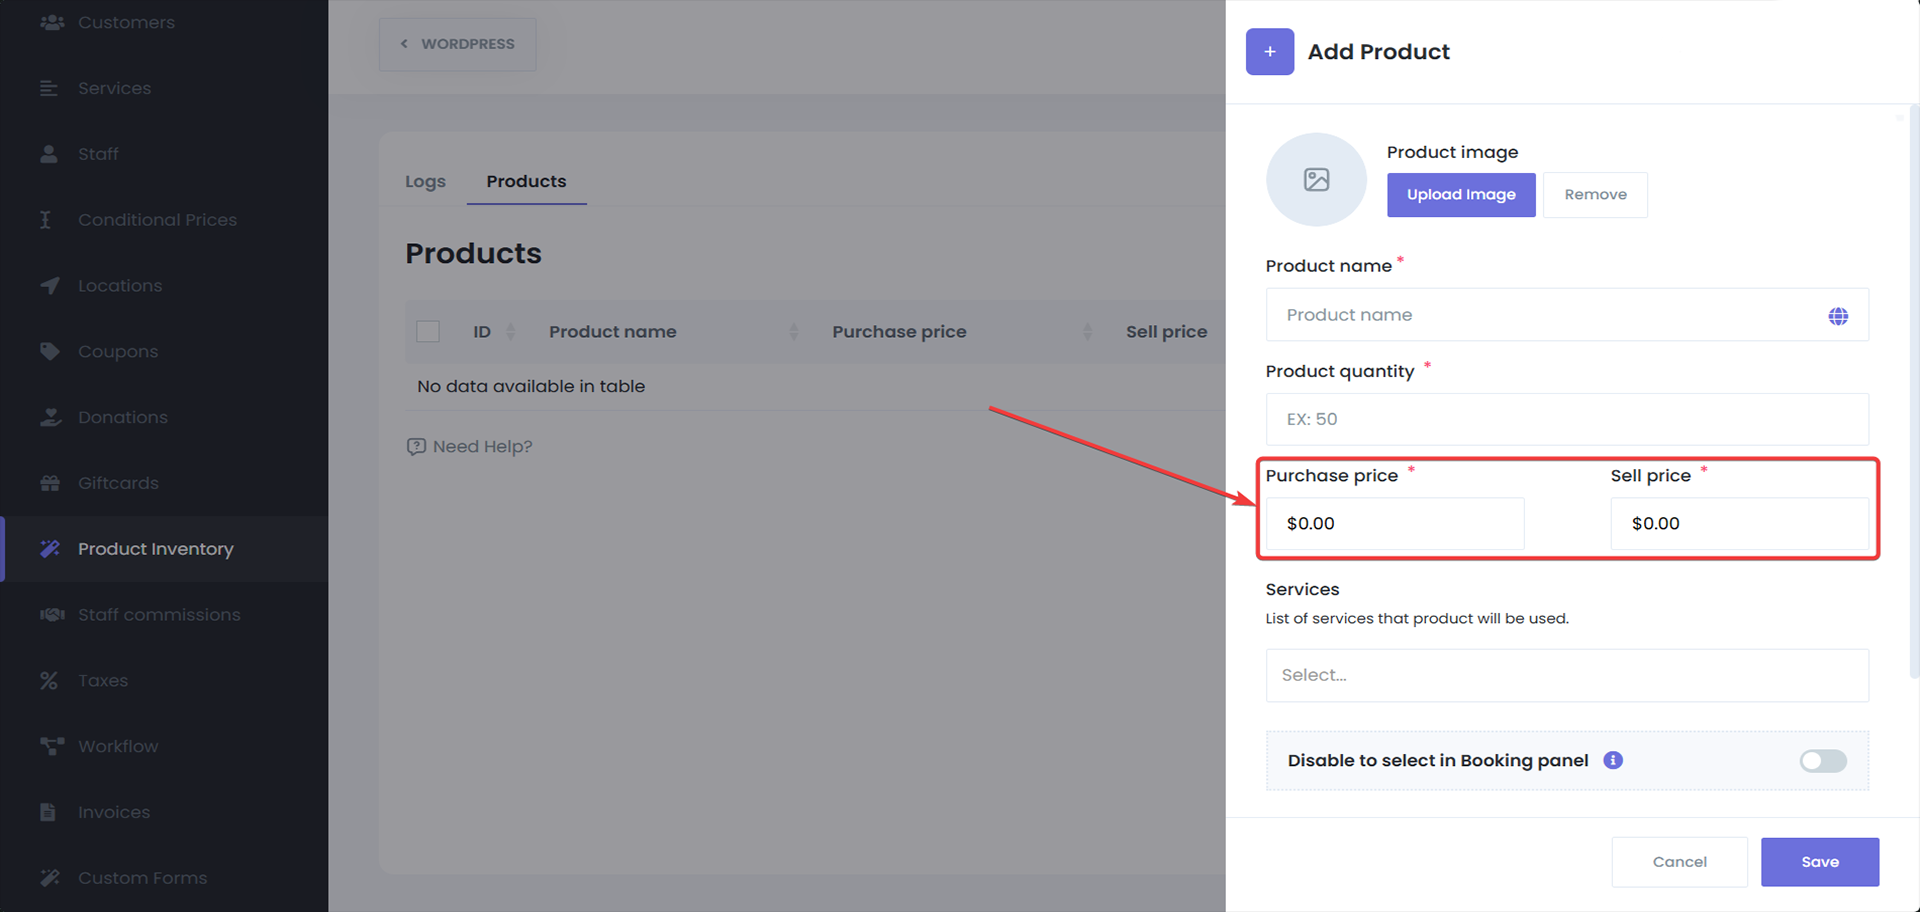
Set the purchase price
You should also set the purchase price, which can be different from the sale price. (Mandatory)
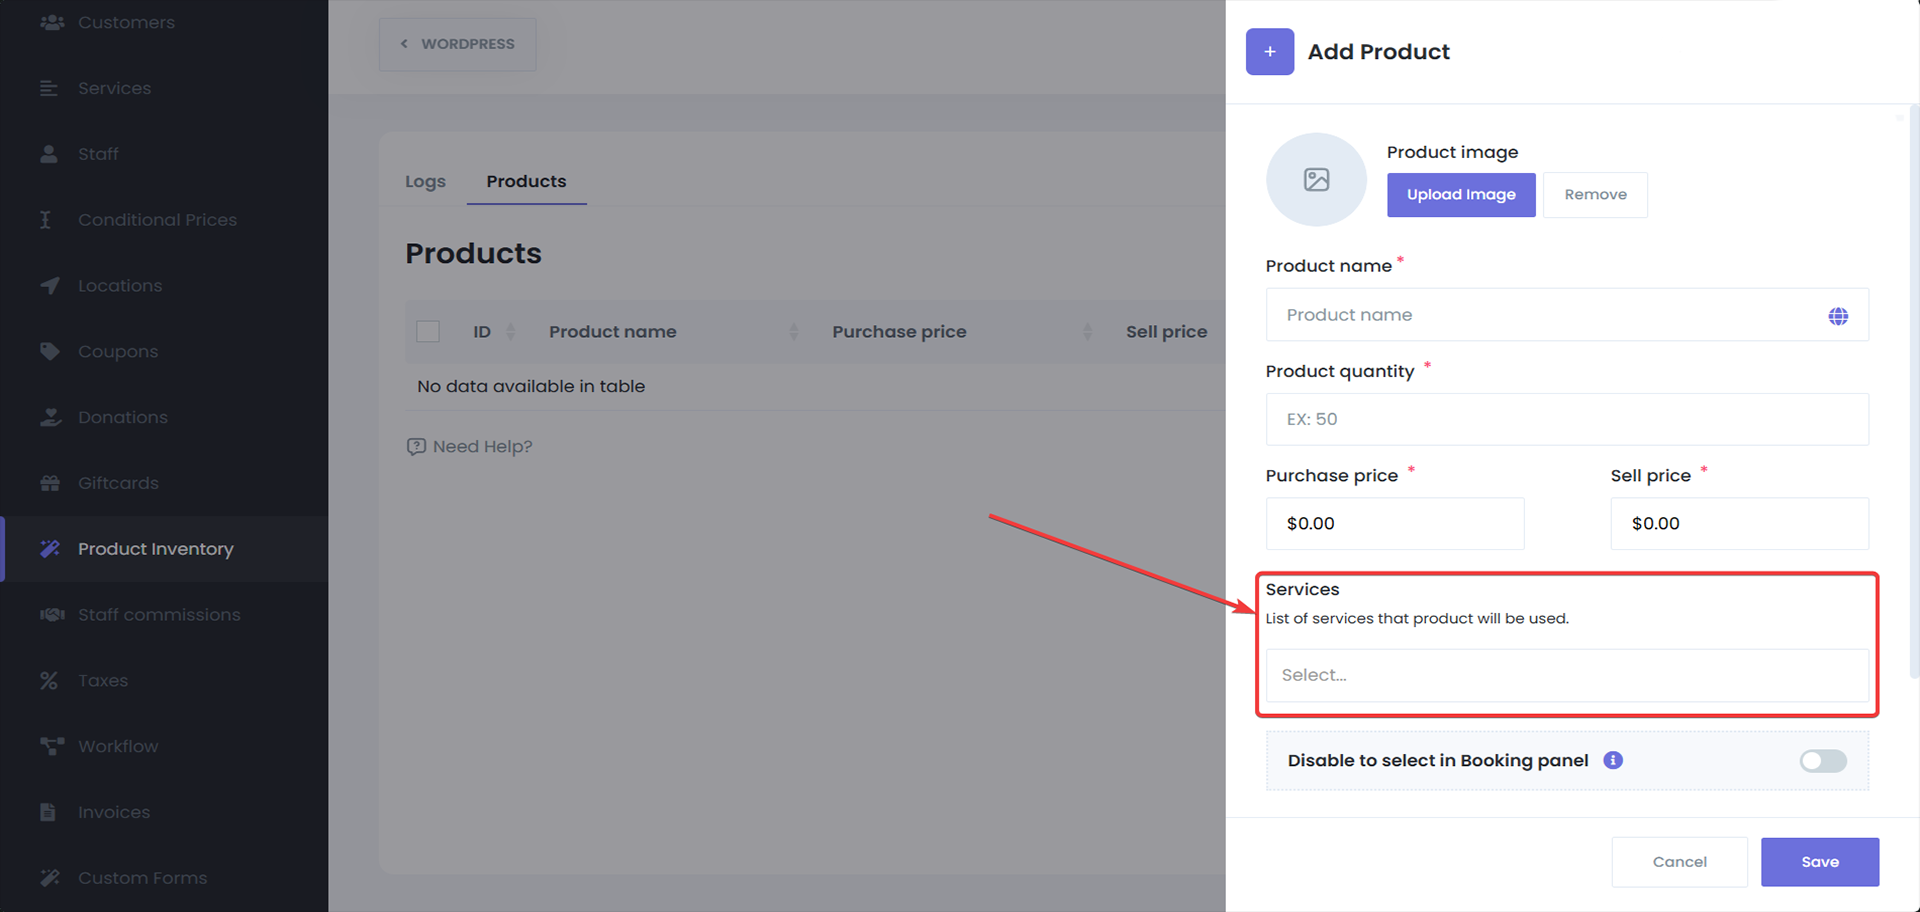
Select the services that will use this product
(Optional)

Enable the "Disable select in booking panel" option
Which will only enable the adminsMonitoring Product Sales/staff to add this product to the appointment when they add appointment from the admin panel.

Provide the description for this product
(Optional)

Click Save
Once the product information has been added.
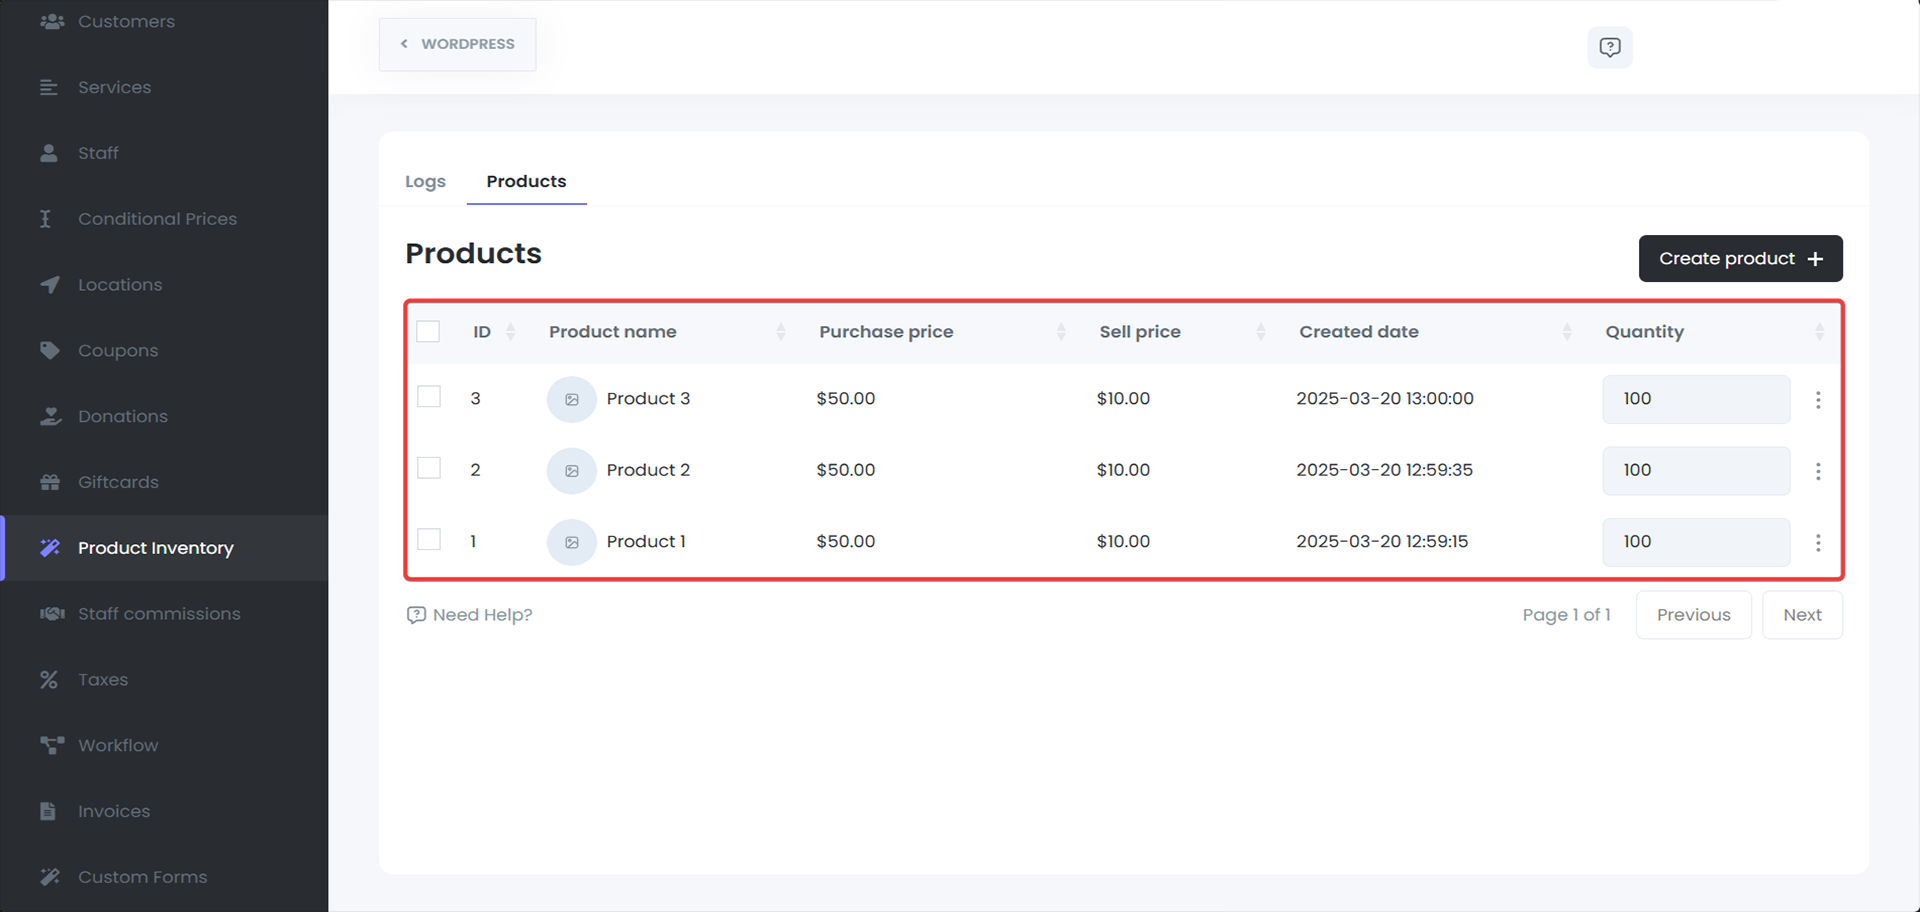
Managing Product Inventory
1. Viewing Existing Products
You can view all the products in your inventory in the Product Inventory section. The list will show you the name, price, quantity, and status (active/inactive) of each product.
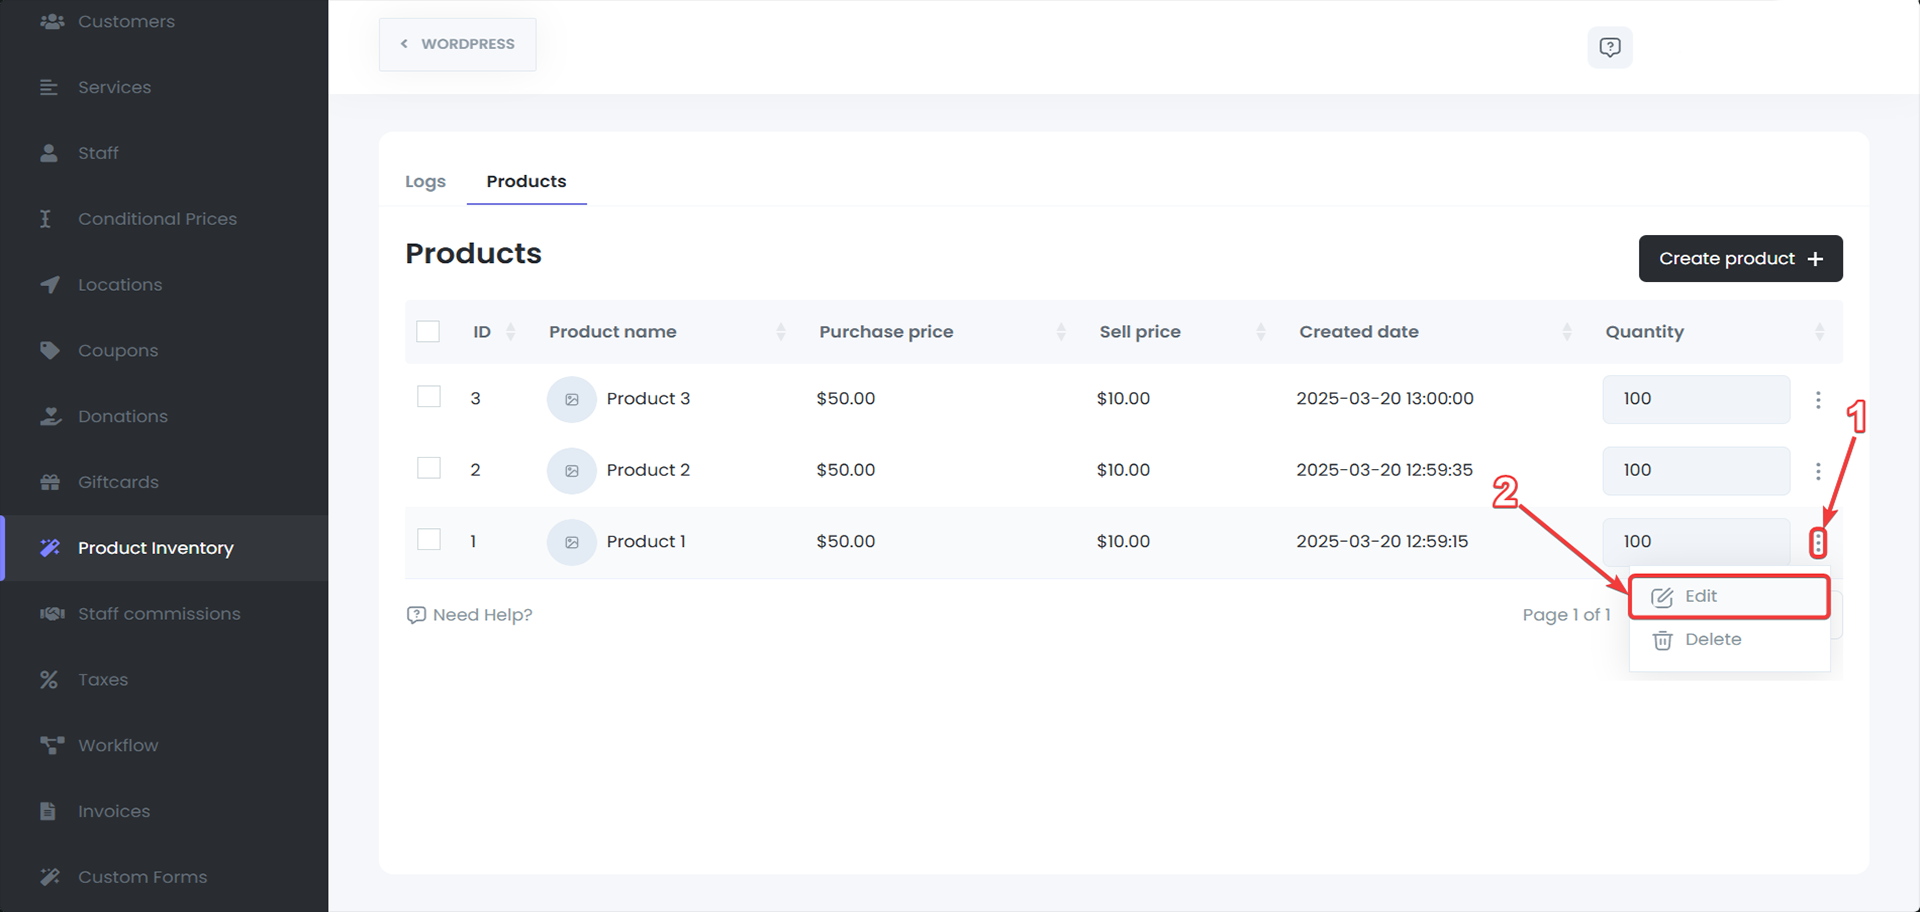
2. Editing a Product
To edit a product:
Click on the three dots next to the product and select Edit.

Modify the product details as needed, such as the name, price, or quantity.
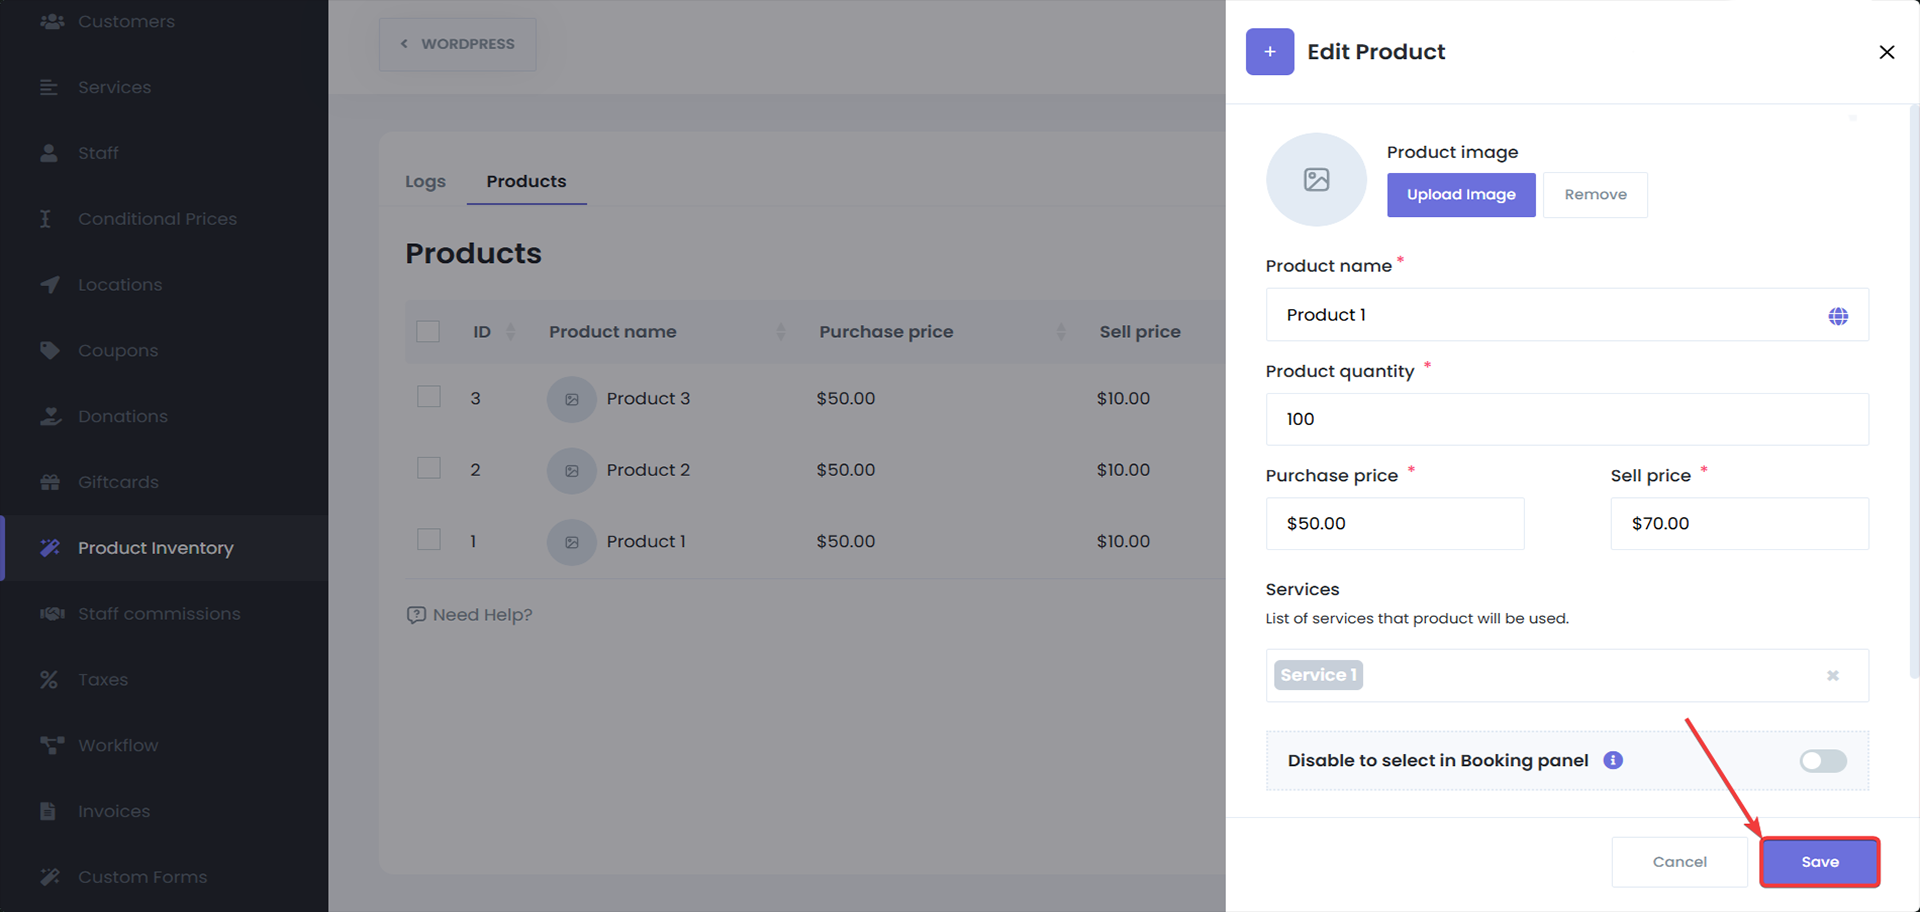
After making the changes, click Save to update the product.
3. Deleting a Product
To delete a product:
In the Products section, click on the three dots next to the product.
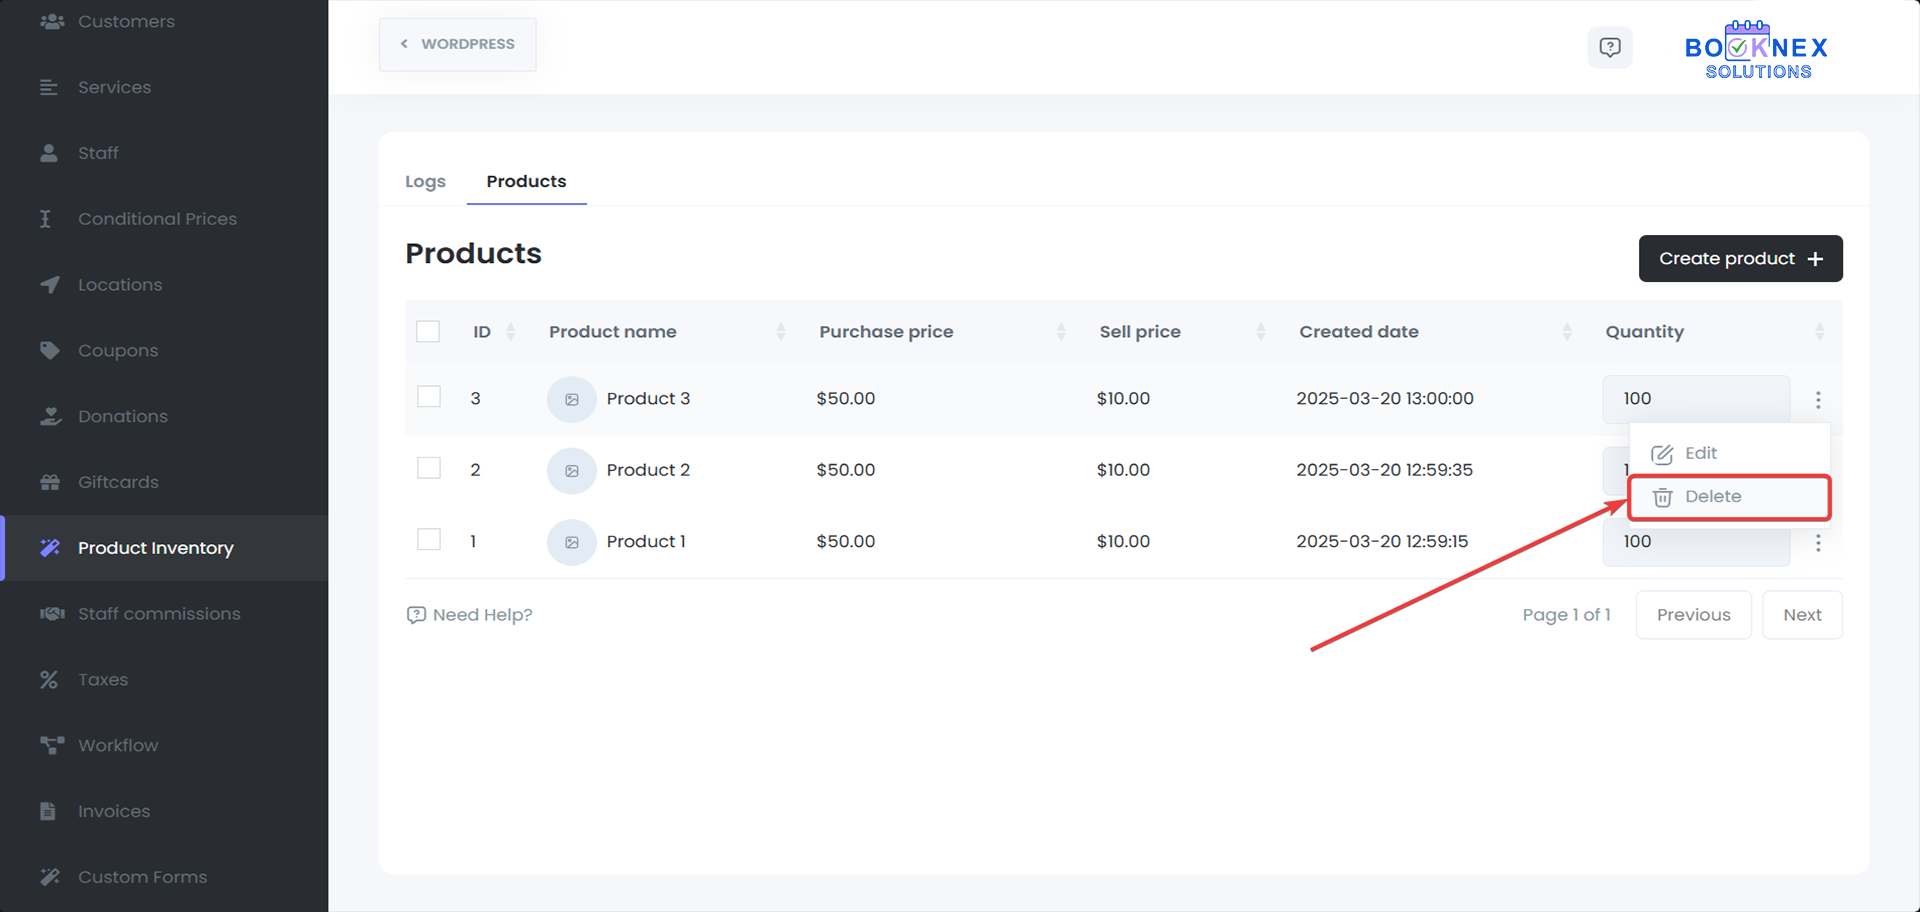
Select Delete.
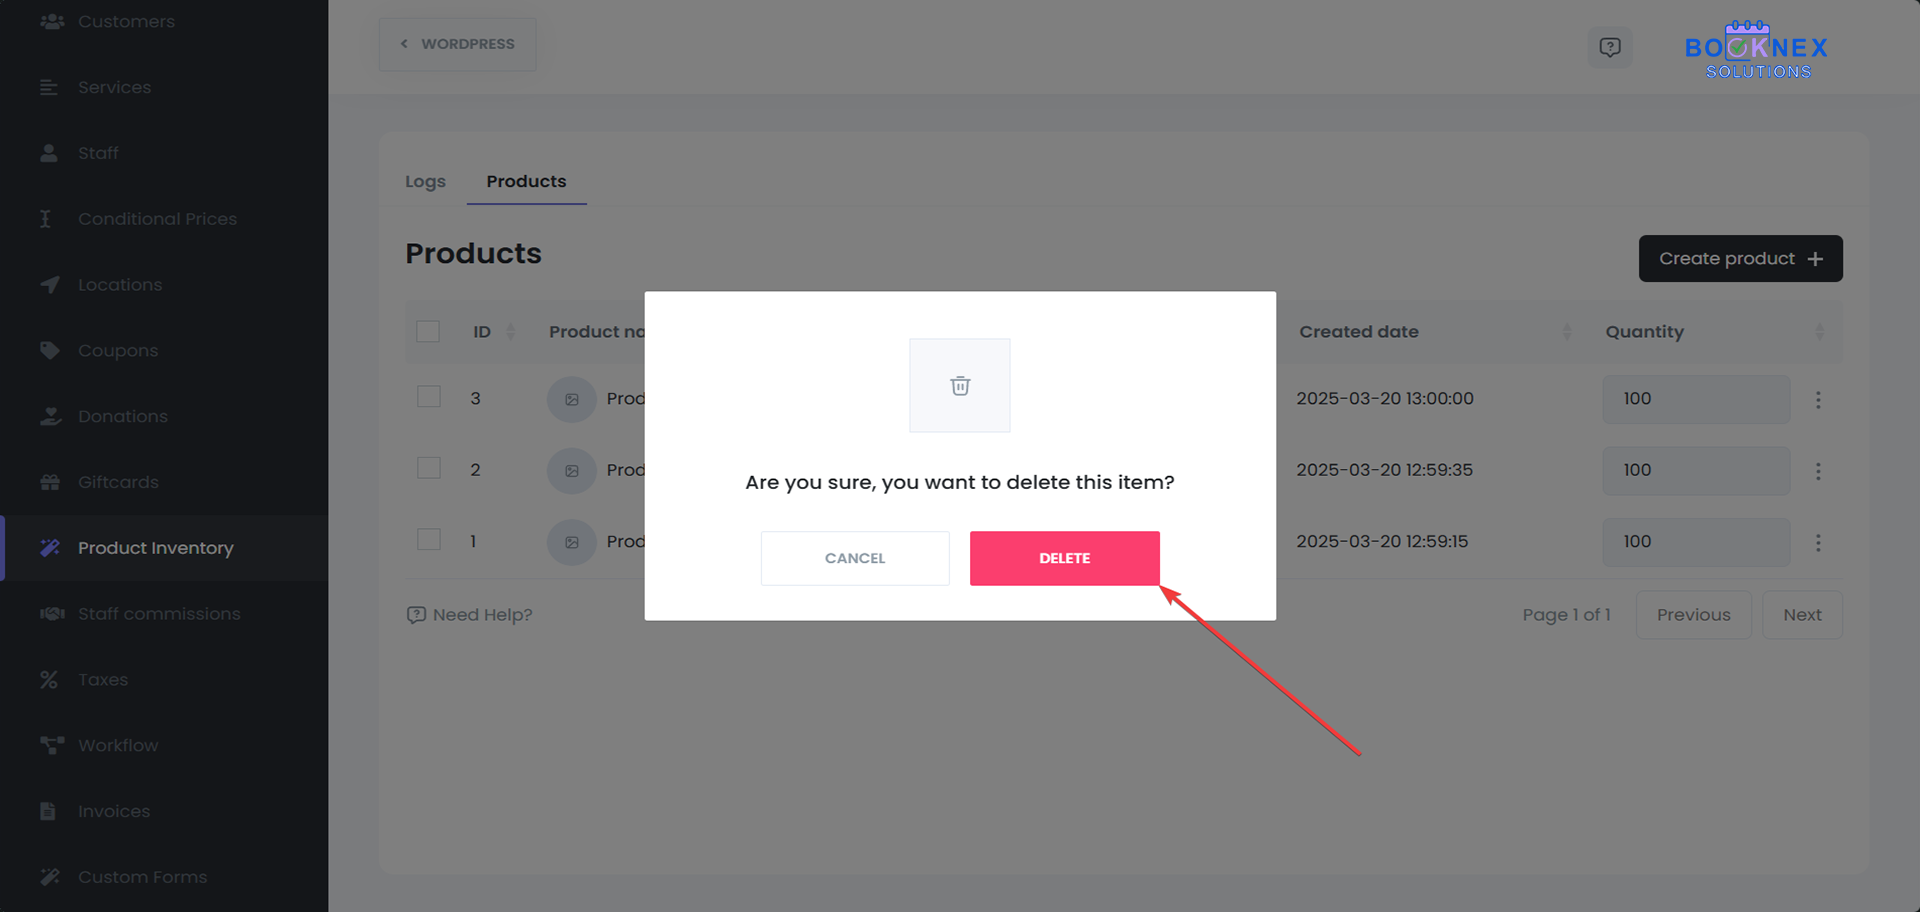
Confirm the deletion to permanently remove the product from the inventory.
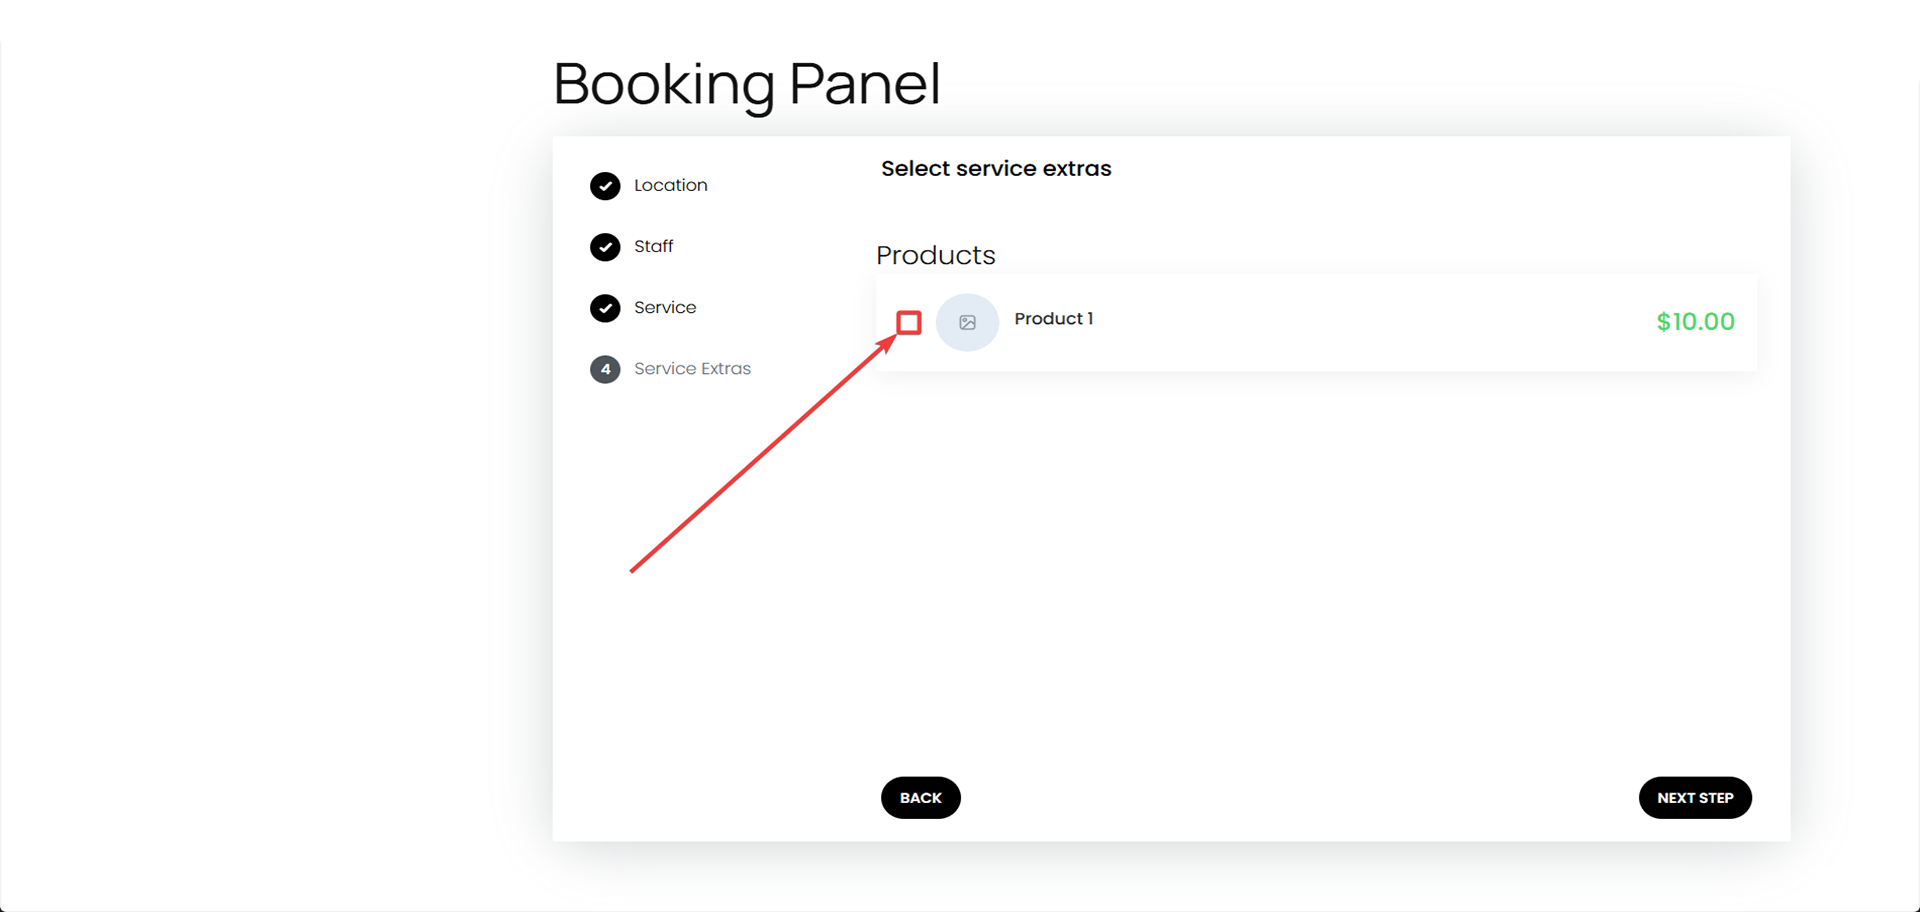
Selling Products During the Booking Process
1. Adding Products to Bookings
Once products are set up in the Product Inventory, customers will be able to select from available products during the booking process.
Steps:
- When customers book an appointment, they will see the Products section after selecting their service.
- Customers can select products they wish to purchase and add them to their booking.
- The selected products will be included in the appointment details and displayed on the final confirmation page.
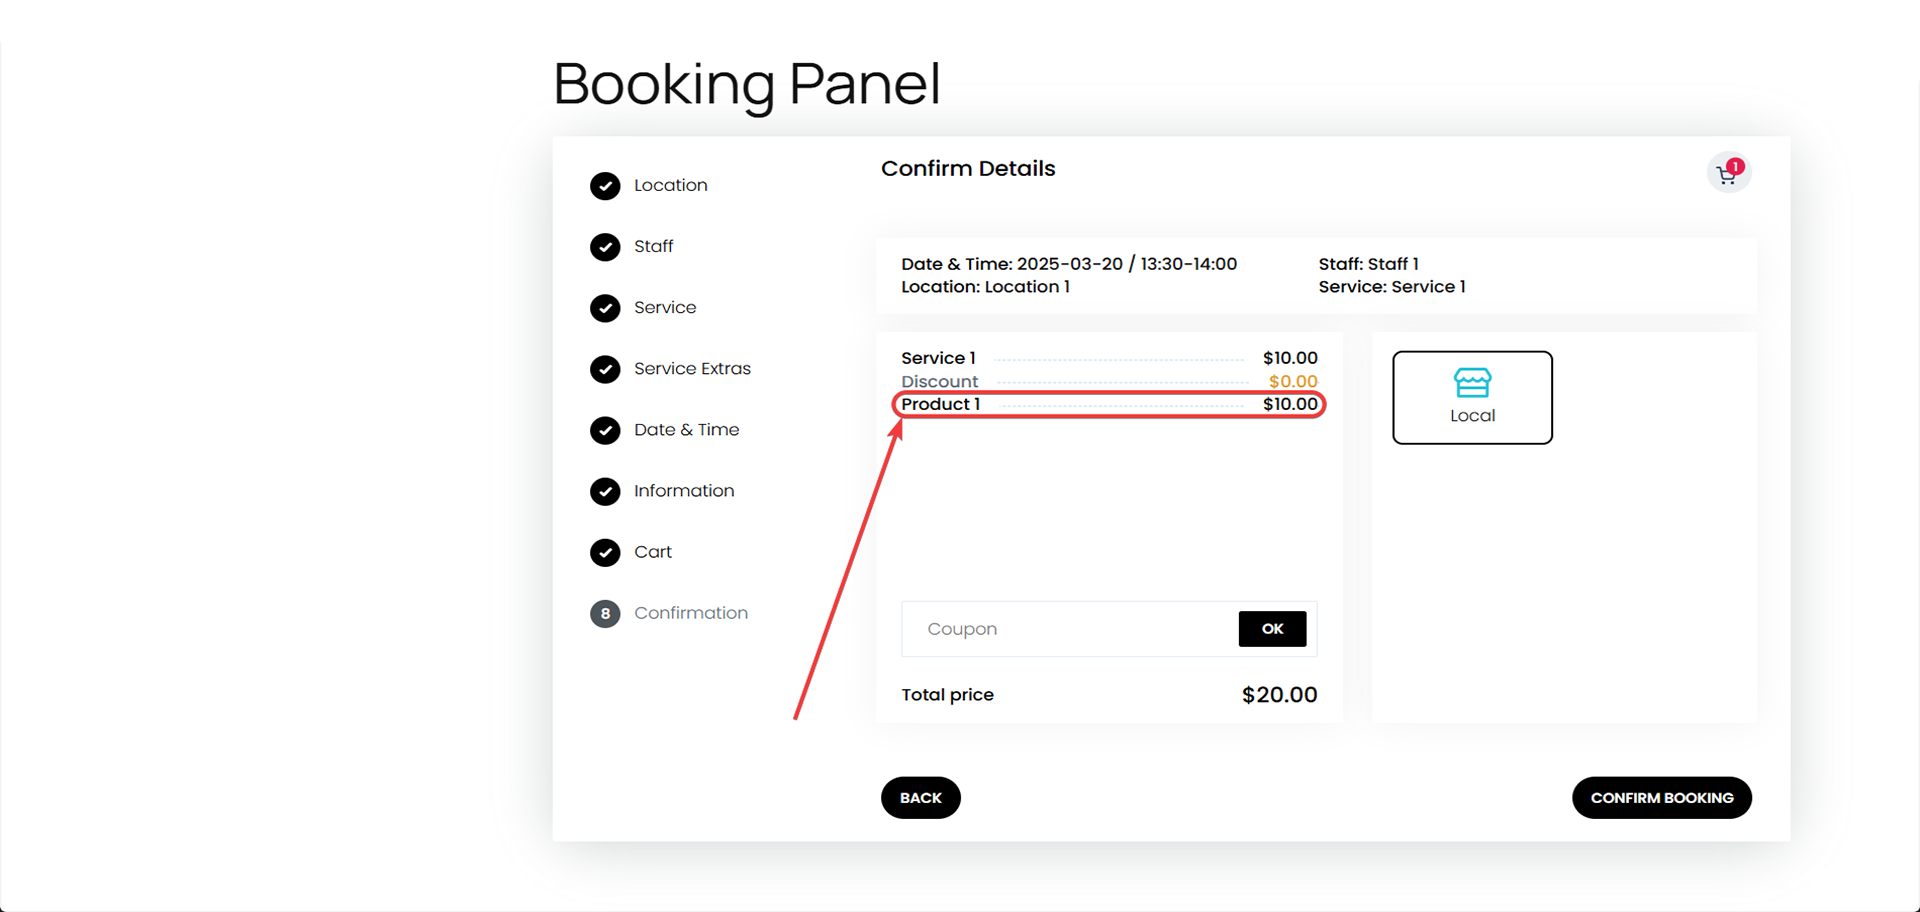
2. Managing Product Quantities
As customers purchase products during the booking process, the quantity of each product is automatically adjusted in the Product Inventory. The inventory system tracks product sales and automatically updates the available quantity as products are purchased.
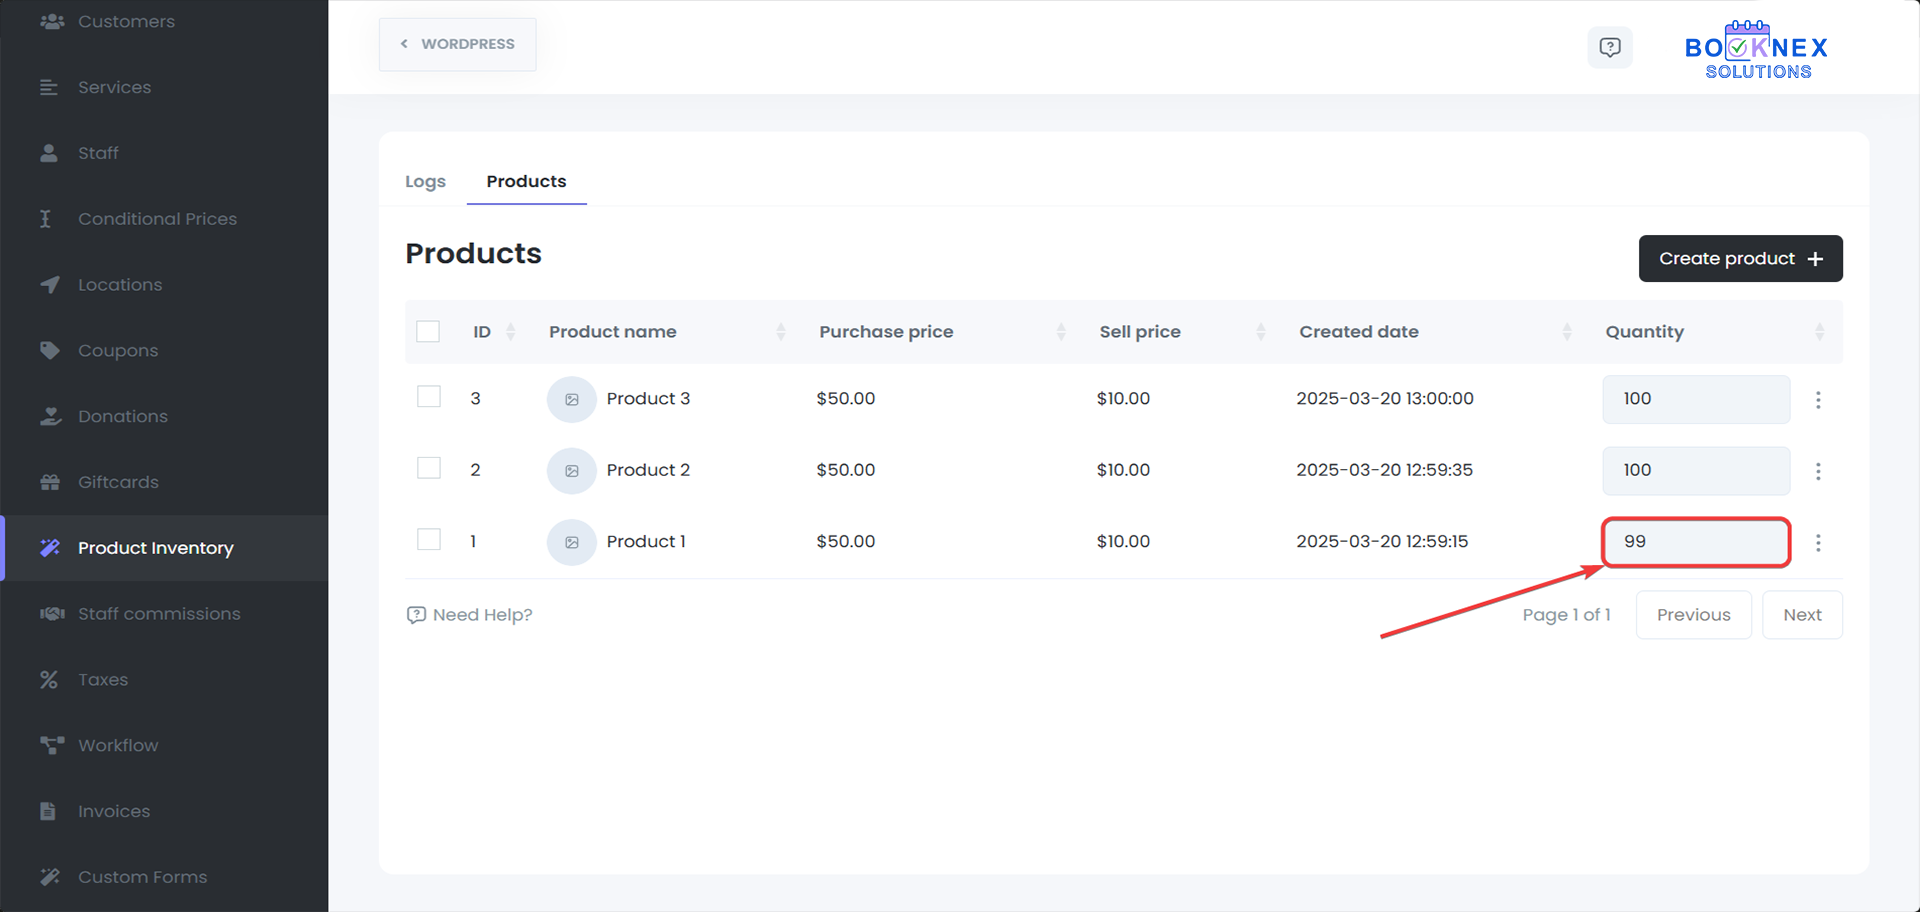
Monitoring Product Sales
1. Accessing Sales Logs
To track the sales of your products, you can use the Logs tab in the Product Inventory section.
Steps:
Click on the Logs tab.
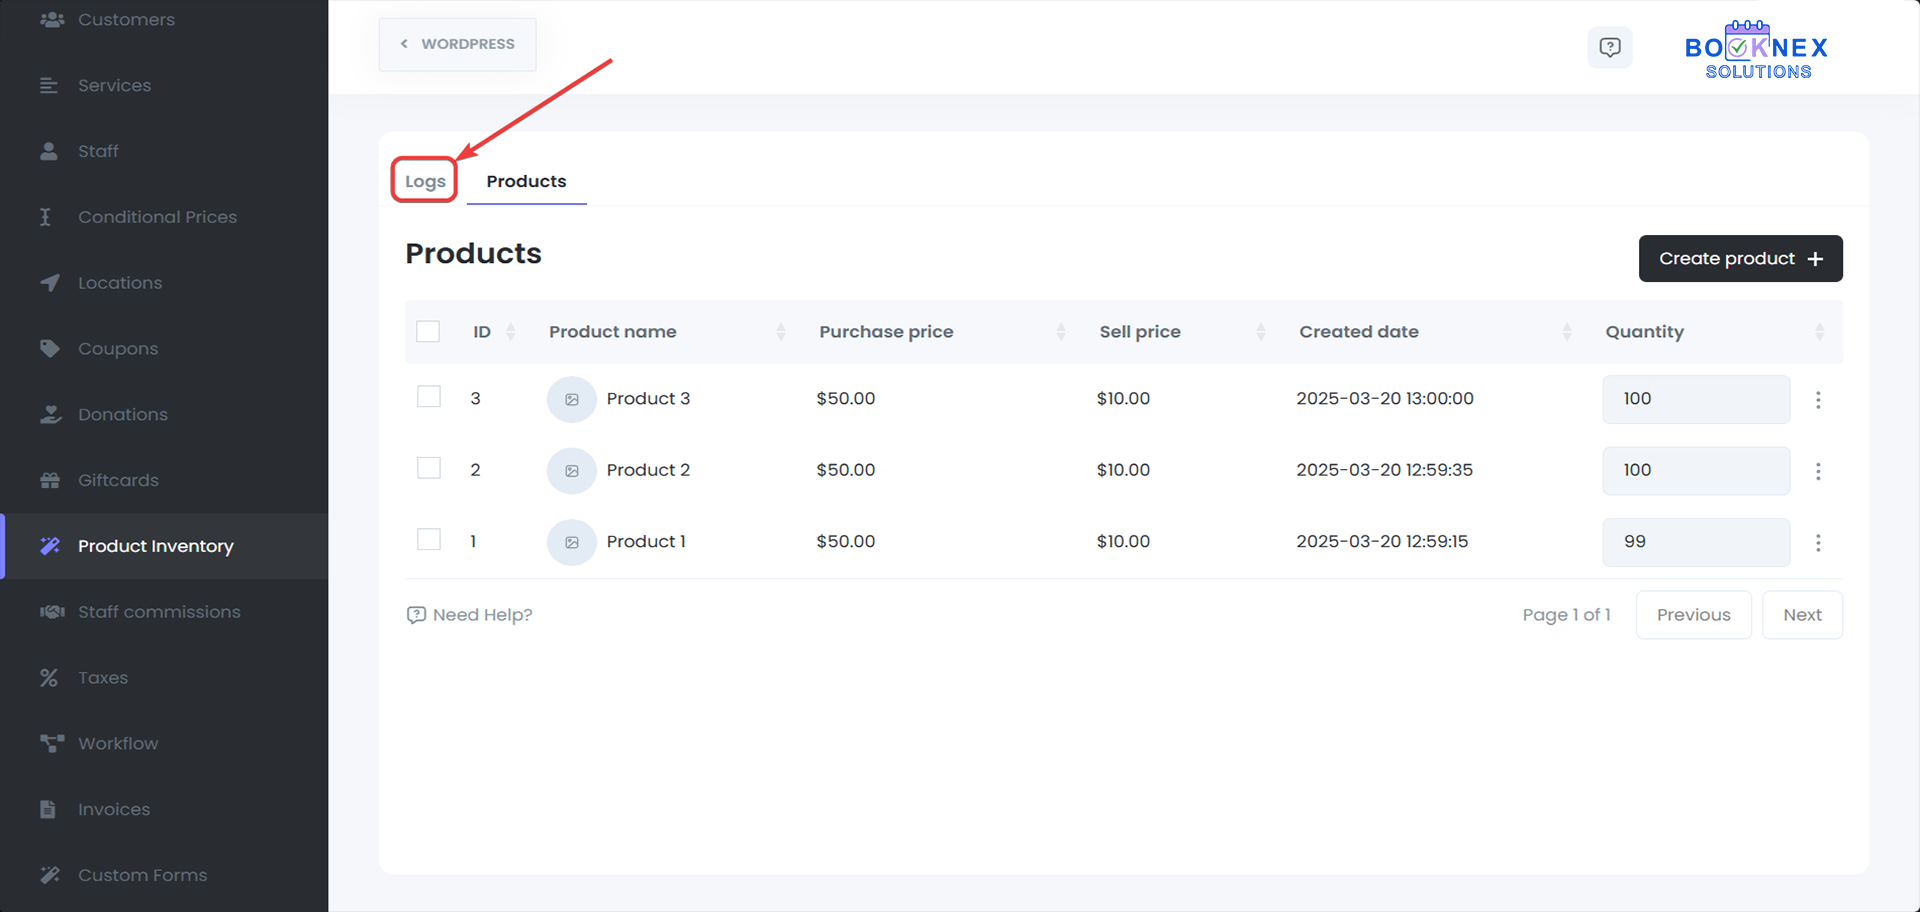
View detailed information about product sales, including the quantity sold, product name, customer details, and purchase date.
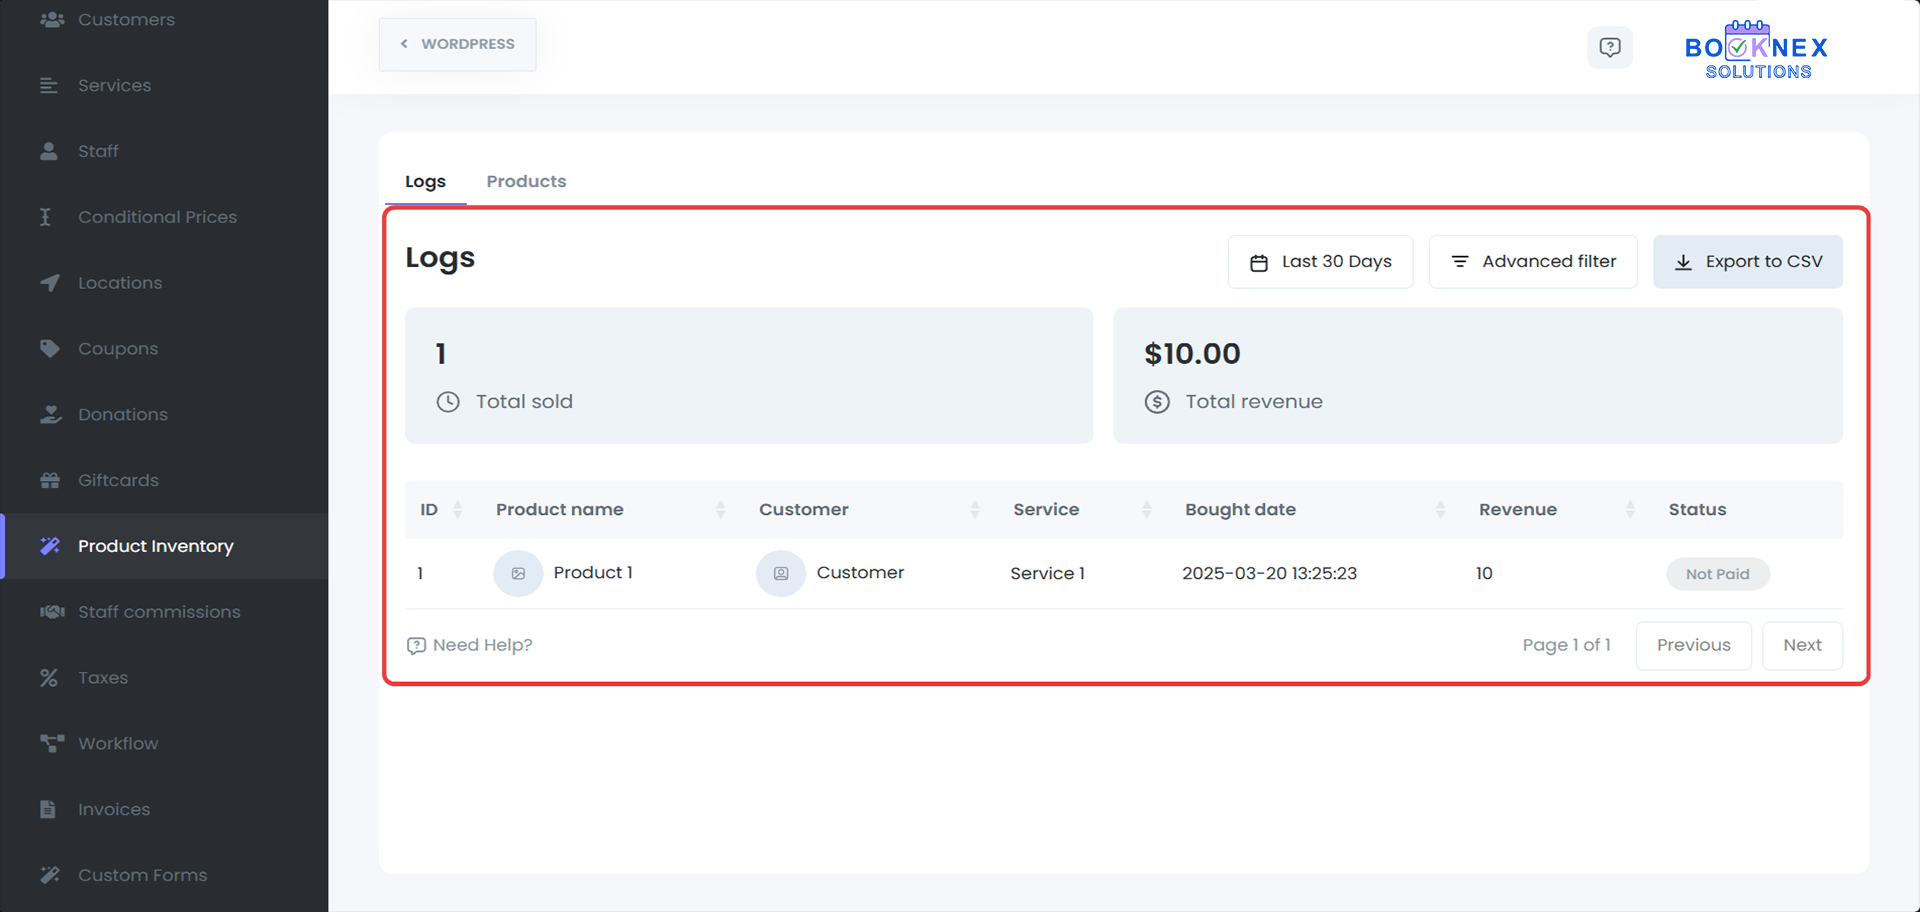
Best Practices
- Regularly Update Product Quantities: Ensure your inventory is always accurate by regularly updating product quantities, especially after a sale.
- Use Product Descriptions Effectively: Provide clear and detailed descriptions for each product to help customers make informed decisions.
- Monitor Product Performance: Use the sales logs to identify top-selling products and optimize your product offerings accordingly.
Staff Commission
The Staff Commissions add-on for Booknex allows businesses to set commission structures for their staff members. This feature is especially useful for businesses that want to incentivize staff based on performance, helping motivate employees and reward them for their work. The add-on provides flexibility in setting commissions globally or per staff member.
Key Features
1. Setting Up Staff Commissions
To set up staff commissions:
Access the Staff Commissions Settings
Navigate to Booknex > Staff Commissions in your admin panel.

Choose a Commission Type
You have two options for setting commissions:
Default Commission: This applies to all staff members. Any commission set here will be applied universally unless overridden by specific staff settings.
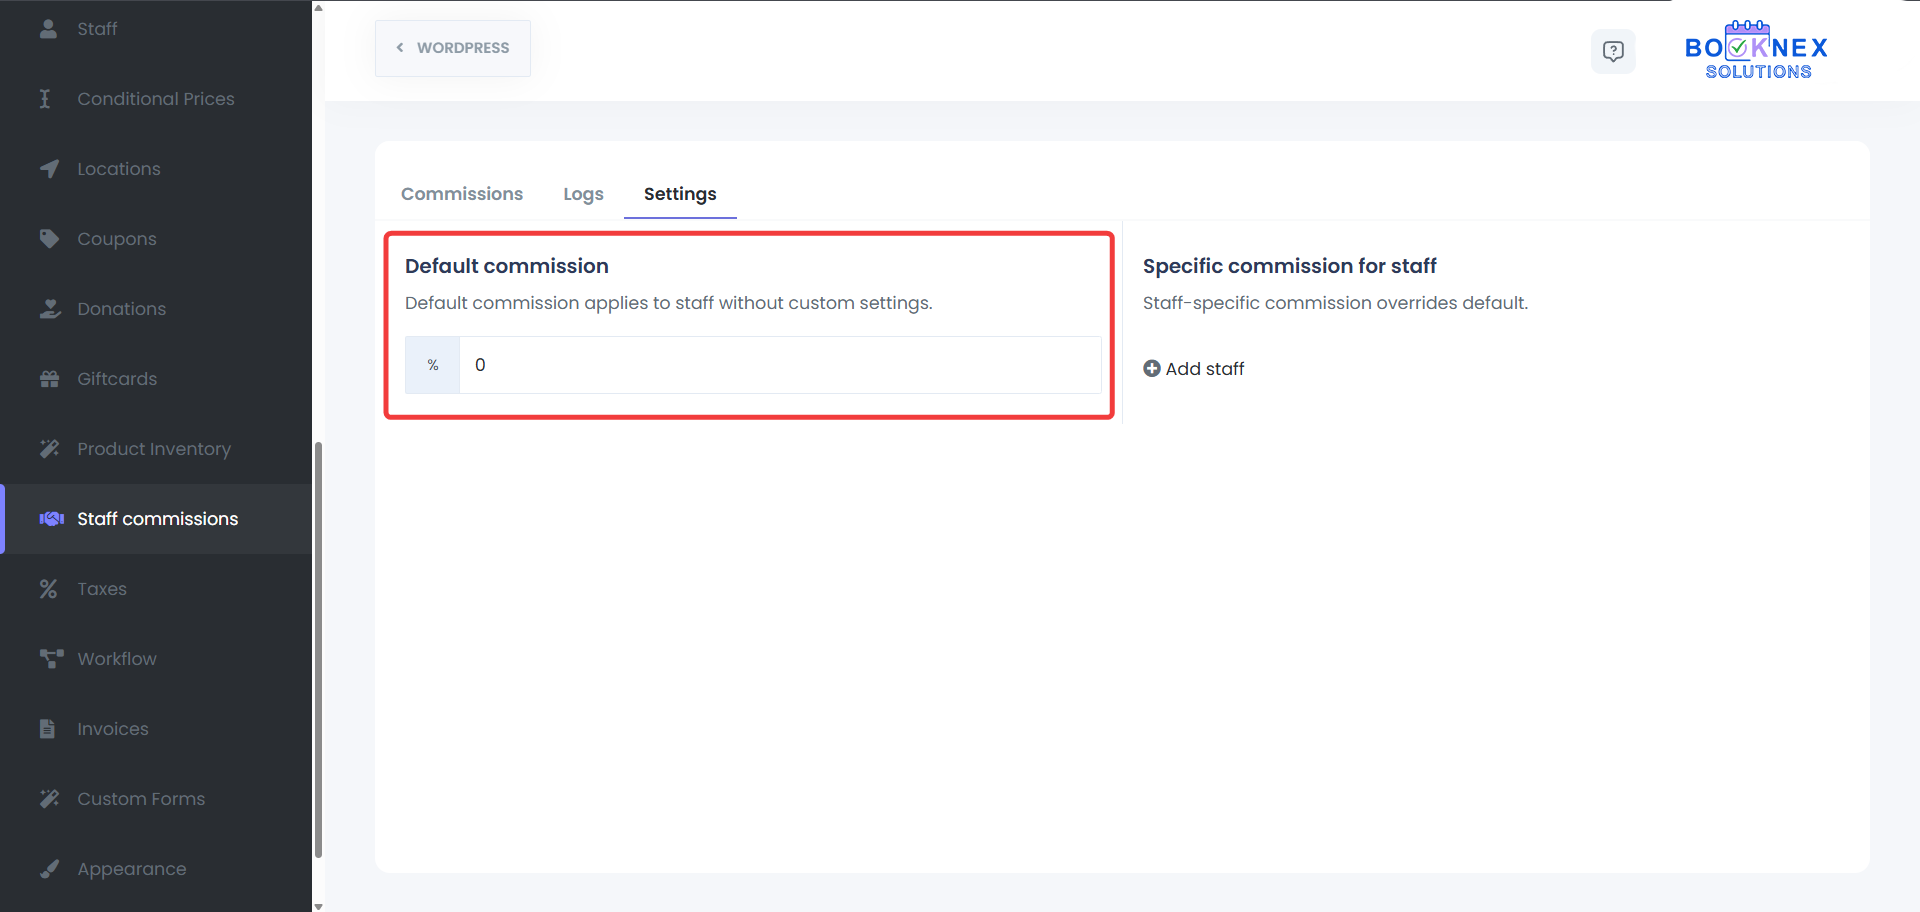
Specific Staff Commission: If you want to apply different commission rates to specific staff, you can set unique commissions for each employee. This will override the default commission for that particular staff member.

Configuring Commission for Staff
For each staff member, either choose to apply the default commission or set a custom commission under their specific settings. After you change any setting, it will be saved automatically, without clicking additional "Save" button.
2. Viewing Commission Information
You can view the commissions for each staff member in the Commissions Tab:
Commissions Tab
This tab displays a list of all staff members and their associated commissions. You can easily review the commission setup and search for the commissions of a specific staff member.
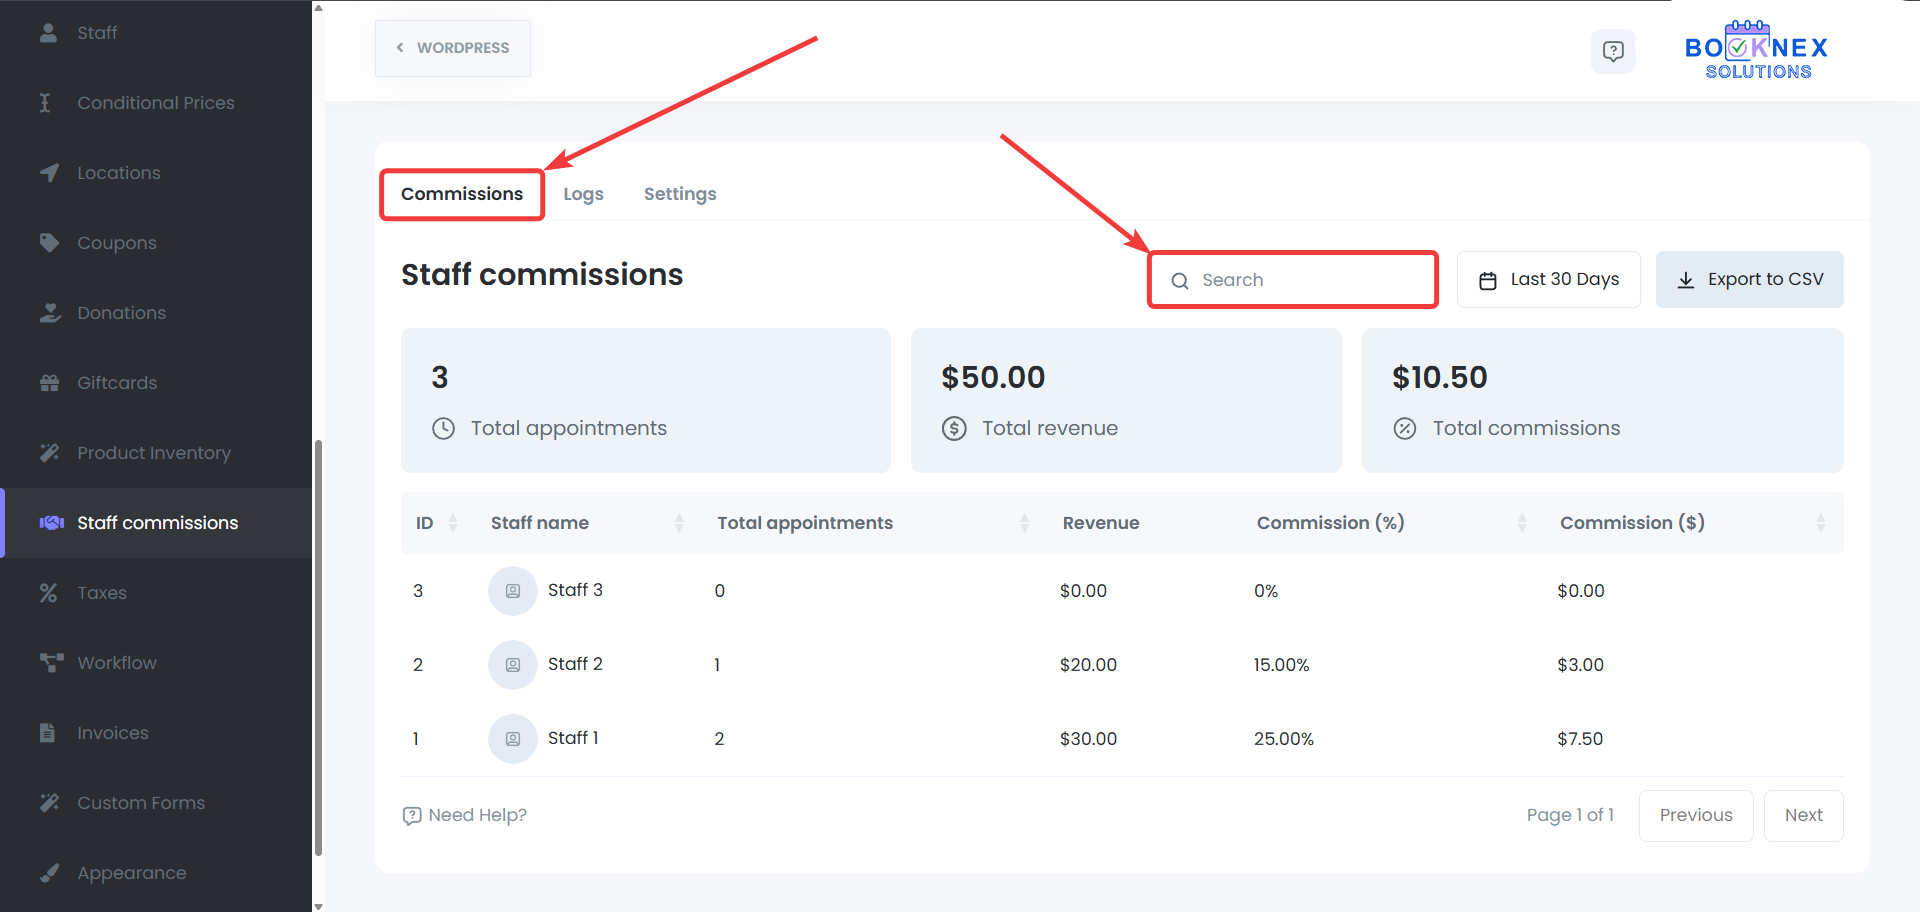
Filters
It is also possible to filter a specific date range and display the commissions you're looking for.
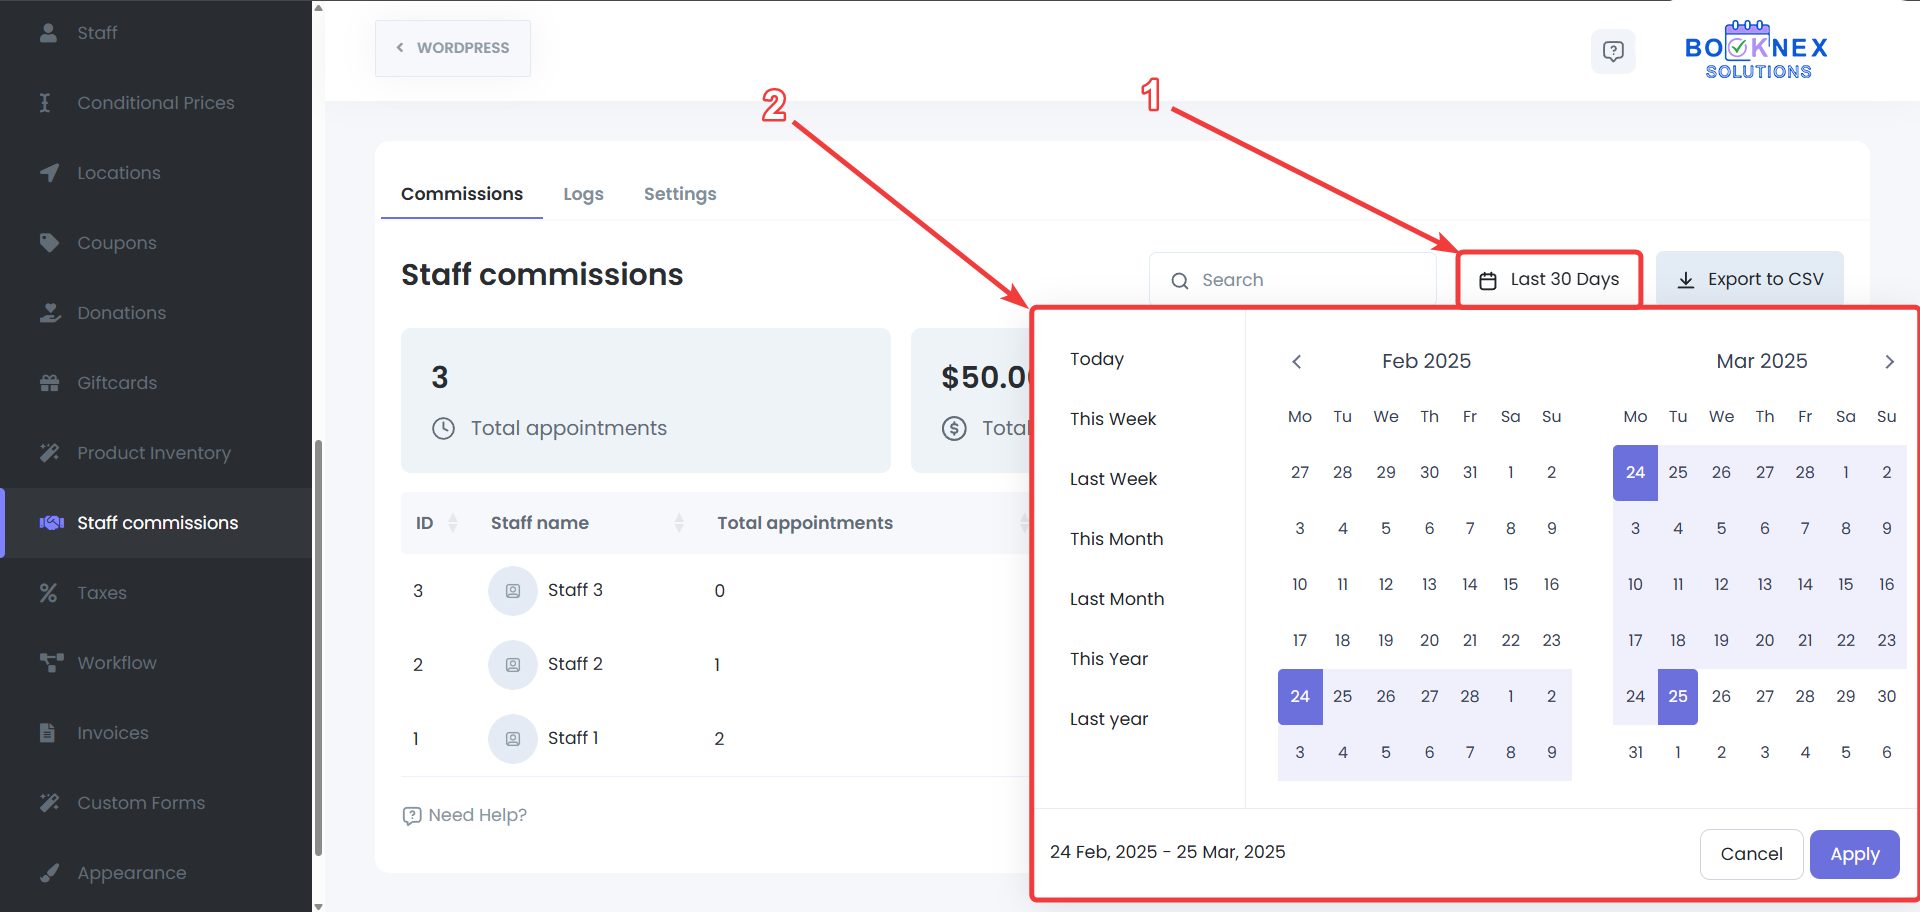
CSV Export
If advanced filtering, data transfer, or such action is needed, the commission data can also be exported to the CSV.
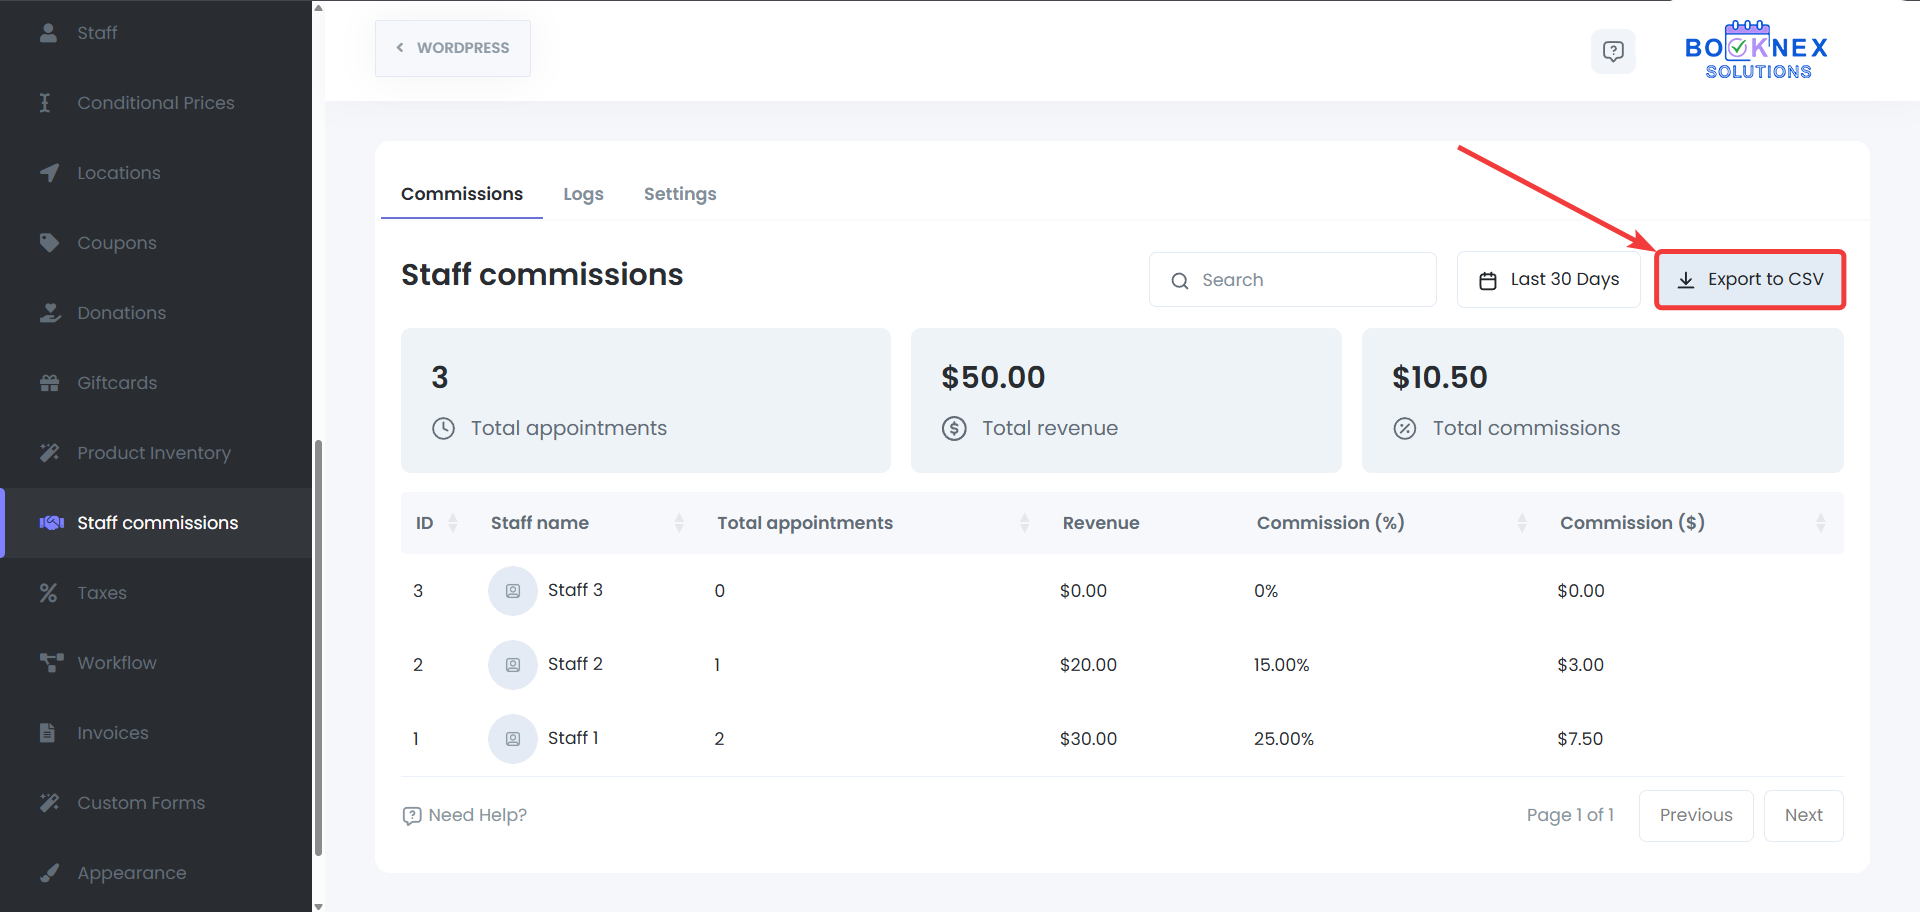
3. Tracking Commission Payments
The Logs Tab allows you to track commission payments:
Logs Tab
View detailed records of commission payments, including the staff member's name, amount earned, and payment status.

Best Practices
- Customize Commissions for Top Performers: Set higher commissions for top-performing staff members to encourage better performance and reward them for their hard work.
- Monitor Commission Payments Regularly: Regularly check the Logs Tab to ensure commission payments are accurate and up to date.